The Spring Cloud Consul project provides integration for Consul and Spring Boot applications through auto-configuration. By using the well-known Spring Framework annotation style, we may enable and configure common patterns within microservice-based environments. These patterns include service discovery using Consul agent, distributed configuration using Consul key/value store, distributed events with Spring Cloud Bus, and Consul Events. The project also supports a client-side load balancer based on Netflix’s Ribbon and an API gateway based on Spring Cloud Gateway. Continue reading “Microservices with Spring Boot, Spring Cloud Gateway and Consul Cluster”
Using Reactive WebClient with Spring WebFlux
Reactive APIs and generally reactive programming become increasingly popular lately. You have a change to observe more and more new frameworks and toolkits supporting reactive programming, or just dedicated for this. Today, in the era of microservices architecture, where the network communication through APIs becomes critical for applications, reactive APIs seems to be an attractive alternative to a traditional, synchronous approach. It should be definitely considered as a primary approach if you are working with large streams of data exchanged via network communication. Continue reading “Using Reactive WebClient with Spring WebFlux”
Performance Comparison Between Spring MVC and Spring WebFlux with Elasticsearch
Since Spring 5 and Spring Boot 2 there is a full support for reactive REST API with Spring WebFlux project. Also project Spring Data systematically includes support for reactive NoSQL databases, and recently for SQL databases too. Since Spring Data Moore we can take advantage of reactive template and repository for Elasticsearch, what I have already described in one of my previous article Reactive Elasticsearch With Spring Boot. Continue reading “Performance Comparison Between Spring MVC and Spring WebFlux with Elasticsearch”
Reactive Elasticsearch With Spring Boot
One of more notable feature introduced in the latest release of Spring Data is reactive support for Elasticsearch. Since Spring Data Moore we can take advantage of reactive template and repository. It is built on top of fully reactive Elasticsearch REST client, that is based on Spring WebClient. It is also worth to mention about support for reactive Querydsl, which can be included to your application through ReactiveQueryPredicateExecutor. Continue reading “Reactive Elasticsearch With Spring Boot”

Reactive Logging With Spring WebFlux and Logstash
I have already introduced my Spring Boot library for synchronous HTTP request/response logging in one of my previous articles Logging with Spring Boot and Elastic Stack. This library is dedicated for synchronous REST applications built with Spring MVC and Spring Web. Since version 5.0 Spring Framework also offers support for reactive REST API through Spring WebFlux project. I decided to extend support for logging in my library to reactive Spring WebFlux.
Continue reading “Reactive Logging With Spring WebFlux and Logstash”

Using New Spring Cloud Load Balancer In Microservices Communication
Almost a year ago Spring Cloud has announced that most of Spring Cloud Netflix OSS projects will be moved to the maintenance mode starting from Spring Cloud Greenwich Release Train. In fact the maintenance mode only does not include Eureka, which still will be supported. I referred to that information in one of my previous articles The Future of Spring Cloud Microservices After Netflix Era. I have shared there some opinions about future of microservices with Spring Cloud. Of course, I also included an example of building microservices architecture without Netflix OSS using HashiCorp’s Consul, Spring Cloud Gateway and an early version of Spring Cloud LoadBalancer.
Continue reading “Using New Spring Cloud Load Balancer In Microservices Communication”
Part 1: Testing Kafka Microservices With Micronaut
I have already described how to build microservices architecture entirely based on message-driven communication through Apache Kafka in one of my previous articles Kafka In Microservices With Micronaut. As you can see in the article title the sample applications and integration with Kafka has been built on top of Micronaut Framework. I described some interesting features of Micronaut, that can be used for building message-driven microservices, but I specially didn’t write anything about testing. In this article I’m going to show you how to test your Kafka microservice using Micronaut Test core features (Component Tests), Testcontainers (Integration Tests) and Pact (Contract Tests).
Continue reading “Part 1: Testing Kafka Microservices With Micronaut”
Overview of Java Stream API Extensions
Stream API, which has been introduced in Java 8, is probably still the most important new feature that has been included to Java during last several years. I think that every Java developer has an opportunity to use Java Stream API in his career. Or I should rather told that you probably use it on a day-to-day basis. However, if you compare the built-in features offered for functional programming with some other languages – for example Kotlin – you will quickly realize that the number of methods provided by Stream API is very limited. Therefore, the community has created several libraries used just for extending API offered by pure Java. Today I’m going to show the most interesting Stream API extensions offered by the three popular Java libraries: StreamEx, jOOλ and Guava.
Using logstash-logging-spring-boot-starter for logging with Spring Boot and Logstash
I have already described some implementation details related to my library logstash-logging-spring-boot-starter for HTTP request/response logging in one of the previous articles Logging with Spring Boot and Elastic Stack. The article has been published some weeks ago, and since that time some important features has been added to this library. Today I’m going to summarise all those changes and describe all the features provided by the library.
Deploying Spring Boot Application on OpenShift with Dekorate
More advanced deployments to Kubernetes or OpenShift are a bit troublesome for developers. In comparison to Kubernetes OpenShift provides S2I (Source-2-Image) mechanism, which may help reduce a time required for preparation of application deployment descriptors. Although S2I is quite useful for developers, it solves only simple use cases and does not provide unified approach to building deployment configuration from a source code. Dekorate (https://dekorate.io), the recently created open-source project, tries to solve that problem. This project seems to be very interesting. It appears to be confirmed by RedHat, which has already announced a decision on including Dekorate to Red Hat OpenShift Application Runtimes as a “Tech Preview”. Continue reading “Deploying Spring Boot Application on OpenShift with Dekorate”

JPA Data Access with Micronaut Data
When I have writing some articles comparing Spring and Micronaut frameworks recently, I have taken a note of many comments about lack of built-in ORM and data repositories support in Micronaut. Spring provides this feature for a long time through Spring Data project. The good news is that the Micronaut team is close to complete work on first version of their project with ORM support. The project called Micronaut Predator (short for Precomputed Data Repositories) is still under active development, and currently we may access just the snapshot version. However, the authors are introducing it is as more efficient with reduced memory consumption than competitive solutions like Spring Data or Grails GORM. In short, this could be achieved thanks to Ahead of Time (AoT) compilation to pre-compute queries for repository interfaces that are then executed by a thin, lightweight runtime layer, and avoiding usage of reflection or runtime proxies. Continue reading “JPA Data Access with Micronaut Data”

Continuous Delivery with OpenShift and Jenkins: A/B Testing
One of the reason you could decide to use OpenShift instead of some other containerized platforms (for example Kubernetes) is out-of-the-box support for continuous delivery pipelines. Without proper tools the process of releasing software in your organization may be really time-consuming and painful. The quickness of that process becoming especially important if you deliver software to production frequently. Currently, the most popular use case for it is microservices-based architecture, where you have many small, independent applications.
Continue reading “Continuous Delivery with OpenShift and Jenkins: A/B Testing”
Logging with Spring Boot and Elastic Stack
In this article I’ll introduce my library for logging designed especially for Spring Boot RESTful web application. The main assumptions regarding this library are:
- Logging all incoming HTTP requests and outgoing HTTP responses with full body
- Integration with Elastic Stack through Logstash using
logstash-logback-encoderlibrary - Possibility for enabling logging on a client-side for most commonly used components in Spring Boot application:
RestTemplateandOpenFeign - Generating and propagating correlationId across all communication within a single API endpoint call
- Calculating and storing execution time for each request
- A library should be auto-configurable – you don’t have to do anything more than including it as a dependency to your application to make it work
Continue reading “Logging with Spring Boot and Elastic Stack”

Micronaut Tutorial: Security
This is the third part of my tutorial to Micronaut Framework. This time we will discuss the most interesting Micronaut security features. I have already described core mechanisms for IoC and dependency injection in the first part of my tutorial, and I have also created a guide to building simple REST server-side application in the second part. For more details you may refer to:
Micronaut Tutorial: Server Application
In this part of my tutorial to Micronaut framework we are going to create simple HTTP server-side application running on Netty. We have already discussed the most interesting core features of Micronaut like beans, scopes or unit testing in the first part of that tutorial. For more details you may refer to my article Micronaut Tutorial: Beans and Scopes.
Assuming we have a basic knowledge about core mechanisms of Micronaut we may proceed to the key part of that framework and discuss how to build simple microservice application exposing REST API over HTTP. Continue reading “Micronaut Tutorial: Server Application”
Micronaut Tutorial: Beans and Scopes
Micronaut is a relatively new JVM-based framework. It is especially designed for building modular, easy testable microservice applications. Micronaut is heavily inspired by Spring and Grails frameworks, which is not a surprise, if we consider it has been developed by the creators of Grails framework. It is based on Java’s annotation processing, IoC (Inversion of Control) and DI (Dependency Injection).
Micronaut implements the JSR-330 (java.inject) specification for dependency injection. It supports constructor injection, field injection, JavaBean and method parameter injection. In this part of tutorial I’m going to give some tips on how to:
- define and register beans in the application context
- use built-in scopes
- inject configuration to your application
- automatically test your beans during application build with JUnit 5
Performance Comparison Between Spring Boot and Micronaut
Today we will compare two frameworks used for building microservices on the JVM: Spring Boot and Micronaut. First of them, Spring Boot is currently the most popular and opinionated framework in the JVM world. On the other side of the barrier is staying Micronaut, quickly gaining popularity framework especially designed for building serverless functions or low memory-footprint microservices. We will be comparing version 2.1.4 of Spring Boot with 1.0.0.RC1 of Micronaut. The comparison criteria are:
- memory usage (heap and non-heap)
- the size in MB of generated fat JAR file
- the application startup time
- the performance of application, in the meaning of average response time from the REST endpoint during sample load testing
Continue reading “Performance Comparison Between Spring Boot and Micronaut”
The Future of Spring Cloud Microservices After Netflix Era
If somebody would ask you about Spring Cloud, the first thing that comes into your mind will probably be Netflix OSS support. Support for such tools like Eureka, Zuul or Ribbon is provided not only by Spring, but also by some other popular frameworks used for building microservices architecture like Apache Camel, Vert.x or Micronaut. Currently, Spring Cloud Netflix is the most popular project being a part of Spring Cloud. It has around 3.2k stars on GitHub, while the second best has around 1.4k. Therefore, it is quite surprising that Pivotal has announced that most of Spring Cloud Netflix modules are entering maintenance mode. You can read more about in the post published on the Spring blog by Spencer Gibb https://spring.io/blog/2018/12/12/spring-cloud-greenwich-rc1-available-now. Continue reading “The Future of Spring Cloud Microservices After Netflix Era”

Elasticsearch with Spring Boot
Elasticsearch is a full-text search engine especially designed for working with large data sets. Following this description it is a natural choice to use it for storing and searching application logs. Together with Logstash and Kibana it is a part of powerful solution called Elastic Stack, that has already been described in some of my previous articles.
Keeping application logs is not the only one use case for Elasticsearch. It is often used as a secondary database for the application, that has primary relational database. Such an approach can be especially useful if you have to perform full-text search over large data set or just store many historical records that are no longer modified by the application. Of course there is always question about advantages and disadvantages of that approach.
When you are working with two different data sources that contain the same data, you have to first think about synchronization. You have several options. Depending on the relational database vendor, you can leverage binary or transaction logs, which contain the history of SQL updates. This approach requires some middleware that reads logs and then puts data to Elasticsearch. You can always move the whole responsibility to the database side (trigger) or into Elasticsearch side (JDBC plugins). Continue reading “Elasticsearch with Spring Boot”
A Magic Around Spring Boot Externalized Configuration
There are some things I really like in Spring Boot, and one of them is an externalized (external) configuration. Spring Boot allows you to configure your application in many ways. You have 17 levels of loading configuration properties into application. All of them are described in the 24th Chapter of Spring Boot documentation available here.
This article was inspired by some last talks with developers about problems with the configuration of their applications. They haven’t heard about some interesting features that may be used to make it more flexible and clear. Continue reading “A Magic Around Spring Boot Externalized Configuration”
Introduction to Spring Data Redis
Redis is an in-memory data structure store with optional durability, used as database, cache and message broker. Currently, it is the most most popular tool in the key/value stores category: https://db-engines.com/en/ranking/key-value+store. The easiest way to integrate your application with Redis is through Spring Data Redis. You can use Spring RedisTemplate directly for that or you might as well use Spring Data Redis repositories. There are some limitations when you integrate with Redis via Spring Data Redis repositories. They require at least Redis Server version 2.8.0 and do not work with transactions. Therefore you need to disable transaction support for RedisTemplate, which is leveraged by Redis repositories. Continue reading “Introduction to Spring Data Redis”

Kotlin Microservices with Micronaut, Spring Cloud and JPA
Micronaut Framework provides support for Kotlin built upon Kapt compiler plugin. It also implements the most popular cloud-native patterns like distributed configuration, service discovery and client-side load balancing. These features allows to include your application built on top of Micronaut into the existing microservices-based system. The most popular example of such approach may be an integration with Spring Cloud ecosystem. If you have already used Spring Cloud, it is very likely you built your microservices-based architecture using Eureka discovery server and Spring Cloud Config as a configuration server. Beginning from version 1.1 Micronaut supports both these popular tools being a part of Spring Cloud project. That’s a good news, because in version 1.0 the only supported distributed solution was Consul, and there were no possibility to use Eureka discovery together with Consul property source (running them together ends with exception). Continue reading “Kotlin Microservices with Micronaut, Spring Cloud and JPA”
Microservices Integration Tests with Hoverfly and Testcontainers
Building good integration tests of a system consisting of several microservices may be quite a challenge. Today I’m going to show you how to use such tools like Hoverfly and Testcontainers to implement such the tests. I have already written about Hoverfly in my previous articles, as well as about Testcontainers. If you are interested in some intro to these framework you may take a look on the following articles:
- Testing REST API with Hoverfly
- Testing Spring Boot Integration with Vault and Postgres using Testcontainers Framework
Continue reading “Microservices Integration Tests with Hoverfly and Testcontainers”

Testing Spring Boot Integration with Vault and Postgres using Testcontainers Framework
I have already written many articles, where I was using Docker containers for running some third-party solutions integrated with my sample applications. Building integration tests for such applications may not be an easy task without Docker containers. Especially, if our application integrates with databases, message brokers or some other popular tools. If you are planning to build such integration tests you should definitely take a look on Testcontainers (https://www.testcontainers.org/). Testcontainers is a Java library that supports JUnit tests, providing fast and lightweight way for running instances of common databases, Selenium web browsers, or anything else that can run in a Docker container. It provides modules for the most popular relational and NoSQL databases like Postgres, MySQL, Cassandra or Neo4j. It also allows to run popular products like Elasticsearch, Kafka, Nginx or HashiCorp’s Vault. Today I’m going to show you more advanced sample of JUnit tests that use Testcontainers to check out an integration between Spring Boot/Spring Cloud application, Postgres database and Vault. For the purposes of that example we will use the case described in one of my previous articles Secure Spring Cloud Microservices with Vault and Nomad. Let us recall that use case. Continue reading “Testing Spring Boot Integration with Vault and Postgres using Testcontainers Framework”

Quick Guide to Microservices with Micronaut Framework
Micronaut framework has been introduced as an alternative to Spring Boot for building microservice applications. At first glance it is very similar to Spring. It also implements such patterns like dependency injection and inversion of control based on annotations, however it uses JSR-330 (java.inject) for doing it. It has been designed specially in order to building serverless functions, Android applications, and low memory-footprint microservices. This means that it should faster startup time, lower memory usage or easier unit testing than competitive frameworks. However, today I don’t want to focus on those characteristics of Micronaut. I’m going to show you how to build simple microservices-based system using this framework. You can easily compare it with Spring Boot and Spring Cloud by reading my previous article about the same subject Quick Guide to Microservices with Spring Boot 2.0, Eureka and Spring Cloud. Does Micronaut have a change to gain the same popularity as Spring Boot? Let’s find out. Continue reading “Quick Guide to Microservices with Micronaut Framework”
Kotlin Microservice with Spring Boot
You may find many examples of microservices built with Spring Boot on my blog, but the most of them is written in Java. With the rise in popularity of Kotlin language it is more often used with Spring Boot for building backend services. Starting with version 5 Spring Framework has introduced first-class support for Kotlin. In this article I’m going to show you example of microservice build with Kotlin and Spring Boot 2. I’ll describe some interesting features of Spring Boot, which can treated as a set of good practices when building backend, REST-based microservices. Continue reading “Kotlin Microservice with Spring Boot”
Running Java Microservices on OpenShift using Source-2-Image
One of the reason you would prefer OpenShift instead of Kubernetes is the simplicity of running new applications. When working with plain Kubernetes you need to provide already built image together with the set of descriptor templates used for deploying it. OpenShift introduces Source-2-Image feature used for building reproducible Docker images from application source code. With S2I you don’t have provide any Kubernetes YAML templates or build Docker image by yourself, OpenShift will do it for you. Let’s see how it works. The best way to test it locally is via Minishift. But the first step is to prepare sample applications source code. Continue reading “Running Java Microservices on OpenShift using Source-2-Image”

Secure Spring Cloud Microservices with Vault and Nomad
One of the significant topics related to microservices security is managing and protecting sensitive data like tokens, passwords or certificates used by your application. As a developer you probably often implement a software that connects with external databases, message brokers or just the other applications. How do you store the credentials used by your application? To be honest, most of the software code I have seen in my life just stored a sensitive data as a plain text in the configuration files. Thanks to that, I could always be able to retrieve the credentials to every database I needed at a given time just by looking at the application source code. Of course, we can always encrypt sensitive data, but if we working with many microservices having separated databases I may not be very comfortable solution. Continue reading “Secure Spring Cloud Microservices with Vault and Nomad”

Microservices with Spring Cloud Alibaba
Some days ago Spring Cloud has announced a support for several Alibaba components used for building microservices-based architecture. The project is still under the incubation stage, but there is a plan for graduating it from incubation to officially join a Spring Cloud Release Train in 2019. The currently released version 0.0.2.RELEASE is compatible with Spring Boot 2, while older version 0.0.1.RELEASE is compatible with Spring Boot 1.x. This project seems to be very interesting, and currently it is the most popular repository amongst Spring Cloud Incubator repositories (around 1.5k likes on GitHub).
Currently, the most commonly used Spring Cloud project for building microservices architecture is Spring Cloud Netflix. As you probably know this project provides Netflix OSS integrations for Spring Boot apps, including service discovery (Eureka), circuit breaker (Hystrix), intelligent routing (Zuul) and client side load balancing (Ribbon). The first question that came to my mind when I was reading about Spring Cloud Alibaba was: ’Can Spring Cloud Alibaba be an alternative for Spring Cloud Netflix ?’. The answer is yes, but not entirely. Spring Cloud Alibaby still integrates with Ribbon, which is used for load balancing based on service discovery. Netflix Eureka server is replaced in that case by Nacos.
Nacos (Dynamic Naming and Configuration Service) is an easy-to-use platform designed for dynamic service discovery and configuration and service management. It helps you to build cloud native applications and microservices platform easily. Following that definition you can use Nacos for:
- Service Discovery – you can register your microservice and discover other microservices via a DNS or HTTP interface. It also provides real-time healthchecks for registered services
- Distributed Configuration – dynamic configuration service provided by Nacos allows you to manage configurations of all services in a centralized and dynamic manner across all environments. In fact, you can replace Spring Cloud Config Server using it
- Dynamic DNS – it supports weighted routing, making it easier to implement mid-tier load balancing, flexible routing policies, flow control, and simple DNS resolution services
Spring Cloud supports another popular Alibaba component – Sentinel. Sentinel is responsible for flow control, concurrency, circuit breaking and load protection.
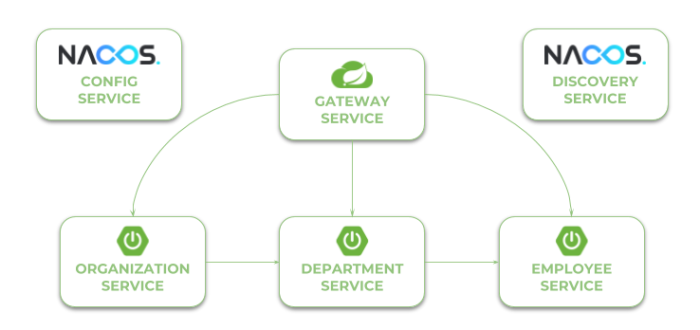
Our sample system consisting of three microservices and API gateway is very similar to the architecture described in my article Quick Guide to Microservices with Spring Boot 2.0, Eureka and Spring Cloud. The only difference is in tools used for configuration management and service discovery. Microservice organization-service calls some endpoints exposed by department-service, while department-service calls endpoints exposed by employee-service. An inter-service communication is realized using OpenFeign client. The complexity of the whole system is hidden behind an API gateway implemented using Netflix Zuul.
1. Running Nacos server
You can run Nacos on both Windows and Linux systems. First, you should download latest stable release provided on the site https://github.com/alibaba/nacos/releases. After unzipping you have to run it in standalone mode by executing the following command.
cmd nacos/bin/startup.cmd -m standalone
By default, Nacos is starting on port 8848. It provides HTTP API under context /nacos/v1, and admin web console under address http://localhost:8848/nacos. If you take a look on the logs you will find out that it is just an application written using Spring Framework.
2. Dependencies
As I have mentioned before Spring Cloud Alibaba is still under incubation stage, therefore it is not included into Spring Cloud Release Train. That’s why we need to include special BOM for Alibaba inside dependency management section in pom.xml. We will also use the newest stable version of Spring Cloud, which is now Finchley.SR2.
<dependencyManagement>
	<dependencies>
		<dependency>
			<groupId>org.springframework.cloud</groupId>
			<artifactId>spring-cloud-dependencies</artifactId>
			<version>Finchley.SR2</version>
			<type>pom</type>
			<scope>import</scope>
		</dependency>
		<dependency>
			<groupId>org.springframework.cloud</groupId>
			<artifactId>spring-cloud-alibaba-dependencies</artifactId>
			<version>0.2.0.RELEASE</version>
			<type>pom</type>
			<scope>import</scope>
		</dependency>
	</dependencies>
</dependencyManagement>
Spring Cloud Alibaba provides three starters for the currently supported components. These are spring-cloud-starter-alibaba-nacos-discovery for service discovery with Nacos, spring-cloud-starter-alibaba-nacos-config for distributed configuration Nacos, and spring-cloud-starter-alibaba-sentinel for Sentinel dependencies.
<dependency>
	<groupId>org.springframework.cloud</groupId>
	<artifactId>spring-cloud-starter-alibaba-nacos-discovery</artifactId>
</dependency>
<dependency>
	<groupId>org.springframework.cloud</groupId>
	<artifactId>spring-cloud-starter-alibaba-nacos-config</artifactId>
</dependency>
<dependency>
	<groupId>org.springframework.cloud</groupId>
	<artifactId>spring-cloud-starter-alibaba-sentinel</artifactId>
</dependency>
3. Enabling distributed configuration with Nacos
To enable configuration management with Nacos we only need to include starter spring-cloud-starter-alibaba-nacos-config. It does not provide auto-configured address of Nacos server, so we need to explicitly set it for the application inside bootstrap.yml file.
spring:
  application:
    name: employee-service
  cloud:
    nacos:
      config:
        server-addr: localhost:8848
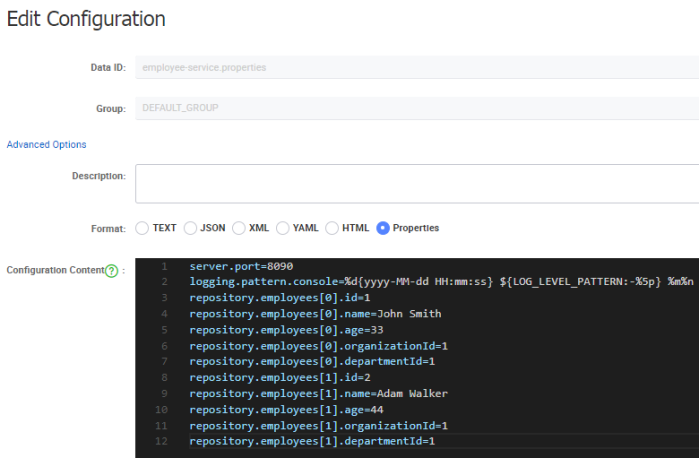
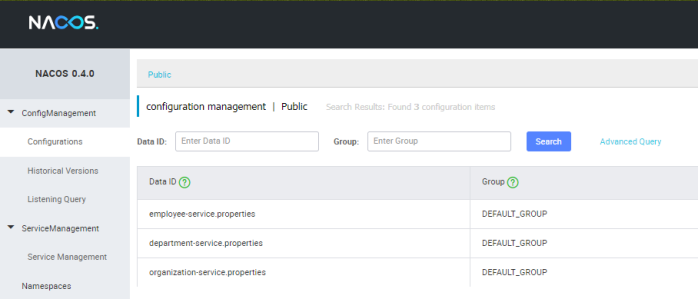
Our application tries to connect with Nacos and fetch configuration provided inside file with the same name as value of property spring.application.name. Currently, Spring Cloud Alibaba supports only .properties file, so we need to create configuration inside file employee-service.properties. Nacos comes with an elegant way of creating and managing configuration properties. We can use web admin console for that. The field Data ID visible on the picture below is in fact the name of our configuration file. The list of configuration properties should be placed inside Configuration Content field.

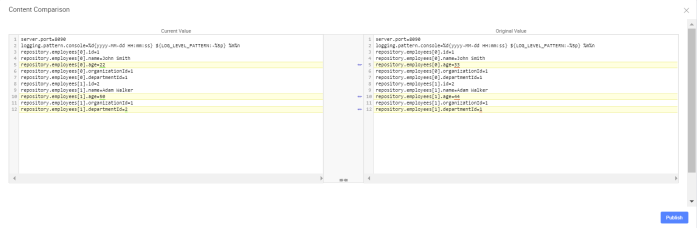
The good news related with Spring Cloud Alibaba is that it dynamically refresh application configuration after modifications on Nacos. The only thing you have to do in your application is to annotate the beans that should be refreshed with @RefreshScope or @ConfigurationProperties. Now, let’s consider the following situation. We will modify our configuration a little to add some properties with test data as shown below.
Here’s the implementation of our repository bean. It injects all configuration properties with prefix repository.employees into the list of employees.
@Repository
@ConfigurationProperties(prefix = "repository")
public class EmployeeRepository {

	private List<Employee> employees = new ArrayList<>();

	public List<Employee> getEmployees() {
		return employees;
	}

	public void setEmployees(List<Employee> employees) {
		this.employees = employees;
	}

	public Employee add(Employee employee) {
		employee.setId((long) (employees.size()+1));
		employees.add(employee);
		return employee;
	}

	public Employee findById(Long id) {
		Optional<Employee> employee = employees.stream().filter(a -> a.getId().equals(id)).findFirst();
		if (employee.isPresent())
			return employee.get();
		else
			return null;
	}

	public List<Employee> findAll() {
		return employees;
	}

	public List<Employee> findByDepartment(Long departmentId) {
		return employees.stream().filter(a -> a.getDepartmentId().equals(departmentId)).collect(Collectors.toList());
	}

	public List<Employee> findByOrganization(Long organizationId) {
		return employees.stream().filter(a -> a.getOrganizationId().equals(organizationId)).collect(Collectors.toList());
	}

}
Now, you can change some values of properties as shown on the picture below. Then, if you call employee-service, that is available on port 8090 (http://localhost:8090) you should see the full list of employees with modified values.
The same configuration properties should be created for our two other microservices department-service and organization-service. Assuming you have already done it, your should have the following configuration entries on Nacos.
4. Enabling service discovery with Nacos
To enable service discovery with Nacos you first need to include starter spring-cloud-starter-alibaba-nacos-discovery. The same as for the configuration server you also need to set address of Nacos server inside bootstrap.yml file.
spring:
  application:
    name: employee-service
  cloud:
    nacos:
      discovery:
        server-addr: localhost:8848
The last step is to enable discovery client for the application by annotating the main class with @EnableDiscoveryClient.
@SpringBootApplication
@EnableDiscoveryClient
@EnableSwagger2
public class EmployeeApplication {

	public static void main(String[] args) {
		SpringApplication.run(EmployeeApplication.class, args);
	}

}
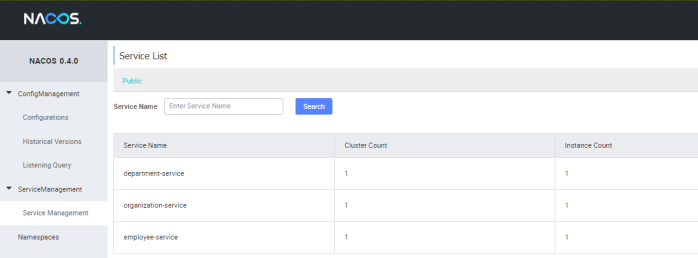
If you provide the same implementation for all our microservices and run them you will see the following list of registered application in Nacos web console.
5. Inter-service communication
Communication between microservices is realized using the standard Spring Cloud components: RestTemplate or OpenFeign client. By default, load balancing is realized by Ribbon client. The only difference in comparison to Spring Cloud Netflix is discovery server used as service registry in the communication process. Here’s the implementation of Feign client in department-service responsible for integration with endpoint GET /department/{departmentId} exposed by employee-service.
@FeignClient(name = "employee-service")
public interface EmployeeClient {

	@GetMapping("/department/{departmentId}")
	List<Employee> findByDepartment(@PathVariable("departmentId") Long departmentId);

}
Don’t forget to enable Feign clients for Spring Boot application.
@SpringBootApplication
@EnableDiscoveryClient
@EnableFeignClients
@EnableSwagger2
public class DepartmentApplication {

	public static void main(String[] args) {
		SpringApplication.run(DepartmentApplication.class, args);
	}

}
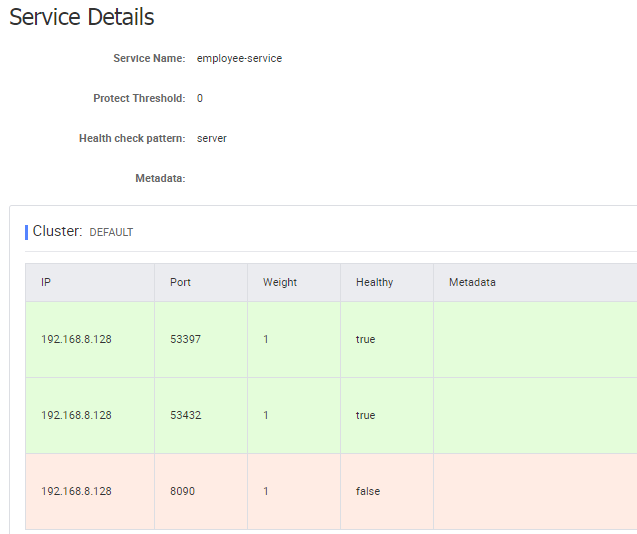
We should also run multiple instances of employee-service in order to test load balancing on the client side. Before doing that we could enable dynamic generation of port number by setting property server.port to 0 inside configuration stored on Nacos. Now, we can run many instances of single service using the same configuration settings without risk of the port number conflict for a single microservice. Let’s scale up number of employee-service instances.
If you would like to test an inter-service communication you can call the following methods that uses OpenFeign client for calling endpoints exposed by other microservices: GET /organization/{organizationId}/with-employees from department-service, and GET /{id}/with-departments, GET /{id}/with-departments-and-employees, GET /{id}/with-employees from organization-service.
6. Running API Gateway
Now it is a time to run the last component in our architecture – an API Gateway. It is built on top of Spring Cloud Netflix Zuul. It also uses Nacos a s a discovery and configuration server.
<dependency>
	<groupId>org.springframework.cloud</groupId>
	<artifactId>spring-cloud-starter-alibaba-nacos-discovery</artifactId>
</dependency>
<dependency>
	<groupId>org.springframework.cloud</groupId>
	<artifactId>spring-cloud-starter-alibaba-nacos-config</artifactId>
</dependency>
<dependency>
	<groupId>org.springframework.cloud</groupId>
	<artifactId>spring-cloud-starter-netflix-zuul</artifactId>
</dependency>
After including required dependencies we need to enable Zuul proxy and discovery client for the application.
@SpringBootApplication
@EnableDiscoveryClient
@EnableZuulProxy
@EnableSwagger2
public class ProxyApplication {

	public static void main(String[] args) {
		SpringApplication.run(ProxyApplication.class, args);
	}

}
Here’s the configuration of Zuul routes defined for our three sample microservices.
zuul:
  routes:
    department:
      path: /department/**
      serviceId: department-service
    employee:
      path: /employee/**
      serviceId: employee-service
    organization:
      path: /organization/**
      serviceId: organization-service
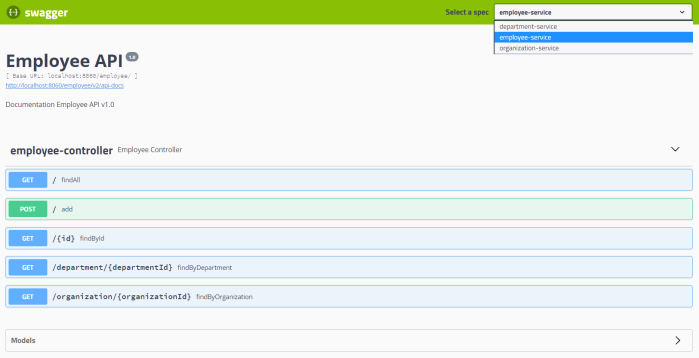
After running gateway exposes Swagger2 specification for API exposed by all defined microservices. Assuming you have run it on port 8080, you can access it under address http://localhost:8080/swagger-ui.html. Thanks to that you can all the methods from one, single location.
Conclusion
Sample applications source code is available on GitHub under repository sample-spring-microservices-new in branch alibaba: https://github.com/piomin/sample-spring-microservices-new/tree/alibaba. The main purpose of this article was to show you how to replace some popular Spring Cloud components with Alibaba Nacos used for service discovery and configuration management. Spring Cloud Alibaba project is at an early stage of development, so we could probably expect some new interesting features near the future. You can find some other examples on Spring Cloud Alibaba Github site here https://github.com/spring-cloud-incubator/spring-cloud-alibaba/tree/master/spring-cloud-alibaba-examples.
Reactive programming with Project Reactor
If you are building reactive microservices you would probably have to merge data streams from different source APIs into a single result stream. It inspired me to create this article containing some most common scenarios of using reactive streams in microservice-based architecture during inter-service communication. I have already described some aspects related to reactive programming with Spring based on Spring WebFlux and Spring Data JDBC projects in the following articles:
- Reactive Microservices with Spring WebFlux and Spring Cloud
- Introduction to Reactive APIs with Postgres, R2DBC, Spring Data JDBC and Spring WebFlux
Continue reading “Reactive programming with Project Reactor”
Introduction to Reactive APIs with Postgres, R2DBC, Spring Data JDBC and Spring WebFlux
There are pretty many technologies listed in the title of this article. Spring WebFlux has been introduced with Spring 5 and Spring Boot 2 as a project for building reactive-stack web applications. I have already described how to use it together with Spring Boot and Spring Cloud for building reactive microservices in that article: Reactive Microservices with Spring WebFlux and Spring Cloud. Spring 5 has also introduced some projects supporting reactive access to NoSQL databases like Cassandra, MongoDB or Couchbase. But there were still a lack in support for reactive to access to relational databases. The change is coming together with R2DBC (Reactive Relational Database Connectivity) project. That project is also being developed by Pivotal members. It seems to be very interesting initiative, however it is rather at the beginning of the road. Anyway, there is a module for integration with Postgres, and we will use it for our demo application. R2DBC will not be the only one new interesting solution described in this article. I also show you how to use Spring Data JDBC – another really interesting project released recently.
It is worth mentioning some words about Spring Data JDBC. This project has been already released, and is available under version 1.0. It is a part of bigger Spring Data framework. It offers a repository abstraction based on JDBC. The main reason of creating that library is allow to access relational databases using Spring Data way (through CrudRepository interfaces) without including JPA library to the application dependencies. Of course, JPA is still certainly the main persistence API used for Java applications. Spring Data JDBC aims to be much simpler conceptually than JPA by not implementing popular patterns like lazy loading, caching, dirty context, sessions. It also provides only very limited support for annotation-based mapping. Finally, it provides an implementation of reactive repositories that uses R2DBC for accessing relational database. Although that module is still under development (only SNAPSHOT version is available), we will try to use it in our demo application. Let’s proceed to the implementation.
Including dependencies
We use Kotlin for implementation. So first, we include some required Kotlin dependencies.
<dependency>
	<groupId>org.jetbrains.kotlin</groupId>
	<artifactId>kotlin-stdlib</artifactId>
	<version>${kotlin.version}</version>
</dependency>
<dependency>
	<groupId>com.fasterxml.jackson.module</groupId>
	<artifactId>jackson-module-kotlin</artifactId>
</dependency>
<dependency>
	<groupId>org.jetbrains.kotlin</groupId>
	<artifactId>kotlin-reflect</artifactId>
</dependency>
<dependency>
	<groupId>org.jetbrains.kotlin</groupId>
	<artifactId>kotlin-test-junit</artifactId>
	<version>${kotlin.version}</version>
	<scope>test</scope>
</dependency>
We should also add kotlin-maven-plugin with support for Spring.
<plugin>
	<groupId>org.jetbrains.kotlin</groupId>
	<artifactId>kotlin-maven-plugin</artifactId>
	<version>${kotlin.version}</version>
	<executions>
		<execution>
			<id>compile</id>
			<phase>compile</phase>
			<goals>
				<goal>compile</goal>
			</goals>
		</execution>
		<execution>
			<id>test-compile</id>
			<phase>test-compile</phase>
			<goals>
				<goal>test-compile</goal>
			</goals>
		</execution>
	</executions>
	<configuration>
		<args>
			<arg>-Xjsr305=strict</arg>
		</args>
		<compilerPlugins>
			<plugin>spring</plugin>
		</compilerPlugins>
	</configuration>
</plugin>
Then, we may proceed to including frameworks required for the demo implementation. We need to include the special SNAPSHOT version of Spring Data JDBC dedicated for accessing database using R2DBC. We also have to add some R2DBC libraries and Spring WebFlux. As you may see below only Spring WebFlux is available in stable version (as a part of Spring Boot RELEASE).
<dependency>
	<groupId>org.springframework.boot</groupId>
	<artifactId>spring-boot-starter-webflux</artifactId>
</dependency>
<dependency>
	<groupId>org.springframework.data</groupId>
	<artifactId>spring-data-jdbc</artifactId>
	<version>1.0.0.r2dbc-SNAPSHOT</version>
</dependency>
<dependency>
	<groupId>io.r2dbc</groupId>
	<artifactId>r2dbc-spi</artifactId>
	<version>1.0.0.M5</version>
</dependency>
<dependency>
	<groupId>io.r2dbc</groupId>
	<artifactId>r2dbc-postgresql</artifactId>
	<version>1.0.0.M5</version>
</dependency>
It is also important to set dependency management for Spring Data project.
<dependencyManagement>
	<dependencies>
		<dependency>
			<groupId>org.springframework.data</groupId>
			<artifactId>spring-data-releasetrain</artifactId>
			<version>Lovelace-RELEASE</version>
			<scope>import</scope>
			<type>pom</type>
		</dependency>
	</dependencies>
</dependencyManagement>
Repositories
We are using well known Spring Data style of CRUD repository implementation. In that case we need to create interface that extends ReactiveCrudRepository interface.
Here’s the implementation of repository for managing Employee objects.
interface EmployeeRepository : ReactiveCrudRepository<Employee, Int< {
    @Query("select id, name, salary, organization_id from employee e where e.organization_id = $1")
    fun findByOrganizationId(organizationId: Int) : Flux<Employee>
}
Here’s the another implementation of repository – this time for managing Organization objects.
interface OrganizationRepository : ReactiveCrudRepository<Organization, Int< {
}
Implementing Entities and DTOs
Kotlin provides a convenient way of creating entity class by declaring it as data class. When using Spring Data JDBC we have to set primary key for entity by annotating the field with @Id. It assumes the key is automatically incremented by database. If you are not using auto-increment columns, you have to use a BeforeSaveEvent listener, which sets the ID of the entity. However, I tried to set such a listener for my entity, but it just didn’t work with reactive version of Spring Data JDBC.
Here’s an implementation of Employee entity class. What is worth mentioning Spring Data JDBC will automatically map class field organizationId into database column organization_id.
data class Employee(val name: String, val salary: Int, val organizationId: Int) {
    @Id
    var id: Int? = null
}
Here’s an implementation of Organization entity class.
data class Organization(var name: String) {
    @Id
    var id: Int? = null
}
R2DBC does not support any lists or sets. Because I’d like to return list with employees inside Organization object in one of API endpoints I have created DTO containing such a list as shown below.
data class OrganizationDTO(var id: Int?, var name: String) {
    var employees : MutableList = ArrayList()
    constructor(employees: MutableList) : this(null, "") {
        this.employees = employees
    }
}
The SQL scripts corresponding to the created entities are visible below. Field type serial will automatically creates sequence and attach it to the field id.
CREATE TABLE employee (
    name character varying NOT NULL,
    salary integer NOT NULL,
    id serial PRIMARY KEY,
    organization_id integer
);
CREATE TABLE organization (
    name character varying NOT NULL,
    id serial PRIMARY KEY
);
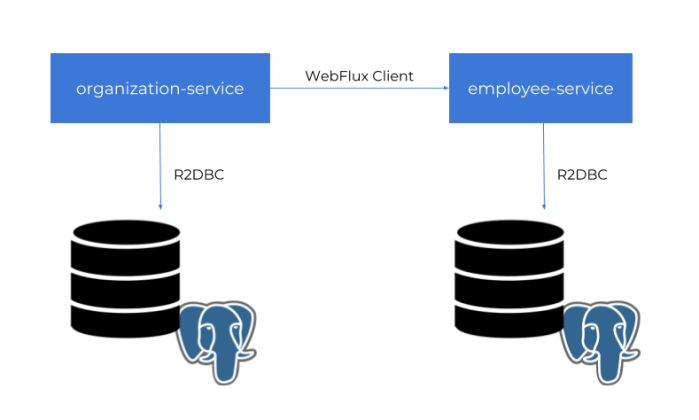
Building sample web applications
For the demo purposes we will build two independent applications employee-service and organization-service. Application organization-service is communicating with employee-service using WebFlux WebClient. It gets the list of employees assigned to the organization, and includes them to response together with Organization object. Sample applications source code is available on GitHub under repository sample-spring-data-webflux: https://github.com/piomin/sample-spring-data-webflux.
Ok, let’s begin from declaring Spring Boot main class. We need to enable Spring Data JDBC repositories by annotating the main class with @EnableJdbcRepositories.
@SpringBootApplication
@EnableJdbcRepositories
class EmployeeApplication

fun main(args: Array<String>) {
    runApplication<EmployeeApplication>(*args)
}
Working with R2DBC and Postgres requires some configuration. Probably due to an early stage of progress in development of Spring Data JDBC and R2DBC there is no Spring Boot auto-configuration for Postgres. We need to declare connection factory, client, and repository inside @Configuration bean.
@Configuration
class EmployeeConfiguration {

    @Bean
    fun repository(factory: R2dbcRepositoryFactory): EmployeeRepository {
        return factory.getRepository(EmployeeRepository::class.java)
    }

    @Bean
    fun factory(client: DatabaseClient): R2dbcRepositoryFactory {
        val context = RelationalMappingContext()
        context.afterPropertiesSet()
        return R2dbcRepositoryFactory(client, context)
    }

    @Bean
    fun databaseClient(factory: ConnectionFactory): DatabaseClient {
        return DatabaseClient.builder().connectionFactory(factory).build()
    }

    @Bean
    fun connectionFactory(): PostgresqlConnectionFactory {
        val config = PostgresqlConnectionConfiguration.builder() //
                .host("192.168.99.100") //
                .port(5432) //
                .database("reactive") //
                .username("reactive") //
                .password("reactive123") //
                .build()

        return PostgresqlConnectionFactory(config)
    }

}
Finally, we can create REST controllers that contain the definition of our reactive API methods. With Kotlin it does not take much space. The following controller definition contains three GET methods that allows to find all employees, all employees assigned to a given organization or a single employee by id.
@RestController
@RequestMapping("/employees")
class EmployeeController {

    @Autowired
    lateinit var repository : EmployeeRepository

    @GetMapping
    fun findAll() : Flux<Employee> = repository.findAll()

    @GetMapping("/{id}")
    fun findById(@PathVariable id : Int) : Mono<Employee> = repository.findById(id)

    @GetMapping("/organization/{organizationId}")
    fun findByorganizationId(@PathVariable organizationId : Int) : Flux<Employee> = repository.findByOrganizationId(organizationId)

    @PostMapping
    fun add(@RequestBody employee: Employee) : Mono<Employee> = repository.save(employee)

}
Inter-service Communication
For the OrganizationController the implementation is a little bit more complicated. Because organization-service is communicating with employee-service, we first need to declare reactive WebFlux WebClient builder.
@Bean
fun clientBuilder() : WebClient.Builder {
	return WebClient.builder()
}
Then, similar to the repository bean the builder is being injected into the controller. It is used inside findByIdWithEmployees method for calling method GET /employees/organization/{organizationId} exposed by employee-service. As you can see on the code fragment below it provides reactive API and return Flux object containing list of found employees. This list is injected into OrganizationDTO object using zipWith Reactor method.
@RestController
@RequestMapping("/organizations")
class OrganizationController {

    @Autowired
    lateinit var repository : OrganizationRepository
    @Autowired
    lateinit var clientBuilder : WebClient.Builder

    @GetMapping
    fun findAll() : Flux<Organization> = repository.findAll()

    @GetMapping("/{id}")
    fun findById(@PathVariable id : Int) : Mono<Organization> = repository.findById(id)

    @GetMapping("/{id}/withEmployees")
    fun findByIdWithEmployees(@PathVariable id : Int) : Mono<OrganizationDTO> {
        val employees : Flux<Employee> = clientBuilder.build().get().uri("http://localhost:8090/employees/organization/$id")
                .retrieve().bodyToFlux(Employee::class.java)
        val org : Mono = repository.findById(id)
        return org.zipWith(employees.collectList())
                .map { tuple -> OrganizationDTO(tuple.t1.id as Int, tuple.t1.name, tuple.t2) }
    }

    @PostMapping
    fun add(@RequestBody employee: Organization) : Mono<Organization> = repository.save(employee)

}
How it works?
Before running the tests we need to start Postgres database. Here’s the Docker command used for running Postgres container. It is creating user with password, and setting up default database.
$ docker run -d --name postgres -p 5432:5432 -e POSTGRES_USER=reactive -e POSTGRES_PASSWORD=reactive123 -e POSTGRES_DB=reactive postgres
Then we need to create some tests tables, so you have to run SQL script placed in the section Implementing Entities and DTOs. After that you can start our test applications. If you do not override default settings provided inside application.yml files employee-service is listening on port 8090, and organization-service on port 8095. The following picture illustrates the architecture of our sample system.
Now, let’s add some test data using reactive API exposed by the applications.
$ curl -d '{"name":"Test1"}' -H "Content-Type: application/json" -X POST http://localhost:8095/organizations
$ curl -d '{"name":"Name1", "balance":5000, "organizationId":1}' -H "Content-Type: application/json" -X POST http://localhost:8090/employees
$ curl -d '{"name":"Name2", "balance":10000, "organizationId":1}' -H "Content-Type: application/json" -X POST http://localhost:8090/employees
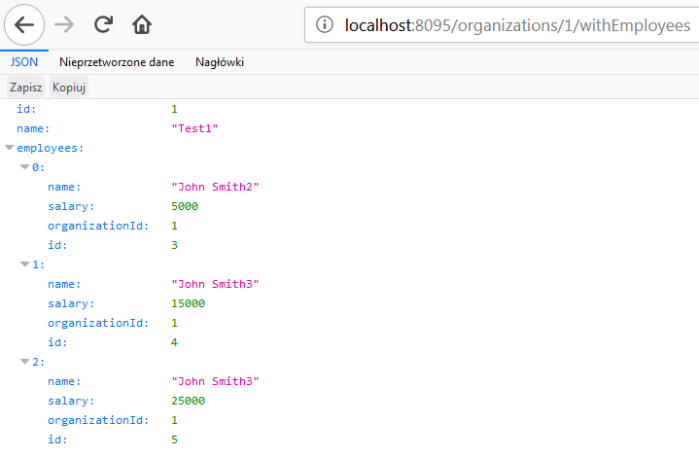
Finally you can call GET organizations/{id}/withEmployees method, for example using your web browser. The result should be similar to the result visible on the following picture.
Kotlin Microservices with Ktor
Ktor is a framework for building asynchronous applications on the server and client side. It is fully written in Kotlin. The main goal of Ktor is to provide an end-to-end multiplatform application framework for connected applications. It allows to easily build web applications and HTTP services, so we can be use it for building microservices-based architecture. Let’s discuss the main features of Ktor framework by the example of a simple system consisting of two microservices. Continue reading “Kotlin Microservices with Ktor”

5 Things You Will Like in Kotlin as a Java Developer
Kotlin language is gaining more and more popularity recently. It is widely used no longer just in mobile apps development, but also for server-side systems. As you probably know is a statically typed programming language that runs on the JVM. That’s why it is often compared with Java language. One of the main reasons of Kotlin popularity is a simplicity. It cleans and removes a lot of the code bloat from Java. However, it is also very similar to Java, so that any experienced Java developer can pick up Kotlin in a few hours.
In this article I’m going to discuss some interesting Kotlin features used for server-side development in comparison to Java. Here’s my personal list of favourite Kotlin features unavailable for Java language.
1. Collections and Generics
I really like Java, but sometimes working with generic collections may be an unpleasant experience, especially if you have to use wildcard types. The good news are that Kotlin doesn’t have any wildcard types. Instead, it provides two other features called declaration-site variance and type projections. Now, let’s consider the following class hierarchy.
abstract class Vehicle {

}

class Truck extends Vehicle {

}

class PassengerCar extends Vehicle {

}
I defined a generic repository that contains all objects with a given type.
public class Repository<T> {

	List<T> l = new ArrayList<>();

	public void addAll(List<T> l) {
		l.addAll(l);
	}

	public void add(T t) {
		l.add(t);
	}
}
Now, I would like to store all the vehicles in that repository, so I declare Repository r = new Repository<Vehicle>(). But invoking repository method addAll with List<Truck> as a parameter you will receive the following error.

You can change the declaration of addAll method to accept parameter that declared like that: public void addAll(List<? extends T> l), and it works fine..
Of course, this situation has a logical explanation. First, generic types in Java are invariant, what in fact means that List<Truck> is not a subtype of List<Vehicle>, although Truck is a subtype of Vehicle. The addAll method takes wildcard type argument <? extends T> as a parameter, what indicates that this method accepts a collection of objects of T or some subtype of T, not just T itself. The List<Truck> is a subtype of List<? extends Vehicle>, but the target list is still List<Vehicle>. I don’t want to get into details about this behaviour – you can read more about it in Java specification. The important thing for us is that Kotlin is solving this problem using feature called Declaration-site variance. If we add the out modifier to the MutableList parameter inside addAll method declaration the compiler will allow to add a list of Truck objects. The smart explanation of that process is provided on the Kotlin site: ‘In “clever words” they say that the class C is covariant in the parameter T, or that T is a covariant type parameter. You can think of C as being a producer of T’s, and NOT a consumer of T’s.’
class Repository<T> {

    var l: MutableList<T> = ArrayList()

    fun addAll(objects: MutableList<out T>) {
        l.addAll(objects)
    }

    fun add(o: T) {
        l.add(o)
    }

}

fun main(args: Array<String>) {
    val r = Repository<Vehicle>()
    var l1: MutableList<Truck> = ArrayList()
    l1.add(Truck())
    r.addAll(l1)
    println("${r.l.size}")
}
2. Data classes
You probably excellent know Java POJOs (Plain Old Java Object). If you are following Java good practices such a class should implement getters, setters, hashCode and equals methods, and also toString method for logging needs. Such an implementation may take up a lot of space even for simple class with only four fields – as shown below (methods auto-generated using Eclipse IDE).
public class Person {

	private Integer id;
	private String firstName;
	private String lastName;
	private int age;

	public Person(Integer id, String firstName, String lastName) {
		this.id = id;
		this.firstName = firstName;
		this.lastName = lastName;
	}

	public Integer getId() {
		return id;
	}

	public void setId(Integer id) {
		this.id = id;
	}

	public String getFirstName() {
		return firstName;
	}

	public void setFirstName(String firstName) {
		this.firstName = firstName;
	}

	public String getLastName() {
		return lastName;
	}

	public void setLastName(String lastName) {
		this.lastName = lastName;
	}

	public int getAge() {
		return age;
	}

	public void setAge(int age) {
		this.age = age;
	}

	@Override
	public int hashCode() {
		final int prime = 31;
		int result = 1;
		result = prime * result + ((firstName == null) ? 0 : firstName.hashCode());
		result = prime * result + ((id == null) ? 0 : id.hashCode());
		result = prime * result + ((lastName == null) ? 0 : lastName.hashCode());
		return result;
	}

	@Override
	public boolean equals(Object obj) {
		if (this == obj)
			return true;
		if (obj == null)
			return false;
		if (getClass() != obj.getClass())
			return false;
		Person other = (Person) obj;
		if (firstName == null) {
			if (other.firstName != null)
				return false;
		} else if (!firstName.equals(other.firstName))
			return false;
		if (id == null) {
			if (other.id != null)
				return false;
		} else if (!id.equals(other.id))
			return false;
		if (lastName == null) {
			if (other.lastName != null)
				return false;
		} else if (!lastName.equals(other.lastName))
			return false;
		return true;
	}

	@Override
	public String toString() {
		return "Person [id=" + id + ", firstName=" + firstName + ", lastName=" + lastName + "]";
	}

}
To avoid many additional lines of code inside your POJO classes you may use project Lombok. It provides a set of annotations that can be used on the class to deliver implementations of getters/setters, equals and hashCode methods. It is also possible to annotate your class with @Data, that bundles all the features of @ToString, @EqualsAndHashCode, @Getter / @Setter and @RequiredArgsConstructor together. So, with Lombok’s @Data the POJO is going to look like as shown below – assuming you don’t require a constructor with parameters.
@Data
public class Person {

	private Integer id;
	private String firstName;
	private String lastName;
	private int age;

}
Including and using Lombok with Java application is quite simple and supported by all the main developer IDEs, but Kotlin solves this issue out-of-the-box. It provides functionality called data classes, which is enabled after adding keyword data to the class definition. The compiler automatically derives the methods from all properties declared in the primary constructor:
equals()/hashCode()pairtoString()methodcomponentN()functions corresponding to the properties in their order of declarationcopy()function
Because Kotlin internally generates a default getter and setter for mutable properties (declared as var), and a getter for read-only properties (declared as val) the similar implementation of Person Java POJO in Kotlin will look as shown below.
data class Person(val firstName: String, val lastName: String, val id: Int) {

    var age: Int = 0

}
What’s worth mentioning the compiler only uses the properties defined inside the primary constructor for the automatically generated functions. So, the field age, which is declared inside class body, will not be used by toString, equals, hashCode, and copy implementations.
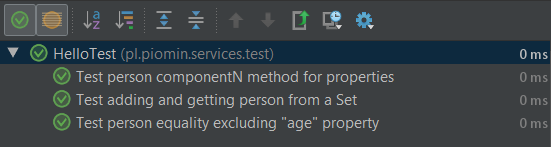
3. Names for test methods
Now, let’s implement some test cases that proofs the features described in the step 2 works properly. The following three tests are comparing two objects with different values of age property, trying to add the same object to the Java HashSet twice, and checking if componentN method of data class is returning properties in the right order.
@Test fun `Test person equality excluding "age" property`() {
	val person = Person("John", "Smith", 1)
	person.age = 35
	val person2 = Person("John", "Smith", 1)
	person2.age = 45
	Assert.assertEquals(person, person2)
}

@Test fun `Test person componentN method for properties`() {
	val person = Person("John", "Smith", 1)
	Assert.assertEquals("John", person.component1())
	Assert.assertEquals("Smith", person.component2())
	Assert.assertEquals(1, person.component3())
}

@Test fun `Test adding and getting person from a Set`() {
	val s = HashSet<Person>()
	val person = Person("John", "Smith", 1)
	var added = s.add(person)
	Assert.assertTrue(added)
	added = s.add(person)
	Assert.assertFalse(added)
}
As you see on the fragment of code above Kotlin is accepting to use method names with spaces enclosed in backticks. Thanks to that I can set a descriptive form of test name, which is then visible during execution, and you know exactly what’s going on 🙂
4. Extensions
Let’s consider the situation that we have a library contains class definitions, which cannot be changed, and we need to add there some methods. In Java, we have some choices to implement such an approach. We can just extend the existing class, implement there a new method or for example implement it with Decorator pattern.
Now, let’s assume we have the following Java class containing list of persons and exposing getters/setters.
public class Organization {

	private List<Person> persons;

	public List<Person> getPersons() {
		return persons;
	}

	public void setPersons(List<Person> persons) {
		this.persons = persons;
	}

}
If I would like to have the method for adding single Person object to the list I would have to extends Organization, and implement new method there.
public class OrganizationExt extends Organization {

	public void addPerson(Person person) {
		getPersons().add(person);
	}
}
Kotlin provides the ability to extend a class with a new functionality without having to inherit from the base class. This is done via special declarations called extensions. Here’s the similar declaration to Organization Java class in Kotlin. Because Kotlin treats simple Listclass as immutable, we need to define MutableList.
class Organization(val persons: MutableList<Person> = ArrayList()) {

}
We can easily extend it with addPerson method as shown below. Extensions are resolved statically, and they do not modify extended classes.
class OrganizationTest {

    fun Organization.addPerson(person: Person) {
        persons.add(person)
    }

    @Test
    fun testExtension() {
        val organization = Organization()
        organization.addPerson(Person("John", "Smith", 1))
        Assert.assertTrue(organization.persons.size == 1)
    }

}
5. String templates
Here’s a little something to make you happy – not available in Java.
println("Organization ${organization.name} with ${organization.persons.size} persons")
Conclusion
Of course there are some other differences between Java and Kotlin. This is only my personal list of favourite features unavailable in Java. The sample source code with described samples is available on GitHub: sample-kotlin-playground.
Running Jenkins Server with Configuration-As-Code
Some days ago I came across a newly created Jenkins plugin called Configuration as Code (JcasC). This plugin allows you to define Jenkins configuration in very popular format these days – YAML notation. It is interesting that such a plugin has not been created before, but better late than never. Of course, we could have use some other Jenkins plugins for that, like Job DSL Plugin, but it is based on Groovy language.
If you have any experience with Jenkins, you probably know how many plugins and other configuration settings it requires to have in order to work in your organization as a main CI server. With JcasC plugin, you can store such a configuration in human-readable declarative YAML files. In this article I’m going to show you how to create and run Jenkins with configuration as code letting you to build Java application using such tools like declarative pipelines, Git, Maven. I’ll also show how to manage sensitive data using Vault server.
1. Using Vault server
We will begin from running Vault server on the local machine. The easiest way to do that is with Docker image. By default, official Vault image is started in development mode. The following command runs an in-memory server, which listens on address 0.0.0.0:8200
docker run -d --name=vault --cap-add=IPC_LOCK -p 8200:8200 vault:0.9.0
There is one thing that should be clarified here. I do not run the newest version of Vault, because it forces us to call endpoints from version 2 of KV (Key-Value Secrets Engine) HTTP API, which is used for manipulating secrets. This version, in turn, is not supported by JcasC plugin that can communicate only with endpoints from version 1 of KV HTTP API. It does not apply to older version of Vault, for example 0.9.0, which allows to call KV in version 1. After running container we should obtain the token used for authentication against Vault from the console logs. To do that just run command docker logs vault and find the following fragment in the logs.

Now, using this authentication token we may add credentials required for accessing Jenkins web dashboard and our account on Git repository host. Jenkins account will be identified by rootPassword key, while GitHub account by githubPassword key.
$ curl -H "X-Vault-Token: 5bcab13b-6cf5-2f58-8b37-34dca31bebde" --request POST -d '{"rootPassword":"your_root_password", "githubPassword":"your_github_password"}' https://192.168.99.100:8200/v1/secret/jenkins
To check out if the parameters has been saved on Vault just call GET method with the same context path.
$ curl -H "X-Vault-Token: 5bcab13b-6cf5-2f58-8b37-34dca31bebde" https://192.168.99.100:8200/v1/secret/jenkins
2. Building Jenkins image
The same as for Vault server we also run Jenkins on Docker container. However, we need to add some configuration settings to Jenkins official image before running it. JcasC plugin requires setting an environment variable that points to location of the current YAML configuration files. This variable can point to the following:
- Path to a folder containing a set of config files
- A full path to a single file
- A URL pointing to a file served on the web, or for example your internal configuration server
The next step is to set some configuration settings required for establishing connection to Vault server. We have to pass the authentication token, the path of created key and the URL of running server. All these configuration settings are set as environment variables and may be overridden on container startup. The same rule applies to the location of JcasC configuration file. The following Dockerfile definition extends Jenkins base image, and add all the required parameters for running it using JcasC plugin and with secrets taken from Vault.
FROM jenkins/jenkins:lts
ENV CASC_JENKINS_CONFIG="/var/jenkins_home/jenkins.yml"
ENV CASC_VAULT_TOKEN=5bcab13b-6cf5-2f58-8b37-34dca31bebde
ENV CASC_VAULT_PATH=/secret/jenkins
ENV CASC_VAULT_URL=http://192.168.99.100:8200
COPY jenkins.yml ${CASC_JENKINS_CONFIG}
USER jenkins
RUN /usr/local/bin/install-plugins.sh configuration-as-code configuration-as-code-support git workflow-cps-global-lib
Now, let’s build the Docker image using Dockerfile visible above. Alternatively, you can just pull the image stored in my Docker Hub repository.
$ docker build -t piomin/jenkins-casc:1.0 .
Finally, you can run the container based on the built image with the following command. Of course, before that we need to prepare the YAML configuration file for JcasC plugin.
$ docker run -d --name jenkins-casc -p 8080:8080 -p 50000:50000 piomin/jenkins-casc:1.0 .
3. Preparing configuration
JcasC plugin provides many configuration settings that allows you to configure various components of your jenkins master installation. However, I will limit myself to defining the basic configuration used for building my sample Java application. We need the following Jenkins components to be configured after startup:
- A set of Jenkins plugins allowing to create declarative pipeline that checkouts source code from Git repository, builds it using Maven, and records JUnit test results
- Basic security realm containing credentials for a single Jenkins user. The user password is read from property
rootPasswordstored on Vault server - JDK location directory
- Maven installation settings – Maven is not installed by default in Jenkins, so we have to set required version and tool name
- Credentials for accessing Git repository containing application source code
plugins: # (1)
  required:
    git: 3.9.1
    pipeline-model-definition: 1.3.2
    pipeline-stage-step: 2.3
    pipeline-maven: 3.5.12
    workflow-aggregator: 2.5
    junit: 1.25
  sites:
  - id: "default"
    url: "https://updates.jenkins.io/update-center.json"
jenkins:
  agentProtocols:
  - "JNLP4-connect"
  - "Ping"
  authorizationStrategy:
    loggedInUsersCanDoAnything:
      allowAnonymousRead: false
  crumbIssuer:
    standard:
      excludeClientIPFromCrumb: false
  disableRememberMe: false
  mode: NORMAL
  numExecutors: 2
  primaryView:
    all:
      name: "all"
  quietPeriod: 5
  scmCheckoutRetryCount: 0
  securityRealm: # (2)
    local:
      allowsSignup: false
      enableCaptcha: false
      users:
      - id: "piomin"
        password: ${rootPassword}
  slaveAgentPort: 50000
  views:
  - all:
      name: "all"
tool:
  git:
    installations:
    - home: "git"
      name: "Default"
  jdk: # (3)
    installations:
    - home: "/docker-java-home"
      name: "jdk"
  maven: # (4)
    installations:
    - name: "maven"
      properties:
      - installSource:
          installers:
          - maven:
              id: "3.5.4"
credentials: # (5)
  system:
    domainCredentials:
      - domain :
          name: "github.com"
          description: "GitHub"
        credentials:
          - usernamePassword:
              scope: SYSTEM
              id: github-piomin
              username: piomin
              password: ${githubPassword}
4. Exporting configuration
After running Jenkins with JcasC plugin installed you can easily export the current configuration to the file. First, navigate to section Manage Jenkins -> Configuration as Code.
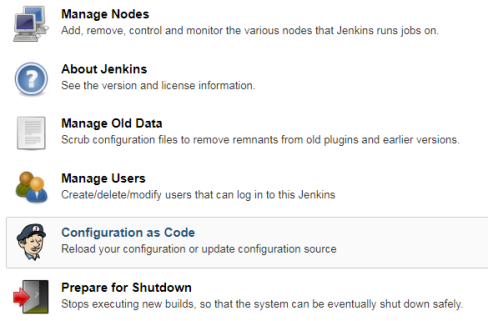
Then, after choosing Export Configuration button, the YAML file with Jenkins configuration will be downloaded to your machine. But following the comment visible below you cannot rely on that file, because this feature is still not stable. For my configuration it didn’t export Maven tool settings and list of Jenkins plugins. However, the JcasC plugin is probably still under active development, so I hope that feature will work succesfully soon.

5. Running sample pipeline
Finally you can create and run pipeline for your sample application. Here’s the definition of my pipeline.
pipeline {
    agent any
    tools {
        maven 'maven'
    }
    stages {
        stage('Checkout') {
            steps {
                git url: 'https://github.com/piomin/sample-spring-boot-autoscaler.git', credentialsId: 'github-piomin', branch: 'master'
            }
        }
		stage('Test') {
            steps {
                dir('example-service') {
                    sh 'mvn clean test'
                }
            }
        }
        stage('Build') {
            steps {
                dir('example-service') {
                    sh 'mvn clean install'
                }
            }
        }
    }
    post {
        always {
            junit '**/target/reports/**/*.xml'
        }
    }
}
Summary
The idea around Jenkins Configuration as Code Plugin is the step in the right direction. I’ll be following the development of this product with the great interest. There are still some features that needs to be added to make it more useful, and some bugs that need to be fixed. But after that I’ll will definitely consider using this plugin for maintaining the current Jenkins master server inside my organization.

Spring Boot Autoscaler
One of more important reasons we are deciding to use such a tools like Kubernetes, Pivotal Cloud Foundry or HashiCorp’s Nomad is an availability of auto-scaling our applications. Of course those tools provides many other useful mechanisms, but we can implement auto-scaling by ourselves. At first glance it seems to be difficult, but assuming we use Spring Boot as a framework for building our applications and Jenkins as a CI server, it finally does not require a lot of work. Today, I’m going to show you how to implement such a solutions using the following frameworks/tools:
- Spring Boot
- Spring Boot Actuator
- Spring Cloud Netflix Eureka
- Jenkins CI
How it works?
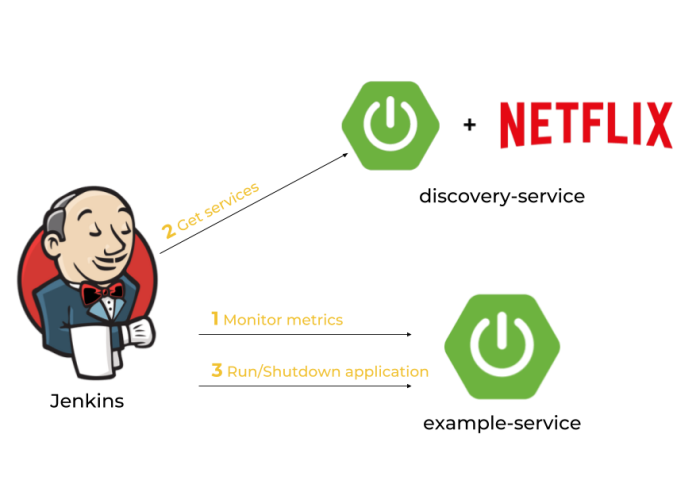
Every Spring Boot application, which contains Spring Boot Actuator library can expose metrics under endpoint /actuator/metrics. There are many valuable metrics that gives you the detailed information about an application status. Some of them may be especially important when talking about autoscaling: JVM, CPU metrics, a number of running threads and a number of incoming HTTP requests. There is dedicated Jenkins pipeline responsible for monitoring application’s metrics by polling endpoint /actuator/metrics periodically. If any monitored metrics is below or above target range it runs new instance or shutdown a running instance of application using another Actuator endpoint /actuator/shutdown. Before that, it needs to fetch the current list of running instances of a single application in order to get an address of existing application selected for shutting down or the address of server with the smallest number of running instances for a new instance of application..
After discussing an architecture of our system we may proceed to the development. Our application needs to meet some requirements: it has to expose metrics and endpoint for graceful shutdown, it needs to register in Eureka after after startup and deregister on shutdown, and finally it also should dynamically allocate running port randomly from the pool of free ports. Thanks to Spring Boot we may easily implement all these mechanisms if five minutes 🙂
Dynamic port allocation
Since it is possible to run many instances of application on a single machine we have to guarantee that there won’t be conflicts in port numbers. Fortunately, Spring Boot provides such mechanisms for an application. We just need to set port number to 0 inside application.yml file using server.port property. Because our application registers itself in eureka it also needs to send unique instanceId, which is by default generated as a concatenation of fields spring.cloud.client.hostname, spring.application.name and server.port.
Here’s current configuration of our sample application. I have changed the template of instanceId field by replacing number of port to randomly generated number.
spring:
  application:
    name: example-service
server:
  port: ${PORT:0}
eureka:
  instance:
    instanceId: ${spring.cloud.client.hostname}:${spring.application.name}:${random.int[1,999999]}
Enabling Actuator metrics
To enable Spring Boot Actuator we need to include the following dependency to pom.xml.
<dependency>
	<groupId>org.springframework.boot</groupId>
	<artifactId>spring-boot-starter-actuator</artifactId>
</dependency>
We also have to enable exposure of actuator endpoints via HTTP API by setting property management.endpoints.web.exposure.include to '*'. Now, the list of all available metric names is available under context path /actuator/metrics, while detailed information for each metric under path /actuator/metrics/{metricName}.
Graceful shutdown
Besides metrics Spring Boot Actuator also provides endpoint for shutting down an application. However, in contrast to other endpoints this endpoint is not available by default. We have to set property management.endpoint.shutdown.enabled to true. After that we will be to stop our application by sending POST request to /actuator/shutdown endpoint.
This method of stopping application guarantees that service will unregister itself from Eureka server before shutdown.
Enabling Eureka discovery
Eureka is the most popular discovery server used for building microservices-based architecture with Spring Cloud. So, if you already have microservices and want to provide auto-scaling mechanisms for them, Eureka would be a natural choice. It contains IP address and port number of every registered instance of application. To enable Eureka on the client side you just need to include the following dependency to your pom.xml.
<dependency>
	<groupId>org.springframework.cloud</groupId>
	<artifactId>spring-cloud-starter-netflix-eureka-client</artifactId>
</dependency>
As I have mentioned before we also have to guarantee an uniqueness of instanceId send to Eureka server by client-side application. It has been described in the step “Dynamic port allocation”.
The next step is to create application with embedded Eureka server. To achieve it we first need to include the following dependency into pom.xml.
<dependency>
	<groupId>org.springframework.cloud</groupId>
	<artifactId>spring-cloud-starter-netflix-eureka-server</artifactId>
</dependency>
The main class should be annotated with @EnableEurekaServer.
@SpringBootApplication
@EnableEurekaServer
public class DiscoveryApp {

    public static void main(String[] args) {
        new SpringApplicationBuilder(DiscoveryApp.class).run(args);
    }

}
Client-side applications by default tries to connect with Eureka server on localhost under port 8761. We only need single, standalone Eureka node, so we will disable registration and attempts to fetching list of services form another instances of server.
spring:
  application:
    name: discovery-service
server:
  port: ${PORT:8761}
eureka:
  instance:
    hostname: localhost
  client:
    registerWithEureka: false
    fetchRegistry: false
    serviceUrl:
      defaultZone: http://localhost:8761/eureka/
The tests of the sample autoscaling system will be performed using Docker containers, so we need to prepare and build image with Eureka server. Here’s Dockerfile with image definition. It can be built using command docker build -t piomin/discovery-server:2.0 ..
FROM openjdk:8-jre-alpine
ENV APP_FILE discovery-service-1.0-SNAPSHOT.jar
ENV APP_HOME /usr/apps
EXPOSE 8761
COPY target/$APP_FILE $APP_HOME/
WORKDIR $APP_HOME
ENTRYPOINT ["sh", "-c"]
CMD ["exec java -jar $APP_FILE"]
Building Jenkins pipeline for autoscaling
The first step is to prepare Jenkins pipeline responsible for autoscaling. We will create Jenkins Declarative Pipeline, which runs every minute. Periodical execution may be configured with the triggers directive, that defines the automated ways in which the pipeline should be re-triggered. Our pipeline will communicate with Eureka server and metrics endpoints exposed by every microservice using Spring Boot Actuator.
The test service name is EXAMPLE-SERVICE, which is equal to value (big letters) of property spring.application.name defined inside application.yml file. The monitored metric is the number of HTTP listener threads running on Tomcat container. These threads are responsible for processing incoming HTTP requests.
pipeline {
    agent any
    triggers {
        cron('* * * * *')
    }
    environment {
        SERVICE_NAME = "EXAMPLE-SERVICE"
        METRICS_ENDPOINT = "/actuator/metrics/tomcat.threads.busy?tag=name:http-nio-auto-1"
        SHUTDOWN_ENDPOINT = "/actuator/shutdown"
    }
    stages { ... }
}
Integrating Jenkins pipeline with Eureka
The first stage of our pipeline is responsible for fetching list of services registered in service discovery server. Eureka exposes HTTP API with several endpoints. One of them is GET /eureka/apps/{serviceName}, which returns list of all instances of application with given name. We are saving the number of running instances and the URL of metrics endpoint of every single instance. These values would be accessed during next stages of pipeline.
Here’s the fragment of pipeline responsible for fetching list of running instances of application. The name of stage is Calculate. We use HTTP Request Plugin for HTTP connections.
stage('Calculate') {
	steps {
		script {
			def response = httpRequest "http://192.168.99.100:8761/eureka/apps/${env.SERVICE_NAME}"
			def app = printXml(response.content)
			def index = 0
			env["INSTANCE_COUNT"] = app.instance.size()
			app.instance.each {
				if (it.status == 'UP') {
					def address = "http://${it.ipAddr}:${it.port}"
					env["INSTANCE_${index++}"] = address
				}
			}
		}
	}
}

@NonCPS
def printXml(String text) {
    return new XmlSlurper(false, false).parseText(text)
}
Here’s a sample response from Eureka API for our microservice. The response content type is XML.

Integrating Jenkins pipeline with Spring Boot Actuator metrics
Spring Boot Actuator exposes endpoint with metrics, which allows to find metric by name and optionally by tag. In the fragment of pipeline visible below I’m trying to find the instance with metric below or above a defined threshold. If there is such an instance we stop the loop in order to proceed to the next stage, which performs scaling down or up. The ip addresses of running applications are taken from pipeline environment variable with prefix INSTANCE_, which has been saved in the previous stage.
stage('Metrics') {
	steps {
		script {
			def count = env.INSTANCE_COUNT
			for(def i=0; i<count; i++) {
				def ip = env["INSTANCE_${i}"] + env.METRICS_ENDPOINT
				if (ip == null)
					break;
				def response = httpRequest ip
				def objRes = printJson(response.content)
				env.SCALE_TYPE = returnScaleType(objRes)
				if (env.SCALE_TYPE != "NONE")
					break
			}
		}
	}
}

@NonCPS
def printJson(String text) {
    return new JsonSlurper().parseText(text)
}

def returnScaleType(objRes) {
def value = objRes.measurements[0].value
if (value.toInteger() > 100)
		return "UP"
else if (value.toInteger() < 20)
		return "DOWN"
else
		return "NONE"
}
Shutdown application instance
In the last stage of our pipeline we will shutdown the running instance or start new instance depending on the result saved in the previous stage. Shutdown may be easily performed by calling Spring Boot Actuator endpoint. In the following fragment of pipeline we pick the instance returned by Eureka as first. Then we send POST request to that ip address.
If we need to scale up our application we call another pipeline responsible for build fat JAR and launch it on our machine.
stage('Scaling') {
	steps {
		script {
			if (env.SCALE_TYPE == 'DOWN') {
				def ip = env["INSTANCE_0"] + env.SHUTDOWN_ENDPOINT
				httpRequest url:ip, contentType:'APPLICATION_JSON', httpMode:'POST'
			} else if (env.SCALE_TYPE == 'UP') {
				build job:'spring-boot-run-pipeline'
			}
			currentBuild.description = env.SCALE_TYPE
		}
	}
}
Here’s a full definition of our pipeline spring-boot-run-pipeline responsible for starting new instance of application. It clones the repository with application source code, builds binaries using Maven commands, and finally runs the application using java -jar command passing address of Eureka server as a parameter.
pipeline {
    agent any
    tools {
        maven 'M3'
    }
    stages {
        stage('Checkout') {
            steps {
                git url: 'https://github.com/piomin/sample-spring-boot-autoscaler.git', credentialsId: 'github-piomin', branch: 'master'
            }
        }
        stage('Build') {
            steps {
                dir('example-service') {
                    sh 'mvn clean package'
                }
            }
        }
        stage('Run') {
            steps {
                dir('example-service') {
                    sh 'nohup java -jar -DEUREKA_URL=http://192.168.99.100:8761/eureka target/example-service-1.0-SNAPSHOT.jar 1>/dev/null 2>logs/runlog &'
                }
            }
        }
    }
}
Remote extension
The algorithm discussed in the previous sections will work fine only for microservices launched on the single machine. If we would like to extend it to work with many machines, we will have to modify our architecture as shown below. Each machine has Jenkins agent running and communicating with Jenkins master. If we would like to start new instance of microservices on the selected machine, we have to run pipeline using agent running on that machine. This agent is responsible only for building application from source code and launching it on the target machine. The shutdown of instance is still performed just by calling HTTP endpoint.
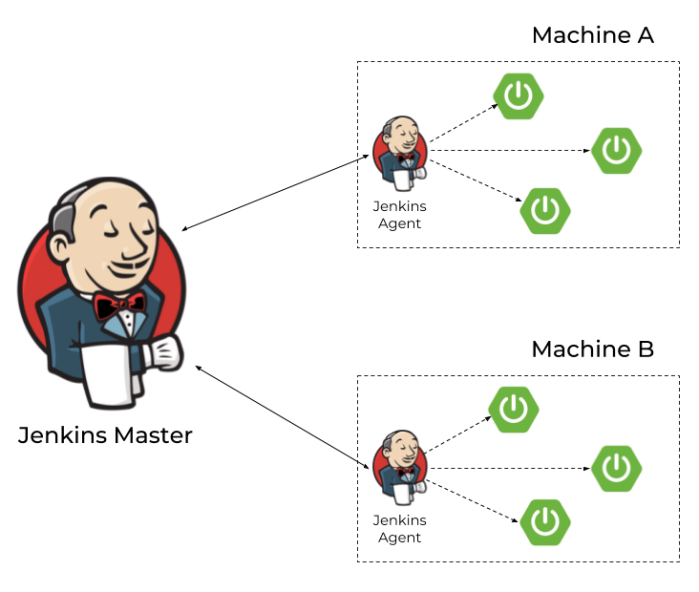
You can find more information about running Jenkins agents and connecting them with Jenkins master via JNLP protocol in my article Jenkins nodes on Docker containers. Assuming we have successfully launched some agents on the target machines we need to parametrize our pipelines in order to be able to select agent (and therefore the target machine) dynamically.
When we are scaling up our application we have to pass agent label to the downstream pipeline.
build job:'spring-boot-run-pipeline', parameters:[string(name: 'agent', value:"slave-1")]
The calling pipeline will be ran by agent labelled with given parameter.
pipeline {
    agent {
        label "${params.agent}"
    }
    stages { ... }
}
If we have more than one agent connected to the master node we can map their addresses into the labels. Thanks to that you would be able to map IP address of microservice instance fetched from Eureka to the target machine with Jenkins agent.
pipeline {
    agent any
    triggers {
        cron('* * * * *')
    }
    environment {
        SERVICE_NAME = "EXAMPLE-SERVICE"
        METRICS_ENDPOINT = "/actuator/metrics/tomcat.threads.busy?tag=name:http-nio-auto-1"
        SHUTDOWN_ENDPOINT = "/actuator/shutdown"
        AGENT_192.168.99.102 = "slave-1"
        AGENT_192.168.99.103 = "slave-2"
    }
    stages { ... }
}
Summary
In this article I have demonstrated how to use Spring Boot Actuator metrics in order to scale up/scale down your Spring Boot application. Using basic mechanisms provided by Spring Boot together with Spring Cloud Netflix Eureka and Jenkins you can implement auto-scaling for your applications without getting any other third-party tools. The case described in this article assumes using Jenkins agents on the remote machines to launch there new instance of application, but you may as well use a tool like Ansible for that. If you would decide to run Ansible playbooks from Jenkins you will not have to launch Jenkins agents on remote machines. The source code with sample applications is available on GitHub: https://github.com/piomin/sample-spring-boot-autoscaler.git.
Integration tests on OpenShift using Arquillian Cube and Istio
Building integration tests for applications deployed on Kubernetes/OpenShift platforms seems to be quite a big challenge. With Arquillian Cube, an Arquillian extension for managing Docker containers, it is not complicated. Kubernetes extension, being a part of Arquillian Cube, helps you write and run integration tests for your Kubernetes/Openshift application. It is responsible for creating and managing temporary namespace for your tests, applying all Kubernetes resources required to setup your environment and once everything is ready it will just run defined integration tests.
The one very good information related to Arquillian Cube is that it supports Istio framework. You can apply Istio resources before executing tests. One of the most important features of Istio is an ability to control of traffic behavior with rich routing rules, retries, delays, failovers, and fault injection. It allows you to test some unexpected situations during network communication between microservices like server errors or timeouts.
If you would like to run some tests using Istio resources on Minishift you should first install it on your platform. To do that you need to change some privileges for your OpenShift user. Let’s do that.
1. Enabling Istio on Minishift
Istio requires some high-level privileges to be able to run on OpenShift. To add those privileges to the current user we need to login as an user with cluster admin role. First, we should enable admin-user addon on Minishift by executing the following command.
$ minishift addons enable admin-user
After that you would be able to login as system:admin user, which has cluster-admin role. With this user you can also add cluster-admin role to other users, for example admin. Let’s do that.
$ oc login -u system:admin
$ oc adm policy add-cluster-role-to-user cluster-admin admin
$ oc login -u admin -p admin
Now, let’s create new project dedicated especially for Istio and then add some required privileges.
$ oc new-project istio-system
$ oc adm policy add-scc-to-user anyuid -z istio-ingress-service-account -n istio-system
$ oc adm policy add-scc-to-user anyuid -z default -n istio-system
$ oc adm policy add-scc-to-user anyuid -z prometheus -n istio-system
$ oc adm policy add-scc-to-user anyuid -z istio-egressgateway-service-account -n istio-system
$ oc adm policy add-scc-to-user anyuid -z istio-citadel-service-account -n istio-system
$ oc adm policy add-scc-to-user anyuid -z istio-ingressgateway-service-account -n istio-system
$ oc adm policy add-scc-to-user anyuid -z istio-cleanup-old-ca-service-account -n istio-system
$ oc adm policy add-scc-to-user anyuid -z istio-mixer-post-install-account -n istio-system
$ oc adm policy add-scc-to-user anyuid -z istio-mixer-service-account -n istio-system
$ oc adm policy add-scc-to-user anyuid -z istio-pilot-service-account -n istio-system
$ oc adm policy add-scc-to-user anyuid -z istio-sidecar-injector-service-account -n istio-system
$ oc adm policy add-scc-to-user anyuid -z istio-galley-service-account -n istio-system
$ oc adm policy add-scc-to-user privileged -z default -n myproject
Finally, we may proceed to Istio components installation. I downloaded the current newest version of Istio – 1.0.1. Installation file is available under install/kubernetes directory. You just have to apply it to your Minishift instance by calling oc apply command.
$ oc apply -f install/kubernetes/istio-demo.yaml
2. Enabling Istio for Arquillian Cube
I have already described how to use Arquillian Cube to run tests with OpenShift in the article Testing microservices on OpenShift using Arquillian Cube. In comparison with the sample described in that article we need to include dependency responsible for enabling Istio features.
<dependency>
	<groupId>org.arquillian.cube</groupId>
	<artifactId>arquillian-cube-istio-kubernetes</artifactId>
	<version>1.17.1</version>
	<scope>test</scope>
</dependency>
Now, we can use @IstioResource annotation to apply Istio resources into OpenShift cluster or IstioAssistant bean to be able to use some additional methods for adding, removing resources programmatically or polling an availability of URLs.
Let’s take a look on the following JUnit test class using Arquillian Cube with Istio support. In addition to the standard test created for running on OpenShift instance I have added Istio resource file customer-to-account-route.yaml. Then I have invoked method await provided by IstioAssistant. First test test1CustomerRoute creates new customer, so it needs to wait until customer-route is deployed on OpenShift. The next test test2AccountRoute adds account for the newly created customer, so it needs to wait until account-route is deployed on OpenShift. Finally, the test test3GetCustomerWithAccounts is ran, which calls the method responsible for finding customer by id with list of accounts. In that case customer-service calls method endpoint by account-service. As you have probably find out the last line of that test method contains an assertion to empty list of accounts: Assert.assertTrue(c.getAccounts().isEmpty()). Why? We will simulate the timeout in communication between customer-service and account-service using Istio rules.
@Category(RequiresOpenshift.class)
@RequiresOpenshift
@Templates(templates = {
        @Template(url = "classpath:account-deployment.yaml"),
        @Template(url = "classpath:deployment.yaml")
})
@RunWith(ArquillianConditionalRunner.class)
@IstioResource("classpath:customer-to-account-route.yaml")
@FixMethodOrder(MethodSorters.NAME_ASCENDING)
public class IstioRuleTest {

    private static final Logger LOGGER = LoggerFactory.getLogger(IstioRuleTest.class);
    private static String id;

    @ArquillianResource
    private IstioAssistant istioAssistant;

    @RouteURL(value = "customer-route", path = "/customer")
    private URL customerUrl;
    @RouteURL(value = "account-route", path = "/account")
    private URL accountUrl;

    @Test
    public void test1CustomerRoute() {
        LOGGER.info("URL: {}", customerUrl);
        istioAssistant.await(customerUrl, r -> r.isSuccessful());
        LOGGER.info("URL ready. Proceeding to the test");
        OkHttpClient httpClient = new OkHttpClient();
        RequestBody body = RequestBody.create(MediaType.parse("application/json"), "{\"name\":\"John Smith\", \"age\":33}");
        Request request = new Request.Builder().url(customerUrl).post(body).build();
        try {
            Response response = httpClient.newCall(request).execute();
            ResponseBody b = response.body();
            String json = b.string();
            LOGGER.info("Test: response={}", json);
            Assert.assertNotNull(b);
            Assert.assertEquals(200, response.code());
            Customer c = Json.decodeValue(json, Customer.class);
            this.id = c.getId();
        } catch (IOException e) {
            e.printStackTrace();
        }
    }

    @Test
    public  void test2AccountRoute() {
        LOGGER.info("Route URL: {}", accountUrl);
        istioAssistant.await(accountUrl, r -> r.isSuccessful());
        LOGGER.info("URL ready. Proceeding to the test");
        OkHttpClient httpClient = new OkHttpClient();
        RequestBody body = RequestBody.create(MediaType.parse("application/json"), "{\"number\":\"01234567890\", \"balance\":10000, \"customerId\":\"" + this.id + "\"}");
        Request request = new Request.Builder().url(accountUrl).post(body).build();
        try {
            Response response = httpClient.newCall(request).execute();
            ResponseBody b = response.body();
            String json = b.string();
            LOGGER.info("Test: response={}", json);
            Assert.assertNotNull(b);
            Assert.assertEquals(200, response.code());
        } catch (IOException e) {
            e.printStackTrace();
        }
    }

    @Test
    public void test3GetCustomerWithAccounts() {
        String url = customerUrl + "/" + id;
        LOGGER.info("Calling URL: {}", customerUrl);
        OkHttpClient httpClient = new OkHttpClient();
        Request request = new Request.Builder().url(url).get().build();
        try {
            Response response = httpClient.newCall(request).execute();
            String json = response.body().string();
            LOGGER.info("Test: response={}", json);
            Assert.assertNotNull(response.body());
            Assert.assertEquals(200, response.code());
            Customer c = Json.decodeValue(json, Customer.class);
            Assert.assertTrue(c.getAccounts().isEmpty());
        } catch (IOException e) {
            e.printStackTrace();
        }
    }

}
3. Creating Istio rules
On of the interesting features provided by Istio is an availability of injecting faults to the route rules. we can specify one or more faults to inject while forwarding HTTP requests to the rule’s corresponding request destination. The faults can be either delays or aborts. We can define a percentage level of error using percent field for the both types of fault. In the following Istio resource I have defines 2 seconds delay for every single request sent to account-service.
apiVersion: networking.istio.io/v1alpha3
kind: VirtualService
metadata:
  name: account-service
spec:
  hosts:
    - account-service
  http:
  - fault:
      delay:
        fixedDelay: 2s
        percent: 100
    route:
    - destination:
        host: account-service
        subset: v1
Besides VirtualService we also need to define DestinationRule for account-service. It is really simple – we have just define version label of the target service.
apiVersion: networking.istio.io/v1alpha3
kind: DestinationRule
metadata:
  name: account-service
spec:
  host: account-service
  subsets:
  - name: v1
    labels:
      version: v1
Before running the test we should also modify OpenShift deployment templates of our sample applications. We need to inject some Istio resources into the pods definition using istioctl kube-inject command as shown below.
$ istioctl kube-inject -f deployment.yaml -o customer-deployment-istio.yaml
$ istioctl kube-inject -f account-deployment.yaml -o account-deployment-istio.yaml
Finally, we may rewrite generated files into OpenShift templates. Here’s the fragment of Openshift template containing DeploymentConfig definition for account-service.
kind: Template
apiVersion: v1
metadata:
  name: account-template
objects:
  - kind: DeploymentConfig
    apiVersion: v1
    metadata:
      name: account-service
      labels:
        app: account-service
        name: account-service
        version: v1
    spec:
      template:
        metadata:
          annotations:
            sidecar.istio.io/status: '{"version":"364ad47b562167c46c2d316a42629e370940f3c05a9b99ccfe04d9f2bf5af84d","initContainers":["istio-init"],"containers":["istio-proxy"],"volumes":["istio-envoy","istio-certs"],"imagePullSecrets":null}'
          name: account-service
          labels:
            app: account-service
            name: account-service
            version: v1
        spec:
          containers:
          - env:
            - name: DATABASE_NAME
              valueFrom:
                secretKeyRef:
                  key: database-name
                  name: mongodb
            - name: DATABASE_USER
              valueFrom:
                secretKeyRef:
                  key: database-user
                  name: mongodb
            - name: DATABASE_PASSWORD
              valueFrom:
                secretKeyRef:
                  key: database-password
                  name: mongodb
            image: piomin/account-vertx-service
            name: account-vertx-service
            ports:
            - containerPort: 8095
            resources: {}
          - args:
            - proxy
            - sidecar
            - --configPath
            - /etc/istio/proxy
            - --binaryPath
            - /usr/local/bin/envoy
            - --serviceCluster
            - account-service
            - --drainDuration
            - 45s
            - --parentShutdownDuration
            - 1m0s
            - --discoveryAddress
            - istio-pilot.istio-system:15007
            - --discoveryRefreshDelay
            - 1s
            - --zipkinAddress
            - zipkin.istio-system:9411
            - --connectTimeout
            - 10s
            - --statsdUdpAddress
            - istio-statsd-prom-bridge.istio-system:9125
            - --proxyAdminPort
            - "15000"
            - --controlPlaneAuthPolicy
            - NONE
            env:
            - name: POD_NAME
              valueFrom:
                fieldRef:
                  fieldPath: metadata.name
            - name: POD_NAMESPACE
              valueFrom:
                fieldRef:
                  fieldPath: metadata.namespace
            - name: INSTANCE_IP
              valueFrom:
                fieldRef:
                  fieldPath: status.podIP
            - name: ISTIO_META_POD_NAME
              valueFrom:
                fieldRef:
                  fieldPath: metadata.name
            - name: ISTIO_META_INTERCEPTION_MODE
              value: REDIRECT
            image: gcr.io/istio-release/proxyv2:1.0.1
            imagePullPolicy: IfNotPresent
            name: istio-proxy
            resources:
              requests:
                cpu: 10m
            securityContext:
              readOnlyRootFilesystem: true
              runAsUser: 1337
            volumeMounts:
            - mountPath: /etc/istio/proxy
              name: istio-envoy
            - mountPath: /etc/certs/
              name: istio-certs
              readOnly: true
          initContainers:
          - args:
            - -p
            - "15001"
            - -u
            - "1337"
            - -m
            - REDIRECT
            - -i
            - '*'
            - -x
            - ""
            - -b
            - 8095,
            - -d
            - ""
            image: gcr.io/istio-release/proxy_init:1.0.1
            imagePullPolicy: IfNotPresent
            name: istio-init
            resources: {}
            securityContext:
              capabilities:
                add:
                - NET_ADMIN
          volumes:
          - emptyDir:
              medium: Memory
            name: istio-envoy
          - name: istio-certs
            secret:
              optional: true
              secretName: istio.default
4. Building applications
The sample applications are implemented using Eclipse Vert.x framework. They use Mongo database for storing data. The connection settings are injected into pods using Kubernetes Secrets.
public class MongoVerticle extends AbstractVerticle {

	private static final Logger LOGGER = LoggerFactory.getLogger(MongoVerticle.class);

	@Override
	public void start() throws Exception {
		ConfigStoreOptions envStore = new ConfigStoreOptions()
				.setType("env")
				.setConfig(new JsonObject().put("keys", new JsonArray().add("DATABASE_USER").add("DATABASE_PASSWORD").add("DATABASE_NAME")));
		ConfigRetrieverOptions options = new ConfigRetrieverOptions().addStore(envStore);
		ConfigRetriever retriever = ConfigRetriever.create(vertx, options);
		retriever.getConfig(r -> {
			String user = r.result().getString("DATABASE_USER");
			String password = r.result().getString("DATABASE_PASSWORD");
			String db = r.result().getString("DATABASE_NAME");
			JsonObject config = new JsonObject();
			LOGGER.info("Connecting {} using {}/{}", db, user, password);
			config.put("connection_string", "mongodb://" + user + ":" + password + "@mongodb/" + db);
			final MongoClient client = MongoClient.createShared(vertx, config);
			final CustomerRepository service = new CustomerRepositoryImpl(client);
			ProxyHelper.registerService(CustomerRepository.class, vertx, service, "customer-service");
		});
	}
}
MongoDB should be started on OpenShift before starting any applications, which connect to it. To achieve it we should insert Mongo deployment resource into Arquillian configuration file as env.config.resource.name field.
The configuration of Arquillian Cube is visible below. We will use an existing namespace myproject, which has already granted the required privileges (see Step 1). We also need to pass authentication token of user admin. You can collect it using command oc whoami -t after login to OpenShift cluster.
<extension qualifier="openshift">
	<property name="namespace.use.current">true</property>
	<property name="namespace.use.existing">myproject</property>
	<property name="kubernetes.master">https://192.168.99.100:8443</property>
	<property name="cube.auth.token">TYYccw6pfn7TXtH8bwhCyl2tppp5MBGq7UXenuZ0fZA</property>
	<property name="env.config.resource.name">mongo-deployment.yaml</property>
</extension>
The communication between customer-service and account-service is realized by Vert.x WebClient. We will set read timeout for the client to 1 second. Because Istio injects 2 seconds delay into the route, the communication is going to end with timeout.
public class AccountClient {

	private static final Logger LOGGER = LoggerFactory.getLogger(AccountClient.class);
	private Vertx vertx;

	public AccountClient(Vertx vertx) {
		this.vertx = vertx;
	}

	public AccountClient findCustomerAccounts(String customerId, Handler<AsyncResult<List>> resultHandler) {
		WebClient client = WebClient.create(vertx);
		client.get(8095, "account-service", "/account/customer/" + customerId).timeout(1000).send(res2 -> {
			if (res2.succeeded()) {
				LOGGER.info("Response: {}", res2.result().bodyAsString());
				List accounts = res2.result().bodyAsJsonArray().stream().map(it -> Json.decodeValue(it.toString(), Account.class)).collect(Collectors.toList());
				resultHandler.handle(Future.succeededFuture(accounts));
			} else {
				resultHandler.handle(Future.succeededFuture(new ArrayList()));
			}
		});
		return this;
	}
}
The full code of sample applications is available on GitHub in the repository https://github.com/piomin/sample-vertx-kubernetes/tree/openshift-istio-tests.
5. Running tests
You can the tests during Maven build or just using your IDE. As the first test1CustomerRoute test is executed. It adds new customer and save generated id for two next tests.

The next test is test2AccountRoute. It adds an account for the customer created during previous test.

Finally, the test responsible for verifying communication between microservices is running. It verifies if the list of accounts is empty, what is a result of timeout in communication with account-service.

Testing Microservices: Tools and Frameworks
There are some key challenges around microservices architecture testing that we are facing. The selection of right tools is one of that elements that helps us deal with the issues related to those challenges. First, let’s identify the most important elements involved into the process of microservices testing. These are some of them:
- Teams coordination – with many independent teams managing their own microservices, it becomes very challenging to coordinate the overall process of software development and testing
- Complexity – there are many microservices that communicate to each other. We need to ensure that every one of them is working properly and is resistant to the slow responses or failures from other microservices
- Performance – since there are many independent services it is important to test the whole architecture under traffic close to the production
Let’s discuss some interesting frameworks helping that may help you in testing microservice-based architecture.
Components tests with Hoverfly
Hoverfly simulation mode may be especially useful for building component tests. During component tests we are verifying the whole microservice without communication over network with other microservices or external datastores. The following picture shows how such a test is performed for our sample microservice.

Hoverfly provides simple DSL for creating simulations, and a JUnit integration for using it within JUnit tests. It may orchestrated via JUnit @Rule. We are simulating two services and then overriding Ribbon properties to resolve address of these services by client name. We should also disable communication with Eureka discovery by disabling registration after application boot or fetching list of services for Ribbon client. Hoverfly simulates responses for PUT and GET methods exposed by passenger-management and driver-management microservices. Controller is the main component that implements business logic in our application. It store data using in-memory repository component and communicates with other microservices through @FeignClient interfaces. By testing three methods implemented by the controller we are testing the whole business logic implemented inside trip-management service.
@SpringBootTest(properties = {
        "eureka.client.enabled=false",
        "ribbon.eureka.enable=false",
        "passenger-management.ribbon.listOfServers=passenger-management",
        "driver-management.ribbon.listOfServers=driver-management"
})
@RunWith(SpringRunner.class)
@AutoConfigureMockMvc
@FixMethodOrder(MethodSorters.NAME_ASCENDING)
public class TripComponentTests {

    ObjectMapper mapper = new ObjectMapper();

    @Autowired
    MockMvc mockMvc;

    @ClassRule
    public static HoverflyRule rule = HoverflyRule.inSimulationMode(SimulationSource.dsl(
            HoverflyDsl.service("passenger-management:80")
                    .get(HoverflyMatchers.startsWith("/passengers/login/"))
                    .willReturn(ResponseCreators.success(HttpBodyConverter.jsonWithSingleQuotes("{'id':1,'name':'John Walker'}")))
                    .put(HoverflyMatchers.startsWith("/passengers")).anyBody()
                    .willReturn(ResponseCreators.success(HttpBodyConverter.jsonWithSingleQuotes("{'id':1,'name':'John Walker'}"))),
            HoverflyDsl.service("driver-management:80")
                    .get(HoverflyMatchers.startsWith("/drivers/"))
                    .willReturn(ResponseCreators.success(HttpBodyConverter.jsonWithSingleQuotes("{'id':1,'name':'David Smith','currentLocationX': 15,'currentLocationY':25}")))
                    .put(HoverflyMatchers.startsWith("/drivers")).anyBody()
                    .willReturn(ResponseCreators.success(HttpBodyConverter.jsonWithSingleQuotes("{'id':1,'name':'David Smith','currentLocationX': 15,'currentLocationY':25}")))
    )).printSimulationData();

    @Test
    public void test1CreateNewTrip() throws Exception {
        TripInput ti = new TripInput("test", 10, 20, "walker");
        mockMvc.perform(MockMvcRequestBuilders.post("/trips")
                .contentType(MediaType.APPLICATION_JSON_UTF8)
                .content(mapper.writeValueAsString(ti)))
                .andExpect(MockMvcResultMatchers.status().isOk())
                .andExpect(MockMvcResultMatchers.jsonPath("$.id", Matchers.any(Integer.class)))
                .andExpect(MockMvcResultMatchers.jsonPath("$.status", Matchers.is("NEW")))
                .andExpect(MockMvcResultMatchers.jsonPath("$.driverId", Matchers.any(Integer.class)));
    }

    @Test
    public void test2CancelTrip() throws Exception {
        mockMvc.perform(MockMvcRequestBuilders.put("/trips/cancel/1")
                .contentType(MediaType.APPLICATION_JSON_UTF8)
                .content(mapper.writeValueAsString(new Trip())))
                .andExpect(MockMvcResultMatchers.status().isOk())
                .andExpect(MockMvcResultMatchers.jsonPath("$.id", Matchers.any(Integer.class)))
                .andExpect(MockMvcResultMatchers.jsonPath("$.status", Matchers.is("IN_PROGRESS")))
                .andExpect(MockMvcResultMatchers.jsonPath("$.driverId", Matchers.any(Integer.class)));
    }

    @Test
    public void test3PayTrip() throws Exception {
        mockMvc.perform(MockMvcRequestBuilders.put("/trips/payment/1")
                .contentType(MediaType.APPLICATION_JSON_UTF8)
                .content(mapper.writeValueAsString(new Trip())))
                .andExpect(MockMvcResultMatchers.status().isOk())
                .andExpect(MockMvcResultMatchers.jsonPath("$.id", Matchers.any(Integer.class)))
                .andExpect(MockMvcResultMatchers.jsonPath("$.status", Matchers.is("PAYED")));
    }

}
The tests visible above verify only positive scenarios. What about testing some unexpected behaviour like network delays or server errors? With Hoverfly we can easily simulate such a behaviour and define some negative scenarios. In the following fragment of code I have defined three scenarios. In the first of them target service has been delayed 2 seconds. In order to simulate timeout on the client side I had to change default readTimeout for Ribbon load balancer and then disabled Hystrix circuit breaker for Feign client. The second test simulates HTTP 500 response status from passenger-management service. The last scenario assumes empty response from method responsible for searching the nearest driver.
@SpringBootTest(properties = {
        "eureka.client.enabled=false",
        "ribbon.eureka.enable=false",
        "passenger-management.ribbon.listOfServers=passenger-management",
        "driver-management.ribbon.listOfServers=driver-management",
        "feign.hystrix.enabled=false",
        "ribbon.ReadTimeout=500"
})
@RunWith(SpringRunner.class)
@AutoConfigureMockMvc
public class TripNegativeComponentTests {

    private ObjectMapper mapper = new ObjectMapper();
    @Autowired
    private MockMvc mockMvc;

    @ClassRule
    public static HoverflyRule rule = HoverflyRule.inSimulationMode(SimulationSource.dsl(
            HoverflyDsl.service("passenger-management:80")
                    .get("/passengers/login/test1")
                    .willReturn(ResponseCreators.success(HttpBodyConverter.jsonWithSingleQuotes("{'id':1,'name':'John Smith'}")).withDelay(2000, TimeUnit.MILLISECONDS))
                    .get("/passengers/login/test2")
                    .willReturn(ResponseCreators.success(HttpBodyConverter.jsonWithSingleQuotes("{'id':1,'name':'John Smith'}")))
                    .get("/passengers/login/test3")
                    .willReturn(ResponseCreators.serverError()),
            HoverflyDsl.service("driver-management:80")
                    .get(HoverflyMatchers.startsWith("/drivers/"))
                    .willReturn(ResponseCreators.success().body("{}"))
            ));

    @Test
    public void testCreateTripWithTimeout() throws Exception {
        mockMvc.perform(MockMvcRequestBuilders.post("/trips").contentType(MediaType.APPLICATION_JSON).content(mapper.writeValueAsString(new TripInput("test", 15, 25, "test1"))))
                .andExpect(MockMvcResultMatchers.status().isOk())
                .andExpect(MockMvcResultMatchers.jsonPath("$.id", Matchers.nullValue()))
                .andExpect(MockMvcResultMatchers.jsonPath("$.status", Matchers.is("REJECTED")));
    }

    @Test
    public void testCreateTripWithError() throws Exception {
        mockMvc.perform(MockMvcRequestBuilders.post("/trips").contentType(MediaType.APPLICATION_JSON).content(mapper.writeValueAsString(new TripInput("test", 15, 25, "test3"))))
                .andExpect(MockMvcResultMatchers.status().isOk())
                .andExpect(MockMvcResultMatchers.jsonPath("$.id", Matchers.nullValue()))
                .andExpect(MockMvcResultMatchers.jsonPath("$.status", Matchers.is("REJECTED")));
    }

    @Test
    public void testCreateTripWithNoDrivers() throws Exception {
        mockMvc.perform(MockMvcRequestBuilders.post("/trips").contentType(MediaType.APPLICATION_JSON).content(mapper.writeValueAsString(new TripInput("test", 15, 25, "test2"))))
                .andExpect(MockMvcResultMatchers.status().isOk())
                .andExpect(MockMvcResultMatchers.jsonPath("$.id", Matchers.nullValue()))
                .andExpect(MockMvcResultMatchers.jsonPath("$.status", Matchers.is("REJECTED")));
    }

}
All the timeouts and errors in communication with external microservices are handled by the bean annotated with @ControllerAdvice. In such cases trip-management microservice should not return server error response, but 200 OK with JSON response containing field status equals to REJECTED.
@ControllerAdvice
public class TripControllerErrorHandler extends ResponseEntityExceptionHandler {

    @ExceptionHandler({RetryableException.class, FeignException.class})
    protected ResponseEntity handleFeignTimeout(RuntimeException ex, WebRequest request) {
        Trip trip = new Trip();
        trip.setStatus(TripStatus.REJECTED);
        return handleExceptionInternal(ex, trip, null, HttpStatus.OK, request);
    }

}
Contract tests with Pact
The next type of test strategy usually implemented for microservices-based architecture is consumer-driven contract testing. In fact, there are some tools especially dedicated for such type of tests. One of them is Pact. Contract testing is a way to ensure that services can communicate with each other without implementing integration tests. A contract is signed between two sides of communication: consumer and provider. Pact assumes that contract code is generated and published on the consumer side, and than verified by the provider.
Pact provides tool that can store and share the contracts between consumers and providers. It is called Pact Broker. It exposes a simple RESTful API for publishing and retrieving pacts, and embedded web dashboard for navigating the API. We can easily run Pact Broker on the local machine using its Docker image.
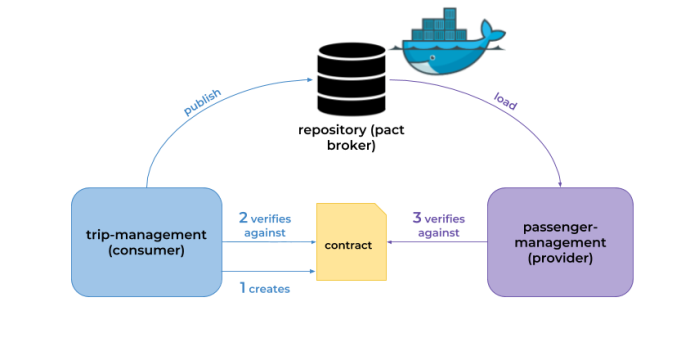
We will begin from running Pact Broker. Pact Broker requires running instance of postgresql, so first we have to launch it using Docker image, and then link our broker container with that container.
docker run -d --name postgres -p 5432:5432 -e POSTGRES_USER=oauth -e POSTGRES_PASSWORD=oauth123 -e POSTGRES_DB=oauth postgres
docker run -d --name pact-broker --link postgres:postgres -e PACT_BROKER_DATABASE_USERNAME=oauth -e PACT_BROKER_DATABASE_PASSWORD=oauth123 -e PACT_BROKER_DATABASE_HOST=postgres -e PACT_BROKER_DATABASE_NAME=oauth -p 9080:80 dius/pact-broker
The next step is to implement contract tests on the consumer side. We will use JVM implementation of Pact library for that. It provides PactProviderRuleMk2 object responsible for creating stubs of the provider service. We should annotate it with JUnit @Rule. Ribbon will forward all requests to passenger-management to the stub address – in that case localhost:8180. Pact JVM supports annotations and provides DSL for building test scenarios. Test method responsible for generating contract data should be annotated with @Pact. It is important to set fields state and provider, because then generated contract would be verified on the provider side using these names. Generated pacts are verified inside the same test class by the methods annotated with @PactVerification. Field fragment points to the name of the method responsible for generating pact inside the same test class. The contract is tested using PassengerManagementClient @FeignClient.
@RunWith(SpringRunner.class)
@SpringBootTest(properties = {
        "driver-management.ribbon.listOfServers=localhost:8190",
        "passenger-management.ribbon.listOfServers=localhost:8180",
        "ribbon.eureka.enabled=false",
        "eureka.client.enabled=false",
        "ribbon.ReadTimeout=5000"
})
public class PassengerManagementContractTests {

    @Rule
    public PactProviderRuleMk2 stubProvider = new PactProviderRuleMk2("passengerManagementProvider", "localhost", 8180, this);
    @Autowired
    private PassengerManagementClient passengerManagementClient;

    @Pact(state = "get-passenger", provider = "passengerManagementProvider", consumer = "passengerManagementClient")
    public RequestResponsePact callGetPassenger(PactDslWithProvider builder) {
        DslPart body = new PactDslJsonBody().integerType("id").stringType("name").numberType("balance").close();
        return builder.given("get-passenger").uponReceiving("test-get-passenger")
                .path("/passengers/login/test").method("GET").willRespondWith().status(200).body(body).toPact();
    }

    @Pact(state = "update-passenger", provider = "passengerManagementProvider", consumer = "passengerManagementClient")
    public RequestResponsePact callUpdatePassenger(PactDslWithProvider builder) {
        return builder.given("update-passenger").uponReceiving("test-update-passenger")
                .path("/passengers").method("PUT").bodyWithSingleQuotes("{'id':1,'amount':1000}", "application/json").willRespondWith().status(200)
                .bodyWithSingleQuotes("{'id':1,'name':'Adam Smith','balance':5000}", "application/json").toPact();
    }

    @Test
    @PactVerification(fragment = "callGetPassenger")
    public void verifyGetPassengerPact() {
        Passenger passenger = passengerManagementClient.getPassenger("test");
        Assert.assertNotNull(passenger);
        Assert.assertNotNull(passenger.getId());
    }

    @Test
    @PactVerification(fragment = "callUpdatePassenger")
    public void verifyUpdatePassengerPact() {
        Passenger passenger = passengerManagementClient.updatePassenger(new PassengerInput(1L, 1000));
        Assert.assertNotNull(passenger);
        Assert.assertNotNull(passenger.getId());
    }

}
Just running the tests is not enough. We also have to publish pacts generated during tests to Pact Broker. In order to achieve it we have to include the following Maven plugin to our pom.xml and then execute command mvn clean install pact:publish.
<plugin>
	<groupId>au.com.dius</groupId>
	<artifactId>pact-jvm-provider-maven_2.12</artifactId>
	<version>3.5.21</version>
	<configuration>
		<pactBrokerUrl>http://192.168.99.100:9080</pactBrokerUrl>
	</configuration>
</plugin>
Pact provides support for Spring on the provider side. Thanks to that we may use MockMvc controllers or inject properties from application.yml into the test class. Here’s dependency declaration that has to be included to our pom.xml
<dependency>
	<groupId>au.com.dius</groupId>
	<artifactId>pact-jvm-provider-spring_2.12</artifactId>
	<version>3.5.21</version>
	<scope>test</scope>
</dependency>
Now , the contract is being verified on the provider side. We need to pass provider name inside @Provider annotation and name of states for every verification test inside @State. These values has been during the tests on the consumer side inside @Pact annotation (fields state and provider).
@RunWith(SpringRestPactRunner.class)
@Provider("passengerManagementProvider")
@PactBroker
public class PassengerControllerContractTests {

    @InjectMocks
    private PassengerController controller = new PassengerController();
    @Mock
    private PassengerRepository repository;
    @TestTarget
    public final MockMvcTarget target = new MockMvcTarget();

    @Before
    public void before() {
        MockitoAnnotations.initMocks(this);
        target.setControllers(controller);
    }

    @State("get-passenger")
    public void testGetPassenger() {
        target.setRunTimes(3);
        Mockito.when(repository.findByLogin(Mockito.anyString()))
                .thenReturn(new Passenger(1L, "Adam Smith", "test", 4000))
                .thenReturn(new Passenger(3L, "Tom Hamilton", "hamilton", 400000))
                .thenReturn(new Passenger(5L, "John Scott", "scott", 222));
    }

    @State("update-passenger")
    public void testUpdatePassenger() {
        target.setRunTimes(1);
        Passenger passenger = new Passenger(1L, "Adam Smith", "test", 4000);
        Mockito.when(repository.findById(1L)).thenReturn(passenger);
        Mockito.when(repository.update(Mockito.any(Passenger.class)))
                .thenReturn(new Passenger(1L, "Adam Smith", "test", 5000));
    }
}
Pact Broker host and port are injected from application.yml file.
pactbroker:
  host: "192.168.99.100"
  port: "8090"
Performance tests with Gatling
An important step of testing microservices before deploying them on production is performance testing. One of interesting tools in this area is Gatling. It is highly capable load testing tool written in Scala. It means that we also have to use Scala DSL in order to build test scenarios. Let’s begin from adding required library to pom.xml file.
<dependency>
	<groupId>io.gatling.highcharts</groupId>
	<artifactId>gatling-charts-highcharts</artifactId>
	<version>2.3.1</version>
</dependency>
Now, we may proceed to the test. In the scenario visible above we are testing two endpoints exposed by trip-management: POST /trips and PUT /trips/payment/${tripId}. In fact, this scenario verifies the whole functionality of our sample system, where we are setting up trip and then pay for it after finish.
Every test class using Gatling needs to extend Simulation class. We are defining scenario using scenario method and then setting its name. We may define multiple executions inside single scenario. After every execution of POST /trips method test save generated id returned by the service. Then it inserts that id into the URL used for calling method PUT /trips/payment/${tripId}. Every single test expects response with 200 OK status.
Gatling provides two interesting features, which are worth mentioning. You can see how they are used in the following performance test. First of them is feeder. It is used for polling records and injecting their content into the test. Feed rPassengers selects one of five defined logins randomly. The final test result may be verified using Assertions API. It is responsible for verifying global statistics like response time or number of failed requests matches expectations for a whole simulation. In the scenario visible below the criterium is max response time that needs to be lower 100 milliseconds.
class CreateAndPayTripPerformanceTest extends Simulation {

  val rPassengers = Iterator.continually(Map("passenger" -> List("walker","smith","hamilton","scott","holmes").lift(Random.nextInt(5)).get))

  val scn = scenario("CreateAndPayTrip").feed(rPassengers).repeat(100, "n") {
    exec(http("CreateTrip-API")
      .post("http://localhost:8090/trips")
      .header("Content-Type", "application/json")
      .body(StringBody("""{"destination":"test${n}","locationX":${n},"locationY":${n},"username":"${passenger}"}"""))
      .check(status.is(200), jsonPath("$.id").saveAs("tripId"))
    ).exec(http("PayTrip-API")
      .put("http://localhost:8090/trips/payment/${tripId}")
      .header("Content-Type", "application/json")
      .check(status.is(200))
    )
  }

  setUp(scn.inject(atOnceUsers(20))).maxDuration(FiniteDuration.apply(5, TimeUnit.MINUTES))
    .assertions(global.responseTime.max.lt(100))

}
In order to run Gatling performance test you need to include the following Maven plugin to your pom.xml. You may run a single scenario or run multiple scenarios. After including the plugin you only need to execute command mvn clean gatling:test.
<plugin>
	<groupId>io.gatling</groupId>
	<artifactId>gatling-maven-plugin</artifactId>
	<version>2.2.4</version>
	<configuration>
		<simulationClass>pl.piomin.performance.tests.CreateAndPayTripPerformanceTest</simulationClass>
	</configuration>
</plugin>
Here are some diagrams illustrating result of performance tests for our microservice. Because maximum response time has been greater than set inside assertion (100ms), the test has failed.
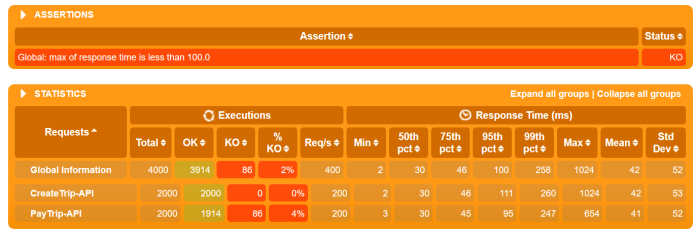
and …
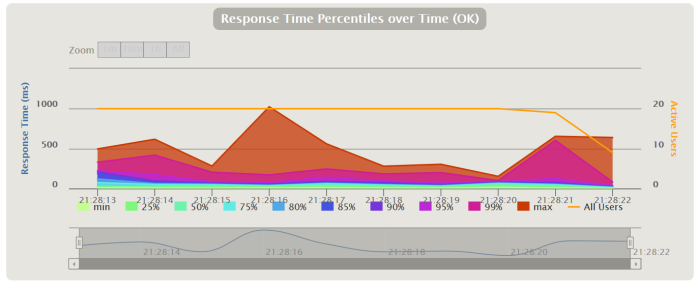
Summary
The right selection of tools is not the most important element phase of microservices testing. However, right tools can help you facing the key challenges related to it. Hoverfly allows to create full component tests that verifies if your microservice is able to handle delays or error from downstream services. Pact helps you to organize team by sharing and verifying contracts between independently developed microservices. Finally, Gatling can help you implementing load tests for selected scenarios, in order to verify an end-to-end performance of your system.
The source code used as a demo for this article is available on GitHub: https://github.com/piomin/sample-testing-microservices.git. If you find this article interesting for you you may be also interested in some other articles related to this subject:
