One of the reason you would prefer OpenShift instead of Kubernetes is the simplicity of running new applications. When working with plain Kubernetes you need to provide already built image together with the set of descriptor templates used for deploying it. OpenShift introduces Source-2-Image feature used for building reproducible Docker images from application source code. With S2I you don’t have provide any Kubernetes YAML templates or build Docker image by yourself, OpenShift will do it for you. Let’s see how it works. The best way to test it locally is via Minishift. But the first step is to prepare sample applications source code. Continue reading “Running Java Microservices on OpenShift using Source-2-Image”
Tag: MongoDB

Reactive Microservices with Spring WebFlux and Spring Cloud
I have already described Spring reactive support about one year ago in the article Reactive microservices with Spring 5. At that time project Spring WebFlux has been under active development, and now after official release of Spring 5 it is worth to take a look on the current version of it. Moreover, we will try to put our reactive microservices inside Spring Cloud ecosystem, which contains such the elements like service discovery with Eureka, load balancing with Spring Cloud Commons @LoadBalanced, and API gateway using Spring Cloud Gateway (also based on WebFlux and Netty). We will also check out Spring reactive support for NoSQL databases by the example of Spring Data Reactive Mongo project.
Here’s the figure that illustrates an architecture of our sample system consisting of two microservices, discovery server, gateway and MongoDB databases. The source code is as usual available on GitHub in sample-spring-cloud-webflux repository.
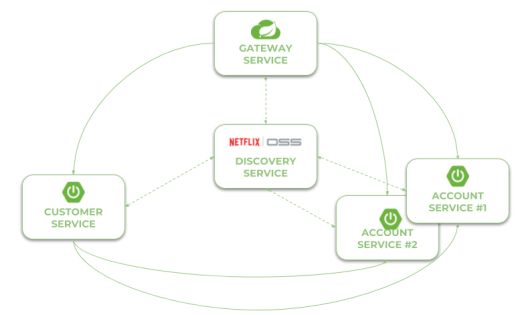
Let’s describe the further steps on the way to create the system illustrated above.
Step 1. Building reactive application using Spring WebFlux
To enable library Spring WebFlux for the project we should include starter spring-boot-starter-webflux to the dependencies. It includes some dependent libraries like Reactor or Netty server.
<dependency>
	<groupId>org.springframework.boot</groupId>
	<artifactId>spring-boot-starter-webflux</artifactId>
</dependency>
REST controller looks pretty similar to the controller defined for synchronous web services. The only difference is in type of returned objects. Instead of single object we return instance of class Mono, and instead of list we return instance of class Flux. Thanks to Spring Data Reactive Mongo we don’t have to do nothing more that call the needed method on the repository bean.
@RestController
public class AccountController {

	private static final Logger LOGGER = LoggerFactory.getLogger(AccountController.class);

	@Autowired
	private AccountRepository repository;

	@GetMapping("/customer/{customer}")
	public Flux findByCustomer(@PathVariable("customer") String customerId) {
		LOGGER.info("findByCustomer: customerId={}", customerId);
		return repository.findByCustomerId(customerId);
	}

	@GetMapping
	public Flux findAll() {
		LOGGER.info("findAll");
		return repository.findAll();
	}

	@GetMapping("/{id}")
	public Mono findById(@PathVariable("id") String id) {
		LOGGER.info("findById: id={}", id);
		return repository.findById(id);
	}

	@PostMapping
	public Mono create(@RequestBody Account account) {
		LOGGER.info("create: {}", account);
		return repository.save(account);
	}

}
Step 2. Integrate an application with database using Spring Data Reactive Mongo
The implementation of integration between application and database is also very simple. First, we need to include starter spring-boot-starter-data-mongodb-reactive to the project dependencies.
<dependency>
	<groupId>org.springframework.boot</groupId>
	<artifactId>spring-boot-starter-data-mongodb-reactive</artifactId>
</dependency>
The support for reactive Mongo repositories is automatically enabled after including the starter. The next step is to declare entity with ORM mappings. The following class is also returned as reponse by AccountController.
@Document
public class Account {

	@Id
	private String id;
	private String number;
	private String customerId;
	private int amount;

	...

}
Finally, we may create repository interface that extends ReactiveCrudRepository. It follows the patterns implemented by Spring Data JPA and provides some basic methods for CRUD operations. It also allows to define methods with names, which are automatically mapped to queries. The only difference in comparison with standard Spring Data JPA repositories is in method signatures. The objects are wrapped by Mono and Flux.
public interface AccountRepository extends ReactiveCrudRepository {

	Flux findByCustomerId(String customerId);

}
In this example I used Docker container for running MongoDB locally. Because I run Docker on Windows using Docker Toolkit the default address of Docker machine is 192.168.99.100. Here’s the configuration of data source in application.yml file.
spring:
  data:
    mongodb:
      uri: mongodb://192.168.99.100/test
Step 3. Enabling service discovery using Eureka
Integration with Spring Cloud Eureka is pretty the same as for synchronous REST microservices. To enable discovery client we should first include starter spring-cloud-starter-netflix-eureka-client to the project dependencies.
<dependency>
	<groupId>org.springframework.cloud</groupId>
	<artifactId>spring-cloud-starter-netflix-eureka-client</artifactId>
</dependency>
Then we have to enable it using @EnableDiscoveryClient annotation.
@SpringBootApplication
@EnableDiscoveryClient
public class AccountApplication {

	public static void main(String[] args) {
		SpringApplication.run(AccountApplication.class, args);
	}

}
Microservice will automatically register itself in Eureka. Of cource, we may run more than instance of every service. Here’s the screen illustrating Eureka Dashboard (http://localhost:8761) after running two instances of account-service and a single instance of customer-service. I would not like to go into the details of running application with embedded Eureka server. You may refer to my previous article for details: Quick Guide to Microservices with Spring Boot 2.0, Eureka and Spring Cloud. Eureka server is available as discovery-service module.

Step 4. Inter-service communication between reactive microservices with WebClient
An inter-service communication is realized by the WebClient from Spring WebFlux project. The same as for RestTemplate you should annotate it with Spring Cloud Commons @LoadBalanced . It enables integration with service discovery and load balancing using Netflix OSS Ribbon client. So, the first step is to declare a client builder bean with @LoadBalanced annotation.
@Bean
@LoadBalanced
public WebClient.Builder loadBalancedWebClientBuilder() {
	return WebClient.builder();
}
Then we may inject WebClientBuilder into the REST controller. Communication with account-service is implemented inside GET /{id}/with-accounts , where first we are searching for customer entity using reactive Spring Data repository. It returns object Mono , while the WebClient returns Flux . Now, our main goal is to merge those to publishers and return single Mono object with the list of accounts taken from Flux without blocking the stream. The following fragment of code illustrates how I used WebClient to communicate with other microservice, and then merge the response and result from repository to single Mono object. This merge may probably be done in more “ellegant” way, so fell free to create push request with your proposal.
@Autowired
private WebClient.Builder webClientBuilder;

@GetMapping("/{id}/with-accounts")
public Mono findByIdWithAccounts(@PathVariable("id") String id) {
	LOGGER.info("findByIdWithAccounts: id={}", id);
	Flux accounts = webClientBuilder.build().get().uri("http://account-service/customer/{customer}", id).retrieve().bodyToFlux(Account.class);
	return accounts
			.collectList()
			.map(a -> new Customer(a))
			.mergeWith(repository.findById(id))
			.collectList()
			.map(CustomerMapper::map);
}
Step 5. Building API gateway using Spring Cloud Gateway
Spring Cloud Gateway is one of the newest Spring Cloud project. It is built on top of Spring WebFlux, and thanks to that we may use it as a gateway to our sample system based on reactive microservices. Similar to Spring WebFlux applications it is ran on embedded Netty server. To enable it for Spring Boot application just include the following dependency to your project.
<dependency>
	<groupId>org.springframework.cloud</groupId>
	<artifactId>spring-cloud-starter-gateway</artifactId>
</dependency>
We should also enable discovery client in order to allow the gateway to fetch list of registered microservices. However, there is no need to register gateway’s application in Eureka. To disable registration you may set property eureka.client.registerWithEureka to false inside application.yml file.
@SpringBootApplication
@EnableDiscoveryClient
public class GatewayApplication {

	public static void main(String[] args) {
		SpringApplication.run(GatewayApplication.class, args);
	}

}
By default, Spring Cloud Gateway does not enable integration with service discovery. To enable it we should set property spring.cloud.gateway.discovery.locator.enabled to true. Now, the last thing that should be done is the configuration of the routes. Spring Cloud Gateway provides two types of components that may be configured inside routes: filters and predicates. Predicates are used for matching HTTP requests with route, while filters can be used to modify requests and responses before or after sending the downstream request. Here’s the full configuration of gateway. It enables service discovery location, and defines two routes based on entries in service registry. We use the Path Route Predicate factory for matching the incoming requests, and the RewritePath GatewayFilter factory for modifying the requested path to adapt it to the format exposed by the downstream services (endpoints are exposed under path /, while gateway expose them under paths /account and /customer).
spring:
  cloud:
    gateway:
      discovery:
        locator:
          enabled: true
      routes:
      - id: account-service
        uri: lb://account-service
        predicates:
        - Path=/account/**
        filters:
        - RewritePath=/account/(?.*), /$\{path}
      - id: customer-service
        uri: lb://customer-service
        predicates:
        - Path=/customer/**
        filters:
        - RewritePath=/customer/(?.*), /$\{path}
Step 6. Testing the sample system
Before making some tests let’s just recap our sample system. We have two microservices account-service, customer-service that use MongoDB as a database. Microservice customer-service calls endpoint GET /customer/{customer} exposed by account-service. URL of account-service is taken from Eureka. The whole sample system is hidden behind gateway, which is available under address localhost:8090.
Now, the first step is to run MongoDB on Docker container. After executing the following command Mongo is available under address 192.168.99.100:27017.
$ docker run -d --name mongo -p 27017:27017 mongo
Then we may proceeed to running discovery-service. Eureka is available under its default address localhost:8761. You may run it using your IDE or just by executing command java -jar target/discovery-service-1.0-SNAPHOT.jar. The same rule applies to our sample microservices. However, account-service needs to be multiplied in two instances, so you need to override default HTTP port when running second instance using -Dserver.port VM argument, for example java -jar -Dserver.port=2223 target/account-service-1.0-SNAPSHOT.jar. Finally, after running gateway-service we may add some test data.
$ curl --header "Content-Type: application/json" --request POST --data '{"firstName": "John","lastName": "Scott","age": 30}' http://localhost:8090/customer
{"id": "5aec1debfa656c0b38b952b4","firstName": "John","lastName": "Scott","age": 30,"accounts": null}
$ curl --header "Content-Type: application/json" --request POST --data '{"number": "1234567890","amount": 5000,"customerId": "5aec1debfa656c0b38b952b4"}' http://localhost:8090/account
{"id": "5aec1e86fa656c11d4c655fb","number": "1234567892","customerId": "5aec1debfa656c0b38b952b4","amount": 5000}
$ curl --header "Content-Type: application/json" --request POST --data '{"number": "1234567891","amount": 12000,"customerId": "5aec1debfa656c0b38b952b4"}' http://localhost:8090/account
{"id": "5aec1e91fa656c11d4c655fc","number": "1234567892","customerId": "5aec1debfa656c0b38b952b4","amount": 12000}
$ curl --header "Content-Type: application/json" --request POST --data '{"number": "1234567892","amount": 2000,"customerId": "5aec1debfa656c0b38b952b4"}' http://localhost:8090/account
{"id": "5aec1e99fa656c11d4c655fd","number": "1234567892","customerId": "5aec1debfa656c0b38b952b4","amount": 2000}
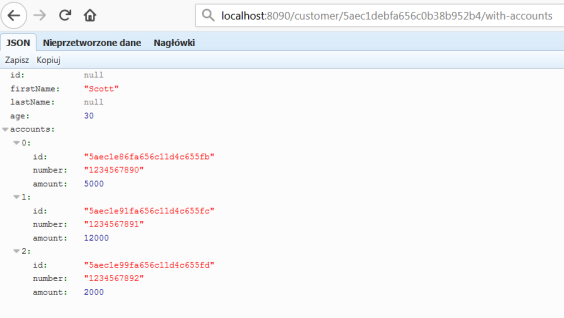
To test inter-service communication just call endpoint GET /customer/{id}/with-accounts on gateway-service. It forward the request to customer-service, and then customer-service calls enpoint exposed by account-service using reactive WebClient. The result is visible below.
Conclusion
Since Spring 5 and Spring Boot 2.0 there is a full range of available ways to build microservices-based architecture. We can build standard synchronous system using one-to-one communication with Spring Cloud Netflix project, messaging microservices based on message broker and publish/subscribe communication model with Spring Cloud Stream, and finally asynchronous, reactive microservices with Spring WebFlux. The main goal of this article is to show you how to use Spring WebFlux together with Spring Cloud projects in order to provide such a mechanisms like service discovery, load balancing or API gateway for reactive microservices build on top of Spring Boot. Before Spring 5 the lack of support for reactive microservices was one of the drawback of Spring framework, but now with Spring WebFlux it is no longer the case. Not only that, we may leverage Spring reactive support for the most popular NoSQL databases like MongoDB or Cassandra, and easily place our reactive microservices inside one system together with synchronous REST microservices.

Asynchronous Microservices with Vert.x
Preface
I must admit that as soon as I saw Vert.x documentation I liked this concept. This may have happened because I had previously use with very similar framework which I used to create simple and lightweight applications exposing REST APIs – Node.js. It is really fine framework, but has one big disadvantage for me – it is JavaScript runtime. What is worth mentioning Vert.x is polyglot, it supports all the most popular JVM based languages like Java, Scala, Groovy, Kotlin and even JavaScript. These are not all of its advantages. It’s lightweight, fast and modular. I was pleasantly surprised when I added the main Vert.x dependencies to my pom.xml and there was not downloaded many of other dependencies, as is often the case when using Spring Boot framework.
Well, I will not elaborate about the advantages and key concepts of this toolkit. I think you can read more about it in other articles. The most important thing for us is that using Vert.x we can can create high performance and asynchronous microservices based on Netty framework. In addition, we can use standardized microservices mechanisms such as service discovery, configuration server or circuit breaking.
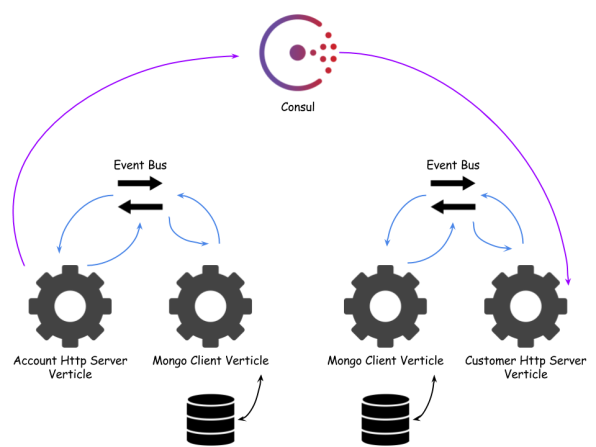
Sample application source code is available on Github. It consists of two modules account-vertx-service and customer-vertx-service. Customer service retrieves data from Consul registry and invokes acccount service API. Architecture of the sample solution is visible on the figure below.
Building services
To be able to create HTTP service exposing REST API we need to include the following dependency into pom.xml.
<dependency>
	<groupId>io.vertx</groupId>
	<artifactId>vertx-web</artifactId>
	<version>${vertx.version}</version>
</dependency>
Here’s the fragment from account service where I defined all API methods. The first step (1) was to declare Router which is one of the core concepts of Vert.x-Web. A router takes an HTTP request, finds the first matching route for that request, and passes the request to that route. The next step (2), (3) is to add some handlers, for example BodyHandler, which allows you to retrieve request bodies and has been added to POST method. Then we can begin to define API methods (4), (5), (6), (7), (8). And finally (9) we are starting HTTP server on the port retrieved from configuration.
Router router = Router.router(vertx); // (1)
router.route("/account/*").handler(ResponseContentTypeHandler.create()); // (2)
router.route(HttpMethod.POST, "/account").handler(BodyHandler.create()); // (3)
router.get("/account/:id").produces("application/json").handler(rc -> { // (4)
	repository.findById(rc.request().getParam("id"), res -> {
		Account account = res.result();
		LOGGER.info("Found: {}", account);
		rc.response().end(account.toString());
	});
});
router.get("/account/customer/:customer").produces("application/json").handler(rc -> { // (5)
	repository.findByCustomer(rc.request().getParam("customer"), res -> {
		List<Account> accounts = res.result();
		LOGGER.info("Found: {}", accounts);
		rc.response().end(Json.encodePrettily(accounts));
	});
});
router.get("/account").produces("application/json").handler(rc -> { // (6)
	repository.findAll(res -> {
		List<Account> accounts = res.result();
		LOGGER.info("Found all: {}", accounts);
		rc.response().end(Json.encodePrettily(accounts));
	});
});
router.post("/account").produces("application/json").handler(rc -> { // (7)
	Account a = Json.decodeValue(rc.getBodyAsString(), Account.class);
	repository.save(a, res -> {
		Account account = res.result();
		LOGGER.info("Created: {}", account);
		rc.response().end(account.toString());
	});
});
router.delete("/account/:id").handler(rc -> { // (8)
	repository.remove(rc.request().getParam("id"), res -> {
		LOGGER.info("Removed: {}", rc.request().getParam("id"));
		rc.response().setStatusCode(200);
	});
});
...
vertx.createHttpServer().requestHandler(router::accept).listen(conf.result().getInteger("port")); // (9)
All API methods uses repository object to communicate with datasource. In this case I decided to use Mongo. Vert.x has a module for interacting with that database, we need to include as new dependency.
<dependency>
	<groupId>io.vertx</groupId>
	<artifactId>vertx-mongo-client</artifactId>
	<version>${vertx.version}</version>
</dependency>
Mongo client, same as all other Vert.x modules, works asynchronously. That’s why we need to use AsyncResult Handler to pass result from repository object. To be able to pass custom object as AsyncResult we have to annotate it with @DataObject and add toJson method.
public AccountRepositoryImpl(final MongoClient client) {
	this.client = client;
}

@Override
public AccountRepository save(Account account, Handler<AsyncResult<Account>> resultHandler) {
	JsonObject json = JsonObject.mapFrom(account);
	client.save(Account.DB_TABLE, json, res -> {
		if (res.succeeded()) {
			LOGGER.info("Account created: {}", res.result());
			account.setId(res.result());
			resultHandler.handle(Future.succeededFuture(account));
		} else {
			LOGGER.error("Account not created", res.cause());
			resultHandler.handle(Future.failedFuture(res.cause()));
		}
	});
	return this;
}

@Override
public AccountRepository findAll(Handler<AsyncResult<List<Account>>> resultHandler) {
	client.find(Account.DB_TABLE, new JsonObject(), res -> {
		if (res.succeeded()) {
			List<Account> accounts = res.result().stream().map(it -> new Account(it.getString("_id"), it.getString("number"), it.getInteger("balance"), it.getString("customerId"))).collect(Collectors.toList());
			resultHandler.handle(Future.succeededFuture(accounts));
		} else {
			LOGGER.error("Account not found", res.cause());
			resultHandler.handle(Future.failedFuture(res.cause()));
		}
	});
	return this;
}
Here’s Account model class.
@DataObject
public class Account {

	public static final String DB_TABLE = "account";

	private String id;
	private String number;
	private int balance;
	private String customerId;

	public Account() {

	}

	public Account(String id, String number, int balance, String customerId) {
		this.id = id;
		this.number = number;
		this.balance = balance;
		this.customerId = customerId;
	}

	public Account(JsonObject json) {
		this.id = json.getString("id");
		this.number = json.getString("number");
		this.balance = json.getInteger("balance");
		this.customerId = json.getString("customerId");
	}

	public String getId() {
		return id;
	}

	public void setId(String id) {
		this.id = id;
	}

	public String getNumber() {
		return number;
	}

	public void setNumber(String number) {
		this.number = number;
	}

	public int getBalance() {
		return balance;
	}

	public void setBalance(int balance) {
		this.balance = balance;
	}

	public String getCustomerId() {
		return customerId;
	}

	public void setCustomerId(String customerId) {
		this.customerId = customerId;
	}

	public JsonObject toJson() {
		return JsonObject.mapFrom(this);
	}

	@Override
	public String toString() {
		return Json.encodePrettily(this);
	}

}
Verticles
It is worth to mention a few words about running an application written in Vert.x. It is based on verticles. Verticles are chunks of code that get deployed and run by Vert.x. A Vert.x instance maintains N event loop threads by default. When creating a verticle we have to extend abstract class AbstractVerticle.
public class AccountServer extends AbstractVerticle {

	@Override
	public void start() throws Exception {
		...
	}
}
I created two verticles per microservice. First for HTTP server and second for communication with Mongo. Here’s main application method where I’m deploying verticles.
public static void main(String[] args) throws Exception {
	Vertx vertx = Vertx.vertx();
	vertx.deployVerticle(new MongoVerticle());
	vertx.deployVerticle(new AccountServer());
}
Well, now we should obtain the reference inside AccountServer verticle to the service running on MongoVerticle. To achieve it we have to generate proxy classes using vertx-codegen module.
<dependency>
	<groupId>io.vertx</groupId>
	<artifactId>vertx-service-proxy</artifactId>
	<version>${vertx.version}</version>
</dependency>
<dependency>
	<groupId>io.vertx</groupId>
	<artifactId>vertx-codegen</artifactId>
	<version>${vertx.version}</version>
	<scope>provided</scope>
</dependency>
First, annotate repository interface with @ProxyGen ad all public methods with @Fluent.
@ProxyGen
public interface AccountRepository {

	@Fluent
	AccountRepository save(Account account, Handler<AsyncResult<Account>> resultHandler);

	@Fluent
	AccountRepository findAll(Handler<AsyncResult<List<Account>>> resultHandler);

	@Fluent
	AccountRepository findById(String id, Handler<AsyncResult<Account>> resultHandler);

	@Fluent
	AccountRepository findByCustomer(String customerId, Handler<AsyncResult<List<Account>>> resultHandler);

	@Fluent
	AccountRepository remove(String id, Handler<AsyncResult<Void>> resultHandler);

	static AccountRepository createProxy(Vertx vertx, String address) {
		return new AccountRepositoryVertxEBProxy(vertx, address);
	}

	static AccountRepository create(MongoClient client) {
		return new AccountRepositoryImpl(client);
	}

}
Generator needs additional configuration inside pom.xml file. After running command mvn clean install on the parent project all generated classes should be available under src/main/generated directory for every microservice module.
<plugin>
	<groupId>org.apache.maven.plugins</groupId>
	<artifactId>maven-compiler-plugin</artifactId>
	<version>3.6.2</version>
	<configuration>
		<encoding>${project.build.sourceEncoding}</encoding>
		<source>${java.version}</source>
		<target>${java.version}</target>
		<useIncrementalCompilation>false</useIncrementalCompilation>
		<annotationProcessors>		<annotationProcessor>io.vertx.codegen.CodeGenProcessor</annotationProcessor>
		</annotationProcessors>
		<generatedSourcesDirectory>${project.basedir}/src/main/generated</generatedSourcesDirectory>
		<compilerArgs>
			<arg>-AoutputDirectory=${project.basedir}/src/main</arg>
		</compilerArgs>
	</configuration>
</plugin>
Now we are able to obtain AccountRepository reference by calling createProxy with account-service name.
AccountRepository repository = AccountRepository.createProxy(vertx, "account-service");
Service Discovery
To use the Vert.x service discovery, we have to add the following dependencies into pom.xml. In the first of them there are mechanisms for built-in Vert.x discovery, which is rather not usable if we would like to invoke microservices running on different hosts. Fortunately, there are also available some additional bridges, for example Consul bridge.
<dependency>
	<groupId>io.vertx</groupId>
	<artifactId>vertx-service-discovery</artifactId>
	<version>${vertx.version}</version>
</dependency>
<dependency>
	<groupId>io.vertx</groupId>
	<artifactId>vertx-service-discovery-bridge-consul</artifactId>
	<version>${vertx.version}</version>
</dependency>
Great, we only have to declare service discovery and register service importer. Now, we can retrieve configuration from Consul, but I assume we also would like to register our service. Unfortunately, problems start here… Like the toolkit authors say It (Vert.x) does not export to Consul and does not support service modification. Maybe somebody will explain me why this library can not also export data to Consul – I just do not understand it. I had the same problem with Apache Camel some months ago and I will use the same solution I developed that time. Fortunately, Consul has simple API for service registration and deregistration. To use it in our appplication we need to include Vert.x HTTP client to our dependencies.
<dependency>
	<groupId>io.vertx</groupId>
	<artifactId>vertx-web-client</artifactId>
	<version>${vertx.version}</version>
</dependency>
Then using declared WebClient while starting application we can register service by invoking Consul PUT method.
WebClient client = WebClient.create(vertx);
...
JsonObject json = new JsonObject().put("ID", "account-service-1").put("Name", "account-service").put("Address", "127.0.0.1").put("Port", 2222).put("Tags", new 		JsonArray().add("http-endpoint"));
client.put(discoveryConfig.getInteger("port"), discoveryConfig.getString("host"), "/v1/agent/service/register").sendJsonObject(json, res -> {
	LOGGER.info("Consul registration status: {}", res.result().statusCode());
});
Once the account-service have registered itself on discovery server we can invoke it from another microservice – in this case from customer-service. We only have to create ServiceDiscovery object and register Consul service importer.
ServiceDiscovery discovery = ServiceDiscovery.create(vertx);
...
discovery.registerServiceImporter(new ConsulServiceImporter(), new JsonObject().put("host", discoveryConfig.getString("host")).put("port", discoveryConfig.getInteger("port")).put("scan-period", 2000));
Here’s AccountClient fragment, which is responsile for invoking GET /account/customer/{customerId} from account-service. It obtains service reference from discovery object and cast it to WebClient instance. I don’t know if you have noticed that apart from the standard fields such as ID, Name or Port, I also set the Tags field to the value of the type of service that we register. In this case it will be an http-endpoint. Whenever Vert.x reads data from Consul, it will be able to automatically assign a service reference to WebClient object.
public AccountClient findCustomerAccounts(String customerId, Handler<AsyncResult<List<Account>>> resultHandler) {
	discovery.getRecord(r -> r.getName().equals("account-service"), res -> {
		LOGGER.info("Result: {}", res.result().getType());
		ServiceReference ref = discovery.getReference(res.result());
		WebClient client = ref.getAs(WebClient.class);
		client.get("/account/customer/" + customerId).send(res2 -> {
			LOGGER.info("Response: {}", res2.result().bodyAsString());
			List<Account> accounts = res2.result().bodyAsJsonArray().stream().map(it -> Json.decodeValue(it.toString(), Account.class)).collect(Collectors.toList());
			resultHandler.handle(Future.succeededFuture(accounts));
		});
	});
	return this;
}
Config
For configuration management within the application Vert.x Config module is responsible.
<dependency>
	<groupId>io.vertx</groupId>
	<artifactId>vertx-config</artifactId>
	<version>${vertx.version}</version>
</dependency>
There are many configuration stores, which can be used as configuration data location:
- File
- Environment Variables
- HTTP
- Event Bus
- Git
- Redis
- Consul
- Kubernetes
- Spring Cloud Config Server
I selected the simplest one – file. But it can be easily changed only by defining another type on ConfigStoreOptions object. For loading configuration data from the store ConfigRetriever is responsible. It reads configuration as JsonObject.
ConfigStoreOptions file = new ConfigStoreOptions().setType("file").setConfig(new JsonObject().put("path", "application.json"));
ConfigRetriever retriever = ConfigRetriever.create(vertx, new ConfigRetrieverOptions().addStore(file));
retriever.getConfig(conf -> {
	JsonObject discoveryConfig = conf.result().getJsonObject("discovery");
	vertx.createHttpServer().requestHandler(router::accept).listen(conf.result().getInteger("port"));
	JsonObject json = new JsonObject().put("ID", "account-service-1").put("Name", "account-service").put("Address", "127.0.0.1").put("Port", 2222).put("Tags", new JsonArray().add("http-endpoint"));
	client.put(discoveryConfig.getInteger("port"), discoveryConfig.getString("host"), "/v1/agent/service/register").sendJsonObject(json, res -> {
		LOGGER.info("Consul registration status: {}", res.result().statusCode());
	});
});
Configuration file application.json is available under src/main/resources and it contains application port, service discovery and datasource adresses.
{
	"port" : 2222,
	"discovery" : {
		"host" : "192.168.99.100",
		"port" : 8500
	},
	"datasource" : {
		"host" : "192.168.99.100",
		"port" : 27017,
		"db_name" : "test"
	}
}
Final thoughts
Vert.x authors wouldn’t like to define their solution as a framework, but as a tool-kit. They don’t tell you what is a correct way to write an application, but only give you a lot of useful bricks helping to create your app. With Vert.x you can create fast and lightweight APIs basing on non-blocking, asynchronous I/O. It gives you a lot of possibilities, as you can see on the Config module example, where you can even use Spring Cloud Config Server as a configuration store. But it is also not free from drawbacks, as I showed on the service registration with Consul example. Vert.x also allows to create reactive microservices with RxJava, what seems to be interesting option, I hope to describe in the future.
Reactive microservices with Spring 5
Spring team has announced support for reactive programming model from 5.0 release. New Spring version will probably be released on March. Fortunately, milestone and snapshot versions with these changes are now available on public spring repositories. There is new Spring Web Reactive project with support for reactive @Controller and also new WebClient with client-side reactive support. Today I’m going to take a closer look on solutions suggested by Spring team.
Following Spring WebFlux documentation the Spring Framework uses Reactor internally for its own reactive support. Reactor is a Reactive Streams implementation that further extends the basic Reactive Streams Publisher contract with the Flux and Mono composable API types to provide declarative operations on data sequences of 0..N and 0..1. On the server-side Spring supports annotation based and functional programming models. Annotation model use @Controller and the other annotations supported also with Spring MVC. Reactive controller will be very similar to standard REST controller for synchronous services instead of it uses Flux, Mono and Publisher objects. Today I’m going to show you how to develop simple reactive microservices using annotation model and MongoDB reactive module. Sample application source code is available on GitHub.
For our example we need to use snapshots of Spring Boot 2.0.0 and Spring Web Reactive 0.1.0. Here are main pom.xml fragment and single microservice pom.xml below. In our microservices we use Netty instead of default Tomcat server.
	<parent>
		<groupId>org.springframework.boot</groupId>
		<artifactId>spring-boot-starter-parent</artifactId>
		<version>2.0.0.BUILD-SNAPSHOT</version>
	</parent>
	<dependencyManagement>
		<dependencies>
			<dependency>
				<groupId>org.springframework.boot.experimental</groupId>
				<artifactId>spring-boot-dependencies-web-reactive</artifactId>
				<version>0.1.0.BUILD-SNAPSHOT</version>
				<type>pom</type>
				<scope>import</scope>
			</dependency>
		</dependencies>
	</dependencyManagement>
	<dependencies>
		<dependency>
			<groupId>org.springframework.boot</groupId>
			<artifactId>spring-boot-starter-data-mongodb-reactive</artifactId>
		</dependency>
		<dependency>
			<groupId>org.springframework.boot.experimental</groupId>
			<artifactId>spring-boot-starter-web-reactive</artifactId>
			<exclusions>
				<exclusion>
					<groupId>org.springframework.boot</groupId>
					<artifactId>spring-boot-starter-tomcat</artifactId>
				</exclusion>
			</exclusions>
		</dependency>
		<dependency>
			<groupId>io.projectreactor.ipc</groupId>
			<artifactId>reactor-netty</artifactId>
		</dependency>
		<dependency>
			<groupId>io.netty</groupId>
			<artifactId>netty-all</artifactId>
		</dependency>
		<dependency>
			<groupId>pl.piomin.services</groupId>
			<artifactId>common</artifactId>
			<version>${project.version}</version>
		</dependency>
		<dependency>
			<groupId>org.springframework.boot</groupId>
			<artifactId>spring-boot-starter-test</artifactId>
			<scope>test</scope>
		</dependency>
		<dependency>
			<groupId>io.projectreactor.addons</groupId>
			<artifactId>reactor-test</artifactId>
			<scope>test</scope>
		</dependency>
	</dependencies>
We have two microservices: account-service and customer-service. Each of them have its own MongoDB database and they are exposing simple reactive API for searching and saving data. Also customer-service interacting with account-service to get all customer accounts and return them in customer-service method. Here’s our account controller code.
@RestController
public class AccountController {

	@Autowired
	private AccountRepository repository;

	@GetMapping(value = "/account/customer/{customer}")
	public Flux<Account> findByCustomer(@PathVariable("customer") Integer customerId) {
		return repository.findByCustomerId(customerId)
				.map(a -> new Account(a.getId(), a.getCustomerId(), a.getNumber(), a.getAmount()));
	}

	@GetMapping(value = "/account")
	public Flux<Account> findAll() {
		return repository.findAll().map(a -> new Account(a.getId(), a.getCustomerId(), a.getNumber(), a.getAmount()));
	}

	@GetMapping(value = "/account/{id}")
	public Mono<Account> findById(@PathVariable("id") Integer id) {
		return repository.findById(id)
				.map(a -> new Account(a.getId(), a.getCustomerId(), a.getNumber(), a.getAmount()));
	}

	@PostMapping("/person")
	public Mono<Account> create(@RequestBody Publisher<Account> accountStream) {
		return repository
				.save(Mono.from(accountStream)
						.map(a -> new pl.piomin.services.account.model.Account(a.getNumber(), a.getCustomerId(),
								a.getAmount())))
				.map(a -> new Account(a.getId(), a.getCustomerId(), a.getNumber(), a.getAmount()));
	}

}
In all API methods we also perform mapping from Account entity (MongoDB @Document) to Account DTO available in our common module. Here’s account repository class. It uses ReactiveMongoTemplate for interacting with Mongo collections.
@Repository
public class AccountRepository {

	@Autowired
	private ReactiveMongoTemplate template;

	public Mono<Account> findById(Integer id) {
		return template.findById(id, Account.class);
	}

	public Flux<Account> findAll() {
		return template.findAll(Account.class);
	}

	public Flux<Account> findByCustomerId(String customerId) {
		return template.find(query(where("customerId").is(customerId)), Account.class);
	}

	public Mono<Account> save(Mono<Account> account) {
		return template.insert(account);
	}

}
In our Spring Boot main or @Configuration class we should declare spring beans for MongoDB with connection settings.
@SpringBootApplication
public class Application {

	public static void main(String[] args) {
		SpringApplication.run(Application.class, args);
	}

	public @Bean MongoClient mongoClient() {
		return MongoClients.create("mongodb://192.168.99.100");
	}

	public @Bean ReactiveMongoTemplate reactiveMongoTemplate() {
		return new ReactiveMongoTemplate(mongoClient(), "account");
	}

}
I used docker MongoDB container for working on this sample.
docker run -d --name mongo -p 27017:27017 mongo
In customer service we call endpoint /account/customer/{customer} from account service. I declared @Bean WebClient in our main class.
	public @Bean WebClient webClient() {
		return WebClient.builder().clientConnector(new ReactorClientHttpConnector()).baseUrl("http://localhost:2222").build();
	}
Here’s customer controller fragment. @Autowired WebClient calls account service after getting customer from MongoDB.
	@Autowired
	private WebClient webClient;

	@GetMapping(value = "/customer/accounts/{pesel}")
	public Mono<Customer> findByPeselWithAccounts(@PathVariable("pesel") String pesel) {
		return repository.findByPesel(pesel).flatMap(customer -> webClient.get().uri("/account/customer/{customer}", customer.getId()).accept(MediaType.APPLICATION_JSON)
				.exchange().flatMap(response -> response.bodyToFlux(Account.class))).collectList().map(l -> {return new Customer(pesel, l);});
	}
We can test GET calls using web browser or REST clients. With POST it’s not so simple. Here are two simple test cases for adding new customer and getting customer with accounts. Test getCustomerAccounts need account service running on port 2222.
@RunWith(SpringRunner.class)
@SpringBootTest(webEnvironment = SpringBootTest.WebEnvironment.RANDOM_PORT)
public class CustomerTest {

	private static final Logger logger = Logger.getLogger("CustomerTest");

	private WebClient webClient;

	@LocalServerPort
	private int port;

	@Before
	public void setup() {
		this.webClient = WebClient.create("http://localhost:" + this.port);
	}

	@Test
	public void getCustomerAccounts() {
		Customer customer = this.webClient.get().uri("/customer/accounts/234543647565")
				.accept(MediaType.APPLICATION_JSON).exchange().then(response -> response.bodyToMono(Customer.class))
				.block();
		logger.info("Customer: " + customer);
	}

	@Test
	public void addCustomer() {
		Customer customer = new Customer(null, "Adam", "Kowalski", "123456787654");
		customer = webClient.post().uri("/customer").accept(MediaType.APPLICATION_JSON)
				.exchange(BodyInserters.fromObject(customer)).then(response -> response.bodyToMono(Customer.class))
				.block();
		logger.info("Customer: " + customer);
	}

}
Conclusion
Spring initiative with support for reactive programming seems promising, but now it’s on early stage of development. There is no availibility to use it with popular projects from Spring Cloud like Eureka, Ribbon or Hystrix. When I tried to add this dependencies to pom.xml my service failed to start. I hope that in the near future such functionalities like service discovery and load balancing will be available also for reactive microservices same as for synchronous REST microservices. Spring has also support for reactive model in Spring Cloud Stream project. It’s more stable than WebFlux framework. I’ll try use it in the future.
