Recently, I have come across some articles and mentions about Spring REST Docs, where it has been present as a better alternative to traditional Swagger docs. Until now, I was always using Swagger for building API documentation, so I decided to try Spring REST Docs. You may even read on the main page of that Spring project (https://spring.io/projects/spring-restdocs) some references to Swagger, for example: “This approach frees you from the limitations of the documentation produced by tools like Swagger”. Are you interested in building API documentation using Spring REST Docs? Let’s take a closer look on that project!
A first difference in comparison to Swagger is a test-driven approach to generating API documentation. Thanks to that Spring REST Docs ensures that the documentation is always generated accurately matches the actual behavior of the API. When using Swagger SpringFox library you just need to enable it for the project and provide some configuration to force it work following your expectations. I have already described usage of Swagger 2 for automated build API documentation for Spring Boot based application in my two previous articles:
The articles mentioned above describe in the details how to use SpringFox Swagger in your Spring Boot application to automatically generate API documentation basing on the source code. Here I’ll give you only a short introduction to that technology, to easily find out differences between usage of Swagger2 and Spring REST Docs.
1. Using Swagger2 with Spring Boot
To enable SpringFox library for your application you need to include the following dependencies to pom.xml.
<dependency>
    <groupId>io.springfox</groupId>
    <artifactId>springfox-swagger2</artifactId>
    <version>2.9.2</version>
</dependency>
<dependency>
    <groupId>io.springfox</groupId>
    <artifactId>springfox-swagger-ui</artifactId>
    <version>2.9.2</version>
</dependency>
Then you should annotate the main or configuration class with @EnableSwagger2. You can also customize the behaviour of SpringFox library by declaring Docket bean.
@Bean
public Docket swaggerEmployeeApi() {
	return new Docket(DocumentationType.SWAGGER_2)
		.select()
			.apis(RequestHandlerSelectors.basePackage("pl.piomin.services.employee.controller"))
			.paths(PathSelectors.any())
		.build()
		.apiInfo(new ApiInfoBuilder().version("1.0").title("Employee API").description("Documentation Employee API v1.0").build());
}
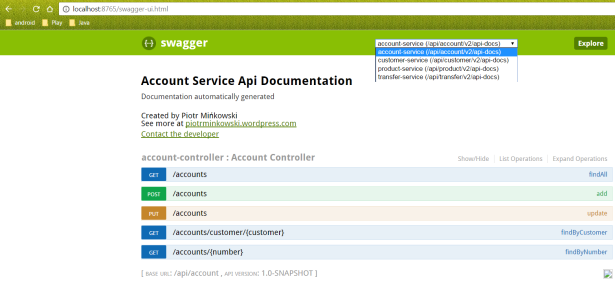
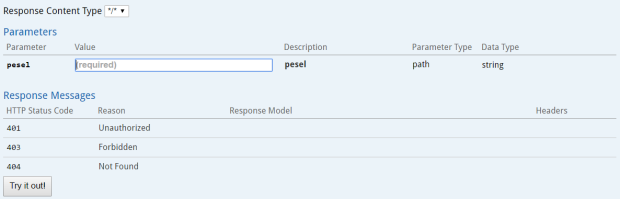
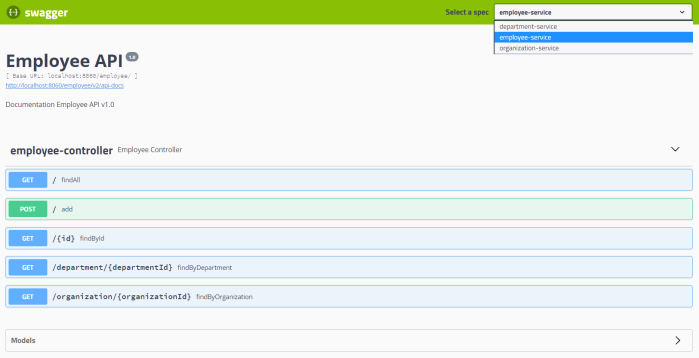
Now, after running the application the documentation is available under context path /v2/api-docs. You can also display it in your web browser using Swagger UI available at site /swagger-ui.html.
It looks easy? Let’s see how to do this with Spring REST Docs.
2. Using Asciidoctor with Spring Boot
There are some other differences between Spring REST Docs and SpringFox Swagger. By default, Spring REST Docs uses Asciidoctor. Asciidoctor processes plain text and produces HTML, styled and layed out to suit your needs. If you prefer, Spring REST Docs can also be configured to use Markdown. This really distinguished it from Swagger, which uses its own notation called OpenAPI Specification.
Spring REST Docs makes use of snippets produced by tests written with Spring MVC’s test framework, Spring WebFlux’s WebTestClient or REST Assured 3. I’ll show you an example based on Spring MVC.
I suggest you begin from creating base Asciidoc file. It should be placed in src/main/asciidoc directory in your application source code. I don’t know if you are familiar with Asciidoctor notation, but it is really intuitive. The sample visible below shows two important things. First we’ll display the version of the project taken from pom.xml. Then we’ll include the snippets generated during JUnit tests by declaring macro called operation containing document name and list of snippets. We can choose between such snippets like curl-request, http-request, http-response, httpie-request, links, request-body, request-fields, response-body, response-fields or path-parameters. The document name is determined by name of the test method in our JUnit test class.
= RESTful Employee API Specification
{project-version}
:doctype: book
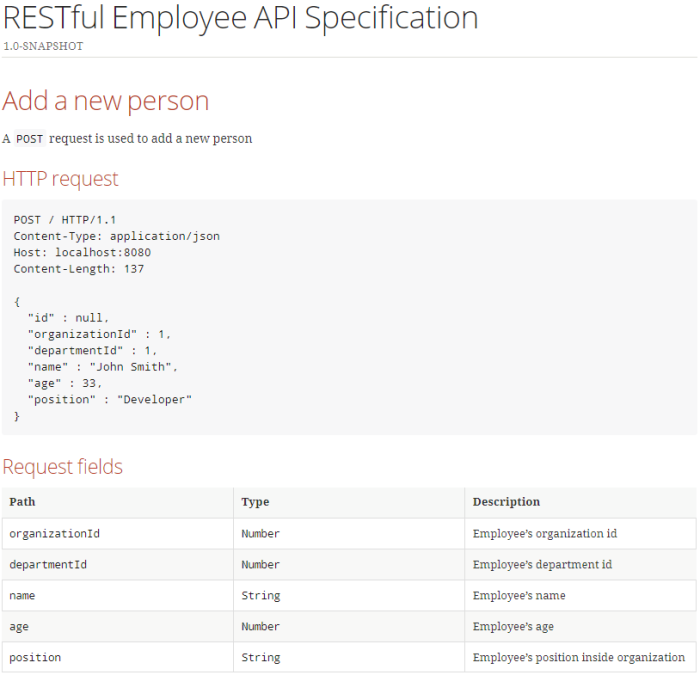
== Add a new person
A `POST` request is used to add a new person
operation::add-person[snippets='http-request,request-fields,http-response']
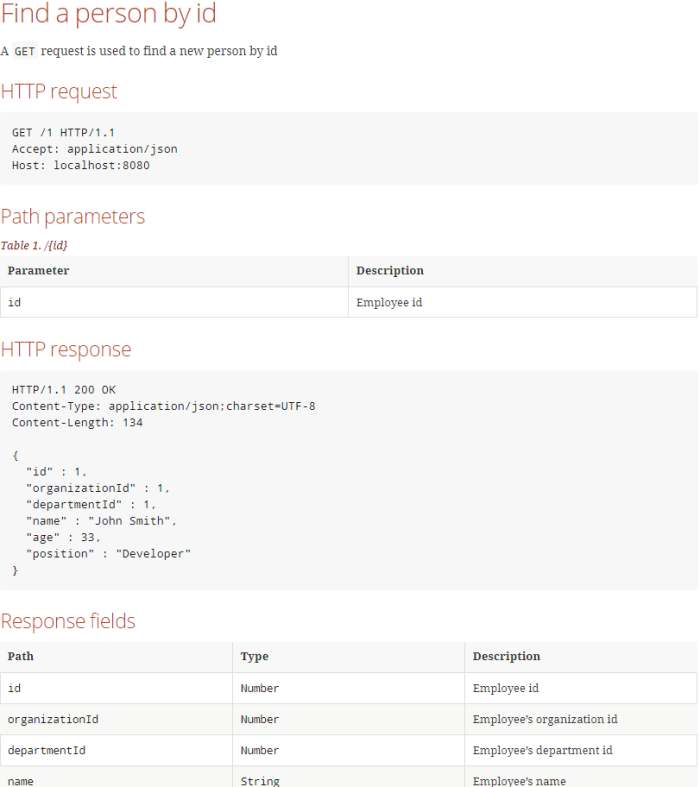
== Find a person by id
A `GET` request is used to find a new person by id
operation::find-person-by-id[snippets='http-request,path-parameters,http-response,response-fields']
The source code fragment with Asciidoc natation is just a template. We would like to generate HTML file, which prettily displays all our automatically generated staff. To achieve it we should enable plugin asciidoctor-maven-plugin in the project’s pom.xml. In order to display Maven project version we need to pass it to the Asciidoc plugin configuration attributes. We also need to spring-restdocs-asciidoctor dependency to that plugin.
<plugin>
	<groupId>org.asciidoctor</groupId>
	<artifactId>asciidoctor-maven-plugin</artifactId>
	<version>1.5.6</version>
	<executions>
		<execution>
			<id>generate-docs</id>
			<phase>prepare-package</phase>
			<goals>
				<goal>process-asciidoc</goal>
			</goals>
			<configuration>
				<backend>html</backend>
				<doctype>book</doctype>
				<attributes>
					<project-version>${project.version}</project-version>
				</attributes>
			</configuration>
		</execution>
	</executions>
	<dependencies>
		<dependency>
			<groupId>org.springframework.restdocs</groupId>
			<artifactId>spring-restdocs-asciidoctor</artifactId>
			<version>2.0.0.RELEASE</version>
		</dependency>
	</dependencies>
</plugin>
Ok, the documentation is automatically generated during Maven build from our api.adoc file located inside src/main/asciidoc directory. But we still need to develop JUnit API tests that automatically generate required snippets. Let’s do that in the next step.
3. Generating snippets for Spring MVC
First, we should enable Spring REST Docs for our project. To achieve it we have to include the following dependency.
<dependency>
	<groupId>org.springframework.restdocs</groupId>
	<artifactId>spring-restdocs-mockmvc</artifactId>
	<scope>test</scope>
</dependency>
Now, all we need to do is to implement JUnit tests. Spring Boot provides an @AutoConfigureRestDocs annotation that allows you to leverage Spring REST Docs in your tests.
In fact, we need to prepare standard Spring MVC test using MockMvc bean. I also mocked some methods implemented by EmployeeRepository. Then, I used some static methods provided by Spring REST Docs with support for generating documentation of request and response payloads. First of those method is document("{method-name}/",...), which is responsible for generating snippets under directory target/generated-snippets/{method-name}, where method name is the name of the test method formatted using kebab-case. I have described all the JSON fields in the requests using requestFields(...) and responseFields(...) methods.
@RunWith(SpringRunner.class)
@WebMvcTest(EmployeeController.class)
@AutoConfigureRestDocs
public class EmployeeControllerTest {

	@MockBean
	EmployeeRepository repository;
	@Autowired
	MockMvc mockMvc;

	private ObjectMapper mapper = new ObjectMapper();

	@Before
	public void setUp() {
		Employee e = new Employee(1L, 1L, "John Smith", 33, "Developer");
		e.setId(1L);
		when(repository.add(Mockito.any(Employee.class))).thenReturn(e);
		when(repository.findById(1L)).thenReturn(e);
	}

	@Test
	public void addPerson() throws JsonProcessingException, Exception {
		Employee employee = new Employee(1L, 1L, "John Smith", 33, "Developer");
		mockMvc.perform(post("/").contentType(MediaType.APPLICATION_JSON).content(mapper.writeValueAsString(employee)))
			.andExpect(status().isOk())
			.andDo(document("{method-name}/", requestFields(
				fieldWithPath("id").description("Employee id").ignored(),
				fieldWithPath("organizationId").description("Employee's organization id"),
				fieldWithPath("departmentId").description("Employee's department id"),
				fieldWithPath("name").description("Employee's name"),
				fieldWithPath("age").description("Employee's age"),
				fieldWithPath("position").description("Employee's position inside organization")
			)));
	}

	@Test
	public void findPersonById() throws JsonProcessingException, Exception {
		this.mockMvc.perform(get("/{id}", 1).accept(MediaType.APPLICATION_JSON))
			.andExpect(status().isOk())
			.andDo(document("{method-name}/", responseFields(
				fieldWithPath("id").description("Employee id"),
				fieldWithPath("organizationId").description("Employee's organization id"),
				fieldWithPath("departmentId").description("Employee's department id"),
				fieldWithPath("name").description("Employee's name"),
				fieldWithPath("age").description("Employee's age"),
				fieldWithPath("position").description("Employee's position inside organization")
			), pathParameters(parameterWithName("id").description("Employee id"))));
	}

}
If you would like to customize some settings of Spring REST Docs you should provide @TestConfiguration class inside JUnit test class. In the following code fragment you may see an example of such customization. I overridden default snippets output directory from index to test method-specific name, and force generation of sample request and responses using prettyPrint option (single parameter in the separated line).
@TestConfiguration
static class CustomizationConfiguration implements RestDocsMockMvcConfigurationCustomizer {

	@Override
	public void customize(MockMvcRestDocumentationConfigurer configurer) {
		configurer.operationPreprocessors()
			.withRequestDefaults(prettyPrint())
			.withResponseDefaults(prettyPrint());
	}

	@Bean
	public RestDocumentationResultHandler restDocumentation() {
		return MockMvcRestDocumentation.document("{method-name}");
	}
}
Now, if you execute mvn clean install on your project you should see the following structure inside your output directory.

4. Viewing and publishing API docs
Once we have successfully built our project, the documentation has been generated. We can display HTML file available at target/generated-docs/api.html. It provides the full documentation of our API.
And the next part…
You may also want to publish it inside your application fat JAR file. If you configure maven-resources-plugin following example vibisle below it would be available under /static/docs directory inside JAR.
<plugin>
	<artifactId>maven-resources-plugin</artifactId>
	<executions>
		<execution>
			<id>copy-resources</id>
			<phase>prepare-package</phase>
			<goals>
				<goal>copy-resources</goal>
			</goals>
			<configuration>
				<outputDirectory>
					${project.build.outputDirectory}/static/docs
				</outputDirectory>
				<resources>
					<resource>
						<directory>
							${project.build.directory}/generated-docs
						</directory>
					</resource>
				</resources>
			</configuration>
		</execution>
	</executions>
</plugin>
Conclusion
That’s all what I wanted to show in this article. The sample service generating documentation using Spring REST Docs is available on GitHub under repository https://github.com/piomin/sample-spring-microservices-new/tree/rest-api-docs/employee-service. I’m not sure that Swagger and Spring REST Docs should be treated as a competitive solutions. I use Swagger for simple testing an API on the running application or exposing specification that can be used for automated generation of a client code. Spring REST Docs is rather used for generating documentation that can be published somewhere, and “is accurate, concise, and well-structured. This documentation then allows your users to get the information they need with a minimum of fuss”. I think there is no obstacle to use Spring REST Docs and SpringFox Swagger together in your project in order to provide the most valuable documentation of API exposed by the application.