Monitoring Microservices With Spring Boot Admin

A few days ago I came across an article about Spring Boot Admin framework. It is a simple solution created to manage and monitor Spring Boot applications. It is based on endpoints exposed by Spring Boot Actuator. It is worth emphasizing that application only allows monitoring and does not have such capabilities like creating new instances, restarting, so it is not a competition for the solutions like Pivotal Cloud Foundry. More about this solution can be read in my previous article Spring Cloud Microservices at Pivotal Platform. Despite this, Spring Boot Admin seems to be an interesting enough to take a closer look on it.

If you have to manage the system consisting of multiple microservices you need to collect all relevant information in one place. This applies to the logs when we usually use ELK stack (Elasticsearch + Logstash + Kibana), metrics (Zipkin) and details about the status of all application instances, which are running right now. If you are interested in more details about ELK or Zipkin I recommend my previous article Part 2: Creating microservices – monitoring with Spring Cloud Sleuth, ELK and Zipkin.

If you already using Spring Cloud Discovery I’ve got good news for you. Although Spring Boot Admin was created by Codecentric company, it fully integrates with Spring Cloud including the most popular service registration and discovery servers like Zookeeper, Consul and Eureka. It is easy to create your admin server instance. You just have to set up Spring Boot application and add annotation @EnableAdminServer into your main class.

@SpringBootApplication
@EnableDiscoveryClient
@EnableAdminServer
@EnableAutoConfiguration
public class Application {

	public static void main(String[] args) {
		SpringApplication.run(Application.class, args);
	}

}

In the sample application available as usual on GitHub, we enabled discovery from Eureka by adding annotation @EnableDiscoveryClient. There is no need to register admin service in Eureka, because we only need to collect information about all registered microservices. There is also a possibility to include Spring Boot Admin to your Eureka server instance, but admin context should be changed (property spring.boot.admin.context-path) to prevent clash with Eureka UI. Here’s application.yml configuration file for the sample with independent admin service.

eureka:
  client:
    registryFetchIntervalSeconds: 5
    registerWithEureka: false
    serviceUrl:
      defaultZone: ${DISCOVERY_URL:http://localhost:8761}/eureka/
  instance:
    leaseRenewalIntervalInSeconds: 10

management:
  security:
    enabled: false

Here is the list of dependencies included in pom.xml.

<dependencies>
	<dependency>
		<groupId>org.springframework.cloud</groupId>
		<artifactId>spring-cloud-starter-eureka</artifactId>
	</dependency>
	<dependency>
		<groupId>de.codecentric</groupId>
		<artifactId>spring-boot-admin-server</artifactId>
		<version>1.5.1</version>
	</dependency>
	<dependency>
		<groupId>de.codecentric</groupId>
		<artifactId>spring-boot-admin-server-ui</artifactId>
		<version>1.5.1</version>
	</dependency>
</dependencies>

Now you only need to build and run your server with java -jar admin-service.jar. UI dashboard is available under http://localhost:8080 as you on the figure below. Services are grouped by name and there is information how many instances of each microservice is running.

boot-admin-1

On the client side we have to add those two dependencies below. Spring Boot Actuator is required as a mentioned before, Jolokia library is used for more advanced features like JMX mbeans and log level management.

<dependency>
	<groupId>org.springframework.boot</groupId>
	<artifactId>spring-boot-starter-actuator</artifactId>
</dependency>
<dependency>
	<groupId>org.jolokia</groupId>
	<artifactId>jolokia-core</artifactId>
</dependency>

To display information visible in the figure below like version, Git commit details below for each application we need to add two maven plugins into pom.xml. First of them will generate build-info.properties file with most important application info. Second includes git.properties file with all information about last commit. Result are available under Spring Boot Actuator info endpoint.

<plugin>
	<groupId>org.springframework.boot</groupId>
	<artifactId>spring-boot-maven-plugin</artifactId>
	<configuration>
		<mainClass>pl.piomin.microservices.account.Application</mainClass>
		<addResources>true</addResources>
	</configuration>
	<executions>
		<execution>
			<goals>
				<goal>build-info</goal>
				<goal>repackage</goal>
			</goals>
			<configuration>
				<additionalProperties>
					<java.target>${maven.compiler.target}</java.target>
					<time>${maven.build.timestamp}</time>
				</additionalProperties>
			</configuration>
		</execution>
	</executions>
</plugin>
<plugin>
	<groupId>pl.project13.maven</groupId>
	<artifactId>git-commit-id-plugin</artifactId>
	<configuration>
		<failOnNoGitDirectory>false</failOnNoGitDirectory>
	</configuration>
</plugin>

I created two microservices in the sample application account-service and customer-service. Run some instances of them on different ports with command java -jar -DPORT=[port] [service-name].jar. Information visible in Version and Info columns is taken from build-info.properties and git.properties files.

boot-admin-2

Here’s full list of parameters for account-service.

boot-admin-3-details

There also some other interesting features offered by Spring Boot Admin. In the Trace section we can browse HTTP requestes and responses history with date, status and method information. It could be filtered by path fragment.

boot-admin-1-trace

By adding Jolokia dependency we are able to view and change log level for every category in the Logging section.

boot-admin-5-logs

We can collect configuration details for every instance of microservice.

boot-admin-7-env

In the Journal tab there is list of status changes for all services monitored by Spring Boot Admin.

boot-admin-11-journal

Conclusion

Spring Boot Admin is an excellent tool for visualizing endpoints exposed by Spring Boot Actuator with healhchecks and application details. It has easy integration with Spring Cloud and can group all running instances of microservice by its name taken from Eureka (or some other registration and discovery servers) registry. However, I see a lack of the possibility for remote application restart. I think it would be quite easy to implement using a tool such as Ansible and the information displayed by the Spring Boot Actuator endpoints.

Serverless on AWS Lambda

Preface

Serverless is now one of the hottest trend in IT world. A more accurate name for it is Function as a Service (FaaS). Have any of you ever tried to share your APIs deployed in the cloud? Before serverless, I had to create a virtual machine with Linux on the cloud provider’s infrastructure, and then deploy and run that application implemented in, for example nodejs or Java. With serverless, you do not have to write any commands in Linux.

What serverless is different from another very popular topic – Microservices? To illustrate the difference serverless is often referred as nanoservices. For example, if we would like to create a microservice that provides API for CRUD operations on database table, then our APIs had several endpoints for searching (GET/{id}), updating (PUT), remowing (DELETE), inserting (POST) and maybe a few more for searching using different input criteria. According to serverless architecture, all of that endpoints would be independent functions created and deployed separately. While microservice can be built on an on-premise architecture, for example with Spring Boot, serverless is closely related to the cloud infrastructure.

Custom function implementation basing on cloud provider’s tools is really quick and easy. I’ll try to show it on sample functions deployed on AWS Amazon using AWS Lambda. Sample application source code is available on GitHub.

How it works

Here’s AWS Lambda solution description from Amazon site.

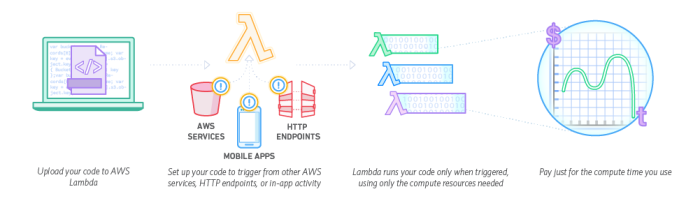
AWS Lambda lets you run code without provisioning or managing servers. You pay only for the compute time you consume – there is no charge when your code is not running. With Lambda, you can run code for virtually any type of application or backend service – all with zero administration. Just upload your code and Lambda takes care of everything required to run and scale your code with high availability. You can set up your code to automatically trigger from other AWS services or call it directly from any web or mobile app.

aws-lambda

AWS Lambda is a compute platform for many application scenarios. It supports applications written in Node.js, Java, C# and Python. On the platform there are also some services available like DynamoDB – NoSQL database, Kinesis – streaming service, CloudWatch – provides monitoring and logs, Redshift – data warehouse solution, S3 – cloud storage and API Gateway. Every event coming to those services can trigger calling of your Lambda function. You can also interact with those service using AWS Lambda SDK.

Preparation

Let’s finish with the theory, all of us the most like concretes 🙂 First of all, we need to set up AWS account. AWS has web management console available here, but there is also command line client called AWS CLI, which can be downloaded here. There are also some other tools through which we can share our functions on AWS. I will tell you about them later. To be able to use them, including the command line client, we need to generate an access key. Go to web console and select My Security Credentials on your profile, then select Continue to Security Credentials and expand Access Keys. Create you new access key and save it on disc. There are to fields Access Key ID and Secret Access Key. If you would like to use AWS CLI first type aws configure and then you should provide those keys, default region and format (for example JSON or text).

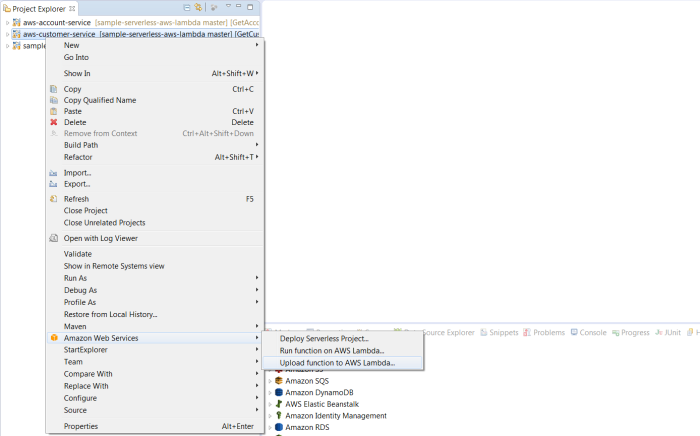
You can use AWS CLI or even web console to deploy your Lambda Function on the cloud. However, I will present you other (in my opinion better :)) solutions. If you are using Eclipse for your development the best option is to download AWS Toolkit plugin. Now, I’m able to upload my function to AWS Lambda or even create or modify table on Amazon DynamoDB. After downloading Eclipse plugin you need to provide Access Key ID and Secret Access Key. You have AWS Management perspective available, where you can see all AWS staff including lambda function, DynamoDB tables, identity management or other service like S3, SNS or SQS. You can create special AWS Java Project or work with standard maven project.  Just display project menu by clicking right button on the project and then select Amazon Web Services and Upload function to AWS Lambda

aws-lambda-deploy-1

After selecting Upload function to AWS Lambda… you should window visible below. You can choose region for your deployment (us-east-1 by default), IAM role and what is most the important – name of your lambda function. We can create new function or update the existing one.

Another interesting possibility for uploading function into AWS Lambda is maven plugin. With lambda-maven-plugin we can define security credentials and all definitions of our functions in JSON format. Here’s plugin declaration in pom.xml. The plugin can be invoked during maven project build mvn clean install lambda:deploy-lambda. Dependencies should be attached into the output JAR file – that’s why maven-shade-plugin is used during build.

<plugin>
	<groupId>com.github.seanroy</groupId>
	<artifactId>lambda-maven-plugin</artifactId>
	<version>2.2.1</version>
	<configuration>
		<accessKey>${aws.accessKey}</accessKey>
		<secretKey>${aws.secretKey}</secretKey>
		<functionCode>${project.build.directory}/${project.build.finalName}.jar</functionCode>
		<version>${project.version}</version>
		<lambdaRoleArn>arn:aws:iam::436521214155:role/lambda_basic_execution</lambdaRoleArn>
		<s3Bucket>lambda-function-bucket-us-east-1-1498055423860</s3Bucket>
		<publish>true</publish>
		<forceUpdate>true</forceUpdate>
		<lambdaFunctionsJSON>
			[
			{
			"functionName": "PostAccountFunction",
			"description": "POST account",
			"handler": "pl.piomin.services.aws.account.add.PostAccount",
			"timeout": 30,
			"memorySize": 256,
			"keepAlive": 10
			},
			{
			"functionName": "GetAccountFunction",
			"description": "GET account",
			"handler": "pl.piomin.services.aws.account.find.GetAccount",
			"timeout": 30,
			"memorySize": 256,
			"keepAlive": 30
			},
			{
			"functionName": "GetAccountsByCustomerIdFunction",
			"description": "GET accountsCustomerId",
			"handler": "pl.piomin.services.aws.account.find.GetAccountsByCustomerId",
			"timeout": 30,
			"memorySize": 256,
			"keepAlive": 30
			}
			]
		</lambdaFunctionsJSON>
	</configuration>
</plugin>

Lambda functions implementation

I implemented sample AWS Lambda functions in Java. Here’s list of dependencies inside pom.xml.

<dependencies>
	<dependency>
		<groupId>com.amazonaws</groupId>
		<artifactId>aws-lambda-java-events</artifactId>
		<version>1.3.0</version>
	</dependency>
	<dependency>
		<groupId>com.amazonaws</groupId>
		<artifactId>aws-lambda-java-core</artifactId>
		<version>1.1.0</version>
	</dependency>
	<dependency>
		<groupId>com.amazonaws</groupId>
		<artifactId>aws-lambda-java-log4j</artifactId>
		<version>1.0.0</version>
	</dependency>
	<dependency>
		<groupId>com.amazonaws</groupId>
		<artifactId>aws-java-sdk-s3</artifactId>
		<version>1.11.152</version>
	</dependency>
	<dependency>
		<groupId>com.amazonaws</groupId>
		<artifactId>aws-java-sdk-lambda</artifactId>
		<version>1.11.152</version>
	</dependency>
</dependencies>

Every function is connecting to Amazon DynamoDB. There are two tables created for that sample: account and customer. One customer could have more than one account and this assignment is realized through the customerId field in account table. AWS library for DynamoDB has ORM mapping mechanisms. Here’s Account entity definition. By using annotations we can declare table name, hash key, index and table attributes.

@DynamoDBTable(tableName = "account")
public class Account implements Serializable {

	private static final long serialVersionUID = 8331074361667921244L;
	private String id;
	private String number;
	private String customerId;

	public Account() {

	}

	public Account(String id, String number, String customerId) {
		this.id = id;
		this.number = number;
		this.customerId = customerId;
	}

	@DynamoDBHashKey(attributeName = "id")
	@DynamoDBAutoGeneratedKey
	public String getId() {
		return id;
	}

	public void setId(String id) {
		this.id = id;
	}

	@DynamoDBAttribute(attributeName = "number")
	public String getNumber() {
		return number;
	}

	public void setNumber(String number) {
		this.number = number;
	}

	@DynamoDBIndexHashKey(attributeName = "customerId", globalSecondaryIndexName = "Customer-Index")
	public String getCustomerId() {
		return customerId;
	}

	public void setCustomerId(String customerId) {
		this.customerId = customerId;
	}

}

In the described sample application there are five lambda functions:
PostAccountFunction – it receives Account object from request and insert it into the table
GetAccountFunction – find account by hash key id attribute
GetAccountsByCustomerId – find list of accounts by input customerId
PostCustomerFunction – it receives Customer object from request and insert it into the table
GetCustomerFunction – find customer by hash key id attribute

Every AWS Lambda function handler needs to implement RequestHandler interface with one method handleRequest. Here’s PostAccount handler class. It connects to DynamoDB using Amazon client and creates ORM mapper DynamoDBMapper, which saves input entity in database.

public class PostAccount implements RequestHandler<Account, Account> {

	private DynamoDBMapper mapper;

	public PostAccount() {
		AmazonDynamoDBClient client = new AmazonDynamoDBClient();
		client.setRegion(Region.getRegion(Regions.US_EAST_1));
		mapper = new DynamoDBMapper(client);
	}

	@Override
	public Account handleRequest(Account a, Context ctx) {
		LambdaLogger logger = ctx.getLogger();
		mapper.save(a);
		Account r = a;
		logger.log("Account: " + r.getId());
		return r;
	}

}

GetCustomer function not only interacts with DynamoDB, but also invokes GetAccountsByCustomerId function. Maybe this may not be the best example of the need to call another function, because it could directly retrieve data from the account table directly. But I wanted to separate the data layer from the function logic and jut show how invoking of another function works in AWS Lambda cloud.

public class GetCustomer implements RequestHandler<Customer, Customer> {

	private DynamoDBMapper mapper;
	private AccountService accountService;

	public GetCustomer() {
		AmazonDynamoDBClient client = new AmazonDynamoDBClient();
		client.setRegion(Region.getRegion(Regions.US_EAST_1));
		mapper = new DynamoDBMapper(client);

		accountService = LambdaInvokerFactory.builder() .lambdaClient(AWSLambdaClientBuilder.defaultClient())
				 .build(AccountService.class);
	}

	@Override
	public Customer handleRequest(Customer customer, Context ctx) {
		LambdaLogger logger = ctx.getLogger();
		logger.log("Account: " + customer.getId());
		customer = mapper.load(Customer.class, customer.getId());
		List<Account> aa = accountService.getAccountsByCustomerId(new Account(customer.getId()));
		customer.setAccounts(aa);
		return customer;
	}
}

AccountService is an interface. It uses @LambdaFunction annotation to declare name of invoked function in the cloud.

public interface AccountService {

	@LambdaFunction(functionName = "GetAccountsByCustomerIdFunction")
	List<Account> getAccountsByCustomerId(Account account);
}

API Configuration

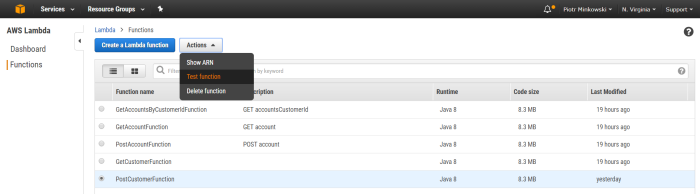
I assume that you have already uploaded your Lambda functions. Now, you can go to AWS Web Console and see the full list of them in the AWS Lambda section. Every function can be tested by selecting item in the functions list and calling Test function action.

aws-lambda-3

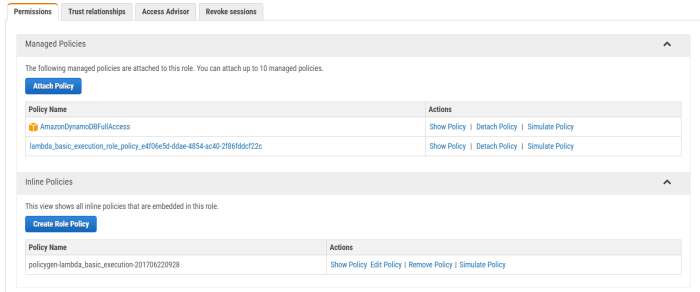
If you did’t configure role permissions you probably got an error while trying to call your lambda function. I attached AmazonDynamoDBFullAccess policy to main lambda_basic_execution role for Amazon DynamoDB connection. Then I created new inline policy to enable invoking GetAccountsByCustomerIdFunction from other lambda function as you can see in the figure below. If you retry your tests now everything works fine.

aws-lambda-4

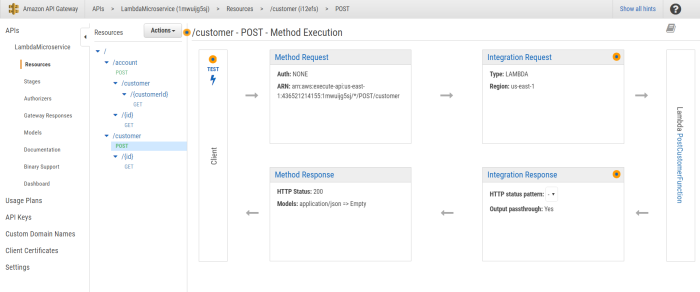
Well, now we are able to test our functions from AWS Lambda Web Test Console. But our main goal is to invoke them from outside client, for example REST client. Fortunately, there is a component called API Gateway which can be configured to proxy our HTTP requests from gateway to Lambda functions. Here’s figure with our API configuration, for example POST /customer is mapped to PostCustomerFunction, GET /customer/{id} is mapped to GetCustomerFunction etc.

aws-lambda-5

You can configure Models definitions and set them as input or output types for API.

{
"title": "Account",
"type": "object",
"properties": {
"id": {
"type": "string"
},
"number": {
"type": "string"
},
"customerId": {
"type": "string"
}
}
}

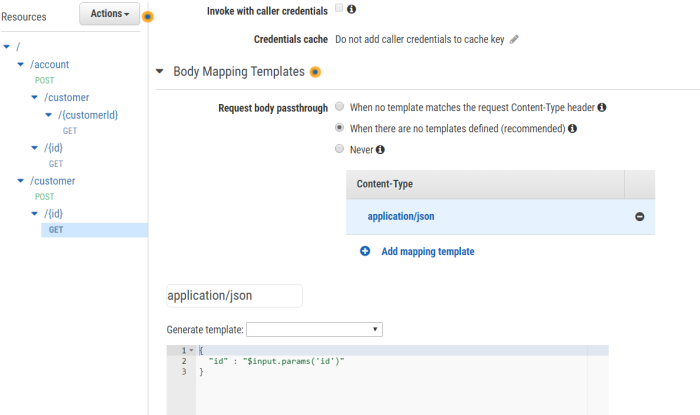
For GET request configuration is a little more complicated. We have to set mapping from path parameter into JSON object which is an input in Lambda functions. Select Integration Request element and then go to Body Mapping Templates section.

aws-lambda-6

Our API can also be exported as Swagger JSON definition. If you are not familiar with take a look on my previous article Microservices API Documentation with Swagger2.

aws-lambda-7

Final words

In my article I described the next steps illustrating how to create an API based on the AWS Lambda serverless solution. I showed the obvious advantages of this solution, such as no need for self-management of servers, the ability to easily deploy applications in the cloud, configuration and monitoring fully based on the solutions provided by the AWS Web Console. You can easily extend my sample with some other services, for example with Kinesis to enable data stream processing. In my opinion, serverless is the perfect solution for exposing simple APIs in the cloud.

Generating large PDF files using JasperReports

During the last ‘Code Europe’ conference in Warsaw appeared many topics related to microservices architecture. Several times I heard the conclusion that the best candidate for separation from monolith is service that generates PDF reports. It’s usually quite independent from the other parts of application. I can see a similar approach in my organization, where first microservice running in production mode was the one that generates PDF reports. To my surprise, the vendor which developed that microservice had to increase maximum heap size to 1GB on each of its instances. This has forced me to take a closer look at the topic of PDF reports generation process.
The most popular Java library for creating PDF files is JasperReports. During generation process, this library by default stores all objects in RAM memory. If such reports are large, this could be a problem my vendor encountered. Their solution, as I have mentioned before, was to increase the maximum size of Java heap 🙂

This time, unlike usual, I’m going to start with the test implementation. Here’s simple JUnit test with 20 requests per second sending to service endpoint.

public class JasperApplicationTest {

	protected Logger logger = Logger.getLogger(JasperApplicationTest.class.getName());
	TestRestTemplate template = new TestRestTemplate();

	@Test
	public void testGetReport() throws InterruptedException {
		List<HttpStatus> responses = new ArrayList<>();
		Random r = new Random();
		int i = 0;
		for (; i < 20; i++) {
			new Thread(new Runnable() {
				@Override
				public void run() {
					int age = r.nextInt(99);
					long start = System.currentTimeMillis();
					ResponseEntity<InputStreamResource> res = template.getForEntity("http://localhost:2222/pdf/{age}", InputStreamResource.class, age);
					logger.info("Response (" +  (System.currentTimeMillis()-start) + "): " + res.getStatusCode());
					responses.add(res.getStatusCode());
					try {
						Thread.sleep(50);
					} catch (InterruptedException e) {
						e.printStackTrace();
					}
				}
			}).start();
		}

		while (responses.size() != i) {
			Thread.sleep(500);
		}
		logger.info("Test finished");
	}
}

In my test scenario I inserted about 1M records into the person table. Everything works fine during running test. Generated files had about 500kb size and 200 pages. All requests were succeeded and each of them had been processed about 8 seconds. In comparison with single request which had been processed 4 seconds it seems to be a good result. The situation with RAM is worse as you can see in the figure below. After generating 20 PDF reports allocated heap size increases to more than 1GB and used heap size was about 550MB. Also CPU usage during report generation increased to 100% usage. I could easily image generating files bigger than 500kb in the production mode…

jasper-1

In our situation we have two options. We can always add more RAM memory or … look for another choice 🙂 Jasper library comes with solution – Virtualizers. The virtualizer cuts the jasper report print into different files and save them on the hard drive and/or compress it. There are three types of virtualizers:
JRFileVirtualizer, JRSwapFileVirtualizer and JRGzipVirtualizer. You can read more about them here. Now, look at the figure below. Here’s illustration of memory and CPU usage for the test with JRFileVirtualizer. It looks a little better than the previous figure, but it does not knock us down 🙂 However, requests with the same overload as for the previous test take much longer – about 30 seconds. It’s not a good message, but at least the heap size allocation is not increases as fast as for previous sample.

jasper-2

Same test has been performed for JRSwapFileVirtualizer. The requests was average processed around 10 seconds. The graph illustrating CPU and memory usage is rather more similar to in memory test than JRFileVirtualizer test.

jasper-3

To see the difference between those three scenarios we have to run our application with maximum heap size set. For my tests I set -Xmx128m -Xms128m. For test with file virtualizers we receive HTTP responses with PDF reports, but for in memory tests the exception is thrown by the sample application: java.lang.OutOfMemoryError: GC overhead limit exceeded.

For testing purposes I created Spring Boot application. Sample source code is available as usual on GitHub. Here’s full list of Maven dependencies for that project.

<dependency>
	<groupId>net.sf.jasperreports</groupId>
	<artifactId>jasperreports</artifactId>
	<version>6.4.0</version>
</dependency>
<dependency>
	<groupId>org.springframework.boot</groupId>
	<artifactId>spring-boot-starter-web</artifactId>
</dependency>
<dependency>
	<groupId>org.springframework.boot</groupId>
	<artifactId>spring-boot-starter-data-jpa</artifactId>
</dependency>
<dependency>
	<groupId>org.springframework.boot</groupId>
	<artifactId>spring-boot-starter-test</artifactId>
	<scope>test</scope>
</dependency>
<dependency>
	<groupId>mysql</groupId>
	<artifactId>mysql-connector-java</artifactId>
	<scope>runtime</scope>
</dependency>

Here’s application main class. There are @Bean declarations of file virtualizers and JasperReport which is responsible for template compilation from .jrxml file. To run application for testing purposes type java -jar -Xms64m -Xmx128m -Ddirectory=C:\Users\minkowp\pdf sample-jasperreport-boot.jar.

@SpringBootApplication
public class JasperApplication {

	@Value("${directory}")
	private String directory;

	public static void main(String[] args) {
		SpringApplication.run(JasperApplication.class, args);
	}

	@Bean
	JasperReport report() throws JRException {
		JasperReport jr = null;
		File f = new File("personReport.jasper");
		if (f.exists()) {
			jr = (JasperReport) JRLoader.loadObject(f);
		} else {
			jr = JasperCompileManager.compileReport("src/main/resources/report.jrxml");
			JRSaver.saveObject(jr, "personReport.jasper");
		}
		return jr;
	}

	@Bean
	JRFileVirtualizer fileVirtualizer() {
		return new JRFileVirtualizer(100, directory);
	}

	@Bean
	JRSwapFileVirtualizer swapFileVirtualizer() {
		JRSwapFile sf = new JRSwapFile(directory, 1024, 100);
		return new JRSwapFileVirtualizer(20, sf, true);
	}

}

There are three endpoints exposed for the tests:
/pdf/{age} – in memory PDF generation
/pdf/fv/{age} – PDF generation with JRFileVirtualizer
/pdf/sfv/{age} – PDF generation with JRSwapFileVirtualizer

Here’s method generating PDF report. Report is generated in fillReport static method from JasperFillManager. It takes three parameters as input: JasperReport which encapsulates compiled .jrxml template file, JDBC connection object and map of parameters. Then report is ganerated and saved on disk as a PDF file. File is returned as an attachement in the response.

	private ResponseEntity<InputStreamResource> generateReport(String name, Map<String, Object> params) {
		FileInputStream st = null;
		Connection cc = null;
		try {
			cc = datasource.getConnection();
			JasperPrint p = JasperFillManager.fillReport(jasperReport, params, cc);
			JRPdfExporter exporter = new JRPdfExporter();
			SimpleOutputStreamExporterOutput c = new SimpleOutputStreamExporterOutput(name);
			exporter.setExporterInput(new SimpleExporterInput(p));
			exporter.setExporterOutput(c);
			exporter.exportReport();

			st = new FileInputStream(name);
			HttpHeaders responseHeaders = new HttpHeaders();
			responseHeaders.setContentType(MediaType.valueOf("application/pdf"));
			responseHeaders.setContentDispositionFormData("attachment", name);
			responseHeaders.setContentLength(st.available());
		    return new ResponseEntity<InputStreamResource>(new InputStreamResource(st), responseHeaders, HttpStatus.OK);
		} catch (Exception e) {
			e.printStackTrace();
		} finally {
			fv.cleanup();
			sfv.cleanup();
			if (cc != null)
				try {
					cc.close();
				} catch (SQLException e) {
					e.printStackTrace();
				}
		}
		return null;
	}

To enable virtualizer during report generation we only have to pass one parameter to the map of parameters – instance of virtualizer object.

	@Autowired
	JRFileVirtualizer fv;
	@Autowired
	JRSwapFileVirtualizer sfv;
	@Autowired
	DataSource datasource;
	@Autowired
	JasperReport jasperReport;

	@ResponseBody
	@RequestMapping(value = "/pdf/fv/{age}")
	public ResponseEntity<InputStreamResource> getReportFv(@PathVariable("age") int age) {
		logger.info("getReportFv(" + age + ")");
		Map<String, Object> m = new HashMap<>();
		m.put(JRParameter.REPORT_VIRTUALIZER, fv);
		m.put("age", age);
		String name = ++count + "personReport.pdf";
		return generateReport(name, m);
	}

Template file report.jrxml is available under /src/main/resources directory. Inside queryString tag there is SQL query which takes age parameter in WHERE statement. There are also five columns declared all taken from SQL query result.

<?xml version = "1.0" encoding = "UTF-8"?>
<!DOCTYPE jasperReport PUBLIC "//JasperReports//DTD Report Design//EN"    "http://jasperreports.sourceforge.net/dtds/jasperreport.dtd">

<jasperReport xmlns="http://jasperreports.sourceforge.net/jasperreports"               xmlns:xsi="http://www.w3.org/2001/XMLSchema-instance"               xsi:schemaLocation="http://jasperreports.sourceforge.net/jasperreports    http://jasperreports.sourceforge.net/xsd/jasperreport.xsd"               name="report2" pageWidth="595" pageHeight="842"                columnWidth="555" leftMargin="20" rightMargin="20"               topMargin="20" bottomMargin="20">
    <parameter name="age" class="java.lang.Integer"/>
    <queryString>
        <![CDATA[SELECT * FROM person WHERE age = $P{age}]]>
    </queryString>
    <field name="id" class="java.lang.Integer" />
    <field name="first_name" class="java.lang.String" />
    <field name="last_name" class="java.lang.String" />
    <field name="age" class="java.lang.Integer" />
    <field name="pesel" class="java.lang.String" />

    <detail>
        <band height="15">

            <textField>
                <reportElement x="0" y="0" width="50" height="15" />

                <textElement textAlignment="Right" verticalAlignment="Middle"/>

                <textFieldExpression class="java.lang.Integer">
                    <![CDATA[$F{id}]]>
                </textFieldExpression>
            </textField>       

            <textField>
                <reportElement x="100" y="0" width="80" height="15" />

                <textElement textAlignment="Left" verticalAlignment="Middle"/>

                <textFieldExpression class="java.lang.String">
                    <![CDATA[$F{first_name}]]>
                </textFieldExpression>
            </textField> 

            <textField>
                <reportElement x="200" y="0" width="80" height="15" />

                <textElement textAlignment="Left" verticalAlignment="Middle"/>

                <textFieldExpression class="java.lang.String">
                    <![CDATA[$F{last_name}]]>
                </textFieldExpression>
            </textField>               

            <textField>
                <reportElement x="300" y="0" width="50" height="15"/>
                <textElement textAlignment="Right" verticalAlignment="Middle"/>

                <textFieldExpression class="java.lang.Integer">
                    <![CDATA[$F{age}]]>
                </textFieldExpression>
            </textField>

           <textField>
                <reportElement x="380" y="0" width="80" height="15" />

                <textElement textAlignment="Left" verticalAlignment="Middle"/>

                <textFieldExpression class="java.lang.String">
                    <![CDATA[$F{pesel}]]>
                </textFieldExpression>
            </textField>         

        </band>
    </detail>

</jasperReport>

And the last thing we have to do is to properly set database connection pool settings. A natural choice for Spring Boot application is Tomcat JDBC pool.

spring:
  application:
    name: jasper-service
  datasource:
    url: jdbc:mysql://192.168.99.100:33306/datagrid?useSSL=false
    username: datagrid
    password: datagrid
    tomcat:
      initial-size: 20
      max-active: 30

Final words

In this article I showed you how to avoid out of memory exception while generating large PDF reports with JasperReports. I compared three solutions: in memory generation and two methods based on cutting the jasper print into different files and save them on the hard drive. For me, the most interesting was the solution based on single swapped file with JRSwapFileVirtualizer. It is slower a little than in memory generation but works faster than similar tests for JRFileVirtualizer and in contrast to in memory generation didn’t avoid out of memory exception for files larger than 500kb with 20 requests per second.

Exposing Microservices over REST Protocol Buffers

Today exposing RESTful API with JSON protocol is the most common standard. We can find many articles describing advantages and disadvantages of JSON versus XML. Both these protocols exchange messages in text format. If an important aspect affecting to the choice of communication protocol in your systems is performance you should definitely pay attention to Protocol Buffers. It is a binary format created by Google as:

A language-neutral, platform-neutral, extensible way of serializing structured data for use in communications protocols, data storage, and more.

Protocol Buffers, which is sometimes referred as Protobuf is not only a message format but also a set of language rules that define the structure of messages. It is extremely useful in service to service communication what has been very well described in that article Beating JSON performance with Protobuf. In that example Protobuf was about 5 times faster than JSON for tests based on Spring Boot framework.

Introduction to Protocol Buffers can be found here. My sample is similar to previous samples from my weblog – it is based on two microservices account and customer which calls one of account’s endpoint. Let’s begin from message types definition provided inside .proto file. Place your .proto file in src/main/proto directory. Here’s account.proto defined in account service. We set java_package and java_outer_classname to define package and name of Java generated class. Message definition syntax is pretty intuitive. Account object generated from that file has three properties id, customerId and number. There is also Accounts object which wrappes list of Account objects.

syntax = "proto3";

package model;

option java_package = "pl.piomin.services.protobuf.account.model";
option java_outer_classname = "AccountProto";

message Accounts {
	repeated Account account = 1;
}

message Account {

	int32 id = 1;
	string number = 2;
	int32 customer_id = 3;

}

Here’s .proto file definition from customer service. It a little more complicated than the previous one from account service. In addition to its definitions it contains definitions of account service messages, because they are used by @Feign client.

syntax = "proto3";

package model;

option java_package = "pl.piomin.services.protobuf.customer.model";
option java_outer_classname = "CustomerProto";

message Accounts {
	repeated Account account = 1;
}

message Account {

	int32 id = 1;
	string number = 2;
	int32 customer_id = 3;

}

message Customers {
	repeated Customer customers = 1;
}

message Customer {

	int32 id = 1;
	string pesel = 2;
	string name = 3;
	CustomerType type = 4;
	repeated Account accounts = 5;

	enum CustomerType {
		INDIVIDUAL = 0;
		COMPANY = 1;
	}

}

We generate source code from the message definitions above by using protobuf-maven-plugin maven plugin. Plugin needs to have protocExecutable file location set. It can be downloaded from Google’s Protocol Buffer download site.

<plugin>
	<groupId>org.xolstice.maven.plugins</groupId>
	<artifactId>protobuf-maven-plugin</artifactId>
	<version>0.5.0</version>
	<executions>
		<execution>
			<id>protobuf-compile</id>
			<phase>generate-sources</phase>
			<goals>
				<goal>compile</goal>
			</goals>
			<configuration>
				<outputDirectory>src/main/generated</outputDirectory>
				<protocExecutable>${proto.executable}</protocExecutable>
			</configuration>
		</execution>
	</executions>
</plugin>

Protobuf classes are generated into src/main/generated output directory. Let’s add that source directory to maven sources with build-helper-maven-plugin.

<plugin>
	<groupId>org.codehaus.mojo</groupId>
	<artifactId>build-helper-maven-plugin</artifactId>
	<executions>
		<execution>
			<id>add-source</id>
			<phase>generate-sources</phase>
			<goals>
				<goal>add-source</goal>
			</goals>
			<configuration>
				<sources>
					<source>src/main/generated</source>
				</sources>
			</configuration>
		</execution>
	</executions>
</plugin>

Sample application source code is available on GitHub. Before proceeding to the next steps build application using mvn clean install command. Generated classes are available under src/main/generated and our microservices are ready to run. Now, let me describe some implementation details. We need two dependencies in maven pom.xml to use Protobuf.

<dependency>
	<groupId>com.google.protobuf</groupId>
	<artifactId>protobuf-java</artifactId>
	<version>3.3.1</version>
</dependency>
<dependency>
	<groupId>com.googlecode.protobuf-java-format</groupId>
	<artifactId>protobuf-java-format</artifactId>
	<version>1.4</version>
</dependency>

Then, we need to declare default HttpMessageConverter @Bean and inject it into RestTemplate @Bean.

    @Bean
    @Primary
    ProtobufHttpMessageConverter protobufHttpMessageConverter() {
        return new ProtobufHttpMessageConverter();
    }

    @Bean
    RestTemplate restTemplate(ProtobufHttpMessageConverter hmc) {
        return new RestTemplate(Arrays.asList(hmc));
    }

Here’s REST @Controller code. Account and Accounts from AccountProto generated class are returned as a response body in all three API methods visible below. All objects generated from .proto files have newBuilder method used for creating new object instances. I also set application/x-protobuf as default response content type.

@RestController
public class AccountController {

	@Autowired
	AccountRepository repository;

	protected Logger logger = Logger.getLogger(AccountController.class.getName());

	@RequestMapping(value = "/accounts/{number}", produces = "application/x-protobuf")
	public Account findByNumber(@PathVariable("number") String number) {
		logger.info(String.format("Account.findByNumber(%s)", number));
		return repository.findByNumber(number);
	}

	@RequestMapping(value = "/accounts/customer/{customer}", produces = "application/x-protobuf")
	public Accounts findByCustomer(@PathVariable("customer") Integer customerId) {
		logger.info(String.format("Account.findByCustomer(%s)", customerId));
		return Accounts.newBuilder().addAllAccount(repository.findByCustomer(customerId)).build();
	}

	@RequestMapping(value = "/accounts", produces = "application/x-protobuf")
	public Accounts findAll() {
		logger.info("Account.findAll()");
		return Accounts.newBuilder().addAllAccount(repository.findAll()).build();
	}

}

Method GET /accounts/customer/{customer} is called from customer service using @Feign client.

@FeignClient(value = "account-service")
public interface AccountClient {

    @RequestMapping(method = RequestMethod.GET, value = "/accounts/customer/{customerId}")
    Accounts getAccounts(@PathVariable("customerId") Integer customerId);

}

We can easily test described configuration using JUnit test class visible below.

@SpringBootTest(webEnvironment = WebEnvironment.RANDOM_PORT)
@RunWith(SpringRunner.class)
public class AccountApplicationTest {

	protected Logger logger = Logger.getLogger(AccountApplicationTest.class.getName());

	@Autowired
	TestRestTemplate template;

	@Test
	public void testFindByNumber() {
		Account a = this.template.getForObject("/accounts/{id}", Account.class, "111111");
		logger.info("Account[\n" + a + "]");
	}

	@Test
	public void testFindByCustomer() {
		Accounts a = this.template.getForObject("/accounts/customer/{customer}", Accounts.class, "2");
		logger.info("Accounts[\n" + a + "]");
	}

	@Test
	public void testFindAll() {
		Accounts a = this.template.getForObject("/accounts", Accounts.class);
		logger.info("Accounts[\n" + a + "]");
	}

	@TestConfiguration
	static class Config {

		@Bean
		public RestTemplateBuilder restTemplateBuilder() {
			return new RestTemplateBuilder().additionalMessageConverters(new ProtobufHttpMessageConverter());
		}

	}

}

Conclusion

This article shows how to enable Protocol Buffers for microservices project based on Spring Boot. Protocol Buffer is an alternative to text-based protocols like XML or JSON and surpasses them in terms of performance. Adapt to this protocol using in Spring Boot application is pretty simple. For microservices we can still uses Spring Cloud components like Feign or Ribbon in combination with Protocol Buffers same as with REST over JSON or XML.

Circuit Breaker, Fallback and Load Balancing with Apache Camel

Apache Camel has just released a new version of their framework – 2.19. In one of my previous articles on DZone I described details about microservices support which was released in the Camel 2.18 version. There are some new features in ServiceCall EIP component, which is responsible for microservice calls. You can see example source code which is based on the sample from my article on DZone. It is available on GitHub under new branch fallback.

In the code fragment below you can see DLS route’s configuration with support for Hystrix circuit breaker, Ribbon load balancer and Consul service discovery and registration. As a service discovery in the route definition you can also use some other solutions instead of Consul like etcd (etcServiceDiscovery) or Kubernetes (kubernetesServiceDiscovery).

from("direct:account")
	.to("bean:customerService?method=findById(${header.id})")
	.log("Msg: ${body}").enrich("direct:acc", new AggregationStrategyImpl());

from("direct:acc").setBody().constant(null)
	.hystrix()
		.hystrixConfiguration()
			.executionTimeoutInMilliseconds(2000)
		.end()
	.serviceCall()
		.name("account//account")
		.component("netty4-http")
		.ribbonLoadBalancer("ribbon-1")
		.consulServiceDiscovery("http://192.168.99.100:8500")
	.end()
	.unmarshal(format)
	.endHystrix()
	.onFallback()
	.to("bean:accountFallback?method=getAccounts");

We can easily configure all Hystrix’s parameters just by calling hystrixConfiguration method. In the sample above Hystrix waits max 2 seconds for the response from remote service. In case of timeout fallback @Bean is called. Fallback @Bean implementation is really simple – it return empty list.

@Service
public class AccountFallback {

	public List<Account> getAccounts() {
		return new ArrayList<>();
	}

}

Alternatively, configuration can be implemented using object delarations. Here is service call configuration with Ribbon and Consul. Additionally, we can provide some parameters to Ribbon like client read timeout or max retry attempts. Unfortunately it seems they doesn’t work in this version of Apache Camel 🙂 (you can try to test it by yourself). I hope this will be corrected soon.

ServiceCallConfigurationDefinition def = new ServiceCallConfigurationDefinition();

ConsulConfiguration config = new ConsulConfiguration();
config.setUrl("http://192.168.99.100:8500");
config.setComponent("netty4-http");
ConsulServiceDiscovery discovery = new ConsulServiceDiscovery(config);

RibbonConfiguration c = new RibbonConfiguration();
c.addProperty("MaxAutoRetries", "0");
c.addProperty("MaxAutoRetriesNextServer", "1");
c.addProperty("ReadTimeout", "1000");
c.setClientName("ribbon-1");
RibbonServiceLoadBalancer lb = new RibbonServiceLoadBalancer(c);
lb.setServiceDiscovery(discovery);

def.setComponent("netty4-http");
def.setLoadBalancer(lb);
def.setServiceDiscovery(discovery);
context.setServiceCallConfiguration(def);

I described similar case for Spring Cloud and Netflix OSS in one of my previous article. Just like in the example presented there, I also set here a delay inside account service, which depends on the port on which the microservice was started.

@Value("${port}")
private int port;

public List<Account> findByCustomerId(Integer customerId) {
	List<Account> l = new ArrayList<>();
	l.add(new Account(1, "1234567890", 4321, customerId));
	l.add(new Account(2, "1234567891", 12346, customerId));
	if (port%2 == 0) {
		try {
			Thread.sleep(5000);
		} catch (InterruptedException e) {
			e.printStackTrace();
		}
	}
	return l;
}

Results for Spring Cloud sample were much more satisfying. The introduced configuration parameters such as read timeout for Ribbon worked and in addition Hystrix was able to automatically redirect a much smaller number of requests to slow service – only 2% of the rest to the non-blocking thread instance for 5 seconds. This shows that Apache Camel still has a few things to improve if wants to compete in microservice’s support with Sprint Cloud framework.