The Spring Cloud Consul project provides integration for Consul and Spring Boot applications through auto-configuration. By using the well-known Spring Framework annotation style, we may enable and configure common patterns within microservice-based environments. These patterns include service discovery using Consul agent, distributed configuration using Consul key/value store, distributed events with Spring Cloud Bus, and Consul Events. The project also supports a client-side load balancer based on Netflix’s Ribbon and an API gateway based on Spring Cloud Gateway. Continue reading “Microservices with Spring Boot, Spring Cloud Gateway and Consul Cluster”
Tag: Consul

Using New Spring Cloud Load Balancer In Microservices Communication
Almost a year ago Spring Cloud has announced that most of Spring Cloud Netflix OSS projects will be moved to the maintenance mode starting from Spring Cloud Greenwich Release Train. In fact the maintenance mode only does not include Eureka, which still will be supported. I referred to that information in one of my previous articles The Future of Spring Cloud Microservices After Netflix Era. I have shared there some opinions about future of microservices with Spring Cloud. Of course, I also included an example of building microservices architecture without Netflix OSS using HashiCorp’s Consul, Spring Cloud Gateway and an early version of Spring Cloud LoadBalancer.
Continue reading “Using New Spring Cloud Load Balancer In Microservices Communication”
The Future of Spring Cloud Microservices After Netflix Era
If somebody would ask you about Spring Cloud, the first thing that comes into your mind will probably be Netflix OSS support. Support for such tools like Eureka, Zuul or Ribbon is provided not only by Spring, but also by some other popular frameworks used for building microservices architecture like Apache Camel, Vert.x or Micronaut. Currently, Spring Cloud Netflix is the most popular project being a part of Spring Cloud. It has around 3.2k stars on GitHub, while the second best has around 1.4k. Therefore, it is quite surprising that Pivotal has announced that most of Spring Cloud Netflix modules are entering maintenance mode. You can read more about in the post published on the Spring blog by Spencer Gibb https://spring.io/blog/2018/12/12/spring-cloud-greenwich-rc1-available-now. Continue reading “The Future of Spring Cloud Microservices After Netflix Era”

Quick Guide to Microservices with Micronaut Framework
Micronaut framework has been introduced as an alternative to Spring Boot for building microservice applications. At first glance it is very similar to Spring. It also implements such patterns like dependency injection and inversion of control based on annotations, however it uses JSR-330 (java.inject) for doing it. It has been designed specially in order to building serverless functions, Android applications, and low memory-footprint microservices. This means that it should faster startup time, lower memory usage or easier unit testing than competitive frameworks. However, today I don’t want to focus on those characteristics of Micronaut. I’m going to show you how to build simple microservices-based system using this framework. You can easily compare it with Spring Boot and Spring Cloud by reading my previous article about the same subject Quick Guide to Microservices with Spring Boot 2.0, Eureka and Spring Cloud. Does Micronaut have a change to gain the same popularity as Spring Boot? Let’s find out. Continue reading “Quick Guide to Microservices with Micronaut Framework”

Secure Spring Cloud Microservices with Vault and Nomad
One of the significant topics related to microservices security is managing and protecting sensitive data like tokens, passwords or certificates used by your application. As a developer you probably often implement a software that connects with external databases, message brokers or just the other applications. How do you store the credentials used by your application? To be honest, most of the software code I have seen in my life just stored a sensitive data as a plain text in the configuration files. Thanks to that, I could always be able to retrieve the credentials to every database I needed at a given time just by looking at the application source code. Of course, we can always encrypt sensitive data, but if we working with many microservices having separated databases I may not be very comfortable solution. Continue reading “Secure Spring Cloud Microservices with Vault and Nomad”
Kotlin Microservices with Ktor
Ktor is a framework for building asynchronous applications on the server and client side. It is fully written in Kotlin. The main goal of Ktor is to provide an end-to-end multiplatform application framework for connected applications. It allows to easily build web applications and HTTP services, so we can be use it for building microservices-based architecture. Let’s discuss the main features of Ktor framework by the example of a simple system consisting of two microservices. Continue reading “Kotlin Microservices with Ktor”
Deploying Spring Cloud Microservices on Hashicorp’s Nomad
Nomad is a little less popular HashiCorp’s cloud product than Consul, Terraform or Vault. It is also not as popular as a competitive software like Kubernetes and Docker Swarm. However, it has its advantages. While Kubernetes is specifically focused on Docker, Nomad is more general purpose. It supports containerized Docker applications as well as simple applications delivered as an executable JAR files. Besides that, Nomad is architecturally much simpler. It is a single binary, both for clients and servers, and does not require any services for coordination or storage.
In this article I’m going to show you how to install, configure and use Nomad in order to run on it some microservices created in Spring Boot and Spring Cloud frameworks. Let’s move on.
Step 1. Installing and running Nomad
HashiCorp’s Nomad can be easily started on Windows. You just have to download it from the following site https://www.nomadproject.io/downloads.html, and then add nomad.exe file to your PATH. Now you are able to run Nomad commands from your command-line. Let’s begin from starting Nomad agent. For simplicity, we will run it in development mode (-dev). With this option it is acting both as a client and a server. Here’s command that starts Nomad agent on my local machine.
nomad agent -dev -network-interface="WiFi" -consul-address=192.168.99.100:8500
Sometimes you could be required to pass selected network interface as a parameter. We also need to integrate agent node with Consul discovery for the purpose of inter-service communication discussed in the next part of this article. The most suitable way to run Consul on your local machine is through a Docker container. Here’s the command that launches single node Consul discovery server and exposes it on port 8500. If you run Docker on Windows it is probably available under address 192.168.99.100.
docker run -d --name consul -p 8500:8500 consul
Step 2. Creating job
Nomad is a tool for managing a cluster of machines and running applications on them. To run the application there we should first create job. Job is the primary configuration unit that users interact with when using Nomad. Job is a specification of tasks that should be ran by Nomad. The job consists of multiple groups, and each group may have multiple tasks.
There are some properties that has to be provided, for example datacenters. You should also set type parameter that indicates scheduler type. I set type service, which is designed for scheduling long lived services that should never go down, like an application exposing HTTP API.
Let’s take a look on Nomad’s job descriptor file. The most important elements of that configuration has been marked by the sequence numbers:
- Property
countspecifies the number of the task groups that should be running under this group. In practice it scales up number of instances of the service started by the task. Here, it has been set to2. - Property
driverspecifies the driver that should be used by Nomad clients to run the task. The driver name corresponds to a technology used for running the application. For example we can setdocker,rktfor containerization solutions orjavafor executing Java applications packaged into a Java JAR file. Here, the property has been set tojava. - After settings the driver we should provide some configuration for this driver in the job spec. There are some options available for
javadriver. But I decided to set the absolute path to the downloaded JAR and some JVM options related to the memory limits. - We may set some requirements for the task including memory, network, CPU, and more. Our task requires max 300 MB or RAM, and enables dynamic port allocation for the port labeled “http”.
- Now, it is required to point out very important thing. When the task is started, it is passed an additional environment variable named
NOMAD_HOST_PORT_httpwhich indicates the host port that the HTTP service is bound to. The suffixhttprelates to the label set for the port. - Property
serviceinside task specifies integrations with Consul for service discovery. Now, Nomad automatically registers a task with the provided name when a task is started and de-registers it when the task dies. As you probably remember, the port number is generated automatically by Nomad. However, I passed the label http to force Nomad to register in Consul with automatically generated port.
job "caller-service" {
	datacenters = ["dc1"]
	type = "service"
	group "caller" {
		count = 2 # (1)
		task "api" {
			driver = "java" # (2)
			config { # (3)
				jar_path    = "C:\\Users\\minkowp\\git\\sample-nomad-java-services\\caller-service\\target\\caller-service-1.0.0-SNAPSHOT.jar"
				jvm_options = ["-Xmx256m", "-Xms128m"]
			}
			resources { # (4)
				cpu    = 500
				memory = 300
				network {
					port "http" {} # (5)
				}
			}
			service { # (6)
				name = "caller-service"
				port = "http"
			}
		}
		restart {
			attempts = 1
		}
	}
}
Once we saved the content visible above as job.nomad file, we may apply it to the Nomad node by executing the following command.
nomad job run job.nomad
Step 3. Building sample microservices
Source code of sample applications is available on GitHub in my repository sample-nomad-java-services. There are two simple microservices callme-service and caller-service. I have already use that sample for in the previous articles for showing inter-service communication mechanism. Microservice callme-service does nothing more than exposing endpoint GET /callme/ping that displays service’s name and version.
@RestController
@RequestMapping("/callme")
public class CallmeController {

	private static final Logger LOGGER = LoggerFactory.getLogger(CallmeController.class);

	@Autowired
	BuildProperties buildProperties;

	@GetMapping("/ping")
	public String ping() {
		LOGGER.info("Ping: name={}, version={}", buildProperties.getName(), buildProperties.getVersion());
		return buildProperties.getName() + ":" + buildProperties.getVersion();
	}

}
Implementation of caller-service endpoint is a little bit more complicated. First we have to connect our service with Consul in order to fetch list of registered instances of callme-service. Because we use Spring Boot for creating sample microservices, the most suitable way to enable Consul client is through Spring Cloud Consul library.
<dependency>
	<groupId>org.springframework.cloud</groupId>
	<artifactId>spring-cloud-starter-consul-discovery</artifactId>
</dependency>
We should override auto-configured connection settings in application.yml. In addition to host and property we have also set spring.cloud.consul.discovery.register property to false. We don’t want discovery client to register application in Consul after startup, because it has been already performed by Nomad.
spring:
  application:
    name: caller-service
  cloud:
    consul:
      host: 192.168.99.100
      port: 8500
      discovery:
        register: false
Then we should enable Spring Cloud discovery client and RestTemplate load balancer in the main class of application.
@SpringBootApplication
@EnableDiscoveryClient
public class CallerApplication {

	public static void main(String[] args) {
		SpringApplication.run(CallerApplication.class, args);
	}

	@Bean
	@LoadBalanced
	RestTemplate restTemplate() {
		return new RestTemplate();
	}

}
Finally, we can implement method GET /caller/ping that call endpoint exposed by callme-service.
@RestController
@RequestMapping("/caller")
public class CallerController {

	private static final Logger LOGGER = LoggerFactory.getLogger(CallerController.class);

	@Autowired
	BuildProperties buildProperties;
	@Autowired
	RestTemplate restTemplate;

	@GetMapping("/ping")
	public String ping() {
		LOGGER.info("Ping: name={}, version={}", buildProperties.getName(), buildProperties.getVersion());
		String response = restTemplate.getForObject("http://callme-service/callme/ping", String.class);
		LOGGER.info("Calling: response={}", response);
		return buildProperties.getName() + ":" + buildProperties.getVersion() + ". Calling... " + response;
	}

}
As you probably remember the port of application is automatically generated by Nomad during task execution. It passes an additional environment variable named NOMAD_HOST_PORT_http to the application. Now, this environment variable should be configured inside application.yml file as the value of server.port property.
server:
  port: ${NOMAD_HOST_PORT_http:8090}
The last step is to build the whole project sample-nomad-java-services with mvn clean install command.
Step 4. Using Nomad web console
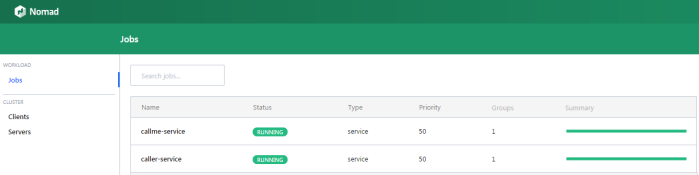
During two previous steps we have created, build and deployed our sample applications on Nomad. Now, we should verify the installation. We can do it using CLI or by visiting web console provided by nomad. Web console is available under address http://localhost:4646.
In the main site of web console we may see the summery of existing jobs. If everything goes fine field status is equal to RUNNING and bar Summary is green.
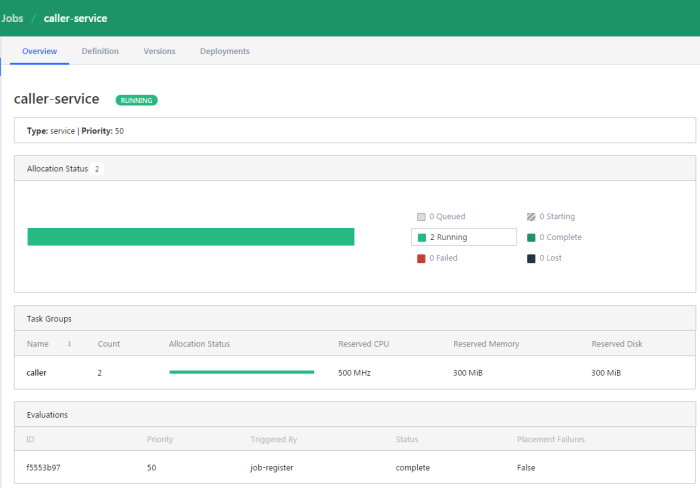
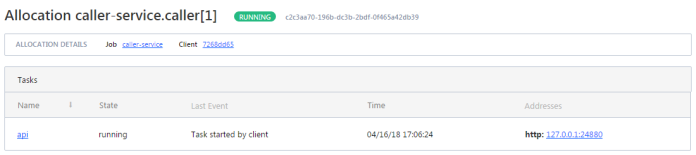
We can display the details of every job in the list. The next screen shows the history of the job, reserved resources and number of running instances (tasks).
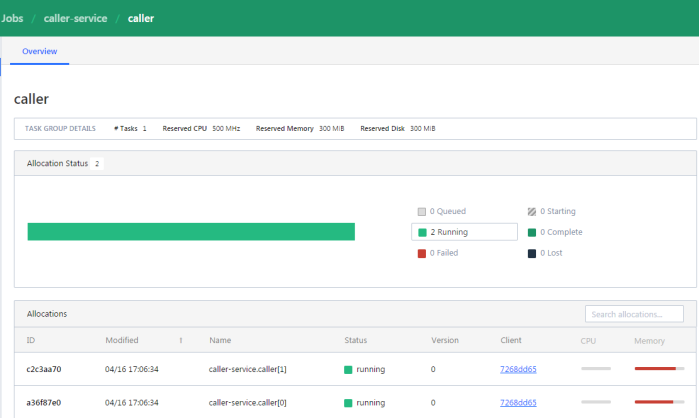
If you would like to check out the details related to the single task, you should navigate to Task Group details.
We may also display the details related to the client node.
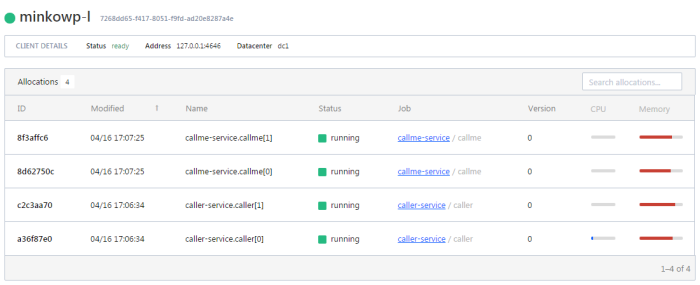
To display the details of allocation select the row in the table. You would be redirected to the following site. You may check out there an IP address of the application instance.
Step 5. Testing a sample system
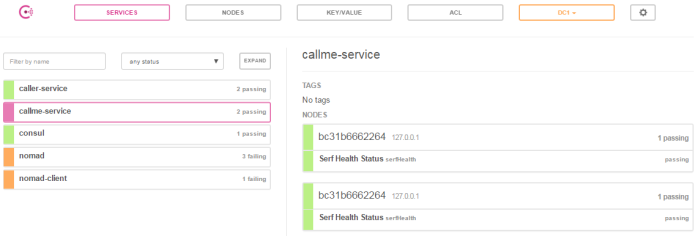
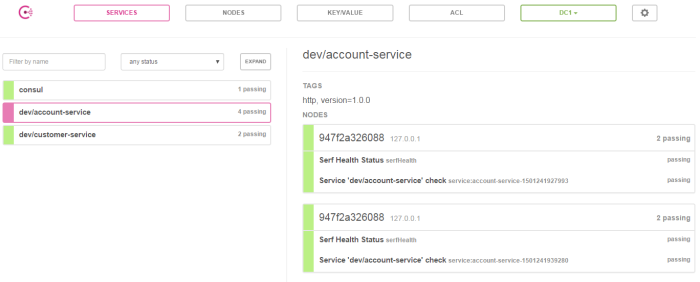
Assuming you have succesfully deployed the applications on Nomad you should see the following services registered in Consul.
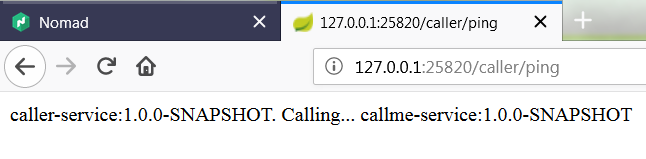
Now, if you call one of two available instances of caller-service, you should see the following response. The address of callme-service instance has been succesfully fetched from Consul through Spring Cloud Consul Client.

Asynchronous Microservices with Vert.x
Preface
I must admit that as soon as I saw Vert.x documentation I liked this concept. This may have happened because I had previously use with very similar framework which I used to create simple and lightweight applications exposing REST APIs – Node.js. It is really fine framework, but has one big disadvantage for me – it is JavaScript runtime. What is worth mentioning Vert.x is polyglot, it supports all the most popular JVM based languages like Java, Scala, Groovy, Kotlin and even JavaScript. These are not all of its advantages. It’s lightweight, fast and modular. I was pleasantly surprised when I added the main Vert.x dependencies to my pom.xml and there was not downloaded many of other dependencies, as is often the case when using Spring Boot framework.
Well, I will not elaborate about the advantages and key concepts of this toolkit. I think you can read more about it in other articles. The most important thing for us is that using Vert.x we can can create high performance and asynchronous microservices based on Netty framework. In addition, we can use standardized microservices mechanisms such as service discovery, configuration server or circuit breaking.
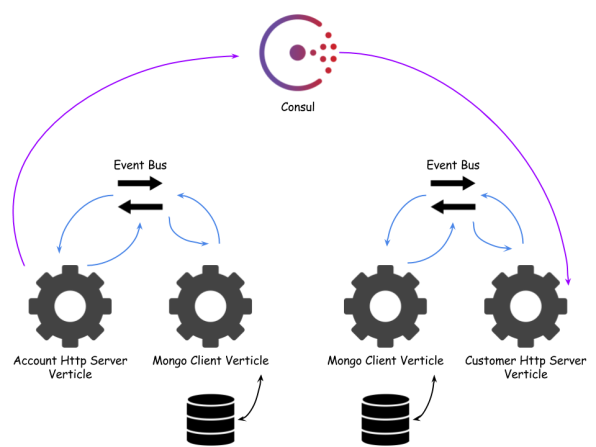
Sample application source code is available on Github. It consists of two modules account-vertx-service and customer-vertx-service. Customer service retrieves data from Consul registry and invokes acccount service API. Architecture of the sample solution is visible on the figure below.
Building services
To be able to create HTTP service exposing REST API we need to include the following dependency into pom.xml.
<dependency>
	<groupId>io.vertx</groupId>
	<artifactId>vertx-web</artifactId>
	<version>${vertx.version}</version>
</dependency>
Here’s the fragment from account service where I defined all API methods. The first step (1) was to declare Router which is one of the core concepts of Vert.x-Web. A router takes an HTTP request, finds the first matching route for that request, and passes the request to that route. The next step (2), (3) is to add some handlers, for example BodyHandler, which allows you to retrieve request bodies and has been added to POST method. Then we can begin to define API methods (4), (5), (6), (7), (8). And finally (9) we are starting HTTP server on the port retrieved from configuration.
Router router = Router.router(vertx); // (1)
router.route("/account/*").handler(ResponseContentTypeHandler.create()); // (2)
router.route(HttpMethod.POST, "/account").handler(BodyHandler.create()); // (3)
router.get("/account/:id").produces("application/json").handler(rc -> { // (4)
	repository.findById(rc.request().getParam("id"), res -> {
		Account account = res.result();
		LOGGER.info("Found: {}", account);
		rc.response().end(account.toString());
	});
});
router.get("/account/customer/:customer").produces("application/json").handler(rc -> { // (5)
	repository.findByCustomer(rc.request().getParam("customer"), res -> {
		List<Account> accounts = res.result();
		LOGGER.info("Found: {}", accounts);
		rc.response().end(Json.encodePrettily(accounts));
	});
});
router.get("/account").produces("application/json").handler(rc -> { // (6)
	repository.findAll(res -> {
		List<Account> accounts = res.result();
		LOGGER.info("Found all: {}", accounts);
		rc.response().end(Json.encodePrettily(accounts));
	});
});
router.post("/account").produces("application/json").handler(rc -> { // (7)
	Account a = Json.decodeValue(rc.getBodyAsString(), Account.class);
	repository.save(a, res -> {
		Account account = res.result();
		LOGGER.info("Created: {}", account);
		rc.response().end(account.toString());
	});
});
router.delete("/account/:id").handler(rc -> { // (8)
	repository.remove(rc.request().getParam("id"), res -> {
		LOGGER.info("Removed: {}", rc.request().getParam("id"));
		rc.response().setStatusCode(200);
	});
});
...
vertx.createHttpServer().requestHandler(router::accept).listen(conf.result().getInteger("port")); // (9)
All API methods uses repository object to communicate with datasource. In this case I decided to use Mongo. Vert.x has a module for interacting with that database, we need to include as new dependency.
<dependency>
	<groupId>io.vertx</groupId>
	<artifactId>vertx-mongo-client</artifactId>
	<version>${vertx.version}</version>
</dependency>
Mongo client, same as all other Vert.x modules, works asynchronously. That’s why we need to use AsyncResult Handler to pass result from repository object. To be able to pass custom object as AsyncResult we have to annotate it with @DataObject and add toJson method.
public AccountRepositoryImpl(final MongoClient client) {
	this.client = client;
}

@Override
public AccountRepository save(Account account, Handler<AsyncResult<Account>> resultHandler) {
	JsonObject json = JsonObject.mapFrom(account);
	client.save(Account.DB_TABLE, json, res -> {
		if (res.succeeded()) {
			LOGGER.info("Account created: {}", res.result());
			account.setId(res.result());
			resultHandler.handle(Future.succeededFuture(account));
		} else {
			LOGGER.error("Account not created", res.cause());
			resultHandler.handle(Future.failedFuture(res.cause()));
		}
	});
	return this;
}

@Override
public AccountRepository findAll(Handler<AsyncResult<List<Account>>> resultHandler) {
	client.find(Account.DB_TABLE, new JsonObject(), res -> {
		if (res.succeeded()) {
			List<Account> accounts = res.result().stream().map(it -> new Account(it.getString("_id"), it.getString("number"), it.getInteger("balance"), it.getString("customerId"))).collect(Collectors.toList());
			resultHandler.handle(Future.succeededFuture(accounts));
		} else {
			LOGGER.error("Account not found", res.cause());
			resultHandler.handle(Future.failedFuture(res.cause()));
		}
	});
	return this;
}
Here’s Account model class.
@DataObject
public class Account {

	public static final String DB_TABLE = "account";

	private String id;
	private String number;
	private int balance;
	private String customerId;

	public Account() {

	}

	public Account(String id, String number, int balance, String customerId) {
		this.id = id;
		this.number = number;
		this.balance = balance;
		this.customerId = customerId;
	}

	public Account(JsonObject json) {
		this.id = json.getString("id");
		this.number = json.getString("number");
		this.balance = json.getInteger("balance");
		this.customerId = json.getString("customerId");
	}

	public String getId() {
		return id;
	}

	public void setId(String id) {
		this.id = id;
	}

	public String getNumber() {
		return number;
	}

	public void setNumber(String number) {
		this.number = number;
	}

	public int getBalance() {
		return balance;
	}

	public void setBalance(int balance) {
		this.balance = balance;
	}

	public String getCustomerId() {
		return customerId;
	}

	public void setCustomerId(String customerId) {
		this.customerId = customerId;
	}

	public JsonObject toJson() {
		return JsonObject.mapFrom(this);
	}

	@Override
	public String toString() {
		return Json.encodePrettily(this);
	}

}
Verticles
It is worth to mention a few words about running an application written in Vert.x. It is based on verticles. Verticles are chunks of code that get deployed and run by Vert.x. A Vert.x instance maintains N event loop threads by default. When creating a verticle we have to extend abstract class AbstractVerticle.
public class AccountServer extends AbstractVerticle {

	@Override
	public void start() throws Exception {
		...
	}
}
I created two verticles per microservice. First for HTTP server and second for communication with Mongo. Here’s main application method where I’m deploying verticles.
public static void main(String[] args) throws Exception {
	Vertx vertx = Vertx.vertx();
	vertx.deployVerticle(new MongoVerticle());
	vertx.deployVerticle(new AccountServer());
}
Well, now we should obtain the reference inside AccountServer verticle to the service running on MongoVerticle. To achieve it we have to generate proxy classes using vertx-codegen module.
<dependency>
	<groupId>io.vertx</groupId>
	<artifactId>vertx-service-proxy</artifactId>
	<version>${vertx.version}</version>
</dependency>
<dependency>
	<groupId>io.vertx</groupId>
	<artifactId>vertx-codegen</artifactId>
	<version>${vertx.version}</version>
	<scope>provided</scope>
</dependency>
First, annotate repository interface with @ProxyGen ad all public methods with @Fluent.
@ProxyGen
public interface AccountRepository {

	@Fluent
	AccountRepository save(Account account, Handler<AsyncResult<Account>> resultHandler);

	@Fluent
	AccountRepository findAll(Handler<AsyncResult<List<Account>>> resultHandler);

	@Fluent
	AccountRepository findById(String id, Handler<AsyncResult<Account>> resultHandler);

	@Fluent
	AccountRepository findByCustomer(String customerId, Handler<AsyncResult<List<Account>>> resultHandler);

	@Fluent
	AccountRepository remove(String id, Handler<AsyncResult<Void>> resultHandler);

	static AccountRepository createProxy(Vertx vertx, String address) {
		return new AccountRepositoryVertxEBProxy(vertx, address);
	}

	static AccountRepository create(MongoClient client) {
		return new AccountRepositoryImpl(client);
	}

}
Generator needs additional configuration inside pom.xml file. After running command mvn clean install on the parent project all generated classes should be available under src/main/generated directory for every microservice module.
<plugin>
	<groupId>org.apache.maven.plugins</groupId>
	<artifactId>maven-compiler-plugin</artifactId>
	<version>3.6.2</version>
	<configuration>
		<encoding>${project.build.sourceEncoding}</encoding>
		<source>${java.version}</source>
		<target>${java.version}</target>
		<useIncrementalCompilation>false</useIncrementalCompilation>
		<annotationProcessors>		<annotationProcessor>io.vertx.codegen.CodeGenProcessor</annotationProcessor>
		</annotationProcessors>
		<generatedSourcesDirectory>${project.basedir}/src/main/generated</generatedSourcesDirectory>
		<compilerArgs>
			<arg>-AoutputDirectory=${project.basedir}/src/main</arg>
		</compilerArgs>
	</configuration>
</plugin>
Now we are able to obtain AccountRepository reference by calling createProxy with account-service name.
AccountRepository repository = AccountRepository.createProxy(vertx, "account-service");
Service Discovery
To use the Vert.x service discovery, we have to add the following dependencies into pom.xml. In the first of them there are mechanisms for built-in Vert.x discovery, which is rather not usable if we would like to invoke microservices running on different hosts. Fortunately, there are also available some additional bridges, for example Consul bridge.
<dependency>
	<groupId>io.vertx</groupId>
	<artifactId>vertx-service-discovery</artifactId>
	<version>${vertx.version}</version>
</dependency>
<dependency>
	<groupId>io.vertx</groupId>
	<artifactId>vertx-service-discovery-bridge-consul</artifactId>
	<version>${vertx.version}</version>
</dependency>
Great, we only have to declare service discovery and register service importer. Now, we can retrieve configuration from Consul, but I assume we also would like to register our service. Unfortunately, problems start here… Like the toolkit authors say It (Vert.x) does not export to Consul and does not support service modification. Maybe somebody will explain me why this library can not also export data to Consul – I just do not understand it. I had the same problem with Apache Camel some months ago and I will use the same solution I developed that time. Fortunately, Consul has simple API for service registration and deregistration. To use it in our appplication we need to include Vert.x HTTP client to our dependencies.
<dependency>
	<groupId>io.vertx</groupId>
	<artifactId>vertx-web-client</artifactId>
	<version>${vertx.version}</version>
</dependency>
Then using declared WebClient while starting application we can register service by invoking Consul PUT method.
WebClient client = WebClient.create(vertx);
...
JsonObject json = new JsonObject().put("ID", "account-service-1").put("Name", "account-service").put("Address", "127.0.0.1").put("Port", 2222).put("Tags", new 		JsonArray().add("http-endpoint"));
client.put(discoveryConfig.getInteger("port"), discoveryConfig.getString("host"), "/v1/agent/service/register").sendJsonObject(json, res -> {
	LOGGER.info("Consul registration status: {}", res.result().statusCode());
});
Once the account-service have registered itself on discovery server we can invoke it from another microservice – in this case from customer-service. We only have to create ServiceDiscovery object and register Consul service importer.
ServiceDiscovery discovery = ServiceDiscovery.create(vertx);
...
discovery.registerServiceImporter(new ConsulServiceImporter(), new JsonObject().put("host", discoveryConfig.getString("host")).put("port", discoveryConfig.getInteger("port")).put("scan-period", 2000));
Here’s AccountClient fragment, which is responsile for invoking GET /account/customer/{customerId} from account-service. It obtains service reference from discovery object and cast it to WebClient instance. I don’t know if you have noticed that apart from the standard fields such as ID, Name or Port, I also set the Tags field to the value of the type of service that we register. In this case it will be an http-endpoint. Whenever Vert.x reads data from Consul, it will be able to automatically assign a service reference to WebClient object.
public AccountClient findCustomerAccounts(String customerId, Handler<AsyncResult<List<Account>>> resultHandler) {
	discovery.getRecord(r -> r.getName().equals("account-service"), res -> {
		LOGGER.info("Result: {}", res.result().getType());
		ServiceReference ref = discovery.getReference(res.result());
		WebClient client = ref.getAs(WebClient.class);
		client.get("/account/customer/" + customerId).send(res2 -> {
			LOGGER.info("Response: {}", res2.result().bodyAsString());
			List<Account> accounts = res2.result().bodyAsJsonArray().stream().map(it -> Json.decodeValue(it.toString(), Account.class)).collect(Collectors.toList());
			resultHandler.handle(Future.succeededFuture(accounts));
		});
	});
	return this;
}
Config
For configuration management within the application Vert.x Config module is responsible.
<dependency>
	<groupId>io.vertx</groupId>
	<artifactId>vertx-config</artifactId>
	<version>${vertx.version}</version>
</dependency>
There are many configuration stores, which can be used as configuration data location:
- File
- Environment Variables
- HTTP
- Event Bus
- Git
- Redis
- Consul
- Kubernetes
- Spring Cloud Config Server
I selected the simplest one – file. But it can be easily changed only by defining another type on ConfigStoreOptions object. For loading configuration data from the store ConfigRetriever is responsible. It reads configuration as JsonObject.
ConfigStoreOptions file = new ConfigStoreOptions().setType("file").setConfig(new JsonObject().put("path", "application.json"));
ConfigRetriever retriever = ConfigRetriever.create(vertx, new ConfigRetrieverOptions().addStore(file));
retriever.getConfig(conf -> {
	JsonObject discoveryConfig = conf.result().getJsonObject("discovery");
	vertx.createHttpServer().requestHandler(router::accept).listen(conf.result().getInteger("port"));
	JsonObject json = new JsonObject().put("ID", "account-service-1").put("Name", "account-service").put("Address", "127.0.0.1").put("Port", 2222).put("Tags", new JsonArray().add("http-endpoint"));
	client.put(discoveryConfig.getInteger("port"), discoveryConfig.getString("host"), "/v1/agent/service/register").sendJsonObject(json, res -> {
		LOGGER.info("Consul registration status: {}", res.result().statusCode());
	});
});
Configuration file application.json is available under src/main/resources and it contains application port, service discovery and datasource adresses.
{
	"port" : 2222,
	"discovery" : {
		"host" : "192.168.99.100",
		"port" : 8500
	},
	"datasource" : {
		"host" : "192.168.99.100",
		"port" : 27017,
		"db_name" : "test"
	}
}
Final thoughts
Vert.x authors wouldn’t like to define their solution as a framework, but as a tool-kit. They don’t tell you what is a correct way to write an application, but only give you a lot of useful bricks helping to create your app. With Vert.x you can create fast and lightweight APIs basing on non-blocking, asynchronous I/O. It gives you a lot of possibilities, as you can see on the Config module example, where you can even use Spring Cloud Config Server as a configuration store. But it is also not free from drawbacks, as I showed on the service registration with Consul example. Vert.x also allows to create reactive microservices with RxJava, what seems to be interesting option, I hope to describe in the future.

JavaEE MicroProfile with KumuluzEE
Preface
Enterprise Java seems to be a step back from the others when it comes to microservices architecture. Some weeks ago I took a part in Code Europe – the programming conference in Warsaw. One of the speakers was Ivar Grimstad who was talking about MicroProfile – an open initiative for optimizing Enterprise Java for a microservices architecture. This idea is very interesting, but at the moment it is rather at the beginning of the road.
However, while I was reading about the microprofile initiative I came across information about JavaEE framework developed by Slovenian company – KumuluzEE. The solution seemed to be interesting enough that I decided to take a closer look on it. Well, we can read on the web site that KumuluzEE is the Java Duke’s Choice Award Winner, so there is still a hope for JavaEE and microservices 🙂
What’s KumuluzEE
Can KumuluzEE be a competitor for the Spring Cloud framework? He is certainly not as popular and advanced in the solutions for microservices like Spring Cloud, but has basic modules for service registration, discovery, distributed configuration propagation, circuit breaking, metrics and support for Docker and Kubernetes. It uses CDI on JBoss Weld container for dependency injection and Jersey as a REST API provider. Modules for configuration and discovery basing on Consul or etcd and they are rather on early stage of development (1.0.0-SNAPSHOT), but let’s try it out.
Preparation
I’ll show you sample application which consists of two independent microservices account-service and customer-service. Both of them exposes REST API and one of customer-service methods invokes method from account-service. Every microservice registers itself in Consul and is able to get configuration properties from Consul. Sample application source code is available on GitHub. Before we begin let’s start Consul instance using Docker container.
docker run -d --name consul -p 8500:8500 -p 8600:8600 consul
We should also add some KumuluzEE dependencies to Maven pom.xml.
<dependency>
	<groupId>com.kumuluz.ee</groupId>
	<artifactId>kumuluzee-core</artifactId>
</dependency>
<dependency>
	<groupId>com.kumuluz.ee</groupId>
	<artifactId>kumuluzee-servlet-jetty</artifactId>
</dependency>
<dependency>
	<groupId>com.kumuluz.ee</groupId>
	<artifactId>kumuluzee-jax-rs-jersey</artifactId>
</dependency>
<dependency>
	<groupId>com.kumuluz.ee</groupId>
	<artifactId>kumuluzee-cdi-weld</artifactId>
</dependency>
Service Registration
To enable service registration we should add one additional dependency to our pom.xml. I chose Consul as a registration and discovery server, but you can also use etcd (kumuluzee-discovery-consul).
<dependency>
	<groupId>com.kumuluz.ee.discovery</groupId>
	<artifactId>kumuluzee-discovery-consul</artifactId>
	<version>1.0.0-SNAPSHOT</version>
</dependency>
Inside application configuration file we should set discovery properties and server URL. For me it is 192.168.99.100.
kumuluzee:
  service-name: account-service
  env: dev
  version: 1.0.0
  discovery:
    consul:
      agent: http://192.168.99.100:8500
      hosts: http://192.168.99.100:8500
    ttl: 20
    ping-interval: 15
Here’s account microservice main class. As you probably guess annotation @RegisterService enables registration on server.
@RegisterService("account-service")
@ApplicationPath("v1")
public class AccountApplication extends Application {

}
We are starting application by running java -cp target/classes;target/dependency/* com.kumuluz.ee.EeApplication. Remember to override default port by setting environment property PORT. I started two instances of account and one of customer microservice.
Service Discovery
Microservice customer exposes API, but also invokes API method from account-service, so it has to discover and connect this service. Maven dependencies and configuration settings are the same as for account-service. The only difference is the resource class. Here’s CustomerResource fragment where we are invoking enpoint GET /customer/{id}.
@Consumes(MediaType.APPLICATION_JSON)
@Produces(MediaType.APPLICATION_JSON)
@Path("customers")
@RequestScoped
public class CustomerResource {

	private List<Customer> customers;

	@Inject
	@DiscoverService(value = "account-service", version = "1.0.x", environment = "dev")
	private WebTarget target;

	...

	@GET
	@Path("{id}")
	@Log(value = LogParams.METRICS, methodCall = true)
	public Customer findById(@PathParam("id") Integer id) {
		Customer customer = customers.stream().filter(it -> it.getId().intValue() == id.intValue()).findFirst().get();
		WebTarget t = target.path("v1/accounts/customer/" + customer.getId());
		List<Account> accounts = t.request().buildGet().invoke(List.class);
		customer.setAccounts(accounts);
		return customer;
	}

}
There is one pretty cool thing in discovery with KumuluzEE. As you see in the @DiscoverService we can specify version and environment for account-service instance. Version and environment for microservice is read automatically from config.yml during registration in discovery server. So we can maintain many versions of single microservice and freely invoke them from other microservices. Requests are automatically load balanced between all microservices matches conditions from annotation @ServiceDiscovery.
We can also monitor metrics such as response time by declaring @Log(value = LogParams.METRICS, methodCall = true) on API method. Here’s log fragment for account-service.
2017-07-28 13:57:01,114 TRACE ENTRY[ METHOD ] Entering method. {class=pl.piomin.services.kumuluz.account.resource.AccountResource, method=findByCustomer, parameters=[1]}
2017-07-28 13:57:01,118 TRACE EXIT[ METHOD ] Exiting method. {class=pl.piomin.services.kumuluz.account.resource.AccountResource, method=findByCustomer, parameters=[1], response-time=3, result=[pl.piomin.services.kumuluz.account.model.Account@1eb26fe3, pl.piomin.services.kumuluz.account.model.Account@2dda41c5]}
Distributed configuration
To enable KumuluzEE Config include Consul implementation by adding the following dependency to pom.xml.
<dependency>
	<groupId>com.kumuluz.ee.config</groupId>
	<artifactId>kumuluzee-config-consul</artifactId>
	<version>1.0.0-SNAPSHOT</version>
</dependency>
I do not use Consul agent running on localhost, so I need to override some properties in config.yml. I also defined one configuration property blacklist
kumuluzee:
  config:
    start-retry-delay-ms: 500
    max-retry-delay-ms: 900000
    consul:
      agent: http://192.168.99.100:8500

rest-config:
  blacklist:
Here’s the class that loads configuration properties and enables dynamically updated on any change in configuration source by declaring @ConfigValue(watch = true) on property.
@ApplicationScoped
@ConfigBundle("rest-config")
public class AccountConfiguration {

	@ConfigValue(watch = true)
	private String blacklist;

	public String getBlacklist() {
		return blacklist;
	}

	public void setBlacklist(String blacklist) {
		this.blacklist = blacklist;
	}

}
We use configution property blacklist in the resource class for filtering all accounts by blacklisted ids.
@GET
@Log(value = LogParams.METRICS, methodCall = true)
public List<Account> findAll() {
	final String blacklist = ConfigurationUtil.getInstance().get("rest-config.blacklist").orElse("nope");
	final String[] ids = blacklist.split(",");
	final List<Integer> blacklistIds = Arrays.asList(ids).stream().map(it -> new Integer(it)).collect(Collectors.toList());
	return accounts.stream().filter(it -> !blacklistIds.contains(it.getId())).collect(Collectors.toList());
}
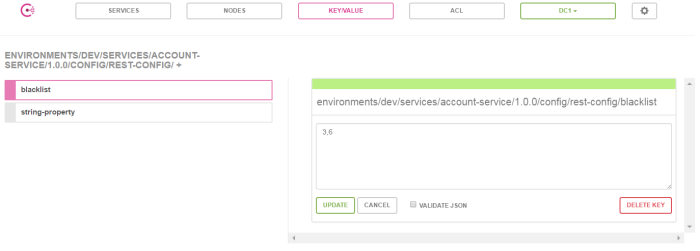
Configuration property should be defined in Consul UI Dashboard under KEY/VALUE tab. KumuluzEE enforces a certain format of key name. In this case it has to be environments/dev/services/account-service/1.0.0/config/rest-config/blacklist. You can update property value and test changes by invoking http://localhost:2222/v1/accounts.
Final Words
Creating microservices with KumuluzEE is pretty easy. I showed you the main capabilities of this framework. KumulezEE has also modules for bircuit breaker with Hystrix, streaming with Apache Kafka and security with OAuth2/OpenID. I will keep a close eye on this library and I hope it will continue to be developed.

Circuit Breaker, Fallback and Load Balancing with Apache Camel
Apache Camel has just released a new version of their framework – 2.19. In one of my previous articles on DZone I described details about microservices support which was released in the Camel 2.18 version. There are some new features in ServiceCall EIP component, which is responsible for microservice calls. You can see example source code which is based on the sample from my article on DZone. It is available on GitHub under new branch fallback.
In the code fragment below you can see DLS route’s configuration with support for Hystrix circuit breaker, Ribbon load balancer and Consul service discovery and registration. As a service discovery in the route definition you can also use some other solutions instead of Consul like etcd (etcServiceDiscovery) or Kubernetes (kubernetesServiceDiscovery).
from("direct:account")
	.to("bean:customerService?method=findById(${header.id})")
	.log("Msg: ${body}").enrich("direct:acc", new AggregationStrategyImpl());

from("direct:acc").setBody().constant(null)
	.hystrix()
		.hystrixConfiguration()
			.executionTimeoutInMilliseconds(2000)
		.end()
	.serviceCall()
		.name("account//account")
		.component("netty4-http")
		.ribbonLoadBalancer("ribbon-1")
		.consulServiceDiscovery("http://192.168.99.100:8500")
	.end()
	.unmarshal(format)
	.endHystrix()
	.onFallback()
	.to("bean:accountFallback?method=getAccounts");
We can easily configure all Hystrix’s parameters just by calling hystrixConfiguration method. In the sample above Hystrix waits max 2 seconds for the response from remote service. In case of timeout fallback @Bean is called. Fallback @Bean implementation is really simple – it return empty list.
@Service
public class AccountFallback {

	public List<Account> getAccounts() {
		return new ArrayList<>();
	}

}
Alternatively, configuration can be implemented using object delarations. Here is service call configuration with Ribbon and Consul. Additionally, we can provide some parameters to Ribbon like client read timeout or max retry attempts. Unfortunately it seems they doesn’t work in this version of Apache Camel 🙂 (you can try to test it by yourself). I hope this will be corrected soon.
ServiceCallConfigurationDefinition def = new ServiceCallConfigurationDefinition();

ConsulConfiguration config = new ConsulConfiguration();
config.setUrl("http://192.168.99.100:8500");
config.setComponent("netty4-http");
ConsulServiceDiscovery discovery = new ConsulServiceDiscovery(config);

RibbonConfiguration c = new RibbonConfiguration();
c.addProperty("MaxAutoRetries", "0");
c.addProperty("MaxAutoRetriesNextServer", "1");
c.addProperty("ReadTimeout", "1000");
c.setClientName("ribbon-1");
RibbonServiceLoadBalancer lb = new RibbonServiceLoadBalancer(c);
lb.setServiceDiscovery(discovery);

def.setComponent("netty4-http");
def.setLoadBalancer(lb);
def.setServiceDiscovery(discovery);
context.setServiceCallConfiguration(def);
I described similar case for Spring Cloud and Netflix OSS in one of my previous article. Just like in the example presented there, I also set here a delay inside account service, which depends on the port on which the microservice was started.
@Value("${port}")
private int port;

public List<Account> findByCustomerId(Integer customerId) {
	List<Account> l = new ArrayList<>();
	l.add(new Account(1, "1234567890", 4321, customerId));
	l.add(new Account(2, "1234567891", 12346, customerId));
	if (port%2 == 0) {
		try {
			Thread.sleep(5000);
		} catch (InterruptedException e) {
			e.printStackTrace();
		}
	}
	return l;
}
Results for Spring Cloud sample were much more satisfying. The introduced configuration parameters such as read timeout for Ribbon worked and in addition Hystrix was able to automatically redirect a much smaller number of requests to slow service – only 2% of the rest to the non-blocking thread instance for 5 seconds. This shows that Apache Camel still has a few things to improve if wants to compete in microservice’s support with Sprint Cloud framework.

Advanced Microservices with Apache Camel
This post is a continuation of my previous microservices sample with Apache Camel described in the post Microservices with Apache Camel. In the picture below you can see the architecture of the proposed solution. All the services will be available behind the API gateway, which is created using Camel Rest DSL component. There is also API documentation available under api-doc context path on gateway. It is created using Swagger framework.
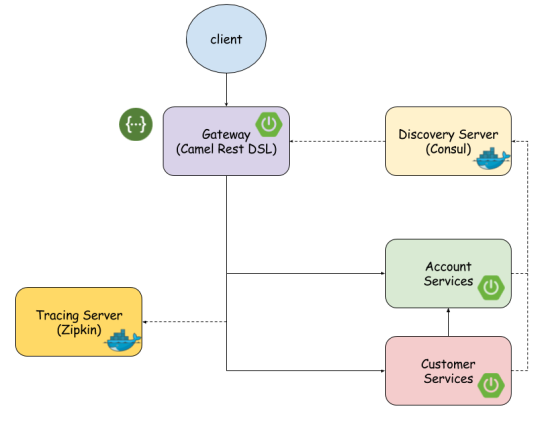
Service discovery and registration was created using Consul. Gateway is interacting with discovery server using Service Call EIP Camel component. Each microservice is registering itself during startup. There is no out of the box mechanisms for service registration in Apache Camel, so that I had to provide custom implementation using EventNotifierSupport class. Service Call EIP is also used inside customer service for discovering and calling account service to enrich returned customer object with its accounts. Microservices communicate with Zipkin to store timing statistics of calling their endpoints.
Sample application source code is available on GitHub. If you are interested in detailed description of introduced solution read my article on DZone. It was also published on Apache Camel site in the Articles section here.

Microservices with Apache Camel
Apache Camel, as usual, is a step backwards in comparion with Spring framework and there is no difference in the case of microservices architecture. However, Camel have introduced new set of components for building microservices some months ago. In its newest version 2.18 there is a support for load balancing with Netflix Ribbon, circuit breaking with Netflix Hystrix, distributed tracing with Zipkin and service registration and discovery with Consul. The new key component for microservices support on Camel is ServiceCall EIP which allows to call a remote service in a distributed system where the service is looked up from a service registry. There are four tools which can be used as service registry for Apache Camel: etcd, Kubernetes, Ribbon and Consul. Release 2.18 also comes with a much-improved Spring Boot support.
In this articale I’m going to show you how to develop microservices in Camel with its support for Spring Boot, REST DSL and Consul. Sample application is available on GitHub. Below you see a picture with our application architecture.

To enable Spring Boot support in Camel application we need to add following dependency to pom.xml. After that we have to annotate our main class with @SpringBootApplication and set property camel.springboot.main-run-controller=true in application configuration file (application.properties or application.yml).
<dependency>
	<groupId>org.apache.camel</groupId>
	<artifactId>camel-spring-boot-starter</artifactId>
	<version>${camel.version}</version>
</dependency>
Then we just have to create Spring @Component extending Camel’s RouteBuilder. Inside route builder configuration we declare REST endpoint using Camel REST DSL. It’s really simple and intuitive. In the code visible below I exposed four REST endpoints: three for GET method and an single one for POST. We are using netty4-http component as a web container for exposing REST endpoints and JSON binding. We also have to add to dependencies to pom.xml: camel-netty4-http for Netty framework and camel-jackson library for enabling consuming and producing JSON data. All routes are forwarding input requests to different methods inside Spring service @Component.
@Component
public class AccountRoute extends RouteBuilder {

	@Value("${port}")
	private int port;

	@Override
	public void configure() throws Exception {
		restConfiguration()
			.component("netty4-http")
			.bindingMode(RestBindingMode.json)
			.port(port);

		rest("/account")
			.get("/{id}")
				.to("bean:accountService?method=findById(${header.id})")
			.get("/customer/{customerId}")
				.to("bean:accountService?method=findByCustomerId(${header.customerId})")
			.get("/")
				.to("bean:accountService?method=findAll")
			.post("/").consumes("application/json").type(Account.class)
				.to("bean:accountService?method=add(${body})");
	}

}
Next element in our architecture is service registry component. We decided to use Consul. The simplest way to run it locally is to pull its docker image and run using docker command below. Consul provides UI management console and REST API for registering and searching services and key/value objects. REST API is available under v1 path and is well documented here.
docker run -d --name consul -p 8500:8500 -p 8600:8600 consul
Well, we have account microservice implemented and running Consul instance, so we would like to register our service there. And here we’ve got a problem. There is no mechanisms out of the box in Camel for service registration, there is only component for searching service. To be more precise I didn’t find any description about such a mechanism in Camel documentation… However, it may exists… somewhere. Maybe, you know how to find it? Here’s interesting solution for Camel Consul registry, but I didn’t check it out. I decided to rather simpler solution implemented by myself. I added two next routes to AccountRoute class.
from("direct:start").marshal().json(JsonLibrary.Jackson)
	.setHeader(Exchange.HTTP_METHOD, constant("PUT"))
	.setHeader(Exchange.CONTENT_TYPE, constant("application/json"))
	.to("http://192.168.99.100:8500/v1/agent/service/register");
from("direct:stop").shutdownRunningTask(ShutdownRunningTask.CompleteAllTasks)
	.toD("http://192.168.99.100:8500/v1/agent/service/deregister/${header.id}");
Route direct:start is running after Camel context startup and direct:stop before shutdown. Here’s EventNotifierSupport implementation for calling routes during startup and shutdown process. You can also try with camel-consul component, but in my opinion it is not well described in Camel documentation. List of services registered on Consul is available here: http://192.168.99.100:8500/v1/agent/services. I launch my account service with VM argument -Dport and it should be registered on Consul with account${port} ID.
@Component
public class EventNotifier extends EventNotifierSupport {

	@Value("${port}")
	private int port;

	@Override
	public void notify(EventObject event) throws Exception {
		if (event instanceof CamelContextStartedEvent) {
			CamelContext context = ((CamelContextStartedEvent) event).getContext();
			ProducerTemplate t = context.createProducerTemplate();
			t.sendBody("direct:start", new Register("account" + port, "account", "127.0.0.1", port));
		}
		if (event instanceof CamelContextStoppingEvent) {
			CamelContext context = ((CamelContextStoppingEvent) event).getContext();
			ProducerTemplate t = context.createProducerTemplate();
			t.sendBodyAndHeader("direct:stop", null, "id", "account" + port);
		}
	}

	@Override
	public boolean isEnabled(EventObject event) {
		return (event instanceof CamelContextStartedEvent || event instanceof CamelContextStoppingEvent);
	}

}
The last (but not least) element of our architecture is gateway. We also use netty for exposing REST services on port 8000.
restConfiguration()
	.component("netty4-http")
	.bindingMode(RestBindingMode.json)
	.port(8000);
We also have to provide configuration for connection with Consul registry and set it on CamelContext calling setServiceCallConfiguration method.
ConsulConfigurationDefinition config = new ConsulConfigurationDefinition();
config.setComponent("netty4-http");
config.setUrl("http://192.168.99.100:8500");
context.setServiceCallConfiguration(config);
Finally, we are defining routes which are mapping paths set on gateway to services registered on Consul using ServiceCall EIP. Now you call in your web browser one of those URLs, for example http://localhost:8000/account/1. If you would like to map path also while serviceCall EIP you need to put ‘//‘ instead of sinle slash ‘/‘ described in the Camel documentation. For example from(“rest:get:account”).serviceCall(“account//all”), not serviceCall(“account/all”).
from("rest:get:account:/{id}").serviceCall("account");
from("rest:get:account:/customer/{customerId}").serviceCall("account");
from("rest:get:account:/").serviceCall("account");
from("rest:post:account:/").serviceCall("account");
Conclusion
I was positively surprised by Camel. Before I started working on the sample described in this post I didn’t expect that Camel has such many features for building microservice solutions and working with them will be simple and fast. Of cource I can also find some disadvantages like inaccuracies or errors in documentation, only short description of some new components in developer guide or no registration process in discovery server like Consul. In these areas, I see an advantage of Spring Framework. But on the other hand Camel has support for some useful tools like etcd or Kubernetes which is not available in Spring. In conclusion, I’m looking forward to further improvements in Camel components for building microservices.
