Micronaut Tutorial: Security

This is the third part of my tutorial to Micronaut Framework. This time we will discuss the most interesting Micronaut security features. I have already described core mechanisms for IoC and dependency injection in the first part of my tutorial, and I have also created a guide to building simple REST server-side application in the second part. For more details you may refer to:

Continue reading “Micronaut Tutorial: Security”

Introduction to Blockchain with Java using Ethereum, web3j and Spring Boot

Blockchain is one of the buzzwords in IT world during some last months. This term is related to cryptocurrencies, and was created together with Bitcoins. It is decentralized, immutable data structure divided into blocks, which are linked and secured using cryptographic algorithms. Every single block in this structure typically contains a cryptographic hash of the previous block, a timestamp, and transaction data. Blockchain is managed by peer-to-peer network, and during inter-node communication every new block is validated before adding. This is short portion of theory about blockchain. In a nutshell, this is a technology which allows us to managed transactions between two parties in a decentralized way. Now, the question is how we can implement it in our system.
Here comes Ethereum. It is a decentralized platform created by Vitarik Buterin that provides scripting language for a development of applications. It is based on ideas from Bitcoin, and is driven by the new cryptocurrency called Ether. Today, Ether is the second largest cryptocurrency after Bitcoin. The heart of Ethereum technology is EVM (Ethereum Virtual Machine), which can be treated as something similar to JVM, but using a network of fully decentralized nodes. To implement transactions based Ethereum in Java world we use web3j library. This is a lightweight, reactive, type safe Java and Android library for integrating with nodes on Ethereum blockchains. More details can be found on its website https://web3j.io.

1. Running Ethereum locally

Although there are many articles on the Web about blockchain and ethereum it is not easy to find a solution describing how to run ready-for-use instance of Ethereum on the local machine. It is worth to mention that generally there are two most popular Ethereum clients we can use: Geth and Parity. It turns out we can easily run Geth node locally using Docker container. By default it connects the node to the Ethereum main network. Alternatively, you can connect it to test network or Rinkeby network. But the best option for beginning is just to run it in development mode by setting --dev parameter on Docker container running command.
Here’s the command that starts Docker container in development mode and exposes Ethereum RPC API on port 8545.

$ docker run -d --name ethereum -p 8545:8545 -p 30303:30303 ethereum/client-go --rpc --rpcaddr "0.0.0.0" --rpcapi="db,eth,net,web3,personal" --rpccorsdomain "*" --dev

The one really good message when running that container in development mode is that you have plenty of Ethers on your default, test account. In that case, you don’t have to mine any Ethers to be able to start tests. Great! Now, let’s create some other test accounts and also check out some things. To achieve it we need to run Geth’s interactive JavaScript console inside Docker container.

$ docker exec -it ethereum geth attach ipc:/tmp/geth.ipc

2. Managing Ethereum node using JavaScript console

After running JavaScript console you can easily display default account (coinbase), the list of all available accounts and their balances. Here’s the screen illustrating results for my Ethereum node.
blockchain-1
Now, we have to create some test accounts. We can do it by calling personal.newAccount(password) function. After creating required accounts, you can perform some test transactions using JavaScript console, and transfer some funds from base account to the newly created accounts. Here are the commands used for creating accounts and executing transactions.
blockchain-2

3. System architecture

The architecture of our sample system is very simple. I don’t want to complicate anything, but just show you how to send transaction to Geth node and receive notifications. While transaction-service sends new transaction to Ethereum node, bonus-service observe node and listening for incoming transactions. Then it send bonus to the sender’s account once per 10 transactions received from his account. Here’s the diagram that illustrates an architecture of our sample system.
blockchain-arch

4. Enable Web3j for Spring Boot app

I think that now we have clarity what exactly we want to do. So, let’s proceed to the implementation. First, we should include all required dependencies in order to be able to use web3j library inside Spring Boot application. Fortunately, there is a starter that can be included.

<dependency>
	<groupId>org.web3j</groupId>
	<artifactId>web3j-spring-boot-starter</artifactId>
	<version>1.6.0</version>
</dependency>

Because we are running Ethereum Geth client on Docker container we need to change auto-configured client’s address for web3j.

spring:
  application:
    name: transaction-service
server:
  port: ${PORT:8090}
web3j:
  client-address: http://192.168.99.100:8545

5. Building applications

If we included web3j starter to the project dependencies all you need is to autowire Web3j bean. Web3j is responsible for sending transaction to Geth client node. It receives response with transaction hash if it has been accepted by the node or error object if it has been rejected. While creating transaction object it is important to set gas limit to minimum 21000. If you sent lower value, you will probably receive error Error: intrinsic gas too low.

@Service
public class BlockchainService {

    private static final Logger LOGGER = LoggerFactory.getLogger(BlockchainService.class);

    @Autowired
    Web3j web3j;

    public BlockchainTransaction process(BlockchainTransaction trx) throws IOException {
        EthAccounts accounts = web3j.ethAccounts().send();
        EthGetTransactionCount transactionCount = web3j.ethGetTransactionCount(accounts.getAccounts().get(trx.getFromId()), DefaultBlockParameterName.LATEST).send();
        Transaction transaction = Transaction.createEtherTransaction(accounts.getAccounts().get(trx.getFromId()), transactionCount.getTransactionCount(), BigInteger.valueOf(trx.getValue()), BigInteger.valueOf(21_000), accounts.getAccounts().get(trx.getToId()),BigInteger.valueOf(trx.getValue()));
        EthSendTransaction response = web3j.ethSendTransaction(transaction).send();
        if (response.getError() != null) {
            trx.setAccepted(false);
            return trx;
        }
        trx.setAccepted(true);
        String txHash = response.getTransactionHash();
        LOGGER.info("Tx hash: {}", txHash);
        trx.setId(txHash);
        EthGetTransactionReceipt receipt = web3j.ethGetTransactionReceipt(txHash).send();
        if (receipt.getTransactionReceipt().isPresent()) {
            LOGGER.info("Tx receipt: {}", receipt.getTransactionReceipt().get().getCumulativeGasUsed().intValue());
        }
        return trx;
    }

}

The @Service bean visible above is invoked by the controller. The implementation of POST method takes BlockchainTransaction object as parameter. You can send there sender id, receiver id, and transaction amount. Sender and receiver ids are equivalent to index in query eth.account[index].

@RestController
public class BlockchainController {

    @Autowired
    BlockchainService service;

    @PostMapping("/transaction")
    public BlockchainTransaction execute(@RequestBody BlockchainTransaction transaction) throws NoSuchAlgorithmException, NoSuchProviderException, InvalidAlgorithmParameterException, CipherException, IOException {
        return service.process(transaction);
    }

}

You can send a test transaction by calling POST method using the following command.

  
$ curl --header "Content-Type: application/json" --request POST --data '{"fromId":2,"toId":1,"value":3}' http://localhost:8090/transaction

Before sending any transactions you should also unlock sender account.
blockchain-3

Application bonus-service listens for transactions processed by Ethereum node. It subscribes for notifications from Web3j library by calling web3j.transactionObservable().subscribe(...) method. It returns the amount of received transaction to the sender’s account once per 10 transactions sent from that address. Here’s the implementation of observable method inside application bonus-service.

@Autowired
Web3j web3j;

@PostConstruct
public void listen() {
	Subscription subscription = web3j.transactionObservable().subscribe(tx -> {
		LOGGER.info("New tx: id={}, block={}, from={}, to={}, value={}", tx.getHash(), tx.getBlockHash(), tx.getFrom(), tx.getTo(), tx.getValue().intValue());
		try {
			EthCoinbase coinbase = web3j.ethCoinbase().send();
			EthGetTransactionCount transactionCount = web3j.ethGetTransactionCount(tx.getFrom(), DefaultBlockParameterName.LATEST).send();
			LOGGER.info("Tx count: {}", transactionCount.getTransactionCount().intValue());
			if (transactionCount.getTransactionCount().intValue() % 10 == 0) {
				EthGetTransactionCount tc = web3j.ethGetTransactionCount(coinbase.getAddress(), DefaultBlockParameterName.LATEST).send();
				Transaction transaction = Transaction.createEtherTransaction(coinbase.getAddress(), tc.getTransactionCount(), tx.getValue(), BigInteger.valueOf(21_000), tx.getFrom(), tx.getValue());
				web3j.ethSendTransaction(transaction).send();
			}
		} catch (IOException e) {
			LOGGER.error("Error getting transactions", e);
		}
	});
	LOGGER.info("Subscribed");
}

Conclusion

Blockchain and cryptocurrencies are not the easy topics to start. Ethereum simplifies development of applications that use blockchain, by providing a complete, scripting language. Using web3j library together with Spring Boot and Docker image of Ethereum Geth client allows to quickly start local development of solution implementing blockchain technology. IF you would like to try it locally just clone my repository available on GitHub https://github.com/piomin/sample-spring-blockchain.git

Secure Discovery with Spring Cloud Netflix Eureka

Building standard discovery mechanism basing on Spring Cloud Netflix Eureka is rather an easy thing to do. The same solution built over secure SSL communication between discovery client and server may be slightly more advanced challenge. I haven’t find any any complete example of such an application on web. Let’s try to implement it beginning from the server-side application.

1. Generate certificates

If you develop Java applications for some years you have probably heard about keytool. This tool is available in your ${JAVA_HOME}\bin directory, and is designed for managing keys and certificates. We begin from generating keystore for server-side Spring Boot application. Here’s the appropriate keytool command that generates certficate stored inside JKS keystore file named eureka.jks.

secure-discovery-2

2. Setting up a secure discovery server

Since Eureka server is embedded to Spring Boot application, we need to secure it using standard Spring Boot properties. I placed generated keystore file eureka.jks on the application’s classpath. Now, the only thing that has to be done is to prepare some configuration settings inside application.yml that point to keystore file location, type, and access password.

server:
  port: 8761
  ssl:
    enabled: true
    key-store: classpath:eureka.jks
    key-store-password: 123456
    trust-store: classpath:eureka.jks
    trust-store-password: 123456
    key-alias: eureka

3. Setting up two-way SSL authentication

We will complicate our example a little. A standard SSL configuration assumes that only the client verifies the server certificate. We will force client’s certificate authentication on the server-side. It can be achieved by setting the property server.ssl.client-auth to need.

server:
  ssl:
    client-auth: need

It’s not all, because we also have to add client’s certficate to the list of trusted certificates on the server-side. So, first let’s generate client’s keystore using the same keytool command as for server’s keystore.

secure-deiscovery-1

Now, we need to export certficates from generated keystores for both client and server sides.

secure-discovery-3

Finally, we import client’s certficate to server’s keystore and server’s certficate to client’s keystore.

secure-discovery-4

4. Running secure Eureka server

The sample applications are available on GitHub in repository sample-secure-eureka-discovery (https://github.com/piomin/sample-secure-eureka-discovery.git). After running discovery-service application, Eureka is available under address https://localhost:8761. If you try to visit its web dashboard you get the following exception in your web browser. It means Eureka server is secured.

hqdefault

Well, Eureka dashboard is sometimes an useful tool, so let’s import client’s keystore to our web browser to be able to access it. We have to convert client’s keystore from JKS to PKCS12 format. Here’s the command that performs mentioned operation.

$ keytool -importkeystore -srckeystore client.jks -destkeystore client.p12 -srcstoretype JKS -deststoretype PKCS12 -srcstorepass 123456 -deststorepass 123456 -srcalias client -destalias client -srckeypass 123456 -destkeypass 123456 -noprompt

5. Client’s application configuration

When implementing secure connection on the client side, we generally need to do the same as in the previous step – import a keystore. However, it is not very simple thing to do, because Spring Cloud does not provide any configuration property that allows you to pass the location of SSL keystore to a discovery client. What’s worth mentioning Eureka client leverages Jersey client to communicate with server-side application. It may be surprising a little it is not Spring RestTemplate, but we should remember that Spring Cloud Eureka is built on top of Netflix OSS Eureka client, which does not use Spring libraries.
HTTP basic authentication is automatically added to your eureka client if you include security credentials to connection URL, for example http://piotrm:12345@localhost:8761/eureka. For more advanced configuration, like passing SSL keystore to HTTP client we need to provide @Bean of type DiscoveryClientOptionalArgs.
The following fragment of code shows how to enable SSL connection for discovery client. First, we set location of keystore and truststore files using javax.net.ssl.* Java system property. Then, we provide custom implementation of Jersey client based on Java SSL settings, and set it for DiscoveryClientOptionalArgs bean.

@Bean
public DiscoveryClient.DiscoveryClientOptionalArgs discoveryClientOptionalArgs() throws NoSuchAlgorithmException {
	DiscoveryClient.DiscoveryClientOptionalArgs args = new DiscoveryClient.DiscoveryClientOptionalArgs();
	System.setProperty("javax.net.ssl.keyStore", "src/main/resources/client.jks");
	System.setProperty("javax.net.ssl.keyStorePassword", "123456");
	System.setProperty("javax.net.ssl.trustStore", "src/main/resources/client.jks");
	System.setProperty("javax.net.ssl.trustStorePassword", "123456");
	EurekaJerseyClientBuilder builder = new EurekaJerseyClientBuilder();
	builder.withClientName("account-client");
	builder.withSystemSSLConfiguration();
	builder.withMaxTotalConnections(10);
	builder.withMaxConnectionsPerHost(10);
	args.setEurekaJerseyClient(builder.build());
	return args;
}

6. Enabling HTTPS on the client side

The configuration provided in the previous step applies only to communication between discovery client and Eureka server. What if we also would like to secure HTTP endpoints exposed by the client-side application? The first step is pretty the same as for the discovery server: we need to generate keystore and set it using Spring Boot properties inside application.yml.

server:
  port: ${PORT:8090}
  ssl:
    enabled: true
    key-store: classpath:client.jks
    key-store-password: 123456
    key-alias: client

During registration we need to “inform” Eureka server that our application’s endpoints are secured. To achieve it we should set property eureka.instance.securePortEnabled to true, and also disable non secure port, which is enabled by default.with nonSecurePortEnabled property.

eureka:
  instance:
    nonSecurePortEnabled: false
    securePortEnabled: true
    securePort: ${server.port}
    statusPageUrl: https://localhost:${server.port}/info
    healthCheckUrl: https://localhost:${server.port}/health
    homePageUrl: https://localhost:${server.port}
  client:
    securePortEnabled: true
    serviceUrl:
      defaultZone: https://localhost:8761/eureka/

7. Running client’s application

Finally, we can run client-side application. After launching the application should be visible in Eureka Dashboard.

secure-discovery-5

All the client application’s endpoints are registred in Eureka under HTTPS protocol. I have also override default implementation of actuator endpoint /info, as shown on the code fragment below.

@Component
public class SecureInfoContributor implements InfoContributor {

	@Override
	public void contribute(Builder builder) {
		builder.withDetail("hello", "I'm secure app!");
	}

}

Now, we can try to visit /info endpoint one more time. You should see the same information as below.

secure-discovery-6

Alternatively, if you try to set on the client-side the certificate, which is not trusted by server-side, you will see the following exception while starting your client application.

secure-discovery-7

Conclusion

Securing connection between microservices and Eureka server is only the first step of securing the whole system. We need to thing about secure connection between microservices and config server, and also between all microservices during inter-service communication with @LoadBalanced RestTemplate or OpenFeign client. You can find the examples of such implementations and many more in my book “Mastering Spring Cloud” (https://www.packtpub.com/application-development/mastering-spring-cloud).

Part 2: Microservices security with OAuth2

I have been writing about security with OAuth2 in some articles before. This article is the continuation of samples previously described in the following posts:

Today I’m going to show you more advanced sample than before, where all authentication and OAuth2 data is stored on database. We also find out how to secure microservices, especially considering an inter-communication between them with Feign client. I hope this article will provide a guidance and help you with designing and implementing secure solutions with Spring Cloud. Let’s begin.

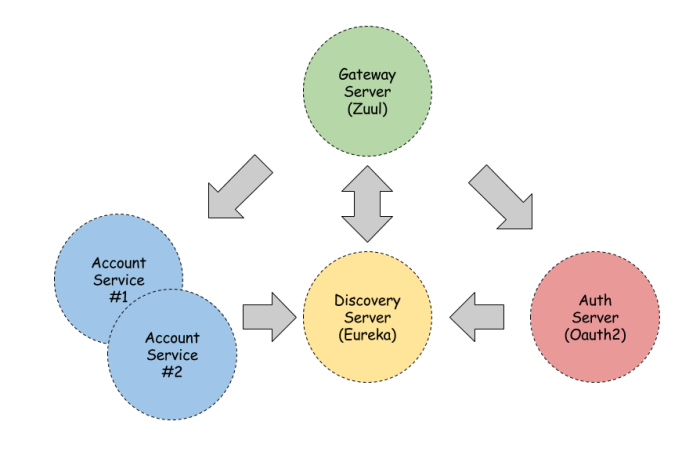
There are four services running inside our sample system, what is visualized on the figure below. There is nothing unusual here. We have a discovery server where our sample microservices account-service and customer-service are registered. Those microservices are both protected with OAuth2 authorization. Authorization is managed by auth-server. It stores not only OAuth2 tokens, but also users authentication data. The whole process is implemented using Spring Security and Spring Cloud libraries.

oauth2-1

1. Start database

All the authentication credentials and tokens are stored in MySQL database. So, the first step is to start MySQL. The most comfortable way to achieve it is through a Docker container. The command visible below in addition to starting database also creates schema and user oauth2.

docker run -d --name mysql -e MYSQL_DATABASE=oauth2 -e MYSQL_USER=oauth2 -e MYSQL_PASSWORD=oauth2 -e MYSQL_ALLOW_EMPTY_PASSWORD=yes -p 33306:3306 mysql

2. Configure data source in application

MySQL is now available on port host 192.168.99.100 if you run Docker on Windows and port 33306. Datasource properties should be set in application.yml of auth-server. Spring Boot is also able to run some SQL scripts on selected datasource after an application startup. It’s good news for us, because we have to create some tables on the schema dedicated for OAuth2 process.

spring:
  application:
    name: auth-server
  datasource:
    url: jdbc:mysql://192.168.99.100:33306/oauth2?useSSL=false
    username: oauth2
    password: oauth2
    driver-class-name: com.mysql.jdbc.Driver
    schema: classpath:/script/schema.sql
    data: classpath:/script/data.sql

3. Create schema in MySQL

Despite appearances, it is not so simple to find the SQL script with tables that needs to be created when using Spring Security for OAuth2. Here’s that script, which is available under /src/main/resources/script/schema.sql in auth-server module. We have to create six tables:

  • oauth_client_details
  • oauth_client_token
  • oauth_access_token
  • oauth_refresh_token
  • oauth_code
  • oauth_approvals
drop table if exists oauth_client_details;
create table oauth_client_details (
  client_id VARCHAR(255) PRIMARY KEY,
  resource_ids VARCHAR(255),
  client_secret VARCHAR(255),
  scope VARCHAR(255),
  authorized_grant_types VARCHAR(255),
  web_server_redirect_uri VARCHAR(255),
  authorities VARCHAR(255),
  access_token_validity INTEGER,
  refresh_token_validity INTEGER,
  additional_information VARCHAR(4096),
  autoapprove VARCHAR(255)
);
drop table if exists oauth_client_token;
create table oauth_client_token (
  token_id VARCHAR(255),
  token LONG VARBINARY,
  authentication_id VARCHAR(255) PRIMARY KEY,
  user_name VARCHAR(255),
  client_id VARCHAR(255)
);

drop table if exists oauth_access_token;
CREATE TABLE oauth_access_token (
  token_id VARCHAR(256) DEFAULT NULL,
  token BLOB,
  authentication_id VARCHAR(256) DEFAULT NULL,
  user_name VARCHAR(256) DEFAULT NULL,
  client_id VARCHAR(256) DEFAULT NULL,
  authentication BLOB,
  refresh_token VARCHAR(256) DEFAULT NULL
);

drop table if exists oauth_refresh_token;
CREATE TABLE oauth_refresh_token (
  token_id VARCHAR(256) DEFAULT NULL,
  token BLOB,
  authentication BLOB
);

drop table if exists oauth_code;
create table oauth_code (
  code VARCHAR(255), authentication LONG VARBINARY
);
drop table if exists oauth_approvals;
create table oauth_approvals (
    userId VARCHAR(255),
    clientId VARCHAR(255),
    scope VARCHAR(255),
    status VARCHAR(10),
    expiresAt DATETIME,
    lastModifiedAt DATETIME
);

4. Add some test data to database

There is also the second SQL script /src/main/resources/script/data.sql with some insert commands for the test purpose. The most important thing is to add some client id/client secret pairs.

INSERT INTO `oauth_client_details` (`client_id`, `client_secret`, `scope`, `authorized_grant_types`, `access_token_validity`, `additional_information`) VALUES ('account-service', 'secret', 'read', 'authorization_code,password,refresh_token,implicit', '900', '{}');
INSERT INTO `oauth_client_details` (`client_id`, `client_secret`, `scope`, `authorized_grant_types`, `access_token_validity`, `additional_information`) VALUES ('customer-service', 'secret', 'read', 'authorization_code,password,refresh_token,implicit', '900', '{}');
INSERT INTO `oauth_client_details` (`client_id`, `client_secret`, `scope`, `authorized_grant_types`, `access_token_validity`, `additional_information`) VALUES ('customer-service-write', 'secret', 'write', 'authorization_code,password,refresh_token,implicit', '900', '{}');

5. Bulding Authorization Server

Now, the most important thing in this article – authorization server configuration. The configuration class should be annotated with @EnableAuthorizationServer. Then we need to overwrite some methods from extended AuthorizationServerConfigurerAdapter class. The first important thing here is to set the default token storage to a database by providing bean JdbcTokenStore with default data source as a parameter. Although all tokens are now stored in a database we still want to generate them in JWT format. That’s why the second bean JwtAccessTokenConverter has to be provided in that class. By overriding different configure methods inherited from the base class we can set a default storage for OAuth2 client details and require authorization server to always verify the API key submitted in HTTP headers.

@Configuration
@EnableAuthorizationServer
public class OAuth2Config extends AuthorizationServerConfigurerAdapter {

   @Autowired
   private DataSource dataSource;
   @Autowired
   private AuthenticationManager authenticationManager;

   @Override
   public void configure(AuthorizationServerEndpointsConfigurer endpoints) throws Exception {
	  endpoints.authenticationManager(this.authenticationManager).tokenStore(tokenStore())
		   .accessTokenConverter(accessTokenConverter());
   }

   @Override
   public void configure(AuthorizationServerSecurityConfigurer oauthServer) throws Exception {
	  oauthServer.checkTokenAccess("permitAll()");
   }

   @Bean
   public JwtAccessTokenConverter accessTokenConverter() {
	  return new JwtAccessTokenConverter();
   }

   @Override
   public void configure(ClientDetailsServiceConfigurer clients) throws Exception {
	  clients.jdbc(dataSource);
   }

   @Bean
   public JdbcTokenStore tokenStore() {
	  return new JdbcTokenStore(dataSource);
   }

}

The main OAuth2 grant type, which is used in the current sample is Resource owner credentials grant. In that type of grant client application sends user login and password to authenticate against OAuth2 server. A POST request sent by the client contains the following parameters:

  • grant_type – with the value ‘password’
  • client_id – with the client’s ID
  • client_secret – with the client’s secret
  • scope – with a space-delimited list of requested scope permissions
  • username – with the user’s username
  • password – with the user’s password

The authorization server will respond with a JSON object containing the following parameters:

  • token_type – with the value ‘Bearer’
  • expires_in – with an integer representing the TTL of the access token
  • access_token – the access token itself
  • refresh_token – a refresh token that can be used to acquire a new access token when the original expires

Spring application provides a custom authentication mechanism by implementing UserDetailsService interface and overriding its method loadUserByUsername. In our sample application user credentials and authorities are also stored in the database, so we inject UserRepository bean to the custom UserDatailsService class.

@Component("userDetailsService")
public class UserDetailsServiceImpl implements UserDetailsService {

    private final Logger log = LoggerFactory.getLogger(UserDetailsServiceImpl.class);

    @Autowired
    private UserRepository userRepository;

    @Override
    @Transactional
    public UserDetails loadUserByUsername(final String login) {

        log.debug("Authenticating {}", login);
        String lowercaseLogin = login.toLowerCase();

        User userFromDatabase;
        if(lowercaseLogin.contains("@")) {
            userFromDatabase = userRepository.findByEmail(lowercaseLogin);
        } else {
            userFromDatabase = userRepository.findByUsernameCaseInsensitive(lowercaseLogin);
        }

        if (userFromDatabase == null) {
            throw new UsernameNotFoundException("User " + lowercaseLogin + " was not found in the database");
        } else if (!userFromDatabase.isActivated()) {
            throw new UserNotActivatedException("User " + lowercaseLogin + " is not activated");
        }

        Collection<GrantedAuthority> grantedAuthorities = new ArrayList<>();
        for (Authority authority : userFromDatabase.getAuthorities()) {
            GrantedAuthority grantedAuthority = new SimpleGrantedAuthority(authority.getName());
            grantedAuthorities.add(grantedAuthority);
        }

        return new org.springframework.security.core.userdetails.User(userFromDatabase.getUsername(), userFromDatabase.getPassword(), grantedAuthorities);
    }

}

That’s practically all what should be written about auth-service module. Let’s move on to the client microservices.

6. Bulding microservices

The REST API is very simple. It does nothing more than returning some data. However, there is one interesting thing in that implementation. That is preauthorization based on OAuth token scope, which is annotated on the API methods with @PreAuthorize("#oauth2.hasScope('read')").

@RestController
public class AccountController {

   @GetMapping("/{id}")
   @PreAuthorize("#oauth2.hasScope('read')")
   public Account findAccount(@PathVariable("id") Integer id) {
	  return new Account(id, 1, "123456789", 1234);
   }

   @GetMapping("/")
   @PreAuthorize("#oauth2.hasScope('read')")
   public List<Account> findAccounts() {
	  return Arrays.asList(new Account(1, 1, "123456789", 1234), new Account(2, 1, "123456780", 2500),
		new Account(3, 1, "123456781", 10000));
   }

}

Preauthorization is disabled by default. To enable it for API methods we should use @EnableGlobalMethodSecurity annotation. We should also declare that such a preauthorization would be based on OAuth2 token scope.

@Configuration
@EnableResourceServer
@EnableGlobalMethodSecurity(prePostEnabled = true)
public class OAuth2ResourceServerConfig extends GlobalMethodSecurityConfiguration {

    @Override
    protected MethodSecurityExpressionHandler createExpressionHandler() {
        return new OAuth2MethodSecurityExpressionHandler();
    }

}

7. Feign client with OAuth2

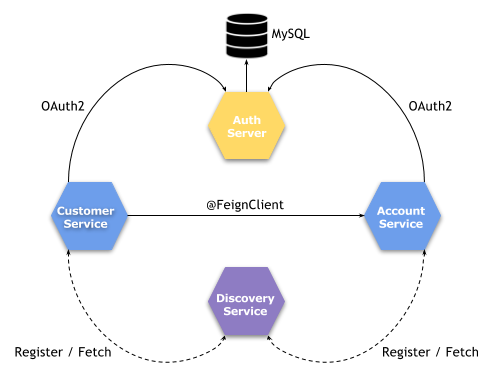
The API method findAccounts implemented in AccountController is invoked by customer-service through a Feign client.

@FeignClient(name = "account-service", configuration = AccountClientConfiguration.class)
public interface AccountClient {

   @GetMapping("/")
   List<Account> findAccounts();

}

If you call account service endpoint via Feign client you get the following exception.

feign.FeignException: status 401 reading AccountClient#findAccounts(); content:{"error":"unauthorized","error_description":"Full authentication is required to access this resource"}

Why? Of course, account-service is protected with OAuth2 token authorization, but Feign client does not send an authorization token in the request header. That aproach may be customized by defining custom configuration class for Feign client. It allows to declare a request interceptor. In that case we can use an implementation for OAuth2 provided by OAuth2FeignRequestInterceptor from Spring Cloud OAuth2 library. We prefer password

public class AccountClientConfiguration {

   @Value("${security.oauth2.client.access-token-uri}")
   private String accessTokenUri;
   @Value("${security.oauth2.client.client-id}")
   private String clientId;
   @Value("${security.oauth2.client.client-secret}")
   private String clientSecret;
   @Value("${security.oauth2.client.scope}")
   private String scope;

   @Bean
   RequestInterceptor oauth2FeignRequestInterceptor() {
	  return new OAuth2FeignRequestInterceptor(new DefaultOAuth2ClientContext(), resource());
   }

   @Bean
   Logger.Level feignLoggerLevel() {
	  return Logger.Level.FULL;
   }

   private OAuth2ProtectedResourceDetails resource() {
	  ResourceOwnerPasswordResourceDetails resourceDetails = new ResourceOwnerPasswordResourceDetails();
	  resourceDetails.setUsername("piomin");
	  resourceDetails.setPassword("piot123");
	  resourceDetails.setAccessTokenUri(accessTokenUri);
	  resourceDetails.setClientId(clientId);
	  resourceDetails.setClientSecret(clientSecret);
	  resourceDetails.setGrantType("password");
	  resourceDetails.setScope(Arrays.asList(scope));
	  return resourceDetails;
   }

}

8. Testing

Finally, we may perform some tests. Let’s build a sample project using mvn clean install command. If you run all the services with the default settings they would be available under addresses:

The test method is visible below. We use OAuth2RestTemplate with ResourceOwnerPasswordResourceDetails to perform resource owner credentials grant operation and call GET /{id} API method from customer-service with OAuth2 token send in the request header.

	@Test
	public void testClient() {
        ResourceOwnerPasswordResourceDetails resourceDetails = new ResourceOwnerPasswordResourceDetails();
        resourceDetails.setUsername("piomin");
        resourceDetails.setPassword("piot123");
        resourceDetails.setAccessTokenUri("http://localhost:9999/oauth/token");
        resourceDetails.setClientId("customer-service");
        resourceDetails.setClientSecret("secret");
        resourceDetails.setGrantType("password");
        resourceDetails.setScope(Arrays.asList("read"));
        DefaultOAuth2ClientContext clientContext = new DefaultOAuth2ClientContext();
        OAuth2RestTemplate restTemplate = new OAuth2RestTemplate(resourceDetails, clientContext);
        restTemplate.setMessageConverters(Arrays.asList(new MappingJackson2HttpMessageConverter()));
        final Customer customer = restTemplate.getForObject("http://localhost:8083/{id}", Customer.class, 1);
        System.out.println(customer);
	}


Building Secure APIs with Vert.x and OAuth2

Preface

Today I would like to get back to the subject touched on in the one of my previous articles – Vert.x toolkit. In the post Asynchronous Microservices With Vert.x I described how to develop microservices using Vert.x modules for web application, service discovery, circuit breaker and distributed configuration. I did not mentioned there anything about security aspects, which are usually important when talking about open APIs. It is a time to take a closer look on some Vert.x modules for authentication and authorization. Following description available on vert.io site it provides some simple out of the box implementations for authentication in our applications. There are modules providing auth implementation backed by JDBC, MongoDB and also some supporting solutions like JSON web tokens (JWT), Apache Shiro and OAuth2. Like you probably know OAuth2 is the most common authentication method for APIs provided by Facebook, Twitter or LinkedIn. If you are interested in more details about that authentication method read my article Microservices security with Oauth2, where I described the basics and introduced the simple sample with Spring Security in conjunction with OAuth2 usage.

In the sample application which is available on GitHub under security branch I’m going to present how to provide Oauth2 security for Vertx application using Keycloak and Vert.x OAuth2 module.

Keycloak

For authentication and authorization management we use Keycloak. It is an open source identity and access management solution, which provides mechanisms supporting i.a. OAuth2. Keycloak has web admin console where administrators can manage all aspects of the server. We can easily run it using docker container.

docker run -d --name keycloak -p 38080:8080 -e KEYCLOAK_USER=admin -e KEYCLOAK_PASSWORD=admin -e KEYCLOAK_LOGLEVEL=DEBUG jboss/keycloak

Management dashboard is available under http://192.168.99.100:38080/. Let’s begin from creating Client. Client will be used by our application (or rather service) for authenticate itself against Keycloak. In the first step we have to set Client ID and Root URL. Root URL is not needed while using OAuth2 Password Credentials Flow, but rather for Authorization Code Flow. I put there our sample application localhost address.

vertx-sec-1

We should enable options Direct Access Grants and Authorization in the Settings section of newly created client. Also Access Type should be set to confidential and Valid Redirect URIs to the callback address routed inside application (it is explained in the later section).

vertx-sec-2

The last information needed from Client section is a Secret available under Credentials tab.

vertx-sec-3

Now we can proceed to create user with credentials. In the sample I’ll present in the next section we use password credentials flow, so don’t forget to change password on newly created user.

vertx-sec-5

vertx-sec-7

Finally, we set authorities for our user. First, let’s create some roles in Roles section. For me it is view-account, modify-account. For these roles I also enabled Scope Param Required. It means that if client need to obtain that authority it has to send role name in the request scope.

vertx-sec-4

The last step is to assign the roles to our test user piotr.minkowski.

vertx-sec-6

Building application

Vert.x provides the module supporting OAuth2 authorization. We should include the following dependency into our pom.xml.

<dependency>
	<groupId>io.vertx</groupId>
	<artifactId>vertx-auth-oauth2</artifactId>
	<version>${vertx.version}</version>
</dependency>

We have to begin from defining Keycloak OAuth2Auth provider. We use default realm (1). In additional to the realm name we should set realm public key (2) which is available in the Realm Settings section under Keys tab. We should also set Keycloak Client ID (3) as resource and client secret as credentials (4).

JsonObject keycloakJson = new JsonObject()
	.put("realm", "master") // (1)
	.put("realm-public-key", "MIIBIjANBgkqhkiG9w0BAQEFAAOCAQ8AMIIBCgKCAQEA1xVBifXfS1uVM8S14JlyLpXck+0+hBQX258IiL5Fm2rZpkQ5lN9N1tadQdXBKk8V/0SxdTyoX7cpYQkcOs0Rj0XXmX7Lnk56euZwel+3MKAZWA20ld8BCfmDtX4/+VP311USUqR/W8Fd2p/gugKWF6VDMkri92qob1DdrcUiRlD8XYC0pwHwSvyW/3JvE5HeTy3U4vxC+19wHcwzLGNlVOlYPk9mzJHXN+LhZr/Tc7HeAsvVxYDXwOOh+/UWweMkvKy+OSNKG3aWLb92Ni3HejFn9kd4TRHfaapwWg1m5Duf3uqz8WDHbS/LeS4g3gQS0SvcCYI0huSoG3NA/z4K7wIDAQAB") // (2)
	.put("auth-server-url", "http://192.168.99.100:38080/auth")
	.put("ssl-required", "external")
	.put("resource", "vertx-account") // (3)
	.put("credentials", new JsonObject().put("secret", "73b55e04-e562-41ea-b39c-263b7b36945d")); // (4)

OAuth2Auth oauth2 = KeycloakAuth.create(vertx, OAuth2FlowType.PASSWORD, keycloakJson);

vertx-sec-8

I exposed API method for login which retrieves token from Keycloak using OAuth2FlowType.PASSWORD authentication method.

router.post("/login").produces("application/json").handler(rc -> {
	User u = Json.decodeValue(rc.getBodyAsString(), User.class);
	oauth2.getToken(u.toJson(), res -> {
		if (res.failed()) {
			LOGGER.error("Access token error: {}", res.cause().getMessage());
			rc.response().setStatusCode(HttpResponseStatus.INTERNAL_SERVER_ERROR.code()).end();
		} else {
			AccessToken token = res.result();
			LOGGER.info("Access Token: {}", KeycloakHelper.rawAccessToken(token.principal()));
			User user = new User(KeycloakHelper.rawAccessToken(token.principal()));
			rc.response().end(user.toString());
		}
	});
});

I sent the following message to POST /login service.

{"username":"piotr.minkowski", "password":"Piot_123", "scope":"modify-account view-account"}

That is an equivalent to the following Vert.x JsonObject passed as a parameter to OAuth2 getToken method.

new JsonObject().put("username", "piotr.minkowski").put("password", "Piot_123").put("scope", "modify-account view-account")

POST /login method return access token inside JSON object. That token should be passed as Authorization header parameter for every call of a protected resource. Here’s main class with API methods definitions. We begin from creating OAuth2AuthHandler object (1) which is responsible for token validation. It takes OAuth2Auth Keycloak object as a parameter. Then we should set OAuth2AuthHandler as a handler for all methods matching /account/* path (2). If token has been successfully validated we can proceed to authorization. We check if view-account role is assigned to user when calling GET method (3), and modify-account role when calling POST method (4). If using Keycloak for authorization we always have to set prefix to “realm” while invoking isAuthorised method. If the role is realm then the lookup happens in global roles list.

OAuth2Auth oauth2 = KeycloakAuth.create(vertx, OAuth2FlowType.PASSWORD, keycloakJson);
OAuth2AuthHandler oauth2Handler = (OAuth2AuthHandler) OAuth2AuthHandler.create(oauth2, "http://localhost:2222"); // (1)
Router router = Router.router(vertx);
router.route("/account/*").handler(ResponseContentTypeHandler.create());
router.route("/account/*").handler(oauth2Handler); // (2)
router.route(HttpMethod.POST, "/account").handler(BodyHandler.create());
router.route(HttpMethod.POST, "/login").handler(BodyHandler.create());
oauth2Handler.setupCallback(router.get("/callback"));
router.get("/account/:id").produces("application/json").handler(rc -> {
	rc.user().isAuthorised("realm:view-account", authRes -> { // (3)
		LOGGER.info("Auth: {}", authRes.result());
		if (authRes.result() == Boolean.TRUE) {
			repository.findById(rc.request().getParam("id"), res -> {
				Account account = res.result();
				LOGGER.info("Found: {}", account);
				rc.response().end(account.toString());
			});
		} else {
			rc.response().setStatusCode(HttpResponseStatus.UNAUTHORIZED.code()).end();
		}
	});
});
router.post("/account").produces("application/json").handler(rc -> {
	rc.user().isAuthorised("realm:modify-account", authRes -> { // (4)
		LOGGER.info("Auth: {}", authRes.result());
		if (authRes.result() == Boolean.TRUE) {
			Account a = Json.decodeValue(rc.getBodyAsString(), Account.class);
			repository.save(a, res -> {
				Account account = res.result();
				LOGGER.info("Created: {}", account);
				rc.response().end(account.toString());
			});
		} else {
			rc.response().setStatusCode(HttpResponseStatus.UNAUTHORIZED.code()).end();
		}
	});
});

Testing

I created JUnit test case to check if OAuth2 authentication works fine. Vert.x provides library which can be used for testing. It is especially design to work well with asynchronous code. Include the following dependency to your pom.xml.

<dependency>
	<groupId>io.vertx</groupId>
	<artifactId>vertx-unit</artifactId>
	<version>${vertx.version}</version>
	<scope>test</scope>
</dependency>

Then annotate your JUnit test class with @RunWith(VertxUnitRunner.class). Before running our test method we should deploy verticles. Verticle with REST API is deployed on port 2222.

Vertx vertx;

@Before
public void before(TestContext context) throws IOException {
	vertx = Vertx.vertx();
	vertx.deployVerticle(MongoVerticle.class.getName(), context.asyncAssertSuccess());
	DeploymentOptions options = new DeploymentOptions().setConfig(new JsonObject().put("http.port", 2222));
	vertx.deployVerticle(AccountServer.class.getName(), options, context.asyncAssertSuccess());
}

Here’s JUnit test method. We use WebClient for calling HTTP methods and Vert.x-Unit Async for complete test case on asynchronous calls finishes (3). First, we are calling POST \login method te retrieve access token from Keycloak (1). Then we are calling one of API method and setting Authorization header with access token string retrieved from POST \login method (2). During test case execution verticle with MongoDB (MongoVerticle) and API definition (AccountServer) are deployed and started, but you need to start manually MongoDB database, Consul and Keycloak. I suggest running it with Docker.

@Test
public void testAuth(TestContext context) {
	Async async = context.async();
	WebClient client = WebClient.create(vertx);
	User u = new User("piotr.minkowski", "Piot_123", "modify-account view-account");
	client.post(2222, "localhost", "/login").sendJson(u, ar -> { // (1)
		LOGGER.info("Response code: {}", ar.result().statusCode());
		LOGGER.info("Response: {}", ar.result().bodyAsString());
		if (ar.result().statusCode() == 200) {
			User user = ar.result().bodyAsJson(User.class);
			client.get(2222, "localhost", "/account").putHeader("Authorization", "Bearer " + user.getAccessToken()).send(r -> { // (2)
				LOGGER.info("GET result: {}", r.result().bodyAsString());
				async.complete(); // (3)
			});
		} else {
			async.complete();
		}
	});
}

Final Thoughts

To be honest I have never dealt with Vert.x before the start of work on a series of articles published on my blog. From those couple of days spending on that toolkit recognition I’ll definitely recommend using it when working on REST APIs. Vert.x provides the smart implementation for security with OAuth2. Additionally you can use it in combination with the solution like Keycloak, which is used for identity and access management. As usual there are also some drawbacks. I had a problem with understanding how the authorities exactly work in Vert.x. When I created a role inside Keycloak client it didn’t work in my application. Only global realm role worked fine. However, those problems does not overshadow Vert.x advantages.

Advanced Microservices Security with OAuth2

In one of my previous posts I described the basic sample illustrating microservices security with Spring Security and OAuth2. You could read there how to create and use authorization and resource server, basic authentication and bearer token with Spring Boot. Now, I would like to introduce more advanced sample with SSO OAuth2 behind Zuul gateway. Architecture of newest sample is rather similar to the previous sample like you can see in the picture below. The difference is in implementation details.

oauth2

Requests to the microservices and authorization server are proxied by the gateway. First request is redirected to the login page. We need to authenticate. User authentication data is stored in MySQL database. After login there is also stored user HTTP session data using Spring Session library. Then you should to perform next steps to obtain OAuth2 authorization token by calling authorization server enpoints via gateway. Finally, you can call concrete microservice providing OAuth2 token as a bearer in Authorization HTTP request header.

If you are interested in technical details of the presented solution you can read my article on DZone. There is also available sample application source code on GitHub.

Microservices security with Oauth2

Preface

One of the most important aspects to consider when exposing a public access API consisting of many microservices is security. Spring has some interesting features and frameworks which makes configuration of our microservices security easier. In this article I’m going to show you how to use Spring Cloud and Oauth2 to provide token access security behind API gateway.

Theory

OAuth2 standard is currently used by all the major websites that allow you to access their resources through the shared API. It is an open authorization standard allowing users to share their private resources stored in one page to another page without having to go into the service of their credentials. These are basic terms related to oauth2.

  • Resource Owner – dispose of access to the resource
  • Resource Server – server that stores the owner’s resources that can be shared using special token
  • Authorization Server – manages the allocation of keys, tokens and other temporary resource access codes. It also has to ensure that access is granted to the relevant person
  • Access Token – the key that allows access to a resource
  • Authorization Grant – grants permission for access. There are different ways to confirm access: authorization code, implicit, resource owner password credentials, and client credentials

You can read more about this standard here and in this digitalocean article. The flow of this protocol has three main steps. In the begining we authorization request is sent to Resource Owner. After response from Resource Owner we send authorization grant request to Authorization Server and receive access token. Finally, we send this access token to Resource Server and if it is valid the API serves the resource to the application.

Our solution

The picture below shows architecture of our sample. We have API Gateway (Zuul) which proxies our requests to authorization server and two instances of account microservice. Authorization server is some kind of infrastructure service which provides outh2 security mechanisms. We also have discovery service (Eureka) where all of our microservices are registered.

sec-micro

Gateway

For our sample we won’t provide any security on API gateway. It just has to proxy requests from clients to authorization server and account microservices. In the Zuul’s gateway configuration visible below we set sensitiveHeaders property on empty value to enable Authorization HTTP header forward. By default Zuul cut that header while forwarding our request to the target API which is incorrect because of the basic authorization demanded by our services behind gateway.

zuul:
  routes:
    uaa:
      path: /uaa/**
      sensitiveHeaders:
      serviceId: auth-server
    account:
      path: /account/**
      sensitiveHeaders:
      serviceId: account-service

Main class inside gateway source code is very simple. It only has to enable Zuul proxy feature and discovery client for collecting services from Eureka registry.

@SpringBootApplication
@EnableZuulProxy
@EnableDiscoveryClient
public class GatewayServer {

	public static void main(String[] args) {
		SpringApplication.run(GatewayServer.class, args);
	}

}

Authorization Server

Our authorization server is as simple as possible. It based on default Spring security configuration. Client authorization details are stored in an in-memory repository. Of cource in the production mode you would like to use other implementations instead of in-memory repository like JDBC datasource and token store. You can read more about Spring authorization mechanisms in Spring Security Reference and Spring Boot Security. Here’s fragment of configuration from application.yml. We provided user basic authentication data and basic security credentials for the /token endpoint: client-id and client-secret. The user credentials are the normal Spring Security user details.

security:
  user:
    name: root
    password: password
  oauth2:
    client:
      client-id: acme
      client-secret: secret

Here’s main class of our authentication server with @EnableAuthorizationServer. We also exposed one REST endpoint with user authentication details for account service and enabled Eureka registration and discovery for clients.

@SpringBootApplication
@EnableAuthorizationServer
@EnableDiscoveryClient
@EnableResourceServer
@RestController
public class AuthServer {

	public static void main(String[] args) {
		SpringApplication.run(AuthServer.class, args);
	}

	@RequestMapping("/user")
	public Principal user(Principal user) {
		return user;
	}

}

Application – account microservice

Our sample microservice has only one endpoint for @GET request which always returns the same account. In main class resource server and Eureka discovery are enabled. Service configuration is trivial. Sample application source code is available on GitHub.

@SpringBootApplication
@EnableDiscoveryClient
@EnableResourceServer
public class AccountService {

	public static void main(String[] args) {
		SpringApplication.run(AccountService.class, args);
	}

}
security:
  user:
    name: root
    password: password
  oauth2:
    resource:
      loadBalanced: true
      userInfoUri: http://localhost:9999/user

Testing

We only need web browser and REST client (for example Chrome Advanced REST client) to test our solution. Let’s start from sending authorization request to resource owner. We can call oauth2 authorize endpoint via Zuul gateway in the web browser.

http://localhost:8765/uaa/oauth/authorize?response_type=token&client_id=acme&redirect_uri=http://example.com&scope=openid&state=48532

After sending this request we should see page below. Select Approve and click Authorize for requests an access token from the authorization server. If the application identity is authenticated and the authorization grant is valid an access token to the application should be returned in the HTTP response.

oauth2

http://example.com/#access_token=b1acaa35-1ebd-4995-987d-56ee1c0619e5&token_type=bearer&state=48532&expires_in=43199

And the final step is to call account endpoint using access token. We had to put it into Authorization header as bearer token. In the sample application logging level for security operation is set to TRACE so you can easily find out what happened if something goes wrong.

call

Conclusion

To be honest I’m not very familiar with security issues in applications. So one very important thing for me is the simplicity of security solution I decided to use. In Spring Security we have almost all needed mechanisms out of the box. It also provides components which can be easily extendable for more advanced requirements. You should treat this article as a brief introduction to more advanced solutions using Spring Cloud and Spring Security projects.