A Deep Dive Into Spring WebFlux Threading Model

If you are building reactive applications with Spring WebFlux, typically you will use Reactor Netty as a default embedded server. Reactor Netty is currently one of the most popular asynchronous event-driven applications framework. It provides non-blocking and backpressure-ready TCP, HTTP, and UDP clients and servers. In fact, the most important difference between synchronous and reactive frameworks is in their threading and concurrency model. Without understanding how reactive framework handles threads, you won’t fully understand reactivity. Let’s take a closer look on the threading model realized by Spring WebFlux and Project Reactor. Continue reading “A Deep Dive Into Spring WebFlux Threading Model”

Using Reactive WebClient with Spring WebFlux

Reactive APIs and generally reactive programming become increasingly popular lately. You have a change to observe more and more new frameworks and toolkits supporting reactive programming, or just dedicated for this. Today, in the era of microservices architecture, where the network communication through APIs becomes critical for applications, reactive APIs seems to be an attractive alternative to a traditional, synchronous approach. It should be definitely considered as a primary approach if you are working with large streams of data exchanged via network communication. Continue reading “Using Reactive WebClient with Spring WebFlux”

Reactive Elasticsearch With Spring Boot

One of more notable feature introduced in the latest release of Spring Data is reactive support for Elasticsearch. Since Spring Data Moore we can take advantage of reactive template and repository. It is built on top of fully reactive Elasticsearch REST client, that is based on Spring WebClient. It is also worth to mention about support for reactive Querydsl, which can be included to your application through ReactiveQueryPredicateExecutor. Continue reading “Reactive Elasticsearch With Spring Boot”

Reactive programming with Project Reactor

If you are building reactive microservices you would probably have to merge data streams from different source APIs into a single result stream. It inspired me to create this article containing some most common scenarios of using reactive streams in microservice-based architecture during inter-service communication. I have already described some aspects related to reactive programming with Spring based on Spring WebFlux and Spring Data JDBC projects in the following articles:

Continue reading “Reactive programming with Project Reactor”

Introduction to Reactive APIs with Postgres, R2DBC, Spring Data JDBC and Spring WebFlux

There are pretty many technologies listed in the title of this article. Spring WebFlux has been introduced with Spring 5 and Spring Boot 2 as a project for building reactive-stack web applications. I have already described how to use it together with Spring Boot and Spring Cloud for building reactive microservices in that article: Reactive Microservices with Spring WebFlux and Spring Cloud. Spring 5 has also introduced some projects supporting reactive access to NoSQL databases like Cassandra, MongoDB or Couchbase. But there were still a lack in support for reactive to access to relational databases. The change is coming together with R2DBC (Reactive Relational Database Connectivity) project. That project is also being developed by Pivotal members. It seems to be very interesting initiative, however it is rather at the beginning of the road. Anyway, there is a module for integration with Postgres, and we will use it for our demo application. R2DBC will not be the only one new interesting solution described in this article. I also show you how to use Spring Data JDBC – another really interesting project released recently.
It is worth mentioning some words about Spring Data JDBC. This project has been already released, and is available under version 1.0. It is a part of bigger Spring Data framework. It offers a repository abstraction based on JDBC. The main reason of creating that library is allow to access relational databases using Spring Data way (through CrudRepository interfaces) without including JPA library to the application dependencies. Of course, JPA is still certainly the main persistence API used for Java applications. Spring Data JDBC aims to be much simpler conceptually than JPA by not implementing popular patterns like lazy loading, caching, dirty context, sessions. It also provides only very limited support for annotation-based mapping. Finally, it provides an implementation of reactive repositories that uses R2DBC for accessing relational database. Although that module is still under development (only SNAPSHOT version is available), we will try to use it in our demo application. Let’s proceed to the implementation.

Including dependencies

We use Kotlin for implementation. So first, we include some required Kotlin dependencies.

<dependency>
	<groupId>org.jetbrains.kotlin</groupId>
	<artifactId>kotlin-stdlib</artifactId>
	<version>${kotlin.version}</version>
</dependency>
<dependency>
	<groupId>com.fasterxml.jackson.module</groupId>
	<artifactId>jackson-module-kotlin</artifactId>
</dependency>
<dependency>
	<groupId>org.jetbrains.kotlin</groupId>
	<artifactId>kotlin-reflect</artifactId>
</dependency>
<dependency>
	<groupId>org.jetbrains.kotlin</groupId>
	<artifactId>kotlin-test-junit</artifactId>
	<version>${kotlin.version}</version>
	<scope>test</scope>
</dependency>

We should also add kotlin-maven-plugin with support for Spring.

<plugin>
	<groupId>org.jetbrains.kotlin</groupId>
	<artifactId>kotlin-maven-plugin</artifactId>
	<version>${kotlin.version}</version>
	<executions>
		<execution>
			<id>compile</id>
			<phase>compile</phase>
			<goals>
				<goal>compile</goal>
			</goals>
		</execution>
		<execution>
			<id>test-compile</id>
			<phase>test-compile</phase>
			<goals>
				<goal>test-compile</goal>
			</goals>
		</execution>
	</executions>
	<configuration>
		<args>
			<arg>-Xjsr305=strict</arg>
		</args>
		<compilerPlugins>
			<plugin>spring</plugin>
		</compilerPlugins>
	</configuration>
</plugin>

Then, we may proceed to including frameworks required for the demo implementation. We need to include the special SNAPSHOT version of Spring Data JDBC dedicated for accessing database using R2DBC. We also have to add some R2DBC libraries and Spring WebFlux. As you may see below only Spring WebFlux is available in stable version (as a part of Spring Boot RELEASE).

<dependency>
	<groupId>org.springframework.boot</groupId>
	<artifactId>spring-boot-starter-webflux</artifactId>
</dependency>
<dependency>
	<groupId>org.springframework.data</groupId>
	<artifactId>spring-data-jdbc</artifactId>
	<version>1.0.0.r2dbc-SNAPSHOT</version>
</dependency>
<dependency>
	<groupId>io.r2dbc</groupId>
	<artifactId>r2dbc-spi</artifactId>
	<version>1.0.0.M5</version>
</dependency>
<dependency>
	<groupId>io.r2dbc</groupId>
	<artifactId>r2dbc-postgresql</artifactId>
	<version>1.0.0.M5</version>
</dependency>

It is also important to set dependency management for Spring Data project.

<dependencyManagement>
	<dependencies>
		<dependency>
			<groupId>org.springframework.data</groupId>
			<artifactId>spring-data-releasetrain</artifactId>
			<version>Lovelace-RELEASE</version>
			<scope>import</scope>
			<type>pom</type>
		</dependency>
	</dependencies>
</dependencyManagement>

Repositories

We are using well known Spring Data style of CRUD repository implementation. In that case we need to create interface that extends ReactiveCrudRepository interface.
Here’s the implementation of repository for managing Employee objects.

interface EmployeeRepository : ReactiveCrudRepository<Employee, Int< {
    @Query("select id, name, salary, organization_id from employee e where e.organization_id = $1")
    fun findByOrganizationId(organizationId: Int) : Flux<Employee>
}

Here’s the another implementation of repository – this time for managing Organization objects.

interface OrganizationRepository : ReactiveCrudRepository<Organization, Int< {
}

Implementing Entities and DTOs

Kotlin provides a convenient way of creating entity class by declaring it as data class. When using Spring Data JDBC we have to set primary key for entity by annotating the field with @Id. It assumes the key is automatically incremented by database. If you are not using auto-increment columns, you have to use a BeforeSaveEvent listener, which sets the ID of the entity. However, I tried to set such a listener for my entity, but it just didn’t work with reactive version of Spring Data JDBC.
Here’s an implementation of Employee entity class. What is worth mentioning Spring Data JDBC will automatically map class field organizationId into database column organization_id.

data class Employee(val name: String, val salary: Int, val organizationId: Int) {
    @Id 
    var id: Int? = null
}

Here’s an implementation of Organization entity class.

data class Organization(var name: String) {
    @Id 
    var id: Int? = null
}

R2DBC does not support any lists or sets. Because I’d like to return list with employees inside Organization object in one of API endpoints I have created DTO containing such a list as shown below.

data class OrganizationDTO(var id: Int?, var name: String) {
    var employees : MutableList = ArrayList()
    constructor(employees: MutableList) : this(null, "") {
        this.employees = employees
    }
}

The SQL scripts corresponding to the created entities are visible below. Field type serial will automatically creates sequence and attach it to the field id.

CREATE TABLE employee (
    name character varying NOT NULL,
    salary integer NOT NULL,
    id serial PRIMARY KEY,
    organization_id integer
);
CREATE TABLE organization (
    name character varying NOT NULL,
    id serial PRIMARY KEY
);

Building sample web applications

For the demo purposes we will build two independent applications employee-service and organization-service. Application organization-service is communicating with employee-service using WebFlux WebClient. It gets the list of employees assigned to the organization, and includes them to response together with Organization object. Sample applications source code is available on GitHub under repository sample-spring-data-webflux: https://github.com/piomin/sample-spring-data-webflux.
Ok, let’s begin from declaring Spring Boot main class. We need to enable Spring Data JDBC repositories by annotating the main class with @EnableJdbcRepositories.

@SpringBootApplication
@EnableJdbcRepositories
class EmployeeApplication

fun main(args: Array<String>) {
    runApplication<EmployeeApplication>(*args)
}

Working with R2DBC and Postgres requires some configuration. Probably due to an early stage of progress in development of Spring Data JDBC and R2DBC there is no Spring Boot auto-configuration for Postgres. We need to declare connection factory, client, and repository inside @Configuration bean.

@Configuration
class EmployeeConfiguration {

    @Bean
    fun repository(factory: R2dbcRepositoryFactory): EmployeeRepository {
        return factory.getRepository(EmployeeRepository::class.java)
    }

    @Bean
    fun factory(client: DatabaseClient): R2dbcRepositoryFactory {
        val context = RelationalMappingContext()
        context.afterPropertiesSet()
        return R2dbcRepositoryFactory(client, context)
    }

    @Bean
    fun databaseClient(factory: ConnectionFactory): DatabaseClient {
        return DatabaseClient.builder().connectionFactory(factory).build()
    }

    @Bean
    fun connectionFactory(): PostgresqlConnectionFactory {
        val config = PostgresqlConnectionConfiguration.builder() //
                .host("192.168.99.100") //
                .port(5432) //
                .database("reactive") //
                .username("reactive") //
                .password("reactive123") //
                .build()

        return PostgresqlConnectionFactory(config)
    }

}

Finally, we can create REST controllers that contain the definition of our reactive API methods. With Kotlin it does not take much space. The following controller definition contains three GET methods that allows to find all employees, all employees assigned to a given organization or a single employee by id.

@RestController
@RequestMapping("/employees")
class EmployeeController {

    @Autowired
    lateinit var repository : EmployeeRepository

    @GetMapping
    fun findAll() : Flux<Employee> = repository.findAll()

    @GetMapping("/{id}")
    fun findById(@PathVariable id : Int) : Mono<Employee> = repository.findById(id)

    @GetMapping("/organization/{organizationId}")
    fun findByorganizationId(@PathVariable organizationId : Int) : Flux<Employee> = repository.findByOrganizationId(organizationId)

    @PostMapping
    fun add(@RequestBody employee: Employee) : Mono<Employee> = repository.save(employee)

}

Inter-service Communication

For the OrganizationController the implementation is a little bit more complicated. Because organization-service is communicating with employee-service, we first need to declare reactive WebFlux WebClient builder.

@Bean
fun clientBuilder() : WebClient.Builder {
	return WebClient.builder()
}

Then, similar to the repository bean the builder is being injected into the controller. It is used inside findByIdWithEmployees method for calling method GET /employees/organization/{organizationId} exposed by employee-service. As you can see on the code fragment below it provides reactive API and return Flux object containing list of found employees. This list is injected into OrganizationDTO object using zipWith Reactor method.

@RestController
@RequestMapping("/organizations")
class OrganizationController {

    @Autowired
    lateinit var repository : OrganizationRepository
    @Autowired
    lateinit var clientBuilder : WebClient.Builder

    @GetMapping
    fun findAll() : Flux<Organization> = repository.findAll()

    @GetMapping("/{id}")
    fun findById(@PathVariable id : Int) : Mono<Organization> = repository.findById(id)

    @GetMapping("/{id}/withEmployees")
    fun findByIdWithEmployees(@PathVariable id : Int) : Mono<OrganizationDTO> {
        val employees : Flux<Employee> = clientBuilder.build().get().uri("http://localhost:8090/employees/organization/$id")
                .retrieve().bodyToFlux(Employee::class.java)
        val org : Mono = repository.findById(id)
        return org.zipWith(employees.collectList())
                .map { tuple -> OrganizationDTO(tuple.t1.id as Int, tuple.t1.name, tuple.t2) }
    }

    @PostMapping
    fun add(@RequestBody employee: Organization) : Mono<Organization> = repository.save(employee)

}

How it works?

Before running the tests we need to start Postgres database. Here’s the Docker command used for running Postgres container. It is creating user with password, and setting up default database.

$ docker run -d --name postgres -p 5432:5432 -e POSTGRES_USER=reactive -e POSTGRES_PASSWORD=reactive123 -e POSTGRES_DB=reactive postgres

Then we need to create some tests tables, so you have to run SQL script placed in the section Implementing Entities and DTOs. After that you can start our test applications. If you do not override default settings provided inside application.yml files employee-service is listening on port 8090, and organization-service on port 8095. The following picture illustrates the architecture of our sample system.
spring-data-1
Now, let’s add some test data using reactive API exposed by the applications.

$ curl -d '{"name":"Test1"}' -H "Content-Type: application/json" -X POST http://localhost:8095/organizations
$ curl -d '{"name":"Name1", "balance":5000, "organizationId":1}' -H "Content-Type: application/json" -X POST http://localhost:8090/employees
$ curl -d '{"name":"Name2", "balance":10000, "organizationId":1}' -H "Content-Type: application/json" -X POST http://localhost:8090/employees

Finally you can call GET organizations/{id}/withEmployees method, for example using your web browser. The result should be similar to the result visible on the following picture.

spring-data-2

Reactive Microservices with Spring WebFlux and Spring Cloud

I have already described Spring reactive support about one year ago in the article Reactive microservices with Spring 5. At that time project Spring WebFlux has been under active development, and now after official release of Spring 5 it is worth to take a look on the current version of it. Moreover, we will try to put our reactive microservices inside Spring Cloud ecosystem, which contains such the elements like service discovery with Eureka, load balancing with Spring Cloud Commons @LoadBalanced, and API gateway using Spring Cloud Gateway (also based on WebFlux and Netty). We will also check out Spring reactive support for NoSQL databases by the example of Spring Data Reactive Mongo project.

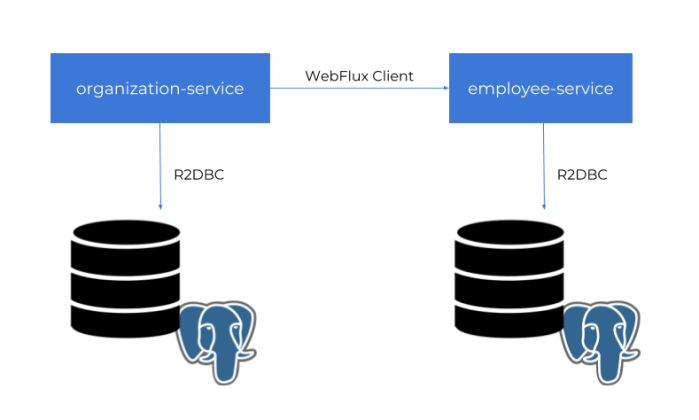
Here’s the figure that illustrates an architecture of our sample system consisting of two microservices, discovery server, gateway and MongoDB databases. The source code is as usual available on GitHub in sample-spring-cloud-webflux repository.

reactive-1

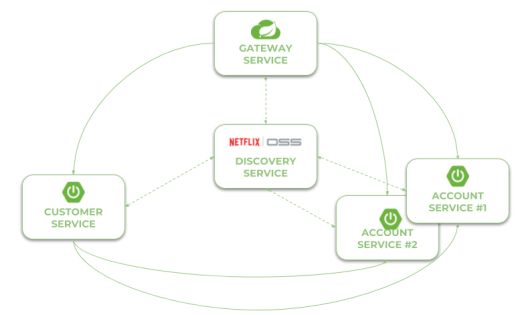
Let’s describe the further steps on the way to create the system illustrated above.

Step 1. Building reactive application using Spring WebFlux

To enable library Spring WebFlux for the project we should include starter spring-boot-starter-webflux to the dependencies. It includes some dependent libraries like Reactor or Netty server.

<dependency>
	<groupId>org.springframework.boot</groupId>
	<artifactId>spring-boot-starter-webflux</artifactId>
</dependency>

REST controller looks pretty similar to the controller defined for synchronous web services. The only difference is in type of returned objects. Instead of single object we return instance of class Mono, and instead of list we return instance of class Flux. Thanks to Spring Data Reactive Mongo we don’t have to do nothing more that call the needed method on the repository bean.

@RestController
public class AccountController {

	private static final Logger LOGGER = LoggerFactory.getLogger(AccountController.class);

	@Autowired
	private AccountRepository repository;

	@GetMapping("/customer/{customer}")
	public Flux findByCustomer(@PathVariable("customer") String customerId) {
		LOGGER.info("findByCustomer: customerId={}", customerId);
		return repository.findByCustomerId(customerId);
	}

	@GetMapping
	public Flux findAll() {
		LOGGER.info("findAll");
		return repository.findAll();
	}

	@GetMapping("/{id}")
	public Mono findById(@PathVariable("id") String id) {
		LOGGER.info("findById: id={}", id);
		return repository.findById(id);
	}

	@PostMapping
	public Mono create(@RequestBody Account account) {
		LOGGER.info("create: {}", account);
		return repository.save(account);
	}

}

Step 2. Integrate an application with database using Spring Data Reactive Mongo

The implementation of integration between application and database is also very simple. First, we need to include starter spring-boot-starter-data-mongodb-reactive to the project dependencies.

<dependency>
	<groupId>org.springframework.boot</groupId>
	<artifactId>spring-boot-starter-data-mongodb-reactive</artifactId>
</dependency>

The support for reactive Mongo repositories is automatically enabled after including the starter. The next step is to declare entity with ORM mappings. The following class is also returned as reponse by AccountController.

@Document
public class Account {

	@Id
	private String id;
	private String number;
	private String customerId;
	private int amount;

	...

}

Finally, we may create repository interface that extends ReactiveCrudRepository. It follows the patterns implemented by Spring Data JPA and provides some basic methods for CRUD operations. It also allows to define methods with names, which are automatically mapped to queries. The only difference in comparison with standard Spring Data JPA repositories is in method signatures. The objects are wrapped by Mono and Flux.

public interface AccountRepository extends ReactiveCrudRepository {

	Flux findByCustomerId(String customerId);

}

In this example I used Docker container for running MongoDB locally. Because I run Docker on Windows using Docker Toolkit the default address of Docker machine is 192.168.99.100. Here’s the configuration of data source in application.yml file.

spring:
  data:
    mongodb:
      uri: mongodb://192.168.99.100/test

Step 3. Enabling service discovery using Eureka

Integration with Spring Cloud Eureka is pretty the same as for synchronous REST microservices. To enable discovery client we should first include starter spring-cloud-starter-netflix-eureka-client to the project dependencies.

<dependency>
	<groupId>org.springframework.cloud</groupId>
	<artifactId>spring-cloud-starter-netflix-eureka-client</artifactId>
</dependency>

Then we have to enable it using @EnableDiscoveryClient annotation.

@SpringBootApplication
@EnableDiscoveryClient
public class AccountApplication {

	public static void main(String[] args) {
		SpringApplication.run(AccountApplication.class, args);
	}

}

Microservice will automatically register itself in Eureka. Of cource, we may run more than instance of every service. Here’s the screen illustrating Eureka Dashboard (http://localhost:8761) after running two instances of account-service and a single instance of customer-service.  I would not like to go into the details of running application with embedded Eureka server. You may refer to my previous article for details: Quick Guide to Microservices with Spring Boot 2.0, Eureka and Spring Cloud. Eureka server is available as discovery-service module.

spring-reactive

Step 4. Inter-service communication between reactive microservices with WebClient

An inter-service communication is realized by the WebClient from Spring WebFlux project. The same as for RestTemplate you should annotate it with Spring Cloud Commons @LoadBalanced . It enables integration with service discovery and load balancing using Netflix OSS Ribbon client. So, the first step is to declare a client builder bean with @LoadBalanced annotation.

@Bean
@LoadBalanced
public WebClient.Builder loadBalancedWebClientBuilder() {
	return WebClient.builder();
}

Then we may inject WebClientBuilder into the REST controller. Communication with account-service is implemented inside GET /{id}/with-accounts , where first we are searching for customer entity using reactive Spring Data repository. It returns object Mono , while the WebClient returns Flux . Now, our main goal is to merge those to publishers and return single Mono object with the list of accounts taken from Flux without blocking the stream. The following fragment of code illustrates how I used WebClient to communicate with other microservice, and then merge the response and result from repository to single Mono object. This merge may probably be done in more “ellegant” way, so fell free to create push request with your proposal.

@Autowired
private WebClient.Builder webClientBuilder;

@GetMapping("/{id}/with-accounts")
public Mono findByIdWithAccounts(@PathVariable("id") String id) {
	LOGGER.info("findByIdWithAccounts: id={}", id);
	Flux accounts = webClientBuilder.build().get().uri("http://account-service/customer/{customer}", id).retrieve().bodyToFlux(Account.class);
	return accounts
			.collectList()
			.map(a -> new Customer(a))
			.mergeWith(repository.findById(id))
			.collectList()
			.map(CustomerMapper::map);
}

Step 5. Building API gateway using Spring Cloud Gateway

Spring Cloud Gateway is one of the newest Spring Cloud project. It is built on top of Spring WebFlux, and thanks to that we may use it as a gateway to our sample system based on reactive microservices. Similar to Spring WebFlux applications it is ran on embedded Netty server. To enable it for Spring Boot application just include the following dependency to your project.

<dependency>
	<groupId>org.springframework.cloud</groupId>
	<artifactId>spring-cloud-starter-gateway</artifactId>
</dependency>

We should also enable discovery client in order to allow the gateway to fetch list of registered microservices. However, there is no need to register gateway’s application in Eureka. To disable registration you may set property eureka.client.registerWithEureka to false inside application.yml file.

@SpringBootApplication
@EnableDiscoveryClient
public class GatewayApplication {

	public static void main(String[] args) {
		SpringApplication.run(GatewayApplication.class, args);
	}

}

By default, Spring Cloud Gateway does not enable integration with service discovery. To enable it we should set property spring.cloud.gateway.discovery.locator.enabled to true. Now, the last thing that should be done is the configuration of the routes. Spring Cloud Gateway provides two types of components that may be configured inside routes: filters and predicates. Predicates are used for matching HTTP requests with route, while filters can be used to modify requests and responses before or after sending the downstream request. Here’s the full configuration of gateway. It enables service discovery location, and defines two routes based on entries in service registry. We use the Path Route Predicate factory for matching the incoming requests, and the RewritePath GatewayFilter factory for modifying the requested path to adapt it to the format exposed by the downstream services (endpoints are exposed under path /, while gateway expose them under paths /account and /customer).

spring:
  cloud:
    gateway:
      discovery:
        locator:
          enabled: true
      routes:
      - id: account-service
        uri: lb://account-service
        predicates:
        - Path=/account/**
        filters:
        - RewritePath=/account/(?.*), /$\{path}
      - id: customer-service
        uri: lb://customer-service
        predicates:
        - Path=/customer/**
        filters:
        - RewritePath=/customer/(?.*), /$\{path}

Step 6. Testing the sample system

Before making some tests let’s just recap our sample system. We have two microservices account-service, customer-service that use MongoDB as a database. Microservice customer-service calls endpoint GET /customer/{customer} exposed by account-service. URL of account-service is taken from Eureka. The whole sample system is hidden behind gateway, which is available under address localhost:8090.
Now, the first step is to run MongoDB on Docker container. After executing the following command Mongo is available under address 192.168.99.100:27017.

$ docker run -d --name mongo -p 27017:27017 mongo

Then we may proceeed to running discovery-service. Eureka is available under its default address localhost:8761. You may run it using your IDE or just by executing command java -jar target/discovery-service-1.0-SNAPHOT.jar. The same rule applies to our sample microservices. However, account-service needs to be multiplied in two instances, so you need to override default HTTP port when running second instance using -Dserver.port VM argument, for example java -jar -Dserver.port=2223 target/account-service-1.0-SNAPSHOT.jar. Finally, after running gateway-service we may add some test data.

$ curl --header "Content-Type: application/json" --request POST --data '{"firstName": "John","lastName": "Scott","age": 30}' http://localhost:8090/customer
{"id": "5aec1debfa656c0b38b952b4","firstName": "John","lastName": "Scott","age": 30,"accounts": null}
$ curl --header "Content-Type: application/json" --request POST --data '{"number": "1234567890","amount": 5000,"customerId": "5aec1debfa656c0b38b952b4"}' http://localhost:8090/account
{"id": "5aec1e86fa656c11d4c655fb","number": "1234567892","customerId": "5aec1debfa656c0b38b952b4","amount": 5000}
$ curl --header "Content-Type: application/json" --request POST --data '{"number": "1234567891","amount": 12000,"customerId": "5aec1debfa656c0b38b952b4"}' http://localhost:8090/account
{"id": "5aec1e91fa656c11d4c655fc","number": "1234567892","customerId": "5aec1debfa656c0b38b952b4","amount": 12000}
$ curl --header "Content-Type: application/json" --request POST --data '{"number": "1234567892","amount": 2000,"customerId": "5aec1debfa656c0b38b952b4"}' http://localhost:8090/account
{"id": "5aec1e99fa656c11d4c655fd","number": "1234567892","customerId": "5aec1debfa656c0b38b952b4","amount": 2000}

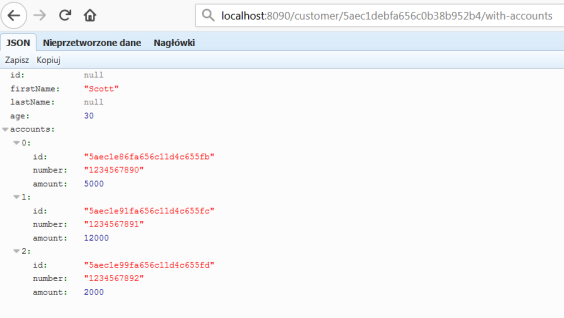
To test inter-service communication just call endpoint GET /customer/{id}/with-accounts on gateway-service. It forward the request to customer-service, and then customer-service calls enpoint exposed by account-service using reactive WebClient. The result is visible below.

reactive-2

Conclusion

Since Spring 5 and Spring Boot 2.0 there is a full range of available ways to build microservices-based architecture. We can build standard synchronous system using one-to-one communication with Spring Cloud Netflix project, messaging microservices based on message broker and publish/subscribe communication model with Spring Cloud Stream, and finally asynchronous, reactive microservices with Spring WebFlux. The main goal of this article is to show you how to use Spring WebFlux together with Spring Cloud projects in order to provide such a mechanisms like service discovery, load balancing or API gateway for reactive microservices build on top of Spring Boot. Before Spring 5 the lack of support for reactive microservices was one of the drawback of Spring framework, but now with Spring WebFlux it is no longer the case. Not only that, we may leverage Spring reactive support for the most popular NoSQL databases like MongoDB or Cassandra, and easily place our reactive microservices inside one system together with synchronous REST microservices.

Reactive microservices with Spring 5

Spring team has announced support for reactive programming model from 5.0 release. New Spring version will probably be released on March. Fortunately, milestone and snapshot versions with these changes are now available on public spring repositories. There is new Spring Web Reactive project with support for reactive @Controller and also new WebClient with client-side reactive support. Today I’m going to take a closer look on solutions suggested by Spring team.

Following Spring WebFlux documentation  the Spring Framework uses Reactor internally for its own reactive support. Reactor is a Reactive Streams implementation that further extends the basic Reactive Streams Publisher contract with the Flux and Mono composable API types to provide declarative operations on data sequences of 0..N and 0..1. On the server-side Spring supports annotation based and functional programming models. Annotation model use @Controller and the other annotations supported also with Spring MVC. Reactive controller will be very similar to standard REST controller for synchronous services instead of it uses Flux, Mono and Publisher objects. Today I’m going to show you how to develop simple reactive microservices using annotation model and MongoDB reactive module. Sample application source code is available on GitHub.

For our example we need to use snapshots of Spring Boot 2.0.0 and Spring Web Reactive 0.1.0. Here are main pom.xml fragment and single microservice pom.xml below. In our microservices we use Netty instead of default Tomcat server.

	<parent>
		<groupId>org.springframework.boot</groupId>
		<artifactId>spring-boot-starter-parent</artifactId>
		<version>2.0.0.BUILD-SNAPSHOT</version>
	</parent>
	<dependencyManagement>
		<dependencies>
			<dependency>
				<groupId>org.springframework.boot.experimental</groupId>
				<artifactId>spring-boot-dependencies-web-reactive</artifactId>
				<version>0.1.0.BUILD-SNAPSHOT</version>
				<type>pom</type>
				<scope>import</scope>
			</dependency>
		</dependencies>
	</dependencyManagement>
	<dependencies>
		<dependency>
			<groupId>org.springframework.boot</groupId>
			<artifactId>spring-boot-starter-data-mongodb-reactive</artifactId>
		</dependency>
		<dependency>
			<groupId>org.springframework.boot.experimental</groupId>
			<artifactId>spring-boot-starter-web-reactive</artifactId>
			<exclusions>
				<exclusion>
					<groupId>org.springframework.boot</groupId>
					<artifactId>spring-boot-starter-tomcat</artifactId>
				</exclusion>
			</exclusions>
		</dependency>
		<dependency>
			<groupId>io.projectreactor.ipc</groupId>
			<artifactId>reactor-netty</artifactId>
		</dependency>
		<dependency>
			<groupId>io.netty</groupId>
			<artifactId>netty-all</artifactId>
		</dependency>
		<dependency>
			<groupId>pl.piomin.services</groupId>
			<artifactId>common</artifactId>
			<version>${project.version}</version>
		</dependency>
		<dependency>
			<groupId>org.springframework.boot</groupId>
			<artifactId>spring-boot-starter-test</artifactId>
			<scope>test</scope>
		</dependency>
		<dependency>
			<groupId>io.projectreactor.addons</groupId>
			<artifactId>reactor-test</artifactId>
			<scope>test</scope>
		</dependency>
	</dependencies>

We have two microservices: account-service and customer-service. Each of them have its own MongoDB database and they are exposing simple reactive API for searching and saving data. Also customer-service interacting with account-service to get all customer accounts and return them in customer-service method. Here’s our account controller code.

@RestController
public class AccountController {

	@Autowired
	private AccountRepository repository;

	@GetMapping(value = "/account/customer/{customer}")
	public Flux<Account> findByCustomer(@PathVariable("customer") Integer customerId) {
		return repository.findByCustomerId(customerId)
				.map(a -> new Account(a.getId(), a.getCustomerId(), a.getNumber(), a.getAmount()));
	}

	@GetMapping(value = "/account")
	public Flux<Account> findAll() {
		return repository.findAll().map(a -> new Account(a.getId(), a.getCustomerId(), a.getNumber(), a.getAmount()));
	}

	@GetMapping(value = "/account/{id}")
	public Mono<Account> findById(@PathVariable("id") Integer id) {
		return repository.findById(id)
				.map(a -> new Account(a.getId(), a.getCustomerId(), a.getNumber(), a.getAmount()));
	}

	@PostMapping("/person")
	public Mono<Account> create(@RequestBody Publisher<Account> accountStream) {
		return repository
				.save(Mono.from(accountStream)
						.map(a -> new pl.piomin.services.account.model.Account(a.getNumber(), a.getCustomerId(),
								a.getAmount())))
				.map(a -> new Account(a.getId(), a.getCustomerId(), a.getNumber(), a.getAmount()));
	}

}

In all API methods we also perform mapping from Account entity (MongoDB @Document) to Account DTO available in our common module. Here’s account repository class. It uses ReactiveMongoTemplate for interacting with Mongo collections.

@Repository
public class AccountRepository {

	@Autowired
	private ReactiveMongoTemplate template;

	public Mono<Account> findById(Integer id) {
		return template.findById(id, Account.class);
	}

	public Flux<Account> findAll() {
		return template.findAll(Account.class);
	}

	public Flux<Account> findByCustomerId(String customerId) {
		return template.find(query(where("customerId").is(customerId)), Account.class);
	}

	public Mono<Account> save(Mono<Account> account) {
		return template.insert(account);
	}

}

In our Spring Boot main or @Configuration class we should declare spring beans for MongoDB with connection settings.

@SpringBootApplication
public class Application {

	public static void main(String[] args) {
		SpringApplication.run(Application.class, args);
	}

	public @Bean MongoClient mongoClient() {
		return MongoClients.create("mongodb://192.168.99.100");
	}

	public @Bean ReactiveMongoTemplate reactiveMongoTemplate() {
		return new ReactiveMongoTemplate(mongoClient(), "account");
	}

}

I used docker MongoDB container for working on this sample.

docker run -d --name mongo -p 27017:27017 mongo

In customer service we call endpoint /account/customer/{customer} from account service. I declared @Bean WebClient in our main class.

	public @Bean WebClient webClient() {
		return WebClient.builder().clientConnector(new ReactorClientHttpConnector()).baseUrl("http://localhost:2222").build();
	}

Here’s customer controller fragment. @Autowired WebClient calls account service after getting customer from MongoDB.

	@Autowired
	private WebClient webClient;

	@GetMapping(value = "/customer/accounts/{pesel}")
	public Mono<Customer> findByPeselWithAccounts(@PathVariable("pesel") String pesel) {
		return repository.findByPesel(pesel).flatMap(customer -> webClient.get().uri("/account/customer/{customer}", customer.getId()).accept(MediaType.APPLICATION_JSON)
				.exchange().flatMap(response -> response.bodyToFlux(Account.class))).collectList().map(l -> {return new Customer(pesel, l);});
	}

We can test GET calls using web browser or REST clients. With POST it’s not so simple. Here are two simple test cases for adding new customer and getting customer with accounts. Test getCustomerAccounts need account service running on port 2222.

@RunWith(SpringRunner.class)
@SpringBootTest(webEnvironment = SpringBootTest.WebEnvironment.RANDOM_PORT)
public class CustomerTest {

	private static final Logger logger = Logger.getLogger("CustomerTest");

	private WebClient webClient;

	@LocalServerPort
	private int port;

	@Before
	public void setup() {
		this.webClient = WebClient.create("http://localhost:" + this.port);
	}

	@Test
	public void getCustomerAccounts() {
		Customer customer = this.webClient.get().uri("/customer/accounts/234543647565")
				.accept(MediaType.APPLICATION_JSON).exchange().then(response -> response.bodyToMono(Customer.class))
				.block();
		logger.info("Customer: " + customer);
	}

	@Test
	public void addCustomer() {
		Customer customer = new Customer(null, "Adam", "Kowalski", "123456787654");
		customer = webClient.post().uri("/customer").accept(MediaType.APPLICATION_JSON)
				.exchange(BodyInserters.fromObject(customer)).then(response -> response.bodyToMono(Customer.class))
				.block();
		logger.info("Customer: " + customer);
	}

}

Conclusion

Spring initiative with support for reactive programming seems promising, but now it’s on early stage of development. There is no availibility to use it with popular projects from Spring Cloud like Eureka, Ribbon or Hystrix. When I tried to add this dependencies to pom.xml my service failed to start. I hope that in the near future such functionalities like service discovery and load balancing will be available also for reactive microservices same as for synchronous REST microservices. Spring has also support for reactive model in Spring Cloud Stream project. It’s more stable than WebFlux framework. I’ll try use it in the future.