An important step before you begin the implementation of microservices is to configure your development IDE and install a set of tools that simplifies integration with Kubernetes. In this article, I’m going to describe the most popular of those tools. Continue reading “Development on Kubernetes: IDE & Tools”
Category: Other
YouTube Channel Released!
My YouTube channel has been finally released! It is available here: https://www.youtube.com/channel/UCAieNgran7umupT_D50KaGw. I’m going to publish there tutorials and courses in the same subject matter as on my dev blog: Microservices, Containers, Spring Boot, Kubernetes etc.
Overview of Java Stream API Extensions
Stream API, which has been introduced in Java 8, is probably still the most important new feature that has been included to Java during last several years. I think that every Java developer has an opportunity to use Java Stream API in his career. Or I should rather told that you probably use it on a day-to-day basis. However, if you compare the built-in features offered for functional programming with some other languages – for example Kotlin – you will quickly realize that the number of methods provided by Stream API is very limited. Therefore, the community has created several libraries used just for extending API offered by pure Java. Today I’m going to show the most interesting Stream API extensions offered by the three popular Java libraries: StreamEx, jOOλ and Guava.
Introduction to Spring Data Redis
Redis is an in-memory data structure store with optional durability, used as database, cache and message broker. Currently, it is the most most popular tool in the key/value stores category: https://db-engines.com/en/ranking/key-value+store. The easiest way to integrate your application with Redis is through Spring Data Redis. You can use Spring RedisTemplate directly for that or you might as well use Spring Data Redis repositories. There are some limitations when you integrate with Redis via Spring Data Redis repositories. They require at least Redis Server version 2.8.0 and do not work with transactions. Therefore you need to disable transaction support for RedisTemplate, which is leveraged by Redis repositories. Continue reading “Introduction to Spring Data Redis”
Reactive programming with Project Reactor
If you are building reactive microservices you would probably have to merge data streams from different source APIs into a single result stream. It inspired me to create this article containing some most common scenarios of using reactive streams in microservice-based architecture during inter-service communication. I have already described some aspects related to reactive programming with Spring based on Spring WebFlux and Spring Data JDBC projects in the following articles:
- Reactive Microservices with Spring WebFlux and Spring Cloud
- Introduction to Reactive APIs with Postgres, R2DBC, Spring Data JDBC and Spring WebFlux
Continue reading “Reactive programming with Project Reactor”
Introduction to Reactive APIs with Postgres, R2DBC, Spring Data JDBC and Spring WebFlux
There are pretty many technologies listed in the title of this article. Spring WebFlux has been introduced with Spring 5 and Spring Boot 2 as a project for building reactive-stack web applications. I have already described how to use it together with Spring Boot and Spring Cloud for building reactive microservices in that article: Reactive Microservices with Spring WebFlux and Spring Cloud. Spring 5 has also introduced some projects supporting reactive access to NoSQL databases like Cassandra, MongoDB or Couchbase. But there were still a lack in support for reactive to access to relational databases. The change is coming together with R2DBC (Reactive Relational Database Connectivity) project. That project is also being developed by Pivotal members. It seems to be very interesting initiative, however it is rather at the beginning of the road. Anyway, there is a module for integration with Postgres, and we will use it for our demo application. R2DBC will not be the only one new interesting solution described in this article. I also show you how to use Spring Data JDBC – another really interesting project released recently.
It is worth mentioning some words about Spring Data JDBC. This project has been already released, and is available under version 1.0. It is a part of bigger Spring Data framework. It offers a repository abstraction based on JDBC. The main reason of creating that library is allow to access relational databases using Spring Data way (through CrudRepository interfaces) without including JPA library to the application dependencies. Of course, JPA is still certainly the main persistence API used for Java applications. Spring Data JDBC aims to be much simpler conceptually than JPA by not implementing popular patterns like lazy loading, caching, dirty context, sessions. It also provides only very limited support for annotation-based mapping. Finally, it provides an implementation of reactive repositories that uses R2DBC for accessing relational database. Although that module is still under development (only SNAPSHOT version is available), we will try to use it in our demo application. Let’s proceed to the implementation.
Including dependencies
We use Kotlin for implementation. So first, we include some required Kotlin dependencies.
<dependency>
	<groupId>org.jetbrains.kotlin</groupId>
	<artifactId>kotlin-stdlib</artifactId>
	<version>${kotlin.version}</version>
</dependency>
<dependency>
	<groupId>com.fasterxml.jackson.module</groupId>
	<artifactId>jackson-module-kotlin</artifactId>
</dependency>
<dependency>
	<groupId>org.jetbrains.kotlin</groupId>
	<artifactId>kotlin-reflect</artifactId>
</dependency>
<dependency>
	<groupId>org.jetbrains.kotlin</groupId>
	<artifactId>kotlin-test-junit</artifactId>
	<version>${kotlin.version}</version>
	<scope>test</scope>
</dependency>
We should also add kotlin-maven-plugin with support for Spring.
<plugin>
	<groupId>org.jetbrains.kotlin</groupId>
	<artifactId>kotlin-maven-plugin</artifactId>
	<version>${kotlin.version}</version>
	<executions>
		<execution>
			<id>compile</id>
			<phase>compile</phase>
			<goals>
				<goal>compile</goal>
			</goals>
		</execution>
		<execution>
			<id>test-compile</id>
			<phase>test-compile</phase>
			<goals>
				<goal>test-compile</goal>
			</goals>
		</execution>
	</executions>
	<configuration>
		<args>
			<arg>-Xjsr305=strict</arg>
		</args>
		<compilerPlugins>
			<plugin>spring</plugin>
		</compilerPlugins>
	</configuration>
</plugin>
Then, we may proceed to including frameworks required for the demo implementation. We need to include the special SNAPSHOT version of Spring Data JDBC dedicated for accessing database using R2DBC. We also have to add some R2DBC libraries and Spring WebFlux. As you may see below only Spring WebFlux is available in stable version (as a part of Spring Boot RELEASE).
<dependency>
	<groupId>org.springframework.boot</groupId>
	<artifactId>spring-boot-starter-webflux</artifactId>
</dependency>
<dependency>
	<groupId>org.springframework.data</groupId>
	<artifactId>spring-data-jdbc</artifactId>
	<version>1.0.0.r2dbc-SNAPSHOT</version>
</dependency>
<dependency>
	<groupId>io.r2dbc</groupId>
	<artifactId>r2dbc-spi</artifactId>
	<version>1.0.0.M5</version>
</dependency>
<dependency>
	<groupId>io.r2dbc</groupId>
	<artifactId>r2dbc-postgresql</artifactId>
	<version>1.0.0.M5</version>
</dependency>
It is also important to set dependency management for Spring Data project.
<dependencyManagement>
	<dependencies>
		<dependency>
			<groupId>org.springframework.data</groupId>
			<artifactId>spring-data-releasetrain</artifactId>
			<version>Lovelace-RELEASE</version>
			<scope>import</scope>
			<type>pom</type>
		</dependency>
	</dependencies>
</dependencyManagement>
Repositories
We are using well known Spring Data style of CRUD repository implementation. In that case we need to create interface that extends ReactiveCrudRepository interface.
Here’s the implementation of repository for managing Employee objects.
interface EmployeeRepository : ReactiveCrudRepository<Employee, Int< {
    @Query("select id, name, salary, organization_id from employee e where e.organization_id = $1")
    fun findByOrganizationId(organizationId: Int) : Flux<Employee>
}
Here’s the another implementation of repository – this time for managing Organization objects.
interface OrganizationRepository : ReactiveCrudRepository<Organization, Int< {
}
Implementing Entities and DTOs
Kotlin provides a convenient way of creating entity class by declaring it as data class. When using Spring Data JDBC we have to set primary key for entity by annotating the field with @Id. It assumes the key is automatically incremented by database. If you are not using auto-increment columns, you have to use a BeforeSaveEvent listener, which sets the ID of the entity. However, I tried to set such a listener for my entity, but it just didn’t work with reactive version of Spring Data JDBC.
Here’s an implementation of Employee entity class. What is worth mentioning Spring Data JDBC will automatically map class field organizationId into database column organization_id.
data class Employee(val name: String, val salary: Int, val organizationId: Int) {
    @Id
    var id: Int? = null
}
Here’s an implementation of Organization entity class.
data class Organization(var name: String) {
    @Id
    var id: Int? = null
}
R2DBC does not support any lists or sets. Because I’d like to return list with employees inside Organization object in one of API endpoints I have created DTO containing such a list as shown below.
data class OrganizationDTO(var id: Int?, var name: String) {
    var employees : MutableList = ArrayList()
    constructor(employees: MutableList) : this(null, "") {
        this.employees = employees
    }
}
The SQL scripts corresponding to the created entities are visible below. Field type serial will automatically creates sequence and attach it to the field id.
CREATE TABLE employee (
    name character varying NOT NULL,
    salary integer NOT NULL,
    id serial PRIMARY KEY,
    organization_id integer
);
CREATE TABLE organization (
    name character varying NOT NULL,
    id serial PRIMARY KEY
);
Building sample web applications
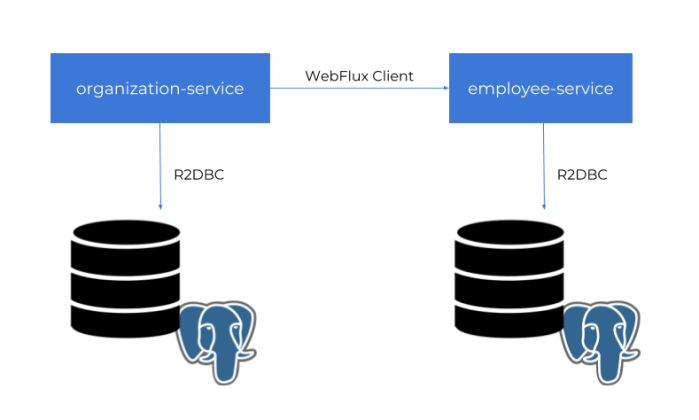
For the demo purposes we will build two independent applications employee-service and organization-service. Application organization-service is communicating with employee-service using WebFlux WebClient. It gets the list of employees assigned to the organization, and includes them to response together with Organization object. Sample applications source code is available on GitHub under repository sample-spring-data-webflux: https://github.com/piomin/sample-spring-data-webflux.
Ok, let’s begin from declaring Spring Boot main class. We need to enable Spring Data JDBC repositories by annotating the main class with @EnableJdbcRepositories.
@SpringBootApplication
@EnableJdbcRepositories
class EmployeeApplication

fun main(args: Array<String>) {
    runApplication<EmployeeApplication>(*args)
}
Working with R2DBC and Postgres requires some configuration. Probably due to an early stage of progress in development of Spring Data JDBC and R2DBC there is no Spring Boot auto-configuration for Postgres. We need to declare connection factory, client, and repository inside @Configuration bean.
@Configuration
class EmployeeConfiguration {

    @Bean
    fun repository(factory: R2dbcRepositoryFactory): EmployeeRepository {
        return factory.getRepository(EmployeeRepository::class.java)
    }

    @Bean
    fun factory(client: DatabaseClient): R2dbcRepositoryFactory {
        val context = RelationalMappingContext()
        context.afterPropertiesSet()
        return R2dbcRepositoryFactory(client, context)
    }

    @Bean
    fun databaseClient(factory: ConnectionFactory): DatabaseClient {
        return DatabaseClient.builder().connectionFactory(factory).build()
    }

    @Bean
    fun connectionFactory(): PostgresqlConnectionFactory {
        val config = PostgresqlConnectionConfiguration.builder() //
                .host("192.168.99.100") //
                .port(5432) //
                .database("reactive") //
                .username("reactive") //
                .password("reactive123") //
                .build()

        return PostgresqlConnectionFactory(config)
    }

}
Finally, we can create REST controllers that contain the definition of our reactive API methods. With Kotlin it does not take much space. The following controller definition contains three GET methods that allows to find all employees, all employees assigned to a given organization or a single employee by id.
@RestController
@RequestMapping("/employees")
class EmployeeController {

    @Autowired
    lateinit var repository : EmployeeRepository

    @GetMapping
    fun findAll() : Flux<Employee> = repository.findAll()

    @GetMapping("/{id}")
    fun findById(@PathVariable id : Int) : Mono<Employee> = repository.findById(id)

    @GetMapping("/organization/{organizationId}")
    fun findByorganizationId(@PathVariable organizationId : Int) : Flux<Employee> = repository.findByOrganizationId(organizationId)

    @PostMapping
    fun add(@RequestBody employee: Employee) : Mono<Employee> = repository.save(employee)

}
Inter-service Communication
For the OrganizationController the implementation is a little bit more complicated. Because organization-service is communicating with employee-service, we first need to declare reactive WebFlux WebClient builder.
@Bean
fun clientBuilder() : WebClient.Builder {
	return WebClient.builder()
}
Then, similar to the repository bean the builder is being injected into the controller. It is used inside findByIdWithEmployees method for calling method GET /employees/organization/{organizationId} exposed by employee-service. As you can see on the code fragment below it provides reactive API and return Flux object containing list of found employees. This list is injected into OrganizationDTO object using zipWith Reactor method.
@RestController
@RequestMapping("/organizations")
class OrganizationController {

    @Autowired
    lateinit var repository : OrganizationRepository
    @Autowired
    lateinit var clientBuilder : WebClient.Builder

    @GetMapping
    fun findAll() : Flux<Organization> = repository.findAll()

    @GetMapping("/{id}")
    fun findById(@PathVariable id : Int) : Mono<Organization> = repository.findById(id)

    @GetMapping("/{id}/withEmployees")
    fun findByIdWithEmployees(@PathVariable id : Int) : Mono<OrganizationDTO> {
        val employees : Flux<Employee> = clientBuilder.build().get().uri("http://localhost:8090/employees/organization/$id")
                .retrieve().bodyToFlux(Employee::class.java)
        val org : Mono = repository.findById(id)
        return org.zipWith(employees.collectList())
                .map { tuple -> OrganizationDTO(tuple.t1.id as Int, tuple.t1.name, tuple.t2) }
    }

    @PostMapping
    fun add(@RequestBody employee: Organization) : Mono<Organization> = repository.save(employee)

}
How it works?
Before running the tests we need to start Postgres database. Here’s the Docker command used for running Postgres container. It is creating user with password, and setting up default database.
$ docker run -d --name postgres -p 5432:5432 -e POSTGRES_USER=reactive -e POSTGRES_PASSWORD=reactive123 -e POSTGRES_DB=reactive postgres
Then we need to create some tests tables, so you have to run SQL script placed in the section Implementing Entities and DTOs. After that you can start our test applications. If you do not override default settings provided inside application.yml files employee-service is listening on port 8090, and organization-service on port 8095. The following picture illustrates the architecture of our sample system.
Now, let’s add some test data using reactive API exposed by the applications.
$ curl -d '{"name":"Test1"}' -H "Content-Type: application/json" -X POST http://localhost:8095/organizations
$ curl -d '{"name":"Name1", "balance":5000, "organizationId":1}' -H "Content-Type: application/json" -X POST http://localhost:8090/employees
$ curl -d '{"name":"Name2", "balance":10000, "organizationId":1}' -H "Content-Type: application/json" -X POST http://localhost:8090/employees
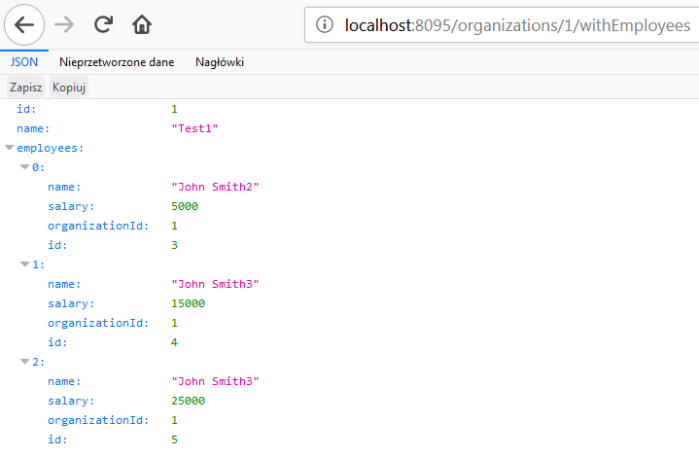
Finally you can call GET organizations/{id}/withEmployees method, for example using your web browser. The result should be similar to the result visible on the following picture.

5 Things You Will Like in Kotlin as a Java Developer
Kotlin language is gaining more and more popularity recently. It is widely used no longer just in mobile apps development, but also for server-side systems. As you probably know is a statically typed programming language that runs on the JVM. That’s why it is often compared with Java language. One of the main reasons of Kotlin popularity is a simplicity. It cleans and removes a lot of the code bloat from Java. However, it is also very similar to Java, so that any experienced Java developer can pick up Kotlin in a few hours.
In this article I’m going to discuss some interesting Kotlin features used for server-side development in comparison to Java. Here’s my personal list of favourite Kotlin features unavailable for Java language.
1. Collections and Generics
I really like Java, but sometimes working with generic collections may be an unpleasant experience, especially if you have to use wildcard types. The good news are that Kotlin doesn’t have any wildcard types. Instead, it provides two other features called declaration-site variance and type projections. Now, let’s consider the following class hierarchy.
abstract class Vehicle {

}

class Truck extends Vehicle {

}

class PassengerCar extends Vehicle {

}
I defined a generic repository that contains all objects with a given type.
public class Repository<T> {

	List<T> l = new ArrayList<>();

	public void addAll(List<T> l) {
		l.addAll(l);
	}

	public void add(T t) {
		l.add(t);
	}
}
Now, I would like to store all the vehicles in that repository, so I declare Repository r = new Repository<Vehicle>(). But invoking repository method addAll with List<Truck> as a parameter you will receive the following error.

You can change the declaration of addAll method to accept parameter that declared like that: public void addAll(List<? extends T> l), and it works fine..
Of course, this situation has a logical explanation. First, generic types in Java are invariant, what in fact means that List<Truck> is not a subtype of List<Vehicle>, although Truck is a subtype of Vehicle. The addAll method takes wildcard type argument <? extends T> as a parameter, what indicates that this method accepts a collection of objects of T or some subtype of T, not just T itself. The List<Truck> is a subtype of List<? extends Vehicle>, but the target list is still List<Vehicle>. I don’t want to get into details about this behaviour – you can read more about it in Java specification. The important thing for us is that Kotlin is solving this problem using feature called Declaration-site variance. If we add the out modifier to the MutableList parameter inside addAll method declaration the compiler will allow to add a list of Truck objects. The smart explanation of that process is provided on the Kotlin site: ‘In “clever words” they say that the class C is covariant in the parameter T, or that T is a covariant type parameter. You can think of C as being a producer of T’s, and NOT a consumer of T’s.’
class Repository<T> {

    var l: MutableList<T> = ArrayList()

    fun addAll(objects: MutableList<out T>) {
        l.addAll(objects)
    }

    fun add(o: T) {
        l.add(o)
    }

}

fun main(args: Array<String>) {
    val r = Repository<Vehicle>()
    var l1: MutableList<Truck> = ArrayList()
    l1.add(Truck())
    r.addAll(l1)
    println("${r.l.size}")
}
2. Data classes
You probably excellent know Java POJOs (Plain Old Java Object). If you are following Java good practices such a class should implement getters, setters, hashCode and equals methods, and also toString method for logging needs. Such an implementation may take up a lot of space even for simple class with only four fields – as shown below (methods auto-generated using Eclipse IDE).
public class Person {

	private Integer id;
	private String firstName;
	private String lastName;
	private int age;

	public Person(Integer id, String firstName, String lastName) {
		this.id = id;
		this.firstName = firstName;
		this.lastName = lastName;
	}

	public Integer getId() {
		return id;
	}

	public void setId(Integer id) {
		this.id = id;
	}

	public String getFirstName() {
		return firstName;
	}

	public void setFirstName(String firstName) {
		this.firstName = firstName;
	}

	public String getLastName() {
		return lastName;
	}

	public void setLastName(String lastName) {
		this.lastName = lastName;
	}

	public int getAge() {
		return age;
	}

	public void setAge(int age) {
		this.age = age;
	}

	@Override
	public int hashCode() {
		final int prime = 31;
		int result = 1;
		result = prime * result + ((firstName == null) ? 0 : firstName.hashCode());
		result = prime * result + ((id == null) ? 0 : id.hashCode());
		result = prime * result + ((lastName == null) ? 0 : lastName.hashCode());
		return result;
	}

	@Override
	public boolean equals(Object obj) {
		if (this == obj)
			return true;
		if (obj == null)
			return false;
		if (getClass() != obj.getClass())
			return false;
		Person other = (Person) obj;
		if (firstName == null) {
			if (other.firstName != null)
				return false;
		} else if (!firstName.equals(other.firstName))
			return false;
		if (id == null) {
			if (other.id != null)
				return false;
		} else if (!id.equals(other.id))
			return false;
		if (lastName == null) {
			if (other.lastName != null)
				return false;
		} else if (!lastName.equals(other.lastName))
			return false;
		return true;
	}

	@Override
	public String toString() {
		return "Person [id=" + id + ", firstName=" + firstName + ", lastName=" + lastName + "]";
	}

}
To avoid many additional lines of code inside your POJO classes you may use project Lombok. It provides a set of annotations that can be used on the class to deliver implementations of getters/setters, equals and hashCode methods. It is also possible to annotate your class with @Data, that bundles all the features of @ToString, @EqualsAndHashCode, @Getter / @Setter and @RequiredArgsConstructor together. So, with Lombok’s @Data the POJO is going to look like as shown below – assuming you don’t require a constructor with parameters.
@Data
public class Person {

	private Integer id;
	private String firstName;
	private String lastName;
	private int age;

}
Including and using Lombok with Java application is quite simple and supported by all the main developer IDEs, but Kotlin solves this issue out-of-the-box. It provides functionality called data classes, which is enabled after adding keyword data to the class definition. The compiler automatically derives the methods from all properties declared in the primary constructor:
equals()/hashCode()pairtoString()methodcomponentN()functions corresponding to the properties in their order of declarationcopy()function
Because Kotlin internally generates a default getter and setter for mutable properties (declared as var), and a getter for read-only properties (declared as val) the similar implementation of Person Java POJO in Kotlin will look as shown below.
data class Person(val firstName: String, val lastName: String, val id: Int) {

    var age: Int = 0

}
What’s worth mentioning the compiler only uses the properties defined inside the primary constructor for the automatically generated functions. So, the field age, which is declared inside class body, will not be used by toString, equals, hashCode, and copy implementations.
3. Names for test methods
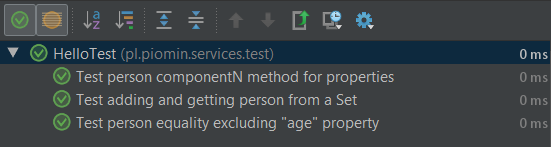
Now, let’s implement some test cases that proofs the features described in the step 2 works properly. The following three tests are comparing two objects with different values of age property, trying to add the same object to the Java HashSet twice, and checking if componentN method of data class is returning properties in the right order.
@Test fun `Test person equality excluding "age" property`() {
	val person = Person("John", "Smith", 1)
	person.age = 35
	val person2 = Person("John", "Smith", 1)
	person2.age = 45
	Assert.assertEquals(person, person2)
}

@Test fun `Test person componentN method for properties`() {
	val person = Person("John", "Smith", 1)
	Assert.assertEquals("John", person.component1())
	Assert.assertEquals("Smith", person.component2())
	Assert.assertEquals(1, person.component3())
}

@Test fun `Test adding and getting person from a Set`() {
	val s = HashSet<Person>()
	val person = Person("John", "Smith", 1)
	var added = s.add(person)
	Assert.assertTrue(added)
	added = s.add(person)
	Assert.assertFalse(added)
}
As you see on the fragment of code above Kotlin is accepting to use method names with spaces enclosed in backticks. Thanks to that I can set a descriptive form of test name, which is then visible during execution, and you know exactly what’s going on 🙂
4. Extensions
Let’s consider the situation that we have a library contains class definitions, which cannot be changed, and we need to add there some methods. In Java, we have some choices to implement such an approach. We can just extend the existing class, implement there a new method or for example implement it with Decorator pattern.
Now, let’s assume we have the following Java class containing list of persons and exposing getters/setters.
public class Organization {

	private List<Person> persons;

	public List<Person> getPersons() {
		return persons;
	}

	public void setPersons(List<Person> persons) {
		this.persons = persons;
	}

}
If I would like to have the method for adding single Person object to the list I would have to extends Organization, and implement new method there.
public class OrganizationExt extends Organization {

	public void addPerson(Person person) {
		getPersons().add(person);
	}
}
Kotlin provides the ability to extend a class with a new functionality without having to inherit from the base class. This is done via special declarations called extensions. Here’s the similar declaration to Organization Java class in Kotlin. Because Kotlin treats simple Listclass as immutable, we need to define MutableList.
class Organization(val persons: MutableList<Person> = ArrayList()) {

}
We can easily extend it with addPerson method as shown below. Extensions are resolved statically, and they do not modify extended classes.
class OrganizationTest {

    fun Organization.addPerson(person: Person) {
        persons.add(person)
    }

    @Test
    fun testExtension() {
        val organization = Organization()
        organization.addPerson(Person("John", "Smith", 1))
        Assert.assertTrue(organization.persons.size == 1)
    }

}
5. String templates
Here’s a little something to make you happy – not available in Java.
println("Organization ${organization.name} with ${organization.persons.size} persons")
Conclusion
Of course there are some other differences between Java and Kotlin. This is only my personal list of favourite features unavailable in Java. The sample source code with described samples is available on GitHub: sample-kotlin-playground.
Introduction to Blockchain with Java using Ethereum, web3j and Spring Boot
Blockchain is one of the buzzwords in IT world during some last months. This term is related to cryptocurrencies, and was created together with Bitcoins. It is decentralized, immutable data structure divided into blocks, which are linked and secured using cryptographic algorithms. Every single block in this structure typically contains a cryptographic hash of the previous block, a timestamp, and transaction data. Blockchain is managed by peer-to-peer network, and during inter-node communication every new block is validated before adding. This is short portion of theory about blockchain. In a nutshell, this is a technology which allows us to managed transactions between two parties in a decentralized way. Now, the question is how we can implement it in our system.
Here comes Ethereum. It is a decentralized platform created by Vitarik Buterin that provides scripting language for a development of applications. It is based on ideas from Bitcoin, and is driven by the new cryptocurrency called Ether. Today, Ether is the second largest cryptocurrency after Bitcoin. The heart of Ethereum technology is EVM (Ethereum Virtual Machine), which can be treated as something similar to JVM, but using a network of fully decentralized nodes. To implement transactions based Ethereum in Java world we use web3j library. This is a lightweight, reactive, type safe Java and Android library for integrating with nodes on Ethereum blockchains. More details can be found on its website https://web3j.io.
1. Running Ethereum locally
Although there are many articles on the Web about blockchain and ethereum it is not easy to find a solution describing how to run ready-for-use instance of Ethereum on the local machine. It is worth to mention that generally there are two most popular Ethereum clients we can use: Geth and Parity. It turns out we can easily run Geth node locally using Docker container. By default it connects the node to the Ethereum main network. Alternatively, you can connect it to test network or Rinkeby network. But the best option for beginning is just to run it in development mode by setting --dev parameter on Docker container running command.
Here’s the command that starts Docker container in development mode and exposes Ethereum RPC API on port 8545.
$ docker run -d --name ethereum -p 8545:8545 -p 30303:30303 ethereum/client-go --rpc --rpcaddr "0.0.0.0" --rpcapi="db,eth,net,web3,personal" --rpccorsdomain "*" --dev
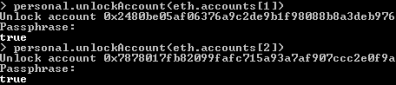
The one really good message when running that container in development mode is that you have plenty of Ethers on your default, test account. In that case, you don’t have to mine any Ethers to be able to start tests. Great! Now, let’s create some other test accounts and also check out some things. To achieve it we need to run Geth’s interactive JavaScript console inside Docker container.
$ docker exec -it ethereum geth attach ipc:/tmp/geth.ipc
2. Managing Ethereum node using JavaScript console
After running JavaScript console you can easily display default account (coinbase), the list of all available accounts and their balances. Here’s the screen illustrating results for my Ethereum node.

Now, we have to create some test accounts. We can do it by calling personal.newAccount(password) function. After creating required accounts, you can perform some test transactions using JavaScript console, and transfer some funds from base account to the newly created accounts. Here are the commands used for creating accounts and executing transactions.

3. System architecture
The architecture of our sample system is very simple. I don’t want to complicate anything, but just show you how to send transaction to Geth node and receive notifications. While transaction-service sends new transaction to Ethereum node, bonus-service observe node and listening for incoming transactions. Then it send bonus to the sender’s account once per 10 transactions received from his account. Here’s the diagram that illustrates an architecture of our sample system.

4. Enable Web3j for Spring Boot app
I think that now we have clarity what exactly we want to do. So, let’s proceed to the implementation. First, we should include all required dependencies in order to be able to use web3j library inside Spring Boot application. Fortunately, there is a starter that can be included.
<dependency>
	<groupId>org.web3j</groupId>
	<artifactId>web3j-spring-boot-starter</artifactId>
	<version>1.6.0</version>
</dependency>
Because we are running Ethereum Geth client on Docker container we need to change auto-configured client’s address for web3j.
spring:
  application:
    name: transaction-service
server:
  port: ${PORT:8090}
web3j:
  client-address: http://192.168.99.100:8545
5. Building applications
If we included web3j starter to the project dependencies all you need is to autowire Web3j bean. Web3j is responsible for sending transaction to Geth client node. It receives response with transaction hash if it has been accepted by the node or error object if it has been rejected. While creating transaction object it is important to set gas limit to minimum 21000. If you sent lower value, you will probably receive error Error: intrinsic gas too low.
@Service
public class BlockchainService {

    private static final Logger LOGGER = LoggerFactory.getLogger(BlockchainService.class);

    @Autowired
    Web3j web3j;

    public BlockchainTransaction process(BlockchainTransaction trx) throws IOException {
        EthAccounts accounts = web3j.ethAccounts().send();
        EthGetTransactionCount transactionCount = web3j.ethGetTransactionCount(accounts.getAccounts().get(trx.getFromId()), DefaultBlockParameterName.LATEST).send();
        Transaction transaction = Transaction.createEtherTransaction(accounts.getAccounts().get(trx.getFromId()), transactionCount.getTransactionCount(), BigInteger.valueOf(trx.getValue()), BigInteger.valueOf(21_000), accounts.getAccounts().get(trx.getToId()),BigInteger.valueOf(trx.getValue()));
        EthSendTransaction response = web3j.ethSendTransaction(transaction).send();
        if (response.getError() != null) {
            trx.setAccepted(false);
            return trx;
        }
        trx.setAccepted(true);
        String txHash = response.getTransactionHash();
        LOGGER.info("Tx hash: {}", txHash);
        trx.setId(txHash);
        EthGetTransactionReceipt receipt = web3j.ethGetTransactionReceipt(txHash).send();
        if (receipt.getTransactionReceipt().isPresent()) {
            LOGGER.info("Tx receipt: {}", receipt.getTransactionReceipt().get().getCumulativeGasUsed().intValue());
        }
        return trx;
    }

}
The @Service bean visible above is invoked by the controller. The implementation of POST method takes BlockchainTransaction object as parameter. You can send there sender id, receiver id, and transaction amount. Sender and receiver ids are equivalent to index in query eth.account[index].
@RestController
public class BlockchainController {

    @Autowired
    BlockchainService service;

    @PostMapping("/transaction")
    public BlockchainTransaction execute(@RequestBody BlockchainTransaction transaction) throws NoSuchAlgorithmException, NoSuchProviderException, InvalidAlgorithmParameterException, CipherException, IOException {
        return service.process(transaction);
    }

}
You can send a test transaction by calling POST method using the following command.
$ curl --header "Content-Type: application/json" --request POST --data '{"fromId":2,"toId":1,"value":3}' http://localhost:8090/transaction
Before sending any transactions you should also unlock sender account.
Application bonus-service listens for transactions processed by Ethereum node. It subscribes for notifications from Web3j library by calling web3j.transactionObservable().subscribe(...) method. It returns the amount of received transaction to the sender’s account once per 10 transactions sent from that address. Here’s the implementation of observable method inside application bonus-service.
@Autowired
Web3j web3j;

@PostConstruct
public void listen() {
	Subscription subscription = web3j.transactionObservable().subscribe(tx -> {
		LOGGER.info("New tx: id={}, block={}, from={}, to={}, value={}", tx.getHash(), tx.getBlockHash(), tx.getFrom(), tx.getTo(), tx.getValue().intValue());
		try {
			EthCoinbase coinbase = web3j.ethCoinbase().send();
			EthGetTransactionCount transactionCount = web3j.ethGetTransactionCount(tx.getFrom(), DefaultBlockParameterName.LATEST).send();
			LOGGER.info("Tx count: {}", transactionCount.getTransactionCount().intValue());
			if (transactionCount.getTransactionCount().intValue() % 10 == 0) {
				EthGetTransactionCount tc = web3j.ethGetTransactionCount(coinbase.getAddress(), DefaultBlockParameterName.LATEST).send();
				Transaction transaction = Transaction.createEtherTransaction(coinbase.getAddress(), tc.getTransactionCount(), tx.getValue(), BigInteger.valueOf(21_000), tx.getFrom(), tx.getValue());
				web3j.ethSendTransaction(transaction).send();
			}
		} catch (IOException e) {
			LOGGER.error("Error getting transactions", e);
		}
	});
	LOGGER.info("Subscribed");
}
Conclusion
Blockchain and cryptocurrencies are not the easy topics to start. Ethereum simplifies development of applications that use blockchain, by providing a complete, scripting language. Using web3j library together with Spring Boot and Docker image of Ethereum Geth client allows to quickly start local development of solution implementing blockchain technology. IF you would like to try it locally just clone my repository available on GitHub https://github.com/piomin/sample-spring-blockchain.git

Generating large PDF files using JasperReports
During the last ‘Code Europe’ conference in Warsaw appeared many topics related to microservices architecture. Several times I heard the conclusion that the best candidate for separation from monolith is service that generates PDF reports. It’s usually quite independent from the other parts of application. I can see a similar approach in my organization, where first microservice running in production mode was the one that generates PDF reports. To my surprise, the vendor which developed that microservice had to increase maximum heap size to 1GB on each of its instances. This has forced me to take a closer look at the topic of PDF reports generation process.
The most popular Java library for creating PDF files is JasperReports. During generation process, this library by default stores all objects in RAM memory. If such reports are large, this could be a problem my vendor encountered. Their solution, as I have mentioned before, was to increase the maximum size of Java heap 🙂
This time, unlike usual, I’m going to start with the test implementation. Here’s simple JUnit test with 20 requests per second sending to service endpoint.
public class JasperApplicationTest {

	protected Logger logger = Logger.getLogger(JasperApplicationTest.class.getName());
	TestRestTemplate template = new TestRestTemplate();

	@Test
	public void testGetReport() throws InterruptedException {
		List<HttpStatus> responses = new ArrayList<>();
		Random r = new Random();
		int i = 0;
		for (; i < 20; i++) {
			new Thread(new Runnable() {
				@Override
				public void run() {
					int age = r.nextInt(99);
					long start = System.currentTimeMillis();
					ResponseEntity<InputStreamResource> res = template.getForEntity("http://localhost:2222/pdf/{age}", InputStreamResource.class, age);
					logger.info("Response (" +  (System.currentTimeMillis()-start) + "): " + res.getStatusCode());
					responses.add(res.getStatusCode());
					try {
						Thread.sleep(50);
					} catch (InterruptedException e) {
						e.printStackTrace();
					}
				}
			}).start();
		}

		while (responses.size() != i) {
			Thread.sleep(500);
		}
		logger.info("Test finished");
	}
}
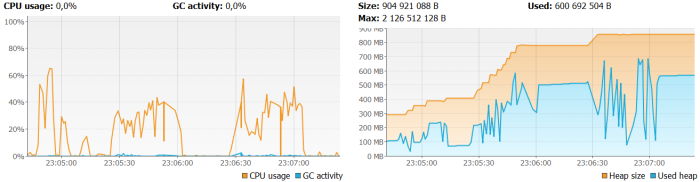
In my test scenario I inserted about 1M records into the person table. Everything works fine during running test. Generated files had about 500kb size and 200 pages. All requests were succeeded and each of them had been processed about 8 seconds. In comparison with single request which had been processed 4 seconds it seems to be a good result. The situation with RAM is worse as you can see in the figure below. After generating 20 PDF reports allocated heap size increases to more than 1GB and used heap size was about 550MB. Also CPU usage during report generation increased to 100% usage. I could easily image generating files bigger than 500kb in the production mode…

In our situation we have two options. We can always add more RAM memory or … look for another choice 🙂 Jasper library comes with solution – Virtualizers. The virtualizer cuts the jasper report print into different files and save them on the hard drive and/or compress it. There are three types of virtualizers:
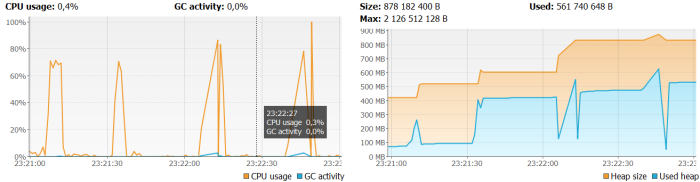
JRFileVirtualizer, JRSwapFileVirtualizer and JRGzipVirtualizer. You can read more about them here. Now, look at the figure below. Here’s illustration of memory and CPU usage for the test with JRFileVirtualizer. It looks a little better than the previous figure, but it does not knock us down 🙂 However, requests with the same overload as for the previous test take much longer – about 30 seconds. It’s not a good message, but at least the heap size allocation is not increases as fast as for previous sample.
Same test has been performed for JRSwapFileVirtualizer. The requests was average processed around 10 seconds. The graph illustrating CPU and memory usage is rather more similar to in memory test than JRFileVirtualizer test.
To see the difference between those three scenarios we have to run our application with maximum heap size set. For my tests I set -Xmx128m -Xms128m. For test with file virtualizers we receive HTTP responses with PDF reports, but for in memory tests the exception is thrown by the sample application: java.lang.OutOfMemoryError: GC overhead limit exceeded.
For testing purposes I created Spring Boot application. Sample source code is available as usual on GitHub. Here’s full list of Maven dependencies for that project.
<dependency>
	<groupId>net.sf.jasperreports</groupId>
	<artifactId>jasperreports</artifactId>
	<version>6.4.0</version>
</dependency>
<dependency>
	<groupId>org.springframework.boot</groupId>
	<artifactId>spring-boot-starter-web</artifactId>
</dependency>
<dependency>
	<groupId>org.springframework.boot</groupId>
	<artifactId>spring-boot-starter-data-jpa</artifactId>
</dependency>
<dependency>
	<groupId>org.springframework.boot</groupId>
	<artifactId>spring-boot-starter-test</artifactId>
	<scope>test</scope>
</dependency>
<dependency>
	<groupId>mysql</groupId>
	<artifactId>mysql-connector-java</artifactId>
	<scope>runtime</scope>
</dependency>
Here’s application main class. There are @Bean declarations of file virtualizers and JasperReport which is responsible for template compilation from .jrxml file. To run application for testing purposes type java -jar -Xms64m -Xmx128m -Ddirectory=C:\Users\minkowp\pdf sample-jasperreport-boot.jar.
@SpringBootApplication
public class JasperApplication {

	@Value("${directory}")
	private String directory;

	public static void main(String[] args) {
		SpringApplication.run(JasperApplication.class, args);
	}

	@Bean
	JasperReport report() throws JRException {
		JasperReport jr = null;
		File f = new File("personReport.jasper");
		if (f.exists()) {
			jr = (JasperReport) JRLoader.loadObject(f);
		} else {
			jr = JasperCompileManager.compileReport("src/main/resources/report.jrxml");
			JRSaver.saveObject(jr, "personReport.jasper");
		}
		return jr;
	}

	@Bean
	JRFileVirtualizer fileVirtualizer() {
		return new JRFileVirtualizer(100, directory);
	}

	@Bean
	JRSwapFileVirtualizer swapFileVirtualizer() {
		JRSwapFile sf = new JRSwapFile(directory, 1024, 100);
		return new JRSwapFileVirtualizer(20, sf, true);
	}

}
There are three endpoints exposed for the tests:
/pdf/{age} – in memory PDF generation
/pdf/fv/{age} – PDF generation with JRFileVirtualizer
/pdf/sfv/{age} – PDF generation with JRSwapFileVirtualizer
Here’s method generating PDF report. Report is generated in fillReport static method from JasperFillManager. It takes three parameters as input: JasperReport which encapsulates compiled .jrxml template file, JDBC connection object and map of parameters. Then report is ganerated and saved on disk as a PDF file. File is returned as an attachement in the response.
	private ResponseEntity<InputStreamResource> generateReport(String name, Map<String, Object> params) {
		FileInputStream st = null;
		Connection cc = null;
		try {
			cc = datasource.getConnection();
			JasperPrint p = JasperFillManager.fillReport(jasperReport, params, cc);
			JRPdfExporter exporter = new JRPdfExporter();
			SimpleOutputStreamExporterOutput c = new SimpleOutputStreamExporterOutput(name);
			exporter.setExporterInput(new SimpleExporterInput(p));
			exporter.setExporterOutput(c);
			exporter.exportReport();

			st = new FileInputStream(name);
			HttpHeaders responseHeaders = new HttpHeaders();
			responseHeaders.setContentType(MediaType.valueOf("application/pdf"));
			responseHeaders.setContentDispositionFormData("attachment", name);
			responseHeaders.setContentLength(st.available());
		    return new ResponseEntity<InputStreamResource>(new InputStreamResource(st), responseHeaders, HttpStatus.OK);
		} catch (Exception e) {
			e.printStackTrace();
		} finally {
			fv.cleanup();
			sfv.cleanup();
			if (cc != null)
				try {
					cc.close();
				} catch (SQLException e) {
					e.printStackTrace();
				}
		}
		return null;
	}
To enable virtualizer during report generation we only have to pass one parameter to the map of parameters – instance of virtualizer object.
	@Autowired
	JRFileVirtualizer fv;
	@Autowired
	JRSwapFileVirtualizer sfv;
	@Autowired
	DataSource datasource;
	@Autowired
	JasperReport jasperReport;

	@ResponseBody
	@RequestMapping(value = "/pdf/fv/{age}")
	public ResponseEntity<InputStreamResource> getReportFv(@PathVariable("age") int age) {
		logger.info("getReportFv(" + age + ")");
		Map<String, Object> m = new HashMap<>();
		m.put(JRParameter.REPORT_VIRTUALIZER, fv);
		m.put("age", age);
		String name = ++count + "personReport.pdf";
		return generateReport(name, m);
	}
Template file report.jrxml is available under /src/main/resources directory. Inside queryString tag there is SQL query which takes age parameter in WHERE statement. There are also five columns declared all taken from SQL query result.
<?xml version = "1.0" encoding = "UTF-8"?>
<!DOCTYPE jasperReport PUBLIC "//JasperReports//DTD Report Design//EN"    "http://jasperreports.sourceforge.net/dtds/jasperreport.dtd">

<jasperReport xmlns="http://jasperreports.sourceforge.net/jasperreports"               xmlns:xsi="http://www.w3.org/2001/XMLSchema-instance"               xsi:schemaLocation="http://jasperreports.sourceforge.net/jasperreports    http://jasperreports.sourceforge.net/xsd/jasperreport.xsd"               name="report2" pageWidth="595" pageHeight="842"                columnWidth="555" leftMargin="20" rightMargin="20"               topMargin="20" bottomMargin="20">
    <parameter name="age" class="java.lang.Integer"/>
    <queryString>
        <![CDATA[SELECT * FROM person WHERE age = $P{age}]]>
    </queryString>
    <field name="id" class="java.lang.Integer" />
    <field name="first_name" class="java.lang.String" />
    <field name="last_name" class="java.lang.String" />
    <field name="age" class="java.lang.Integer" />
    <field name="pesel" class="java.lang.String" />

    <detail>
        <band height="15">

            <textField>
                <reportElement x="0" y="0" width="50" height="15" />

                <textElement textAlignment="Right" verticalAlignment="Middle"/>

                <textFieldExpression class="java.lang.Integer">
                    <![CDATA[$F{id}]]>
                </textFieldExpression>
            </textField>

            <textField>
                <reportElement x="100" y="0" width="80" height="15" />

                <textElement textAlignment="Left" verticalAlignment="Middle"/>

                <textFieldExpression class="java.lang.String">
                    <![CDATA[$F{first_name}]]>
                </textFieldExpression>
            </textField>

            <textField>
                <reportElement x="200" y="0" width="80" height="15" />

                <textElement textAlignment="Left" verticalAlignment="Middle"/>

                <textFieldExpression class="java.lang.String">
                    <![CDATA[$F{last_name}]]>
                </textFieldExpression>
            </textField>

            <textField>
                <reportElement x="300" y="0" width="50" height="15"/>
                <textElement textAlignment="Right" verticalAlignment="Middle"/>

                <textFieldExpression class="java.lang.Integer">
                    <![CDATA[$F{age}]]>
                </textFieldExpression>
            </textField>

           <textField>
                <reportElement x="380" y="0" width="80" height="15" />

                <textElement textAlignment="Left" verticalAlignment="Middle"/>

                <textFieldExpression class="java.lang.String">
                    <![CDATA[$F{pesel}]]>
                </textFieldExpression>
            </textField>

        </band>
    </detail>

</jasperReport>
And the last thing we have to do is to properly set database connection pool settings. A natural choice for Spring Boot application is Tomcat JDBC pool.
spring:
  application:
    name: jasper-service
  datasource:
    url: jdbc:mysql://192.168.99.100:33306/datagrid?useSSL=false
    username: datagrid
    password: datagrid
    tomcat:
      initial-size: 20
      max-active: 30
Final words
In this article I showed you how to avoid out of memory exception while generating large PDF reports with JasperReports. I compared three solutions: in memory generation and two methods based on cutting the jasper print into different files and save them on the hard drive. For me, the most interesting was the solution based on single swapped file with JRSwapFileVirtualizer. It is slower a little than in memory generation but works faster than similar tests for JRFileVirtualizer and in contrast to in memory generation didn’t avoid out of memory exception for files larger than 500kb with 20 requests per second.
