The Spring Cloud Consul project provides integration for Consul and Spring Boot applications through auto-configuration. By using the well-known Spring Framework annotation style, we may enable and configure common patterns within microservice-based environments. These patterns include service discovery using Consul agent, distributed configuration using Consul key/value store, distributed events with Spring Cloud Bus, and Consul Events. The project also supports a client-side load balancer based on Netflix’s Ribbon and an API gateway based on Spring Cloud Gateway. Continue reading “Microservices with Spring Boot, Spring Cloud Gateway and Consul Cluster”
Tag: Spring Boot Microservices
The Future of Spring Cloud Microservices After Netflix Era
If somebody would ask you about Spring Cloud, the first thing that comes into your mind will probably be Netflix OSS support. Support for such tools like Eureka, Zuul or Ribbon is provided not only by Spring, but also by some other popular frameworks used for building microservices architecture like Apache Camel, Vert.x or Micronaut. Currently, Spring Cloud Netflix is the most popular project being a part of Spring Cloud. It has around 3.2k stars on GitHub, while the second best has around 1.4k. Therefore, it is quite surprising that Pivotal has announced that most of Spring Cloud Netflix modules are entering maintenance mode. You can read more about in the post published on the Spring blog by Spencer Gibb https://spring.io/blog/2018/12/12/spring-cloud-greenwich-rc1-available-now. Continue reading “The Future of Spring Cloud Microservices After Netflix Era”
Quick Guide to Microservices with Kubernetes, Spring Boot 2.0 and Docker
Here’s the next article in a series of “Quick Guide to…”. This time we will discuss and run examples of Spring Boot microservices on Kubernetes. The structure of that article will be quite similar to this one Quick Guide to Microservices with Spring Boot 2.0, Eureka and Spring Cloud, as they are describing the same aspects of applications development. I’m going to focus on showing you the differences and similarities in development between for Spring Cloud and for Kubernetes. The topics covered in this article are:
- Using Spring Boot 2.0 in cloud-native development
- Providing service discovery for all microservices using Spring Cloud Kubernetes project
- Injecting configuration settings into application pods using Kubernetes Config Maps and Secrets
- Building application images using Docker and deploying them on Kubernetes using YAML configuration files
- Using Spring Cloud Kubernetes together with Zuul proxy to expose a single Swagger API documentation for all microservices
Spring Cloud and Kubernetes may be threaten as a competitive solutions when you build microservices environment. Such components like Eureka, Spring Cloud Config or Zuul provided by Spring Cloud may be replaced by built-in Kubernetes objects like services, config maps, secrets or ingresses. But even if you decide to use Kubernetes components instead of Spring Cloud you can take advantage of some interesting features provided throughout the whole Spring Cloud project.
The one raelly interesting project that helps us in development is Spring Cloud Kubernetes (https://github.com/spring-cloud-incubator/spring-cloud-kubernetes). Although it is still in incubation stage it is definitely worth to dedicating some time to it. It integrates Spring Cloud with Kubernetes. I’ll show you how to use implementation of discovery client, inter-service communication with Ribbon client and Zipkin discovery using Spring Cloud Kubernetes.
Before we proceed to the source code, let’s take a look on the following diagram. It illustrates the architecture of our sample system. It is quite similar to the architecture presented in the already mentioned article about microservices on Spring Cloud. There are three independent applications (employee-service, department-service, organization-service), which communicate between each other through REST API. These Spring Boot microservices use some build-in mechanisms provided by Kubernetes: config maps and secrets for distributed configuration, etcd for service discovery, and ingresses for API gateway.

Let’s proceed to the implementation. Currently, the newest stable version of Spring Cloud is Finchley.RELEASE. This version of spring-cloud-dependencies should be declared as a BOM for dependency management.
<dependencyManagement>
	<dependencies>
		<dependency>
			<groupId>org.springframework.cloud</groupId>
			<artifactId>spring-cloud-dependencies</artifactId>
			<version>Finchley.RELEASE</version>
			<type>pom</type>
			<scope>import</scope>
		</dependency>
	</dependencies>
</dependencyManagement>
Spring Cloud Kubernetes is not released under Spring Cloud Release Trains. So, we need to explicitly define its version. Because we use Spring Boot 2.0 we have to include the newest SNAPSHOT version of spring-cloud-kubernetes artifacts, which is 0.3.0.BUILD-SNAPSHOT.
The source code of sample applications presented in this article is available on GitHub in repository https://github.com/piomin/sample-spring-microservices-kubernetes.git.
Pre-requirements
In order to be able to deploy and test our sample microservices we need to prepare a development environment. We can realize that in the following steps:
- You need at least a single node cluster instance of Kubernetes (Minikube) or Openshift (Minishift) running on your local machine. You should start it and expose embedded Docker client provided by both of them. The detailed intruction for Minishift may be found there: Quick guide to deploying Java apps on OpenShift. You can also use that description to run Minikube – just replace word ‘minishift’ with ‘minikube’. In fact, it does not matter if you choose Kubernetes or Openshift – the next part of this tutorial would be applicable for both of them
- Spring Cloud Kubernetes requires access to Kubernetes API in order to be able to retrieve a list of address of pods running for a single service. If you use Kubernetes you should just execute the following command:
$ kubectl create clusterrolebinding admin --clusterrole=cluster-admin --serviceaccount=default:default
If you deploy your microservices on Minishift you should first enable admin-user addon, then login as a cluster admin, and grant required permissions.
$ minishift addons enable admin-user
$ oc login -u system:admin
$ oc policy add-role-to-user cluster-reader system:serviceaccount:myproject:default
- All our sample microservices use MongoDB as a backend store. So, you should first run an instance of this database on your node. With Minishift it is quite simple, as you can use predefined templates just by selecting service Mongo on the Catalog list. With Kubernetes the task is more difficult. You have to prepare deployment configuration files by yourself and apply it to the cluster. All the configuration files are available under kubernetes directory inside sample Git repository. To apply the following YAML definition to the cluster you should execute command
kubectl apply -f kubernetes\mongo-deployment.yaml. After it Mongo database would be available under the namemongodbinside Kubernetes cluster.
apiVersion: apps/v1
kind: Deployment
metadata:
  name: mongodb
  labels:
    app: mongodb
spec:
  replicas: 1
  selector:
    matchLabels:
      app: mongodb
  template:
    metadata:
      labels:
        app: mongodb
    spec:
      containers:
      - name: mongodb
        image: mongo:latest
        ports:
        - containerPort: 27017
        env:
        - name: MONGO_INITDB_DATABASE
          valueFrom:
            configMapKeyRef:
              name: mongodb
              key: database-name
        - name: MONGO_INITDB_ROOT_USERNAME
          valueFrom:
            secretKeyRef:
              name: mongodb
              key: database-user
        - name: MONGO_INITDB_ROOT_PASSWORD
          valueFrom:
            secretKeyRef:
              name: mongodb
              key: database-password
---
apiVersion: v1
kind: Service
metadata:
  name: mongodb
  labels:
    app: mongodb
spec:
  ports:
  - port: 27017
    protocol: TCP
  selector:
    app: mongodb
1. Inject configuration with Config Maps and Secrets
When using Spring Cloud the most obvious choice for realizing distributed configuration in your system is Spring Cloud Config. With Kubernetes you can use Config Map. It holds key-value pairs of configuration data that can be consumed in pods or used to store configuration data. It is used for storing and sharing non-sensitive, unencrypted configuration information. To use sensitive information in your clusters, you must use Secrets. An usage of both these Kubernetes objects can be perfectly demonstrated basing on the example of MongoDB connection settings. Inside Spring Boot application we can easily inject it using environment variables. Here’s fragment of application.yml file with URI configuration.
spring:
  data:
    mongodb:
      uri: mongodb://${MONGO_USERNAME}:${MONGO_PASSWORD}@mongodb/${MONGO_DATABASE}
While username or password are a sensitive fields, a database name is not. So we can place it inside config map.
apiVersion: v1
kind: ConfigMap
metadata:
  name: mongodb
data:
  database-name: microservices
Of course, username and password are defined as secrets.
apiVersion: v1
kind: Secret
metadata:
  name: mongodb
type: Opaque
data:
  database-password: MTIzNDU2
  database-user: cGlvdHI=
To apply the configuration to Kubernetes cluster we run the following commands.
$ kubectl apply -f kubernetes/mongodb-configmap.yaml
$ kubectl apply -f kubernetes/mongodb-secret.yaml
After it we should inject the configuration properties into application’s pods. When defining container configuration inside Deployment YAML file we have to include references to environment variables and secrets as shown below
apiVersion: apps/v1
kind: Deployment
metadata:
  name: employee
  labels:
    app: employee
spec:
  replicas: 1
  selector:
    matchLabels:
      app: employee
  template:
    metadata:
      labels:
        app: employee
    spec:
      containers:
      - name: employee
        image: piomin/employee:1.0
        ports:
        - containerPort: 8080
        env:
        - name: MONGO_DATABASE
          valueFrom:
            configMapKeyRef:
              name: mongodb
              key: database-name
        - name: MONGO_USERNAME
          valueFrom:
            secretKeyRef:
              name: mongodb
              key: database-user
        - name: MONGO_PASSWORD
          valueFrom:
            secretKeyRef:
              name: mongodb
              key: database-password
2. Building service discovery with Kubernetes
We usually running microservices on Kubernetes using Docker containers. One or more containers are grouped by pods, which are the smallest deployable units created and managed in Kubernetes. A good practice is to run only one container inside a single pod. If you would like to scale up your microservice you would just have to increase a number of running pods. All running pods that belong to a single microservice are logically grouped by Kubernetes Service. This service may be visible outside the cluster, and is able to load balance incoming requests between all running pods. The following service definition groups all pods labelled with field app equaled to employee.
apiVersion: v1
kind: Service
metadata:
  name: employee
  labels:
    app: employee
spec:
  ports:
  - port: 8080
    protocol: TCP
  selector:
    app: employee
Service can be used for accessing application outside Kubernetes cluster or for inter-service communication inside a cluster. However, the communication between microservices can be implemented more comfortable with Spring Cloud Kubernetes. First we need to include the following dependency to project pom.xml.
<dependency>
	<groupId>org.springframework.cloud</groupId>
	<artifactId>spring-cloud-starter-kubernetes</artifactId>
	<version>0.3.0.BUILD-SNAPSHOT</version>
</dependency>
Then we should enable discovery client for an application – the same as we have always done for discovery Spring Cloud Netflix Eureka. This allows you to query Kubernetes endpoints (services) by name. This discovery feature is also used by the Spring Cloud Kubernetes Ribbon or Zipkin projects to fetch respectively the list of the pods defined for a microservice to be load balanced or the Zipkin servers available to send the traces or spans.
@SpringBootApplication
@EnableDiscoveryClient
@EnableMongoRepositories
@EnableSwagger2
public class EmployeeApplication {

	public static void main(String[] args) {
		SpringApplication.run(EmployeeApplication.class, args);
	}

	// ...
}
The last important thing in this section is to guarantee that Spring application name would be exactly the same as Kubernetes service name for the application. For application employee-service it is employee.
spring:
  application:
    name: employee
3. Building microservice using Docker and deploying on Kubernetes
There is nothing unusual in our sample microservices. We have included some standard Spring dependencies for building REST-based microservices, integrating with MongoDB and generating API documentation using Swagger2.
<dependency>
	<groupId>org.springframework.boot</groupId>
	<artifactId>spring-boot-starter-web</artifactId>
</dependency>
<dependency>
	<groupId>org.springframework.boot</groupId>
	<artifactId>spring-boot-starter-actuator</artifactId>
</dependency>
<dependency>
	<groupId>io.springfox</groupId>
	<artifactId>springfox-swagger2</artifactId>
	<version>2.9.2</version>
</dependency>
<dependency>
	<groupId>org.springframework.boot</groupId>
	<artifactId>spring-boot-starter-data-mongodb</artifactId>
</dependency>
In order to integrate with MongoDB we should create interface that extends standard Spring Data CrudRepository.
public interface EmployeeRepository extends CrudRepository {

	List findByDepartmentId(Long departmentId);
	List findByOrganizationId(Long organizationId);

}
Entity class should be annotated with Mongo @Document and a primary key field with @Id.
@Document(collection = "employee")
public class Employee {

	@Id
	private String id;
	private Long organizationId;
	private Long departmentId;
	private String name;
	private int age;
	private String position;

	// ...

}
The repository bean has been injected to the controller class. Here’s the full implementation of our REST API inside employee-service.
@RestController
public class EmployeeController {

	private static final Logger LOGGER = LoggerFactory.getLogger(EmployeeController.class);

	@Autowired
	EmployeeRepository repository;

	@PostMapping("/")
	public Employee add(@RequestBody Employee employee) {
		LOGGER.info("Employee add: {}", employee);
		return repository.save(employee);
	}

	@GetMapping("/{id}")
	public Employee findById(@PathVariable("id") String id) {
		LOGGER.info("Employee find: id={}", id);
		return repository.findById(id).get();
	}

	@GetMapping("/")
	public Iterable findAll() {
		LOGGER.info("Employee find");
		return repository.findAll();
	}

	@GetMapping("/department/{departmentId}")
	public List findByDepartment(@PathVariable("departmentId") Long departmentId) {
		LOGGER.info("Employee find: departmentId={}", departmentId);
		return repository.findByDepartmentId(departmentId);
	}

	@GetMapping("/organization/{organizationId}")
	public List findByOrganization(@PathVariable("organizationId") Long organizationId) {
		LOGGER.info("Employee find: organizationId={}", organizationId);
		return repository.findByOrganizationId(organizationId);
	}

}
In order to run our microservices on Kubernetes we should first build the whole Maven project with mvn clean install command. Each microservice has Dockerfile placed in the root directory. Here’s Dockerfile definition for employee-service.
FROM openjdk:8-jre-alpine
ENV APP_FILE employee-service-1.0-SNAPSHOT.jar
ENV APP_HOME /usr/apps
EXPOSE 8080
COPY target/$APP_FILE $APP_HOME/
WORKDIR $APP_HOME
ENTRYPOINT ["sh", "-c"]
CMD ["exec java -jar $APP_FILE"]
Let’s build Docker images for all three sample microservices.
$ cd employee-service
$ docker build -t piomin/employee:1.0 .
$ cd department-service
$ docker build -t piomin/department:1.0 .
$ cd organization-service
$ docker build -t piomin/organization:1.0 .
The last step is to deploy Docker containers with applications on Kubernetes. To do that just execute commands kubectl apply on YAML configuration files. The sample deployment file for employee-service has been demonstrated in step 1. All required deployment fields are available inside project repository in kubernetes directory.
$ kubectl apply -f kubernetes\employee-deployment.yaml
$ kubectl apply -f kubernetes\department-deployment.yaml
$ kubectl apply -f kubernetes\organization-deployment.yaml
4. Communication between microservices with Spring Cloud Kubernetes Ribbon
All the microservice are deployed on Kubernetes. Now, it’s worth to discuss some aspects related to inter-service communication. Application employee-service in contrast to other microservices did not invoke any other microservices. Let’s take a look on to other microservices that calls API exposed by employee-service and communicates between each other (organization-service calls department-service API).
First we need to include some additional dependencies to the project. We use Spring Cloud Ribbon and OpenFeign. Alternatively you can also use Spring @LoadBalanced RestTemplate.
<dependency>
	<groupId>org.springframework.cloud</groupId>
	<artifactId>spring-cloud-starter-netflix-ribbon</artifactId>
</dependency>
<dependency>
	<groupId>org.springframework.cloud</groupId>
	<artifactId>spring-cloud-starter-kubernetes-ribbon</artifactId>
	<version>0.3.0.BUILD-SNAPSHOT</version>
</dependency>
<dependency>
	<groupId>org.springframework.cloud</groupId>
	<artifactId>spring-cloud-starter-openfeign</artifactId>
</dependency>
Here’s the main class of department-service. It enables Feign client using @EnableFeignClients annotation. It works the same as with discovery based on Spring Cloud Netflix Eureka. OpenFeign uses Ribbon for client-side load balancing. Spring Cloud Kubernetes Ribbon provides some beans that forces Ribbon to communicate with Kubernetes API through Fabric8 KubernetesClient.
@SpringBootApplication
@EnableDiscoveryClient
@EnableFeignClients
@EnableMongoRepositories
@EnableSwagger2
public class DepartmentApplication {

	public static void main(String[] args) {
		SpringApplication.run(DepartmentApplication.class, args);
	}

	// ...

}
Here’s implementation of Feign client for calling method exposed by employee-service.
@FeignClient(name = "employee")
public interface EmployeeClient {

	@GetMapping("/department/{departmentId}")
	List findByDepartment(@PathVariable("departmentId") String departmentId);

}
Finally, we have to inject Feign client’s beans to the REST controller. Now, we may call the method defined inside EmployeeClient, which is equivalent to calling REST endpoints.
@RestController
public class DepartmentController {

	private static final Logger LOGGER = LoggerFactory.getLogger(DepartmentController.class);

	@Autowired
	DepartmentRepository repository;
	@Autowired
	EmployeeClient employeeClient;

	// ...

	@GetMapping("/organization/{organizationId}/with-employees")
	public List findByOrganizationWithEmployees(@PathVariable("organizationId") Long organizationId) {
		LOGGER.info("Department find: organizationId={}", organizationId);
		List departments = repository.findByOrganizationId(organizationId);
		departments.forEach(d -> d.setEmployees(employeeClient.findByDepartment(d.getId())));
		return departments;
	}

}
5. Building API gateway using Kubernetes Ingress
An Ingress is a collection of rules that allow incoming requests to reach the downstream services. In our microservices architecture ingress is playing a role of an API gateway. To create it we should first prepare YAML description file. The descriptor file should contain the hostname under which the gateway will be available and mapping rules to the downstream services.
apiVersion: extensions/v1beta1
kind: Ingress
metadata:
  name: gateway-ingress
  annotations:
    nginx.ingress.kubernetes.io/rewrite-target: /
spec:
  backend:
    serviceName: default-http-backend
    servicePort: 80
  rules:
  - host: microservices.info
    http:
      paths:
      - path: /employee
        backend:
          serviceName: employee
          servicePort: 8080
      - path: /department
        backend:
          serviceName: department
          servicePort: 8080
      - path: /organization
        backend:
          serviceName: organization
          servicePort: 8080
You have to execute the following command to apply the configuration visible above to the Kubernetes cluster.
$ kubectl apply -f kubernetes\ingress.yaml
For testing this solution locally we have to insert the mapping between IP address and hostname set in ingress definition inside hosts file as shown below. After it we can services through ingress using defined hostname just like that: http://microservices.info/employee.
192.168.99.100 microservices.info
You can check the details of created ingress just by executing command kubectl describe ing gateway-ingress.

6. Enabling API specification on gateway using Swagger2
Ok, what if we would like to expose single swagger documentation for all microservices deployed on Kubernetes? Well, here the things are getting complicated… We can run container with Swagger UI, and map all paths exposed by the ingress manually, but it is rather not a good solution…
In that case we can use Spring Cloud Kubernetes Ribbon one more time – this time together with Spring Cloud Netflix Zuul. Zuul will act as gateway only for serving Swagger API.
Here’s the list of dependencies used in my gateway-service project.
<dependency>
	<groupId>org.springframework.cloud</groupId>
	<artifactId>spring-cloud-starter-netflix-zuul</artifactId>
</dependency>
<dependency>
	<groupId>org.springframework.cloud</groupId>
	<artifactId>spring-cloud-starter-kubernetes</artifactId>
	<version>0.3.0.BUILD-SNAPSHOT</version>
</dependency>
<dependency>
	<groupId>org.springframework.cloud</groupId>
	<artifactId>spring-cloud-starter-netflix-ribbon</artifactId>
</dependency>
<dependency>
	<groupId>org.springframework.cloud</groupId>
	<artifactId>spring-cloud-starter-kubernetes-ribbon</artifactId>
	<version>0.3.0.BUILD-SNAPSHOT</version>
</dependency>
<dependency>
	<groupId>io.springfox</groupId>
	<artifactId>springfox-swagger-ui</artifactId>
	<version>2.9.2</version>
</dependency>
<dependency>
	<groupId>io.springfox</groupId>
	<artifactId>springfox-swagger2</artifactId>
	<version>2.9.2</version>
</dependency>
Kubernetes discovery client will detect all services exposed on cluster. We would like to display documentation only for our three microservices. That’s why I defined the following routes for Zuul.
zuul:
  routes:
    department:
      path: /department/**
    employee:
      path: /employee/**
    organization:
      path: /organization/**
Now we can use ZuulProperties bean to get routes addresses from Kubernetes discovery, and configure them as Swagger resources as shown below.
@Configuration
public class GatewayApi {

	@Autowired
	ZuulProperties properties;

	@Primary
	@Bean
	public SwaggerResourcesProvider swaggerResourcesProvider() {
		return () -> {
			List resources = new ArrayList();
			properties.getRoutes().values().stream()
					.forEach(route -> resources.add(createResource(route.getId(), "2.0")));
			return resources;
		};
	}

	private SwaggerResource createResource(String location, String version) {
		SwaggerResource swaggerResource = new SwaggerResource();
		swaggerResource.setName(location);
		swaggerResource.setLocation("/" + location + "/v2/api-docs");
		swaggerResource.setSwaggerVersion(version);
		return swaggerResource;
	}

}
Application gateway-service should be deployed on cluster the same as other applications. You can the list of running service by executing command kubectl get svc. Swagger documentation is available under address http://192.168.99.100:31237/swagger-ui.html.

Conclusion
I’m actually rooting for Spring Cloud Kubernetes project, which is still at the incubation stage. Kubernetes popularity as a platform is rapidly growing during some last months, but it still has some weaknesses. One of them is inter-service communication. Kubernetes doesn’t give us many mechanisms out-of-the-box, which allows configure more advanced rules. This a reason for creating frameworks for service mesh on Kubernetes like Istio or Linkerd. While these projects are still relatively new solutions, Spring Cloud is stable, opinionated framework. Why not to use to provide service discovery, inter-service communication or load balancing? Thanks to Spring Cloud Kubernetes it is possible.

Reactive Microservices with Spring WebFlux and Spring Cloud
I have already described Spring reactive support about one year ago in the article Reactive microservices with Spring 5. At that time project Spring WebFlux has been under active development, and now after official release of Spring 5 it is worth to take a look on the current version of it. Moreover, we will try to put our reactive microservices inside Spring Cloud ecosystem, which contains such the elements like service discovery with Eureka, load balancing with Spring Cloud Commons @LoadBalanced, and API gateway using Spring Cloud Gateway (also based on WebFlux and Netty). We will also check out Spring reactive support for NoSQL databases by the example of Spring Data Reactive Mongo project.
Here’s the figure that illustrates an architecture of our sample system consisting of two microservices, discovery server, gateway and MongoDB databases. The source code is as usual available on GitHub in sample-spring-cloud-webflux repository.
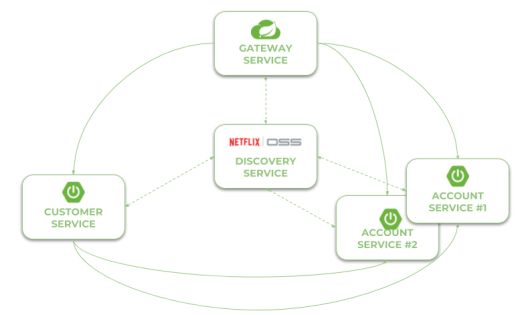
Let’s describe the further steps on the way to create the system illustrated above.
Step 1. Building reactive application using Spring WebFlux
To enable library Spring WebFlux for the project we should include starter spring-boot-starter-webflux to the dependencies. It includes some dependent libraries like Reactor or Netty server.
<dependency>
	<groupId>org.springframework.boot</groupId>
	<artifactId>spring-boot-starter-webflux</artifactId>
</dependency>
REST controller looks pretty similar to the controller defined for synchronous web services. The only difference is in type of returned objects. Instead of single object we return instance of class Mono, and instead of list we return instance of class Flux. Thanks to Spring Data Reactive Mongo we don’t have to do nothing more that call the needed method on the repository bean.
@RestController
public class AccountController {

	private static final Logger LOGGER = LoggerFactory.getLogger(AccountController.class);

	@Autowired
	private AccountRepository repository;

	@GetMapping("/customer/{customer}")
	public Flux findByCustomer(@PathVariable("customer") String customerId) {
		LOGGER.info("findByCustomer: customerId={}", customerId);
		return repository.findByCustomerId(customerId);
	}

	@GetMapping
	public Flux findAll() {
		LOGGER.info("findAll");
		return repository.findAll();
	}

	@GetMapping("/{id}")
	public Mono findById(@PathVariable("id") String id) {
		LOGGER.info("findById: id={}", id);
		return repository.findById(id);
	}

	@PostMapping
	public Mono create(@RequestBody Account account) {
		LOGGER.info("create: {}", account);
		return repository.save(account);
	}

}
Step 2. Integrate an application with database using Spring Data Reactive Mongo
The implementation of integration between application and database is also very simple. First, we need to include starter spring-boot-starter-data-mongodb-reactive to the project dependencies.
<dependency>
	<groupId>org.springframework.boot</groupId>
	<artifactId>spring-boot-starter-data-mongodb-reactive</artifactId>
</dependency>
The support for reactive Mongo repositories is automatically enabled after including the starter. The next step is to declare entity with ORM mappings. The following class is also returned as reponse by AccountController.
@Document
public class Account {

	@Id
	private String id;
	private String number;
	private String customerId;
	private int amount;

	...

}
Finally, we may create repository interface that extends ReactiveCrudRepository. It follows the patterns implemented by Spring Data JPA and provides some basic methods for CRUD operations. It also allows to define methods with names, which are automatically mapped to queries. The only difference in comparison with standard Spring Data JPA repositories is in method signatures. The objects are wrapped by Mono and Flux.
public interface AccountRepository extends ReactiveCrudRepository {

	Flux findByCustomerId(String customerId);

}
In this example I used Docker container for running MongoDB locally. Because I run Docker on Windows using Docker Toolkit the default address of Docker machine is 192.168.99.100. Here’s the configuration of data source in application.yml file.
spring:
  data:
    mongodb:
      uri: mongodb://192.168.99.100/test
Step 3. Enabling service discovery using Eureka
Integration with Spring Cloud Eureka is pretty the same as for synchronous REST microservices. To enable discovery client we should first include starter spring-cloud-starter-netflix-eureka-client to the project dependencies.
<dependency>
	<groupId>org.springframework.cloud</groupId>
	<artifactId>spring-cloud-starter-netflix-eureka-client</artifactId>
</dependency>
Then we have to enable it using @EnableDiscoveryClient annotation.
@SpringBootApplication
@EnableDiscoveryClient
public class AccountApplication {

	public static void main(String[] args) {
		SpringApplication.run(AccountApplication.class, args);
	}

}
Microservice will automatically register itself in Eureka. Of cource, we may run more than instance of every service. Here’s the screen illustrating Eureka Dashboard (http://localhost:8761) after running two instances of account-service and a single instance of customer-service. I would not like to go into the details of running application with embedded Eureka server. You may refer to my previous article for details: Quick Guide to Microservices with Spring Boot 2.0, Eureka and Spring Cloud. Eureka server is available as discovery-service module.

Step 4. Inter-service communication between reactive microservices with WebClient
An inter-service communication is realized by the WebClient from Spring WebFlux project. The same as for RestTemplate you should annotate it with Spring Cloud Commons @LoadBalanced . It enables integration with service discovery and load balancing using Netflix OSS Ribbon client. So, the first step is to declare a client builder bean with @LoadBalanced annotation.
@Bean
@LoadBalanced
public WebClient.Builder loadBalancedWebClientBuilder() {
	return WebClient.builder();
}
Then we may inject WebClientBuilder into the REST controller. Communication with account-service is implemented inside GET /{id}/with-accounts , where first we are searching for customer entity using reactive Spring Data repository. It returns object Mono , while the WebClient returns Flux . Now, our main goal is to merge those to publishers and return single Mono object with the list of accounts taken from Flux without blocking the stream. The following fragment of code illustrates how I used WebClient to communicate with other microservice, and then merge the response and result from repository to single Mono object. This merge may probably be done in more “ellegant” way, so fell free to create push request with your proposal.
@Autowired
private WebClient.Builder webClientBuilder;

@GetMapping("/{id}/with-accounts")
public Mono findByIdWithAccounts(@PathVariable("id") String id) {
	LOGGER.info("findByIdWithAccounts: id={}", id);
	Flux accounts = webClientBuilder.build().get().uri("http://account-service/customer/{customer}", id).retrieve().bodyToFlux(Account.class);
	return accounts
			.collectList()
			.map(a -> new Customer(a))
			.mergeWith(repository.findById(id))
			.collectList()
			.map(CustomerMapper::map);
}
Step 5. Building API gateway using Spring Cloud Gateway
Spring Cloud Gateway is one of the newest Spring Cloud project. It is built on top of Spring WebFlux, and thanks to that we may use it as a gateway to our sample system based on reactive microservices. Similar to Spring WebFlux applications it is ran on embedded Netty server. To enable it for Spring Boot application just include the following dependency to your project.
<dependency>
	<groupId>org.springframework.cloud</groupId>
	<artifactId>spring-cloud-starter-gateway</artifactId>
</dependency>
We should also enable discovery client in order to allow the gateway to fetch list of registered microservices. However, there is no need to register gateway’s application in Eureka. To disable registration you may set property eureka.client.registerWithEureka to false inside application.yml file.
@SpringBootApplication
@EnableDiscoveryClient
public class GatewayApplication {

	public static void main(String[] args) {
		SpringApplication.run(GatewayApplication.class, args);
	}

}
By default, Spring Cloud Gateway does not enable integration with service discovery. To enable it we should set property spring.cloud.gateway.discovery.locator.enabled to true. Now, the last thing that should be done is the configuration of the routes. Spring Cloud Gateway provides two types of components that may be configured inside routes: filters and predicates. Predicates are used for matching HTTP requests with route, while filters can be used to modify requests and responses before or after sending the downstream request. Here’s the full configuration of gateway. It enables service discovery location, and defines two routes based on entries in service registry. We use the Path Route Predicate factory for matching the incoming requests, and the RewritePath GatewayFilter factory for modifying the requested path to adapt it to the format exposed by the downstream services (endpoints are exposed under path /, while gateway expose them under paths /account and /customer).
spring:
  cloud:
    gateway:
      discovery:
        locator:
          enabled: true
      routes:
      - id: account-service
        uri: lb://account-service
        predicates:
        - Path=/account/**
        filters:
        - RewritePath=/account/(?.*), /$\{path}
      - id: customer-service
        uri: lb://customer-service
        predicates:
        - Path=/customer/**
        filters:
        - RewritePath=/customer/(?.*), /$\{path}
Step 6. Testing the sample system
Before making some tests let’s just recap our sample system. We have two microservices account-service, customer-service that use MongoDB as a database. Microservice customer-service calls endpoint GET /customer/{customer} exposed by account-service. URL of account-service is taken from Eureka. The whole sample system is hidden behind gateway, which is available under address localhost:8090.
Now, the first step is to run MongoDB on Docker container. After executing the following command Mongo is available under address 192.168.99.100:27017.
$ docker run -d --name mongo -p 27017:27017 mongo
Then we may proceeed to running discovery-service. Eureka is available under its default address localhost:8761. You may run it using your IDE or just by executing command java -jar target/discovery-service-1.0-SNAPHOT.jar. The same rule applies to our sample microservices. However, account-service needs to be multiplied in two instances, so you need to override default HTTP port when running second instance using -Dserver.port VM argument, for example java -jar -Dserver.port=2223 target/account-service-1.0-SNAPSHOT.jar. Finally, after running gateway-service we may add some test data.
$ curl --header "Content-Type: application/json" --request POST --data '{"firstName": "John","lastName": "Scott","age": 30}' http://localhost:8090/customer
{"id": "5aec1debfa656c0b38b952b4","firstName": "John","lastName": "Scott","age": 30,"accounts": null}
$ curl --header "Content-Type: application/json" --request POST --data '{"number": "1234567890","amount": 5000,"customerId": "5aec1debfa656c0b38b952b4"}' http://localhost:8090/account
{"id": "5aec1e86fa656c11d4c655fb","number": "1234567892","customerId": "5aec1debfa656c0b38b952b4","amount": 5000}
$ curl --header "Content-Type: application/json" --request POST --data '{"number": "1234567891","amount": 12000,"customerId": "5aec1debfa656c0b38b952b4"}' http://localhost:8090/account
{"id": "5aec1e91fa656c11d4c655fc","number": "1234567892","customerId": "5aec1debfa656c0b38b952b4","amount": 12000}
$ curl --header "Content-Type: application/json" --request POST --data '{"number": "1234567892","amount": 2000,"customerId": "5aec1debfa656c0b38b952b4"}' http://localhost:8090/account
{"id": "5aec1e99fa656c11d4c655fd","number": "1234567892","customerId": "5aec1debfa656c0b38b952b4","amount": 2000}
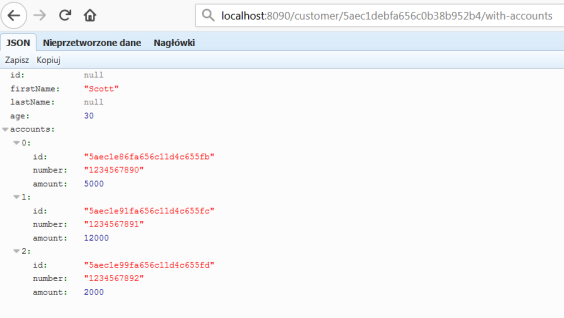
To test inter-service communication just call endpoint GET /customer/{id}/with-accounts on gateway-service. It forward the request to customer-service, and then customer-service calls enpoint exposed by account-service using reactive WebClient. The result is visible below.
Conclusion
Since Spring 5 and Spring Boot 2.0 there is a full range of available ways to build microservices-based architecture. We can build standard synchronous system using one-to-one communication with Spring Cloud Netflix project, messaging microservices based on message broker and publish/subscribe communication model with Spring Cloud Stream, and finally asynchronous, reactive microservices with Spring WebFlux. The main goal of this article is to show you how to use Spring WebFlux together with Spring Cloud projects in order to provide such a mechanisms like service discovery, load balancing or API gateway for reactive microservices build on top of Spring Boot. Before Spring 5 the lack of support for reactive microservices was one of the drawback of Spring framework, but now with Spring WebFlux it is no longer the case. Not only that, we may leverage Spring reactive support for the most popular NoSQL databases like MongoDB or Cassandra, and easily place our reactive microservices inside one system together with synchronous REST microservices.

Quick Guide to Microservices with Spring Boot 2.0, Eureka and Spring Cloud
There are many articles on my blog about microservices with Spring Boot and Spring Cloud. The main purpose of this article is to provide a brief summary of the most important components provided by these frameworks that help you in creating microservices and in fact explain you what is Spring Cloud for microservices architecture. The topics covered in this article are:
- Using Spring Boot 2 in cloud-native development
- Providing service discovery for all microservices with Spring Cloud Netflix Eureka
- Distributed configuration with Spring Cloud Config
- API Gateway pattern using a new project inside Spring Cloud: Spring Cloud Gateway
- Correlating logs with Spring Cloud Sleuth
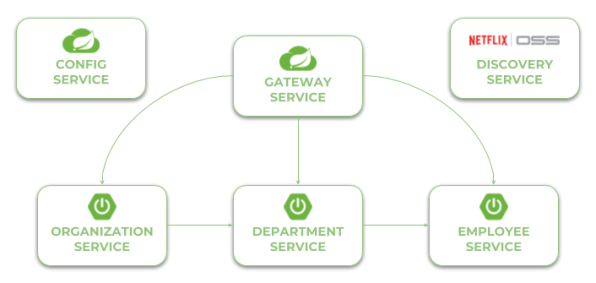
Before we proceed to the source code, let’s take a look on the following diagram. It illustrates the architecture of our sample system. We have three independent microservices, which register themself in service discovery, fetch properties from configuration service and communicate with each other. The whole system is hidden behind API gateway.
Currently, the newest version of Spring Cloud is Finchley.M9. This version of spring-cloud-dependencies should be declared as a BOM for dependency management.
<dependencyManagement>
	<dependencies>
		<dependency>
			<groupId>org.springframework.cloud</groupId>
			<artifactId>spring-cloud-dependencies</artifactId>
			<version>Finchley.M9</version>
			<type>pom</type>
			<scope>import</scope>
		</dependency>
	</dependencies>
</dependencyManagement>
Now, let’s consider the further steps to be taken in order to create working microservices-based system using Spring Cloud. We will begin from Configuration Server.
The source code of sample applications presented in this article is available on GitHub in repository https://github.com/piomin/sample-spring-microservices-new.git.
Step 1. Building configuration server with Spring Cloud Config
To enable Spring Cloud Config feature for an application, first include spring-cloud-config-server to your project dependencies.
<dependency>
	<groupId>org.springframework.cloud</groupId>
	<artifactId>spring-cloud-config-server</artifactId>
</dependency>
Then enable running embedded configuration server during application boot use @EnableConfigServer annotation.
@SpringBootApplication
@EnableConfigServer
public class ConfigApplication {

	public static void main(String[] args) {
		new SpringApplicationBuilder(ConfigApplication.class).run(args);
	}

}
By default Spring Cloud Config Server store the configuration data inside Git repository. This is very good choice in production mode, but for the sample purpose file system backend will be enough. It is really easy to start with config server, because we can place all the properties in the classpath. Spring Cloud Config by default search for property sources inside the following locations: classpath:/, classpath:/config, file:./, file:./config.
We place all the property sources inside src/main/resources/config. The YAML filename will be the same as the name of service. For example, YAML file for discovery-service will be located here: src/main/resources/config/discovery-service.yml.
And last two important things. If you would like to start config server with file system backend you have activate Spring Boot profile native. It may be achieved by setting parameter --spring.profiles.active=native during application boot. I have also changed the default config server port (8888) to 8061 by setting property server.port in bootstrap.yml file.
Step 2. Building service discovery with Spring Cloud Netflix Eureka
More to the point of configuration server. Now, all other applications, including discovery-service, need to add spring-cloud-starter-config dependency in order to enable config client. We also have to include dependency to spring-cloud-starter-netflix-eureka-server.
<dependency>
	<groupId>org.springframework.cloud</groupId>
	<artifactId>spring-cloud-starter-netflix-eureka-server</artifactId>
</dependency>
Then you should enable running embedded discovery server during application boot by setting @EnableEurekaServer annotation on the main class.
@SpringBootApplication
@EnableEurekaServer
public class DiscoveryApplication {

	public static void main(String[] args) {
		new SpringApplicationBuilder(DiscoveryApplication.class).run(args);
	}

}
Application has to fetch property source from configuration server. The minimal configuration required on the client side is an application name and config server’s connection settings.
spring:
  application:
    name: discovery-service
  cloud:
    config:
      uri: http://localhost:8088
As I have already mentioned, the configuration file discovery-service.yml should be placed inside config-service module. However, it is required to say a few words about the configuration visible below. We have changed Eureka running port from default value (8761) to 8061. For standalone Eureka instance we have to disable registration and fetching registry.
server:
  port: 8061

eureka:
  instance:
    hostname: localhost
  client:
    registerWithEureka: false
    fetchRegistry: false
    serviceUrl:
      defaultZone: http://${eureka.instance.hostname}:${server.port}/eureka/
Now, when you are starting your application with embedded Eureka server you should see the following logs.

Once you have succesfully started application you may visit Eureka Dashboard available under address http://localhost:8061/.
Step 3. Building microservice using Spring Boot and Spring Cloud
Our microservice has te perform some operations during boot. It needs to fetch configuration from config-service, register itself in discovery-service, expose HTTP API and automatically generate API documentation. To enable all these mechanisms we need to include some dependencies in pom.xml. To enable config client we should include starter spring-cloud-starter-config. Discovery client will be enabled for microservice after including spring-cloud-starter-netflix-eureka-client and annotating the main class with @EnableDiscoveryClient. To force Spring Boot application generating API documentation we should include springfox-swagger2 dependency and add annotation @EnableSwagger2.
Here is the full list of dependencies defined for my sample microservice.
<dependency>
	<groupId>org.springframework.cloud</groupId>
	<artifactId>spring-cloud-starter-netflix-eureka-client</artifactId>
</dependency>
<dependency>
	<groupId>org.springframework.cloud</groupId>
	<artifactId>spring-cloud-starter-config</artifactId>
</dependency>
<dependency>
	<groupId>org.springframework.boot</groupId>
	<artifactId>spring-boot-starter-web</artifactId>
</dependency>
<dependency>
	<groupId>io.springfox</groupId>
	<artifactId>springfox-swagger2</artifactId>
	<version>2.8.0</version>
</dependency>
And here is the main class of application that enables Discovery Client and Swagger2 for the microservice.
@SpringBootApplication
@EnableDiscoveryClient
@EnableSwagger2
public class EmployeeApplication {
public static void main(String[] args) {
SpringApplication.run(EmployeeApplication.class, args);
}
@Bean
public Docket swaggerApi() {
return new Docket(DocumentationType.SWAGGER_2)
.select()
.apis(RequestHandlerSelectors.basePackage("pl.piomin.services.employee.controller"))
.paths(PathSelectors.any())
.build()
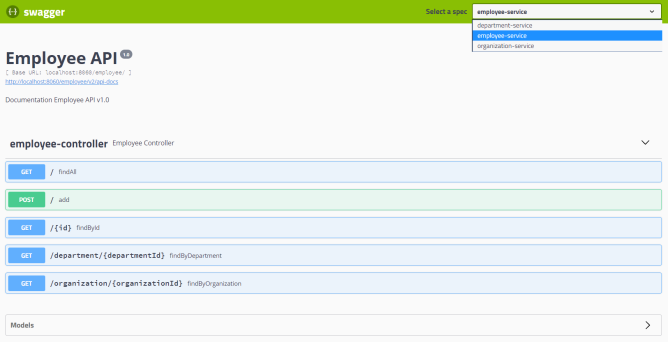
.apiInfo(new ApiInfoBuilder().version("1.0").title("Employee API").description("Documentation Employee API v1.0").build());
}
...
}
Application has to fetch configuration from a remote server, so we should only provide bootstrap.yml file with service name and server URL. In fact, this is the example of Config First Bootstrap approach, when an application first connects to a config server and takes a discovery server address from a remote property source. There is also Discovery First Bootstrap, where a config server address is fetched from a discovery server.
spring:
  application:
    name: employee-service
  cloud:
    config:
      uri: http://localhost:8088
There is no much configuration settings. Here’s application’s configuration file stored on a remote server. It stores only HTTP running port and Eureka URL. However, I also placed file employee-service-instance2.yml on remote config server. It sets different HTTP port for application, so you can esily run two instances of the same service locally basing on remote properties. Now, you may run the second instance of employee-service on port 9090 after passing argument spring.profiles.active=instance2 during an application startup. With default settings you will start the microservice on port 8090.
server:
  port: 9090

eureka:
  client:
    serviceUrl:
      defaultZone: http://localhost:8061/eureka/
Here’s the code with implementation of REST controller class. It provides an implementation for adding new employee and searching for employee using different filters.
@RestController
public class EmployeeController {

	private static final Logger LOGGER = LoggerFactory.getLogger(EmployeeController.class);

	@Autowired
	EmployeeRepository repository;

	@PostMapping
	public Employee add(@RequestBody Employee employee) {
		LOGGER.info("Employee add: {}", employee);
		return repository.add(employee);
	}

	@GetMapping("/{id}")
	public Employee findById(@PathVariable("id") Long id) {
		LOGGER.info("Employee find: id={}", id);
		return repository.findById(id);
	}

	@GetMapping
	public List findAll() {
		LOGGER.info("Employee find");
		return repository.findAll();
	}

	@GetMapping("/department/{departmentId}")
	public List findByDepartment(@PathVariable("departmentId") Long departmentId) {
		LOGGER.info("Employee find: departmentId={}", departmentId);
		return repository.findByDepartment(departmentId);
	}

	@GetMapping("/organization/{organizationId}")
	public List findByOrganization(@PathVariable("organizationId") Long organizationId) {
		LOGGER.info("Employee find: organizationId={}", organizationId);
		return repository.findByOrganization(organizationId);
	}

}
Step 4. Communication between microservice with Spring Cloud Open Feign
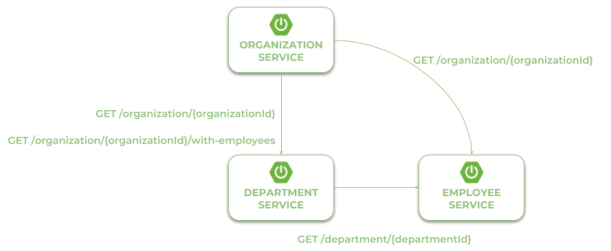
Our first microservice has been created and started. Now, we will add other microservices that communicate with each other. The following diagram illustrates the communication flow between three sample microservices: organization-service, department-service and employee-service. Microservice organization-service collect list of departments with (GET /organization/{organizationId}/with-employees) or without employees (GET /organization/{organizationId}) from department-service, and list of employees without dividing them into different departments directly from employee-service. Microservice department-service is able to collect list of employees assigned to the particular department.
In the scenario described above both organization-service and department-service have to localize other microservices and communicate with them. That’s why we need to include additional dependency for those modules: spring-cloud-starter-openfeign. Spring Cloud Open Feign is a declarative REST client that used Ribbon client-side load balancer in order to communicate with other microservice.
<dependency>
	<groupId>org.springframework.cloud</groupId>
	<artifactId>spring-cloud-starter-openfeign</artifactId>
</dependency>
The alternative solution to Open Feign is Spring RestTemplate with @LoadBalanced. However, Feign provides more ellegant way of defining client, so I prefer it instead of RestTemplate. After including the required dependency we should also enable Feign clients using @EnableFeignClients annotation.
@SpringBootApplication
@EnableDiscoveryClient
@EnableFeignClients
@EnableSwagger2
public class OrganizationApplication {

	public static void main(String[] args) {
		SpringApplication.run(OrganizationApplication.class, args);
	}

	...

}
Now, we need to define client’s interfaces. Because organization-service communicates with two other microservices we should create two interfaces, one per single microservice. Every client’s interface should be annotated with @FeignClient. One field inside annotation is required – name. This name should be the same as the name of target service registered in service discovery. Here’s the interface of the client that calls endpoint GET /organization/{organizationId} exposed by employee-service.
@FeignClient(name = "employee-service")
public interface EmployeeClient {

	@GetMapping("/organization/{organizationId}")
	List findByOrganization(@PathVariable("organizationId") Long organizationId);

}
The second client’s interface available inside organization-service calls two endpoints from department-service. First of them GET /organization/{organizationId} returns organization only with the list of available departments, while the second GET /organization/{organizationId}/with-employees return the same set of data including the list employees assigned to every department.
@FeignClient(name = "department-service")
public interface DepartmentClient {

	@GetMapping("/organization/{organizationId}")
	public List findByOrganization(@PathVariable("organizationId") Long organizationId);

	@GetMapping("/organization/{organizationId}/with-employees")
	public List findByOrganizationWithEmployees(@PathVariable("organizationId") Long organizationId);

}
Finally, we have to inject Feign client’s beans to the REST controller. Now, we may call the methods defined inside DepartmentClient and EmployeeClient, which is equivalent to calling REST endpoints.
@RestController
public class OrganizationController {

	private static final Logger LOGGER = LoggerFactory.getLogger(OrganizationController.class);

	@Autowired
	OrganizationRepository repository;
	@Autowired
	DepartmentClient departmentClient;
	@Autowired
	EmployeeClient employeeClient;

	...

	@GetMapping("/{id}")
	public Organization findById(@PathVariable("id") Long id) {
		LOGGER.info("Organization find: id={}", id);
		return repository.findById(id);
	}

	@GetMapping("/{id}/with-departments")
	public Organization findByIdWithDepartments(@PathVariable("id") Long id) {
		LOGGER.info("Organization find: id={}", id);
		Organization organization = repository.findById(id);
		organization.setDepartments(departmentClient.findByOrganization(organization.getId()));
		return organization;
	}

	@GetMapping("/{id}/with-departments-and-employees")
	public Organization findByIdWithDepartmentsAndEmployees(@PathVariable("id") Long id) {
		LOGGER.info("Organization find: id={}", id);
		Organization organization = repository.findById(id);
		organization.setDepartments(departmentClient.findByOrganizationWithEmployees(organization.getId()));
		return organization;
	}

	@GetMapping("/{id}/with-employees")
	public Organization findByIdWithEmployees(@PathVariable("id") Long id) {
		LOGGER.info("Organization find: id={}", id);
		Organization organization = repository.findById(id);
		organization.setEmployees(employeeClient.findByOrganization(organization.getId()));
		return organization;
	}

}
Step 5. Building API gateway using Spring Cloud Gateway
Spring Cloud Gateway is relatively new Spring Cloud project. It is built on top of Spring Framework 5, Project Reactor and Spring Boot 2.0. It requires the Netty runtime provided by Spring Boot and Spring Webflux. This is really nice alternative to Spring Cloud Netflix Zuul, which has been the only one Spring Cloud project providing API gateway for microservices until now.
API gateway is implemented inside module gateway-service. First, we should include starter spring-cloud-starter-gateway to the project dependencies.
<dependency>
	<groupId>org.springframework.cloud</groupId>
	<artifactId>spring-cloud-starter-gateway</artifactId>
</dependency>
We also need to have discovery client enabled, because gateway-service integrates with Eureka in order to be able to perform routing to the downstream services. Gateway will also expose API specification of all the endpoints exposed by our sample microservices. That’s why we enabled Swagger2 also on the gateway.
@SpringBootApplication
@EnableDiscoveryClient
@EnableSwagger2
public class GatewayApplication {

	public static void main(String[] args) {
		SpringApplication.run(GatewayApplication.class, args);
	}

}
Spring Cloud Gateway provides three basic components used for configuration: routes, predicates and filters. Route is the basic building block of the gateway. It contains destination URI and list of defined predicates and filters. Predicate is responsible for matching on anything from the incoming HTTP request, such as headers or parameters. Filter may modify request and response before and after sending it to downstream services. All these components may be set using configuration properties. We will create and place on the confiration server file gateway-service.yml with the routes defined for our sample microservices.
But first, we should enable integration with discovery server for the routes by setting property spring.cloud.gateway.discovery.locator.enabled to true. Then we may proceed to defining the route rules. We use the Path Route Predicate Factory for matching the incoming requests, and the RewritePath GatewayFilter Factory for modifying the requested path to adapt it to the format exposed by downstream services. The uri parameter specifies the name of target service registered in discovery server. Let’s take a look on the following routes definition. For example, in order to make organization-service available on gateway under path /organization/**, we should define predicate Path=/organization/**, and then strip prefix /organization from the path, because the target service is exposed under path /**. The address of target service is fetched for Eureka basing uri value lb://organization-service.
spring:
  cloud:
    gateway:
      discovery:
        locator:
          enabled: true
      routes:
      - id: employee-service
        uri: lb://employee-service
        predicates:
        - Path=/employee/**
        filters:
        - RewritePath=/employee/(?.*), /$\{path}
      - id: department-service
        uri: lb://department-service
        predicates:
        - Path=/department/**
        filters:
        - RewritePath=/department/(?.*), /$\{path}
      - id: organization-service
        uri: lb://organization-service
        predicates:
        - Path=/organization/**
        filters:
        - RewritePath=/organization/(?.*), /$\{path}
Step 6. Enabling API specification on gateway using Swagger2
Every Spring Boot microservice that is annotated with @EnableSwagger2 exposes Swagger API documentation under path /v2/api-docs. However, we would like to have that documentation located in the single place – on API gateway. To achieve it we need to provide bean implementing SwaggerResourcesProvider interface inside gateway-service module. That bean is responsible for defining list storing locations of Swagger resources, which should be displayed by the application. Here’s the implementation of SwaggerResourcesProvider that takes the required locations from service discovery basing on the Spring Cloud Gateway configuration properties.
Unfortunately, SpringFox Swagger still does not provide support for Spring WebFlux. It means that if you include SpringFox Swagger dependencies to the project application will fail to start… I hope the support for WebFlux will be available soon, but now we have to use Spring Cloud Netflix Zuul as a gateway, if we would like to run embedded Swagger2 on it.
I created module proxy-service that is an alternative API gateway based on Netflix Zuul to gateway-service based on Spring Cloud Gateway. Here’s a bean with SwaggerResourcesProvider implementation available inside proxy-service. It uses ZuulProperties bean to dynamically load routes definition into the bean.
@Configuration
public class ProxyApi {

	@Autowired
	ZuulProperties properties;

	@Primary
	@Bean
	public SwaggerResourcesProvider swaggerResourcesProvider() {
		return () -> {
			List resources = new ArrayList();
			properties.getRoutes().values().stream()
					.forEach(route -> resources.add(createResource(route.getServiceId(), route.getId(), "2.0")));
			return resources;
		};
	}

	private SwaggerResource createResource(String name, String location, String version) {
		SwaggerResource swaggerResource = new SwaggerResource();
		swaggerResource.setName(name);
		swaggerResource.setLocation("/" + location + "/v2/api-docs");
		swaggerResource.setSwaggerVersion(version);
		return swaggerResource;
	}

}
Here’s Swagger UI for our sample microservices system available under address http://localhost:8060/swagger-ui.html.
Step 7. Running applications
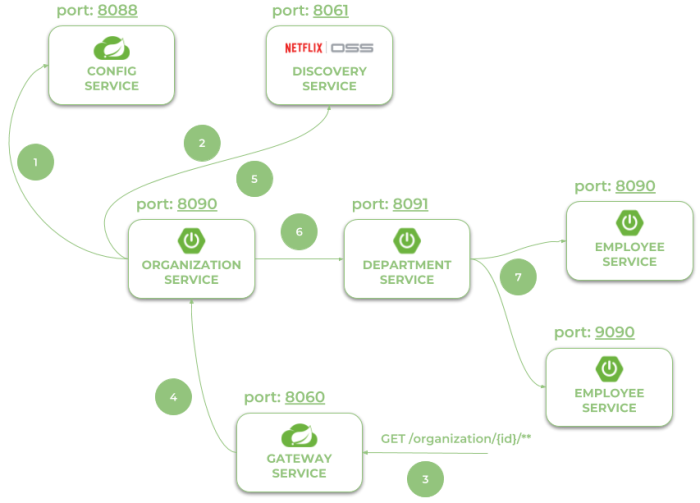
Let’s take a look on the architecture of our system visible on the following diagram. We will discuss it from the organization-service point of view. After starting organization-service connects to config-service available under address localhost:8088 (1). Basing on remote configuration settings it is able to register itself in Eureka (2). When the endpoint of organization-service is invoked by external client via gateway (3) available under address localhost:8060, the request is forwarded to instance of organization-service basing on entries from service discovery (4). Then organization-service lookup for address of department-service in Eureka (5), and call its endpoint (6). Finally department-service calls endpont from employee-service. The request as load balanced between two available instance of employee-service by Ribbon (7).
Let’s take a look on the Eureka Dashboard available under address http://localhost:8061. There are four instances of microservices registered there: a single instance of organization-service and department-service, and two instances of employee-service.

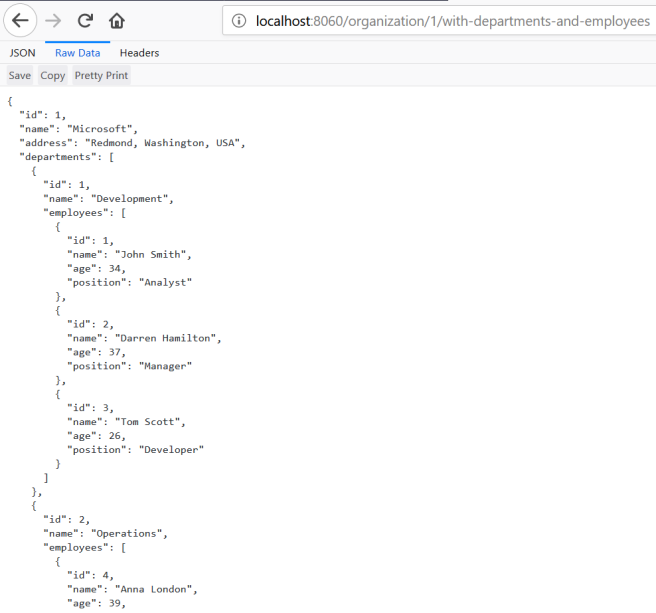
Now, let’s call endpoint http://localhost:8060/organization/1/with-departments-and-employees.
Step 8. Correlating logs between independent microservices using Spring Cloud Sleuth
Correlating logs between different microservice using Spring Cloud Sleuth is very easy. In fact, the only thing you have to do is to add starter spring-cloud-starter-sleuth to the dependencies of every single microservice and gateway.
<dependency>
	<groupId>org.springframework.cloud</groupId>
	<artifactId>spring-cloud-starter-sleuth</artifactId>
</dependency>
For clarification we will change default log format a little to: %d{yyyy-MM-dd HH:mm:ss} ${LOG_LEVEL_PATTERN:-%5p} %m%n. Here are the logs generated by our three sample miccroservices. There are four entries inside braces [] generated by Spring Cloud Stream. The most important for us is the second entry, which indicates on traceId, that is set once per incoming HTTP request on the edge of the system.


Deploying Spring Cloud Microservices on Hashicorp’s Nomad
Nomad is a little less popular HashiCorp’s cloud product than Consul, Terraform or Vault. It is also not as popular as a competitive software like Kubernetes and Docker Swarm. However, it has its advantages. While Kubernetes is specifically focused on Docker, Nomad is more general purpose. It supports containerized Docker applications as well as simple applications delivered as an executable JAR files. Besides that, Nomad is architecturally much simpler. It is a single binary, both for clients and servers, and does not require any services for coordination or storage.
In this article I’m going to show you how to install, configure and use Nomad in order to run on it some microservices created in Spring Boot and Spring Cloud frameworks. Let’s move on.
Step 1. Installing and running Nomad
HashiCorp’s Nomad can be easily started on Windows. You just have to download it from the following site https://www.nomadproject.io/downloads.html, and then add nomad.exe file to your PATH. Now you are able to run Nomad commands from your command-line. Let’s begin from starting Nomad agent. For simplicity, we will run it in development mode (-dev). With this option it is acting both as a client and a server. Here’s command that starts Nomad agent on my local machine.
nomad agent -dev -network-interface="WiFi" -consul-address=192.168.99.100:8500
Sometimes you could be required to pass selected network interface as a parameter. We also need to integrate agent node with Consul discovery for the purpose of inter-service communication discussed in the next part of this article. The most suitable way to run Consul on your local machine is through a Docker container. Here’s the command that launches single node Consul discovery server and exposes it on port 8500. If you run Docker on Windows it is probably available under address 192.168.99.100.
docker run -d --name consul -p 8500:8500 consul
Step 2. Creating job
Nomad is a tool for managing a cluster of machines and running applications on them. To run the application there we should first create job. Job is the primary configuration unit that users interact with when using Nomad. Job is a specification of tasks that should be ran by Nomad. The job consists of multiple groups, and each group may have multiple tasks.
There are some properties that has to be provided, for example datacenters. You should also set type parameter that indicates scheduler type. I set type service, which is designed for scheduling long lived services that should never go down, like an application exposing HTTP API.
Let’s take a look on Nomad’s job descriptor file. The most important elements of that configuration has been marked by the sequence numbers:
- Property
countspecifies the number of the task groups that should be running under this group. In practice it scales up number of instances of the service started by the task. Here, it has been set to2. - Property
driverspecifies the driver that should be used by Nomad clients to run the task. The driver name corresponds to a technology used for running the application. For example we can setdocker,rktfor containerization solutions orjavafor executing Java applications packaged into a Java JAR file. Here, the property has been set tojava. - After settings the driver we should provide some configuration for this driver in the job spec. There are some options available for
javadriver. But I decided to set the absolute path to the downloaded JAR and some JVM options related to the memory limits. - We may set some requirements for the task including memory, network, CPU, and more. Our task requires max 300 MB or RAM, and enables dynamic port allocation for the port labeled “http”.
- Now, it is required to point out very important thing. When the task is started, it is passed an additional environment variable named
NOMAD_HOST_PORT_httpwhich indicates the host port that the HTTP service is bound to. The suffixhttprelates to the label set for the port. - Property
serviceinside task specifies integrations with Consul for service discovery. Now, Nomad automatically registers a task with the provided name when a task is started and de-registers it when the task dies. As you probably remember, the port number is generated automatically by Nomad. However, I passed the label http to force Nomad to register in Consul with automatically generated port.
job "caller-service" {
	datacenters = ["dc1"]
	type = "service"
	group "caller" {
		count = 2 # (1)
		task "api" {
			driver = "java" # (2)
			config { # (3)
				jar_path    = "C:\\Users\\minkowp\\git\\sample-nomad-java-services\\caller-service\\target\\caller-service-1.0.0-SNAPSHOT.jar"
				jvm_options = ["-Xmx256m", "-Xms128m"]
			}
			resources { # (4)
				cpu    = 500
				memory = 300
				network {
					port "http" {} # (5)
				}
			}
			service { # (6)
				name = "caller-service"
				port = "http"
			}
		}
		restart {
			attempts = 1
		}
	}
}
Once we saved the content visible above as job.nomad file, we may apply it to the Nomad node by executing the following command.
nomad job run job.nomad
Step 3. Building sample microservices
Source code of sample applications is available on GitHub in my repository sample-nomad-java-services. There are two simple microservices callme-service and caller-service. I have already use that sample for in the previous articles for showing inter-service communication mechanism. Microservice callme-service does nothing more than exposing endpoint GET /callme/ping that displays service’s name and version.
@RestController
@RequestMapping("/callme")
public class CallmeController {

	private static final Logger LOGGER = LoggerFactory.getLogger(CallmeController.class);

	@Autowired
	BuildProperties buildProperties;

	@GetMapping("/ping")
	public String ping() {
		LOGGER.info("Ping: name={}, version={}", buildProperties.getName(), buildProperties.getVersion());
		return buildProperties.getName() + ":" + buildProperties.getVersion();
	}

}
Implementation of caller-service endpoint is a little bit more complicated. First we have to connect our service with Consul in order to fetch list of registered instances of callme-service. Because we use Spring Boot for creating sample microservices, the most suitable way to enable Consul client is through Spring Cloud Consul library.
<dependency>
	<groupId>org.springframework.cloud</groupId>
	<artifactId>spring-cloud-starter-consul-discovery</artifactId>
</dependency>
We should override auto-configured connection settings in application.yml. In addition to host and property we have also set spring.cloud.consul.discovery.register property to false. We don’t want discovery client to register application in Consul after startup, because it has been already performed by Nomad.
spring:
  application:
    name: caller-service
  cloud:
    consul:
      host: 192.168.99.100
      port: 8500
      discovery:
        register: false
Then we should enable Spring Cloud discovery client and RestTemplate load balancer in the main class of application.
@SpringBootApplication
@EnableDiscoveryClient
public class CallerApplication {

	public static void main(String[] args) {
		SpringApplication.run(CallerApplication.class, args);
	}

	@Bean
	@LoadBalanced
	RestTemplate restTemplate() {
		return new RestTemplate();
	}

}
Finally, we can implement method GET /caller/ping that call endpoint exposed by callme-service.
@RestController
@RequestMapping("/caller")
public class CallerController {
private static final Logger LOGGER = LoggerFactory.getLogger(CallerController.class);
@Autowired
BuildProperties buildProperties;
@Autowired
RestTemplate restTemplate;
@GetMapping("/ping")
public String ping() {
LOGGER.info("Ping: name={}, version={}", buildProperties.getName(), buildProperties.getVersion());
String response = restTemplate.getForObject("http://callme-service/callme/ping", String.class);
LOGGER.info("Calling: response={}", response);
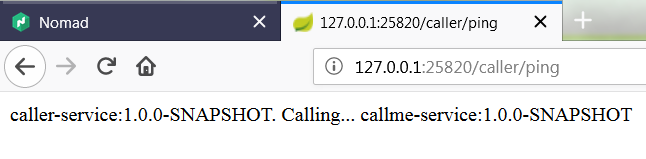
return buildProperties.getName() + ":" + buildProperties.getVersion() + ". Calling... " + response;
}
}
As you probably remember the port of application is automatically generated by Nomad during task execution. It passes an additional environment variable named NOMAD_HOST_PORT_http to the application. Now, this environment variable should be configured inside application.yml file as the value of server.port property.
server:
  port: ${NOMAD_HOST_PORT_http:8090}
The last step is to build the whole project sample-nomad-java-services with mvn clean install command.
Step 4. Using Nomad web console
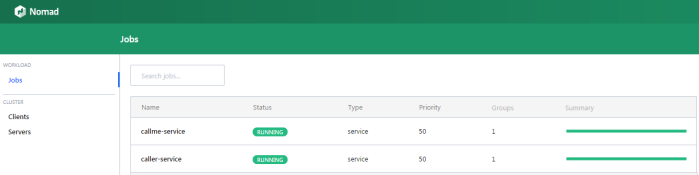
During two previous steps we have created, build and deployed our sample applications on Nomad. Now, we should verify the installation. We can do it using CLI or by visiting web console provided by nomad. Web console is available under address http://localhost:4646.
In the main site of web console we may see the summery of existing jobs. If everything goes fine field status is equal to RUNNING and bar Summary is green.
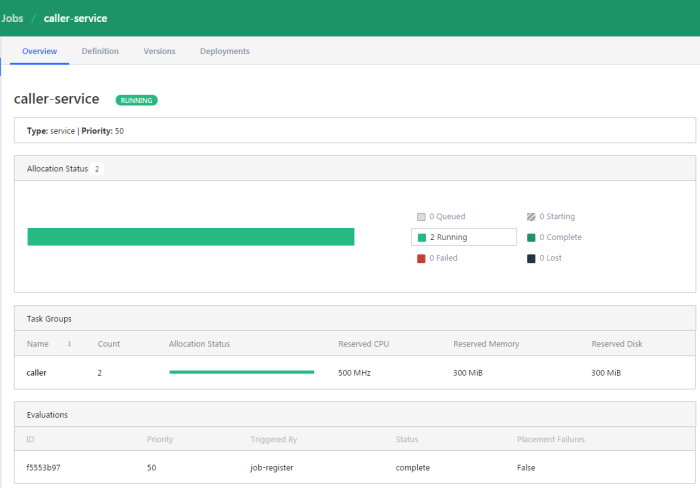
We can display the details of every job in the list. The next screen shows the history of the job, reserved resources and number of running instances (tasks).
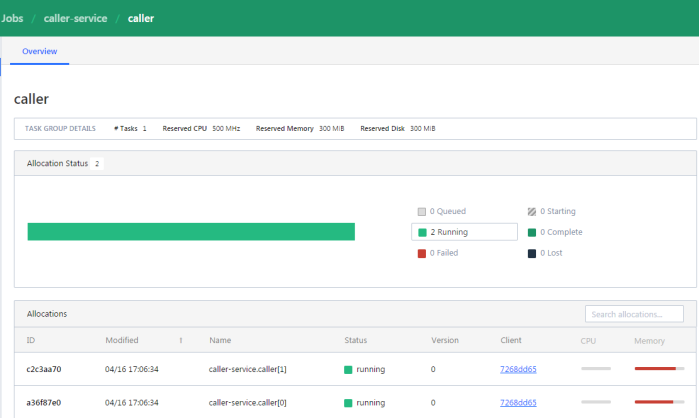
If you would like to check out the details related to the single task, you should navigate to Task Group details.
We may also display the details related to the client node.
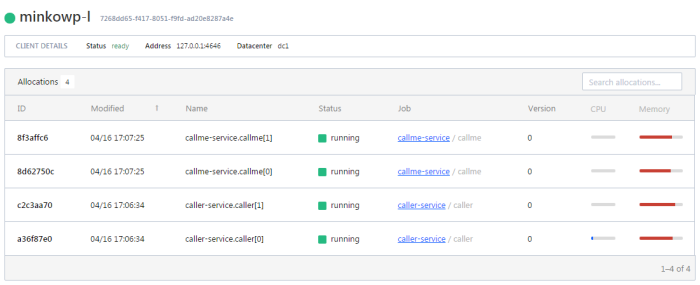
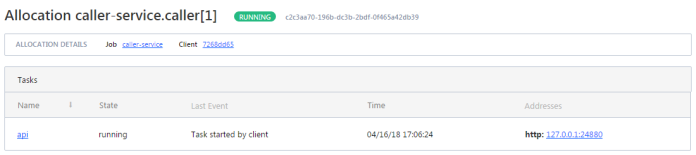
To display the details of allocation select the row in the table. You would be redirected to the following site. You may check out there an IP address of the application instance.
Step 5. Testing a sample system
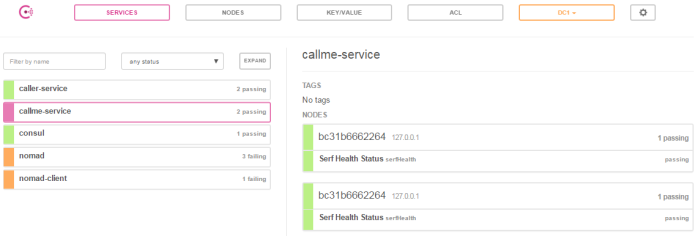
Assuming you have succesfully deployed the applications on Nomad you should see the following services registered in Consul.
Now, if you call one of two available instances of caller-service, you should see the following response. The address of callme-service instance has been succesfully fetched from Consul through Spring Cloud Consul Client.