Intro to Blockchain with Ethereum, Web3j and Spring Boot: Smart Contracts

I have already provided a quick introduction to building Spring Boot applications with Ethereum and web3j in one of my latest articles Introduction to Blockchain with Java using Ethereum, web3j and Spring Boot. That article has attracted much interest from you, so I decided to describe some more advanced aspects related to Ethereum and web3j. Today I’m going to show how you can implement Ethereum smart contracts in your application. First, let’s define what exactly is smart contract.

Smart contract is just a program that is executed on EVM (Ethereum Virtual Machine). Each contract contains a collection of code (functions) and data. It has an address in the Ethereum blockchain, can interact with other contracts, make decisions, store data, and send ether to others. Ethereum smart contracts are usually written in a language named Solidity, which is a statically typed high level language. Every contract needs to be compiled. After it you can generate source code for your application basing on the compiled binaries. Web3j library provides tools dedicated for that. Before we proceed to the source code let’s discuss an architecture of our sample system.

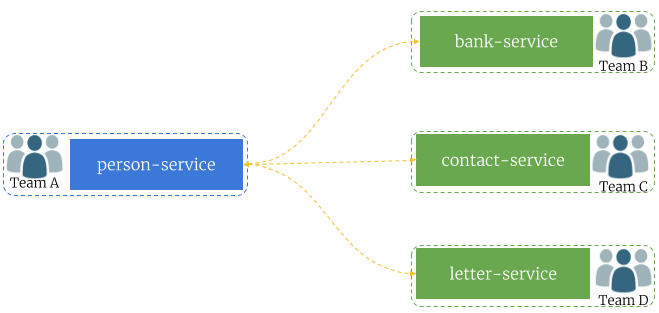
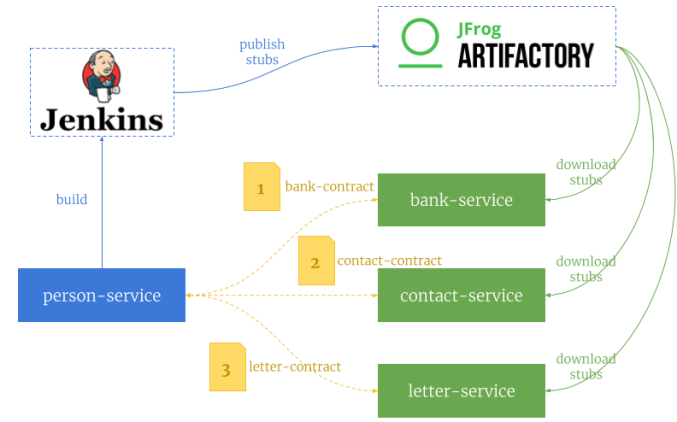
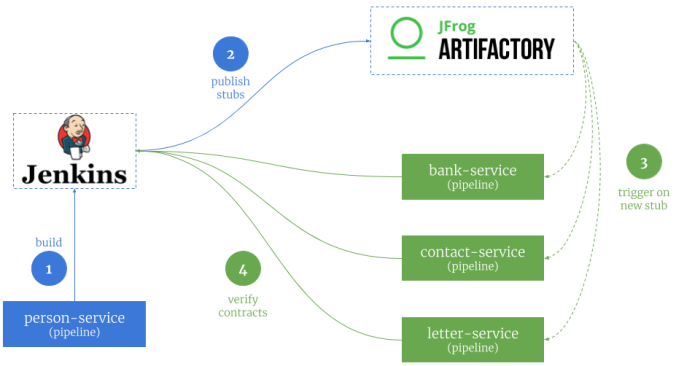
It consists of two independent applications contract-service and transaction-service. The most business logic is performed by contract-service application. It provides methods for creating smart wallets, deploying smart contracts on Ethereum and calling contract’s functions. Application transaction-service is responsible only for performing transaction between third-party and the owner of contract. It gets the owner’s account by calling endpoint exposed by contract-service. Application contract-service observing for transactions performed on the Ethereum node. If it is related to the contract owner’s account application calls function responsible for transferring funds to contract receiver’s account on all contracts signed by this owner. Here’s the diagram that illustrates process described above.

blockchain-contract

1. Building a smart contract with Solidity

The most popular tool for creating smart contracts in Ethereum is Solidity. Solidity is a contract-oriented, high-level language for implementing smart contracts. It was influenced by C++, Python and JavaScript and is designed to target the Ethereum Virtual Machine (EVM). It is statically typed, supports inheritance, libraries and complex user-defined types among other features. For more information about that language you should refer to Solidity documentation available on site http://solidity.readthedocs.io/.

Our main goal in this article is just to build a simple contract, compile it and generate required source code. That’s why I don’t want to go into the exact implementation details of contracts using Solidity. Here’s the implementation of contract responsible for counting a fee for incoming transaction. On the basis of this calculation it deposits funds on the transaction owner’s account and withdraws funds from sender’s account. This contract is signed between two users. Every one of them has it own smart wallet secured by their credentials. The understanding of this simple contract is very important, so let’s analyze it line after line.

Each contract is described by a percentage of transaction, which goes to receiver’s account (1) and receiver’s account address (2). Two first lines of contract declare variables for storing these parameters: fee of Solidity type uint, and receiver of type address. Both these values are initialized inside contract’s constructor (5). Parameter fee indicates the percentage fee of transaction, that is withdrawn from sender’s account and deposited on the receiver’s account. The line mapping (address => uint) public balances maps addresses of all balances to unsigned integers (3). We have also defines event Sent, which is emitted after every transaction within the contract (4). Function getReceiverBalance return the receiver’s account balance (6). Finally, there is a function sendTrx(...) that can be can be called by external client (7). It is responsible for performing withdrawal and deposit operations basing on the contract’s percentage fee and transaction amount. It requires a little more attention. First, it needs to have payable modifier to able to transfer funds between Ethereum accounts. After that, the transaction amount can be read from msg.value parameter. Then, we call function send on receiver address variable with given amount in Wei, and save this value on the contract’s balance. Additionally, we may sent an event that can be received by client application.

pragma solidity ^0.4.21;

contract TransactionFee {

    // (1)
    uint public fee;
    // (2)
    address public receiver;
    // (3)
    mapping (address => uint) public balances;
    // (4)
    event Sent(address from, address to, uint amount, bool sent);

    // (5)
    constructor(address _receiver, uint _fee) public {
        receiver = _receiver;
        fee = _fee;
    }

    // (6)
    function getReceiverBalance() public view returns(uint) {
        return receiver.balance;
    }

    // (7)
    function sendTrx() public payable {
        uint value = msg.value * fee / 100;
        bool sent = receiver.send(value);
        balances[receiver] += (value);
        emit Sent(msg.sender, receiver, value, sent);
    }

}

Once we have created a contract, we have to compile it and generate source code that can be use inside our application to deploy contract and call its functions. For just a quick check you can use Solidity compiler available online on site https://remix.ethereum.org.

2. Compiling contract and generating source code

Solidity provides up to date docker builds for their compiler. Released version are tagged with stable, while unstable changes from development branch are tagged with nightly. However, that Docker image contains only compiler executable file, so we would have to mount a persistent volume with input file with Solidity contract. Assuming that it is available under directory /home/docker on our Docker machine, we can compile it using the following command. This command creates two files: a binary .bin file, which is the smart contract code in a format the EVM can interpret, and an application binary interface .abi file, which defines the smart contract methods.

$ docker run --rm -v /home/docker:/build ethereum/solc:stable /build/TransactionFee.sol --bin --abi --optimize -o /build

The compilation output files are available under /build on the container, and are persisted inside /home/docker directory. The container is removed after compilation, because it is no needed now. We can generate source code from compiled contract using executable file provided together with Web3j library. It is available under directory ${WEB3J_HOME}/bin. When generating source code using Web3j we should pass location of .bin and .abi files, then set target package name and directory.

$ web3j solidity generate /build/transactionfee.bin /build/transactionfee.abi -p pl.piomin.services.contract.model -o src/main/java/

Web3j executable generates Java source file with Solidity contract name inside a given package. Here are the most important fragments of generated source file.

public class Transactionfee extends Contract {
    private static final String BINARY = "608060405234801561..."
    public static final String FUNC_GETRECEIVERBALANCE = "getReceiverBalance";
    public static final String FUNC_BALANCES = "balances";
    public static final String FUNC_SENDTRX = "sendTrx";
    public static final String FUNC_FEE = "fee";
    public static final String FUNC_RECEIVER = "receiver";

    // ...

    protected Transactionfee(String contractAddress, Web3j web3j, TransactionManager transactionManager, BigInteger gasPrice, BigInteger gasLimit) {
        super(BINARY, contractAddress, web3j, transactionManager, gasPrice, gasLimit);
    }

    public RemoteCall getReceiverBalance() {
        final Function function = new Function(FUNC_GETRECEIVERBALANCE,
                Arrays.asList(),
                Arrays.asList(new TypeReference() {}));
        return executeRemoteCallSingleValueReturn(function, BigInteger.class);
    }

    public RemoteCall balances(String param0) {
        final Function function = new Function(FUNC_BALANCES,
                Arrays.asList(new org.web3j.abi.datatypes.Address(param0)),
                Arrays.asList(new TypeReference() {}));
        return executeRemoteCallSingleValueReturn(function, BigInteger.class);
    }

    public RemoteCall sendTrx(BigInteger weiValue) {
        final Function function = new Function(
                FUNC_SENDTRX,
                Arrays.asList(),
                Collections.emptyList());
        return executeRemoteCallTransaction(function, weiValue);
    }

    public RemoteCall fee() {
        final Function function = new Function(FUNC_FEE,
                Arrays.asList(),
                Arrays.asList(new TypeReference() {}));
        return executeRemoteCallSingleValueReturn(function, BigInteger.class);
    }

    public RemoteCall receiver() {
        final Function function = new Function(FUNC_RECEIVER,
                Arrays.asList(),
                Arrays.<TypeReference>asList(new TypeReference
<Address>() {}));
        return executeRemoteCallSingleValueReturn(function, String.class);
    }

    public static RemoteCall deploy(Web3j web3j, Credentials credentials, BigInteger gasPrice, BigInteger gasLimit, String _receiver, BigInteger _fee) {
        String encodedConstructor = FunctionEncoder.encodeConstructor(Arrays.asList(new org.web3j.abi.datatypes.Address(_receiver),
                new org.web3j.abi.datatypes.generated.Uint256(_fee)));
        return deployRemoteCall(Transactionfee.class, web3j, credentials, gasPrice, gasLimit, BINARY, encodedConstructor);
    }

    public static RemoteCall deploy(Web3j web3j, TransactionManager transactionManager, BigInteger gasPrice, BigInteger gasLimit, String _receiver, BigInteger _fee) {
        String encodedConstructor = FunctionEncoder.encodeConstructor(Arrays.asList(new org.web3j.abi.datatypes.Address(_receiver),
                new org.web3j.abi.datatypes.generated.Uint256(_fee)));
        return deployRemoteCall(Transactionfee.class, web3j, transactionManager, gasPrice, gasLimit, BINARY, encodedConstructor);
    }

    // ...

    public Observable sentEventObservable(DefaultBlockParameter startBlock, DefaultBlockParameter endBlock) {
        EthFilter filter = new EthFilter(startBlock, endBlock, getContractAddress());
        filter.addSingleTopic(EventEncoder.encode(SENT_EVENT));
        return sentEventObservable(filter);
    }

    public static Transactionfee load(String contractAddress, Web3j web3j, Credentials credentials, BigInteger gasPrice, BigInteger gasLimit) {
        return new Transactionfee(contractAddress, web3j, credentials, gasPrice, gasLimit);
    }

    public static Transactionfee load(String contractAddress, Web3j web3j, TransactionManager transactionManager, BigInteger gasPrice, BigInteger gasLimit) {
        return new Transactionfee(contractAddress, web3j, transactionManager, gasPrice, gasLimit);
    }

    public static class SentEventResponse {
        public Log log;
        public String from;
        public String to;
        public BigInteger amount;
        public Boolean sent;
    }
}

3. Deploying contract

Once we have successfully generated Java object representing contract inside our application we may proceed to the application development. We will begin from contract-service. First, we will create smart wallet with credentials with sufficient funds for signing contracts as an owner. The following fragment of code is responsible for that, and is invoked just after application boot. You can also see here an implementation of HTTP GET method responsible for returning owner account address.

@PostConstruct
public void init() throws IOException, CipherException, NoSuchAlgorithmException, NoSuchProviderException, InvalidAlgorithmParameterException {
	String file = WalletUtils.generateLightNewWalletFile("piot123", null);
	credentials = WalletUtils.loadCredentials("piot123", file);
	LOGGER.info("Credentials created: file={}, address={}", file, credentials.getAddress());
	EthCoinbase coinbase = web3j.ethCoinbase().send();
	EthGetTransactionCount transactionCount = web3j.ethGetTransactionCount(coinbase.getAddress(), DefaultBlockParameterName.LATEST).send();
	Transaction transaction = Transaction.createEtherTransaction(coinbase.getAddress(), transactionCount.getTransactionCount(), BigInteger.valueOf(20_000_000_000L), BigInteger.valueOf(21_000), credentials.getAddress(),BigInteger.valueOf(25_000_000_000_000_000L));
	web3j.ethSendTransaction(transaction).send();
	EthGetBalance balance = web3j.ethGetBalance(credentials.getAddress(), DefaultBlockParameterName.LATEST).send();
	LOGGER.info("Balance: {}", balance.getBalance().longValue());
}

@GetMapping("/owner")
public String getOwnerAccount() {
	return credentials.getAddress();
}

Application contract-service exposes some endpoints that can be called by an external client or the second application in our sample system – transaction-service. The following implementation of POST /contract method performs two actions. First, it creates a new smart wallet with credentials. Then it uses those credentials to sign a smart contract with the address defined in the previous step. To sign a new contract you have to call method deploy from class generated from Solidity definition – Transactionfee. It is responsible for deploying a new instance of contract on the Ethereum node.

private List contracts = new ArrayList();

@PostMapping
public Contract createContract(@RequestBody Contract newContract) throws Exception {
	String file = WalletUtils.generateLightNewWalletFile("piot123", null);
	Credentials receiverCredentials = WalletUtils.loadCredentials("piot123", file);
	LOGGER.info("Credentials created: file={}, address={}", file, credentials.getAddress());
	Transactionfee2 contract = Transactionfee2.deploy(web3j, credentials, GAS_PRICE, GAS_LIMIT, receiverCredentials.getAddress(), BigInteger.valueOf(newContract.getFee())).send();
	newContract.setReceiver(receiverCredentials.getAddress());
	newContract.setAddress(contract.getContractAddress());
	contracts.add(contract.getContractAddress());
	LOGGER.info("New contract deployed: address={}", contract.getContractAddress());
	Optional tr = contract.getTransactionReceipt();
	if (tr.isPresent()) {
		LOGGER.info("Transaction receipt: from={}, to={}, gas={}", tr.get().getFrom(), tr.get().getTo(), tr.get().getGasUsed().intValue());
	}
	return newContract;
}

Every contract deployed on Ethereum has its own unique address. The unique address of every created contract is stored by the application. Then the application is able to load all existing contracts using those addresses. The following method is responsible for executing method sentTrx on the selected contract.

public void processContracts(long transactionAmount) {
	contracts.forEach(it -> {
		Transactionfee contract = Transactionfee.load(it, web3j, credentials, GAS_PRICE, GAS_LIMIT);
		try {
			TransactionReceipt tr = contract.sendTrx(BigInteger.valueOf(transactionAmount)).send();
			LOGGER.info("Transaction receipt: from={}, to={}, gas={}", tr.getFrom(), tr.getTo(), tr.getGasUsed().intValue());
			LOGGER.info("Get receiver: {}", contract.getReceiverBalance().send().longValue());
			EthFilter filter = new EthFilter(DefaultBlockParameterName.EARLIEST, DefaultBlockParameterName.LATEST, contract.getContractAddress());
			web3j.ethLogObservable(filter).subscribe(log -> {
				LOGGER.info("Log: {}", log.getData());
			});
		} catch (Exception e) {
			LOGGER.error("Error during contract execution", e);
		}
	});
}

Application contract-service listens for transactions incoming to Ethereum node, that has been send by transaction-service. If target account of transaction is equal to contracts owner account a given transaction is processed.

@Autowired
Web3j web3j;
@Autowired
ContractService service;

@PostConstruct
public void listen() {
	web3j.transactionObservable().subscribe(tx -> {
		if (tx.getTo() != null && tx.getTo().equals(service.getOwnerAccount())) {
			LOGGER.info("New tx: id={}, block={}, from={}, to={}, value={}", tx.getHash(), tx.getBlockHash(), tx.getFrom(), tx.getTo(), tx.getValue().intValue());
			service.processContracts(tx.getValue().longValue());
		} else {
			LOGGER.info("Not matched: id={}, to={}", tx.getHash(), tx.getTo());
		}
	});
}

Here’s the source code from transaction-service responsible for transfer funds from third-party account to contracts owner account.

@Value("${contract-service.url}")
String url;
@Autowired
Web3j web3j;
@Autowired
RestTemplate template;
Credentials credentials;

@PostMapping
public String performTransaction(@RequestBody TransactionRequest request) throws Exception {
	EthAccounts accounts = web3j.ethAccounts().send();
	String owner = template.getForObject(url, String.class);
	EthGetTransactionCount transactionCount = web3j.ethGetTransactionCount(accounts.getAccounts().get(request.getFromId()), DefaultBlockParameterName.LATEST).send();
	Transaction transaction = Transaction.createEtherTransaction(accounts.getAccounts().get(request.getFromId()), transactionCount.getTransactionCount(), GAS_PRICE, GAS_LIMIT, owner, BigInteger.valueOf(request.getAmount()));
	EthSendTransaction response = web3j.ethSendTransaction(transaction).send();
	if (response.getError() != null) {
		LOGGER.error("Transaction error: {}", response.getError().getMessage());
		return "ERR";
	}
	LOGGER.info("Transaction: {}", response.getResult());
	EthGetTransactionReceipt receipt = web3j.ethGetTransactionReceipt(response.getTransactionHash()).send();
	if (receipt.getTransactionReceipt().isPresent()) {
		TransactionReceipt r = receipt.getTransactionReceipt().get();
		LOGGER.info("Tx receipt: from={}, to={}, gas={}, cumulativeGas={}", r.getFrom(), r.getTo(), r.getGasUsed().intValue(), r.getCumulativeGasUsed().intValue());
	}
	EthGetBalance balance = web3j.ethGetBalance(accounts.getAccounts().get(request.getFromId()), DefaultBlockParameterName.LATEST).send();
	LOGGER.info("Balance: address={}, amount={}", accounts.getAccounts().get(request.getFromId()), balance.getBalance().longValue());
	balance = web3j.ethGetBalance(owner, DefaultBlockParameterName.LATEST).send();
	LOGGER.info("Balance: address={}, amount={}", owner, balance.getBalance().longValue());
	return response.getTransactionHash();
}

4. Test scenario

To run test scenario we need to have launched:

  • Ethereum node in development on Docker container
  • Ethereum Geth console client on Docker container
  • Instance of contact-service application, by default available on port 8090
  • Instance of transaction-service application, by default available on port 8091

Instruction how to run Ethereum node and Geth client using Docker container is available in my previous article about blockchain Introduction to Blockchain with Java using Ethereum, web3j and Spring Boot.

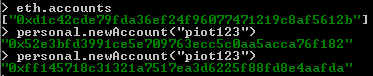
Before starting sample applications we should create at least one test account on Ethereum node. To achieve it we have to execute personal.newAccount Geth command as shown below.

blockchain-contract-1

After startup application transaction-service transfer some funds from coinbase account to all other existing accounts.

blockchain-contract-2

The next step is to create some contracts using owner account created automatically by contract-service on startup. You should call POST /contract method with fee parameter, that specifies percentage of transaction amount transfer from contract owner’s account to contract receiver’s account. Using the following command I have deployed two contracts with 10% and 5%. It means that 10% and 5% of each transaction sent to owner’s account by third-party user is transferred to the accounts generated by POST method. The address of account created by the POST method is returned in the response in the receiver field.

curl -X POST -H "Content-Type: application/json" -d '{"fee":10}' http://localhost:8090/contract
{"fee": 10,"receiver": "0x864ef9931c2690efcc6a773760237c4b09f40e65","address": "0xa6205a746ae0858fa22d6451b794cc977faa507c"}
curl -X POST -H "Content-Type: application/json" -d '{"fee":5}' http://localhost:8090/contract
{"fee": 5,"receiver": "0x098898594d7acd1481324af779e431ab87a3155d","address": "0x9c64d6b0fc01ee055e114a528fb5ad853843cde3"}

If contracts have been successfully deployed the last thing to do is to send a transaction by calling endpoint POST /transaction exposed by transaction-service. The owner account is automatically retrieved from contract-service. You have to set the transaction amount and source account index (means eth.accounts[index]).

curl -X POST -H "Content-Type: application/json" -d '{"amount":1000000,"fromId":1}' http://localhost:8090/transaction

Ok, that’s finally it. Now, the transaction is received by contract-service, which executes function sendTrx(...) on all defined contracts. As a result 10% and 5% of that transaction amount goes to contract receivers.

blockchain-contract-3

Sample applications source code is available in repository sample-spring-blockchain-contract (https://github.com/piomin/sample-spring-blockchain-contract.git). Enjoy! 🙂


Spring REST Docs versus SpringFox Swagger for API documentation

Recently, I have come across some articles and mentions about Spring REST Docs, where it has been present as a better alternative to traditional Swagger docs. Until now, I was always using Swagger for building API documentation, so I decided to try Spring REST Docs. You may even read on the main page of that Spring project (https://spring.io/projects/spring-restdocs) some references to Swagger, for example: “This approach frees you from the limitations of the documentation produced by tools like Swagger”. Are you interested in building API documentation using Spring REST Docs? Let’s take a closer look on that project!

A first difference in comparison to Swagger is a test-driven approach to generating API documentation. Thanks to that Spring REST Docs ensures that the documentation is always generated accurately matches the actual behavior of the API. When using Swagger SpringFox library you just need to enable it for the project and provide some configuration to force it work following your expectations. I have already described usage of Swagger 2 for automated build API documentation for Spring Boot based application in my two previous articles:

The articles mentioned above describe in the details how to use SpringFox Swagger in your Spring Boot application to automatically generate API documentation basing on the source code. Here I’ll give you only a short introduction to that technology, to easily find out differences between usage of Swagger2 and Spring REST Docs.

1. Using Swagger2 with Spring Boot

To enable SpringFox library for your application you need to include the following dependencies to pom.xml.

<dependency>
    <groupId>io.springfox</groupId>
    <artifactId>springfox-swagger2</artifactId>
    <version>2.9.2</version>
</dependency>
<dependency>
    <groupId>io.springfox</groupId>
    <artifactId>springfox-swagger-ui</artifactId>
    <version>2.9.2</version>
</dependency>

Then you should annotate the main or configuration class with @EnableSwagger2. You can also customize the behaviour of SpringFox library by declaring Docket bean.

@Bean
public Docket swaggerEmployeeApi() {
	return new Docket(DocumentationType.SWAGGER_2)
		.select()
			.apis(RequestHandlerSelectors.basePackage("pl.piomin.services.employee.controller"))
			.paths(PathSelectors.any())
		.build()
		.apiInfo(new ApiInfoBuilder().version("1.0").title("Employee API").description("Documentation Employee API v1.0").build());
}

Now, after running the application the documentation is available under context path /v2/api-docs. You can also display it in your web browser using Swagger UI available at site /swagger-ui.html.

spring-cloud-3
It looks easy? Let’s see how to do this with Spring REST Docs.

2. Using Asciidoctor with Spring Boot

There are some other differences between Spring REST Docs and SpringFox Swagger. By default, Spring REST Docs uses Asciidoctor. Asciidoctor processes plain text and produces HTML, styled and layed out to suit your needs. If you prefer, Spring REST Docs can also be configured to use Markdown. This really distinguished it from Swagger, which uses its own notation called OpenAPI Specification.
Spring REST Docs makes use of snippets produced by tests written with Spring MVC’s test framework, Spring WebFlux’s WebTestClient or REST Assured 3. I’ll show you an example based on Spring MVC.
I suggest you begin from creating base Asciidoc file. It should be placed in src/main/asciidoc directory in your application source code. I don’t know if you are familiar with Asciidoctor notation, but it is really intuitive. The sample visible below shows two important things. First we’ll display the version of the project taken from pom.xml. Then we’ll include the snippets generated during JUnit tests by declaring macro called operation containing document name and list of snippets. We can choose between such snippets like curl-request, http-request, http-response, httpie-request, links, request-body, request-fields, response-body, response-fields or path-parameters. The document name is determined by name of the test method in our JUnit test class.

= RESTful Employee API Specification
{project-version}
:doctype: book

== Add a new person

A `POST` request is used to add a new person

operation::add-person[snippets='http-request,request-fields,http-response']

== Find a person by id

A `GET` request is used to find a new person by id

operation::find-person-by-id[snippets='http-request,path-parameters,http-response,response-fields']

The source code fragment with Asciidoc natation is just a template. We would like to generate HTML file, which prettily displays all our automatically generated staff. To achieve it we should enable plugin asciidoctor-maven-plugin in the project’s pom.xml. In order to display Maven project version we need to pass it to the Asciidoc plugin configuration attributes. We also need to spring-restdocs-asciidoctor dependency to that plugin.

<plugin>
	<groupId>org.asciidoctor</groupId>
	<artifactId>asciidoctor-maven-plugin</artifactId>
	<version>1.5.6</version>
	<executions>
		<execution>
			<id>generate-docs</id>
			<phase>prepare-package</phase>
			<goals>
				<goal>process-asciidoc</goal>
			</goals>
			<configuration>
				<backend>html</backend>
				<doctype>book</doctype>
				<attributes>
					<project-version>${project.version}</project-version>
				</attributes>
			</configuration>
		</execution>
	</executions>
	<dependencies>
		<dependency>
			<groupId>org.springframework.restdocs</groupId>
			<artifactId>spring-restdocs-asciidoctor</artifactId>
			<version>2.0.0.RELEASE</version>
		</dependency>
	</dependencies>
</plugin>

Ok, the documentation is automatically generated during Maven build from our api.adoc file located inside src/main/asciidoc directory. But we still need to develop JUnit API tests that automatically generate required snippets. Let’s do that in the next step.

3. Generating snippets for Spring MVC

First, we should enable Spring REST Docs for our project. To achieve it we have to include the following dependency.

<dependency>
	<groupId>org.springframework.restdocs</groupId>
	<artifactId>spring-restdocs-mockmvc</artifactId>
	<scope>test</scope>
</dependency>

Now, all we need to do is to implement JUnit tests. Spring Boot provides an @AutoConfigureRestDocs annotation that allows you to leverage Spring REST Docs in your tests.
In fact, we need to prepare standard Spring MVC test using MockMvc bean. I also mocked some methods implemented by EmployeeRepository. Then, I used some static methods provided by Spring REST Docs with support for generating documentation of request and response payloads. First of those method is document("{method-name}/",...), which is responsible for generating snippets under directory target/generated-snippets/{method-name}, where method name is the name of the test method formatted using kebab-case. I have described all the JSON fields in the requests using requestFields(...) and responseFields(...) methods.

@RunWith(SpringRunner.class)
@WebMvcTest(EmployeeController.class)
@AutoConfigureRestDocs
public class EmployeeControllerTest {

	@MockBean
	EmployeeRepository repository;
	@Autowired
	MockMvc mockMvc;
	
	private ObjectMapper mapper = new ObjectMapper();

	@Before
	public void setUp() {
		Employee e = new Employee(1L, 1L, "John Smith", 33, "Developer");
		e.setId(1L);
		when(repository.add(Mockito.any(Employee.class))).thenReturn(e);
		when(repository.findById(1L)).thenReturn(e);
	}

	@Test
	public void addPerson() throws JsonProcessingException, Exception {
		Employee employee = new Employee(1L, 1L, "John Smith", 33, "Developer");
		mockMvc.perform(post("/").contentType(MediaType.APPLICATION_JSON).content(mapper.writeValueAsString(employee)))
			.andExpect(status().isOk())
			.andDo(document("{method-name}/", requestFields(
				fieldWithPath("id").description("Employee id").ignored(),
				fieldWithPath("organizationId").description("Employee's organization id"),
				fieldWithPath("departmentId").description("Employee's department id"),
				fieldWithPath("name").description("Employee's name"),
				fieldWithPath("age").description("Employee's age"),
				fieldWithPath("position").description("Employee's position inside organization")
			)));
	}
	
	@Test
	public void findPersonById() throws JsonProcessingException, Exception {
		this.mockMvc.perform(get("/{id}", 1).accept(MediaType.APPLICATION_JSON))
			.andExpect(status().isOk())
			.andDo(document("{method-name}/", responseFields(
				fieldWithPath("id").description("Employee id"),
				fieldWithPath("organizationId").description("Employee's organization id"),
				fieldWithPath("departmentId").description("Employee's department id"),
				fieldWithPath("name").description("Employee's name"),
				fieldWithPath("age").description("Employee's age"),
				fieldWithPath("position").description("Employee's position inside organization")
			), pathParameters(parameterWithName("id").description("Employee id"))));
	}

}

If you would like to customize some settings of Spring REST Docs you should provide @TestConfiguration class inside JUnit test class. In the following code fragment you may see an example of such customization. I overridden default snippets output directory from index to test method-specific name, and force generation of sample request and responses using prettyPrint option (single parameter in the separated line).

@TestConfiguration
static class CustomizationConfiguration implements RestDocsMockMvcConfigurationCustomizer {

	@Override
	public void customize(MockMvcRestDocumentationConfigurer configurer) {
		configurer.operationPreprocessors()
			.withRequestDefaults(prettyPrint())
			.withResponseDefaults(prettyPrint());
	}
	
	@Bean
	public RestDocumentationResultHandler restDocumentation() {
		return MockMvcRestDocumentation.document("{method-name}");
	}
}

Now, if you execute mvn clean install on your project you should see the following structure inside your output directory.
rest-api-docs-3

4. Viewing and publishing API docs

Once we have successfully built our project, the documentation has been generated. We can display HTML file available at target/generated-docs/api.html. It provides the full documentation of our API.

rest-api-docs-1
And the next part…

rest-api-docs-2
You may also want to publish it inside your application fat JAR file. If you configure maven-resources-plugin following example vibisle below it would be available under /static/docs directory inside JAR.

<plugin>
	<artifactId>maven-resources-plugin</artifactId>
	<executions>
		<execution>
			<id>copy-resources</id>
			<phase>prepare-package</phase>
			<goals>
				<goal>copy-resources</goal>
			</goals>
			<configuration>
				<outputDirectory>
					${project.build.outputDirectory}/static/docs
				</outputDirectory>
				<resources>
					<resource>
						<directory>
							${project.build.directory}/generated-docs
						</directory>
					</resource>
				</resources>
			</configuration>
		</execution>
	</executions>
</plugin>

Conclusion

That’s all what I wanted to show in this article. The sample service generating documentation using Spring REST Docs is available on GitHub under repository https://github.com/piomin/sample-spring-microservices-new/tree/rest-api-docs/employee-service. I’m not sure that Swagger and Spring REST Docs should be treated as a competitive solutions. I use Swagger for simple testing an API on the running application or exposing specification that can be used for automated generation of a client code. Spring REST Docs is rather used for generating documentation that can be published somewhere, and “is accurate, concise, and well-structured. This documentation then allows your users to get the information they need with a minimum of fuss”. I think there is no obstacle to use Spring REST Docs and SpringFox Swagger together in your project in order to provide the most valuable documentation of API exposed by the application.

Continuous Integration with Jenkins, Artifactory and Spring Cloud Contract

Consumer Driven Contract (CDC) testing is one of the method that allows you to verify integration between applications within your system. The number of such interactions may be really large especially if you maintain microservices-based architecture. Assuming that every microservice is developed by different teams or sometimes even different vendors, it is important to automate the whole testing process. As usual, we can use Jenkins server for running contract tests within our Continuous Integration (CI) process.

The sample scenario has been visualized on the picture below. We have one application (person-service) that exposes API leveraged by three different applications. Each application is implementing by a different development team. Consequently, every application is stored in the separated Git repository and has dedicated pipeline in Jenkins for building, testing and deploying.

contracts-3 (1)

The source code of sample applications is available on GitHub in the repository sample-spring-cloud-contract-ci (https://github.com/piomin/sample-spring-cloud-contract-ci.git). I placed all the sample microservices in the single Git repository only for our demo simplification. We will still treat them as a separated microservices, developed and built independently.

In this article I used Spring Cloud Contract for CDC implementation. It is the first choice solution for JVM applications written in Spring Boot. Contracts can be defined using Groovy or YAML notation. After building on the producer side Spring Cloud Contract generate special JAR file with stubs suffix, that contains all defined contracts and JSON mappings. Such a JAR file can be build on Jenkins and then published on Artifactory. Contract consumer also use the same Artifactory server, so they can use the latest version of stubs file. Because every application expects different response from person-service, we have to define three different contracts between person-service and a target consumer.

contracts-1

Let’s analyze the sample scenario. Assuming we have performed some changes in the API exposed by person-service and we have modified contracts on the producer side, we would like to publish them on shared server. First, we need to verify contracts against producer (1), and in case of success publish artifact with stubs to Artifactory (2). All the pipelines defined for applications that use this contract are able to trigger the build on a new version of JAR file with stubs (3). Then, the newest version contract is verifying against consumer (4). If contract testing fails, pipeline is able to notify the responsible team about this failure.

contracts-2

1. Pre-requirements

Before implementing and running any sample we need to prepare our environment. We need to launch Jenkins and Artifactory servers on the local machine. The most suitable way for this is through a Docker containers. Here are the commands required for run these containers.

$ docker run --name artifactory -d -p 8081:8081 docker.bintray.io/jfrog/artifactory-oss:latest
$ docker run --name jenkins -d -p 8080:8080 -p 50000:50000 jenkins/jenkins:lts

I don’t know if you are familiar with such tools like Artifactory and Jenkins. But after starting them we need to configure some things. First you need to initialize Maven repositories for Artifactory. You will be prompt for that just after a first launch. It also automatically add one remote repository: JCenter Bintray (https://bintray.com/bintray/jcenter), which is enough for our build. Jenkins also comes with default set of plugins, which you can install just after first launch (Install suggested plugins). For this demo, you will also have to install plugin for integration with Artifactory (https://wiki.jenkins.io/display/JENKINS/Artifactory+Plugin). If you need more details about Jenkins and Artifactory configuration you can refer to my older article How to setup Continuous Delivery environment.

2. Building contracts

We are beginning contract definition from the producer side application. Producer exposes only one GET /persons/{id} method that returns Person object. Here are the fields contained by Person class.

public class Person {

	private Integer id;
	private String firstName;
	private String lastName;
	@JsonFormat(pattern = "yyyy-MM-dd")
	private Date birthDate;
	private Gender gender;
	private Contact contact;
	private Address address;
	private String accountNo;

	// ...
}

The following picture illustrates, which fields of Person object are used by consumers. As you see, some of the fields are shared between consumers, while some other are required only by single consuming application.

contracts-4

Now we can take a look on contract definition between person-service and bank-service.

import org.springframework.cloud.contract.spec.Contract

Contract.make {
	request {
		method 'GET'
		urlPath('/persons/1')
	}
	response {
		status OK()
		body([
			id: 1,
			firstName: 'Piotr',
			lastName: 'Minkowski',
			gender: $(regex('(MALE|FEMALE)')),
			contact: ([
				email: $(regex(email())),
				phoneNo: $(regex('[0-9]{9}$'))
			])
		])
		headers {
			contentType(applicationJson())
		}
	}
}

For comparison, here’s definition of contract between person-service and letter-service.

import org.springframework.cloud.contract.spec.Contract

Contract.make {
	request {
		method 'GET'
		urlPath('/persons/1')
	}
	response {
		status OK()
		body([
			id: 1,
			firstName: 'Piotr',
			lastName: 'Minkowski',
			address: ([
				city: $(regex(alphaNumeric())),
				country: $(regex(alphaNumeric())),
				postalCode: $(regex('[0-9]{2}-[0-9]{3}')),
				houseNo: $(regex(positiveInt())),
				street: $(regex(nonEmpty()))
			])
		])
		headers {
			contentType(applicationJson())
		}
	}
}

3. Implementing tests on the producer side

Ok, we have three different contracts assigned to the single endpoint exposed by person-service. We need to publish them in such a way to that they are easily available for consumers. In that case Spring Cloud Contract comes with a handy solution. We may define contracts with different response for the same request, and than choose the appropriate definition on the consumer side. All those contract definitions will be published within the same JAR file. Because we have three consumers we define three different contracts placed in directories bank-consumer, contact-consumer and letter-consumer.

contracts-5

All the contracts will use a single base test class. To achieve it we need to provide a fully qualified name of that class for Spring Cloud Contract Verifier plugin in pom.xml.

<plugin>
	<groupId>org.springframework.cloud</groupId>
	<artifactId>spring-cloud-contract-maven-plugin</artifactId>
	<extensions>true</extensions>
	<configuration>
		<baseClassForTests>pl.piomin.services.person.BasePersonContractTest</baseClassForTests>
	</configuration>
</plugin>

Here’s the full definition of base class for our contract tests. We will mock the repository bean with the answer matching to the rules created inside contract files.

@RunWith(SpringRunner.class)
@SpringBootTest(webEnvironment = WebEnvironment.DEFINED_PORT)
public abstract class BasePersonContractTest {

	@Autowired
	WebApplicationContext context;
	@MockBean
	PersonRepository repository;
	
	@Before
	public void setup() {
		RestAssuredMockMvc.webAppContextSetup(this.context);
		PersonBuilder builder = new PersonBuilder()
			.withId(1)
			.withFirstName("Piotr")
			.withLastName("Minkowski")
			.withBirthDate(new Date())
			.withAccountNo("1234567890")
			.withGender(Gender.MALE)
			.withPhoneNo("500070935")
			.withCity("Warsaw")
			.withCountry("Poland")
			.withHouseNo(200)
			.withStreet("Al. Jerozolimskie")
			.withEmail("piotr.minkowski@gmail.com")
			.withPostalCode("02-660");
		when(repository.findById(1)).thenReturn(builder.build());
	}
	
}

Spring Cloud Contract Maven plugin visible above is responsible for generating stubs from contract definitions. It is executed during Maven build after running mvn clean install command. The build is performed on Jenkins CI. Jenkins pipeline is responsible for updating remote Git repository, build binaries from source code, running automated tests and finally publishing JAR file containing stubs on a remote artifact repository – Artifactory. Here’s Jenkins pipeline created for the contract producer side (person-service).

node {
  withMaven(maven:'M3') {
    stage('Checkout') {
      git url: 'https://github.com/piomin/sample-spring-cloud-contract-ci.git', credentialsId: 'piomin-github', branch: 'master'
    }
    stage('Publish') {
      def server = Artifactory.server 'artifactory'
      def rtMaven = Artifactory.newMavenBuild()
      rtMaven.tool = 'M3'
      rtMaven.resolver server: server, releaseRepo: 'libs-release', snapshotRepo: 'libs-snapshot'
      rtMaven.deployer server: server, releaseRepo: 'libs-release-local', snapshotRepo: 'libs-snapshot-local'
      rtMaven.deployer.artifactDeploymentPatterns.addInclude("*stubs*")
      def buildInfo = rtMaven.run pom: 'person-service/pom.xml', goals: 'clean install'
      rtMaven.deployer.deployArtifacts buildInfo
      server.publishBuildInfo buildInfo
    }
  }
}

We also need to include dependency spring-cloud-starter-contract-verifier to the producer app to enable Spring Cloud Contract Verifier.

<dependency>
	<groupId>org.springframework.cloud</groupId>
	<artifactId>spring-cloud-starter-contract-verifier</artifactId>
	<scope>test</scope>
</dependency>

4. Implementing tests on the consumer side

To enable Spring Cloud Contract on the consumer side we need to include artifact spring-cloud-starter-contract-stub-runner to the project dependencies.

<dependency>
	<groupId>org.springframework.cloud</groupId>
	<artifactId>spring-cloud-starter-contract-stub-runner</artifactId>
	<scope>test</scope>
</dependency>

Then, the only thing left is to build JUnit test, which verifies our contract by calling it through OpenFeign client. The configuration of that test is provided inside annotation @AutoConfigureStubRunner. We select the latest version of person-service stubs artifact by setting + in the version section of ids parameter. Because, we have multiple contracts defined inside person-service we need to choose the right for current service by setting consumer-name parameter. All the contract definitions are downloaded from Artifactory server, so we set stubsMode parameter to REMOTE. The address of Artifactory server has to be set using repositoryRoot property.

@RunWith(SpringRunner.class)
@SpringBootTest(webEnvironment = WebEnvironment.NONE)
@AutoConfigureStubRunner(ids = {"pl.piomin.services:person-service:+:stubs:8090"}, consumerName = "letter-consumer",  stubsPerConsumer = true, stubsMode = StubsMode.REMOTE, repositoryRoot = "http://192.168.99.100:8081/artifactory/libs-snapshot-local")
@DirtiesContext
public class PersonConsumerContractTest {

	@Autowired
	private PersonClient personClient;
	
	@Test
	public void verifyPerson() {
		Person p = personClient.findPersonById(1);
		Assert.assertNotNull(p);
		Assert.assertEquals(1, p.getId().intValue());
		Assert.assertNotNull(p.getFirstName());
		Assert.assertNotNull(p.getLastName());
		Assert.assertNotNull(p.getAddress());
		Assert.assertNotNull(p.getAddress().getCity());
		Assert.assertNotNull(p.getAddress().getCountry());
		Assert.assertNotNull(p.getAddress().getPostalCode());
		Assert.assertNotNull(p.getAddress().getStreet());
		Assert.assertNotEquals(0, p.getAddress().getHouseNo());
	}
	
}

Here’s Feign client implementation responsible for calling endpoint exposed by person-service

@FeignClient("person-service")
public interface PersonClient {

	@GetMapping("/persons/{id}")
	Person findPersonById(@PathVariable("id") Integer id);
	
}

5. Setup of Continuous Integration process

Ok, we have already defined all the contracts required for our exercise. We have also build a pipeline responsible for building and publishing stubs with contracts on the producer side (person-service). It always publish the newest version of stubs generated from source code. Now, our goal is to launch pipelines defined for three consumer applications, each time when new stubs would be published to Artifactory server by producer pipeline.
The best solution for that would be to trigger a Jenkins build when you deploy an artifact. To achieve it we use Jenkins plugin called URLTrigger, that can be configured to watch for changes on a certain URL, in that case REST API endpoint exposed by Artifactory for selected repository path.
After installing URLTrigger plugin we have to enable it for all consumer pipelines. You can configure it to watch for changes in the returned JSON file from the Artifactory File List REST API, that is accessed via the following URI: http://192.168.99.100:8081/artifactory/api/storage/[PATH_TO_FOLDER_OR_REPO]/. The file maven-metadata.xml will change every time you deploy a new version of application to Artifactory. We can monitor the change of response’s content between the last two polls. The last field that has to be filled is Schedule. If you set it to * * * * * it will poll for a change every minute.

contracts-6

Our three pipelines for consumer applications are ready. The first run was finished with success.

contracts-7

If you have already build person-service application and publish stubs to Artifactory you will see the following structure in libs-snapshot-local repository. I have deployed three different versions of API exposed by person-service. Each time I publish new version of contract all the dependent pipelines are triggered to verify it.

contracts-8

The JAR file with contracts is published under classifier stubs.

contracts-9

Spring Cloud Contract Stub Runner tries to find the latest version of contracts.

2018-07-04 11:46:53.273  INFO 4185 --- [           main] o.s.c.c.stubrunner.AetherStubDownloader  : Desired version is [+] - will try to resolve the latest version
2018-07-04 11:46:54.752  INFO 4185 --- [           main] o.s.c.c.stubrunner.AetherStubDownloader  : Resolved version is [1.3-SNAPSHOT]
2018-07-04 11:46:54.823  INFO 4185 --- [           main] o.s.c.c.stubrunner.AetherStubDownloader  : Resolved artifact [pl.piomin.services:person-service:jar:stubs:1.3-SNAPSHOT] to /var/jenkins_home/.m2/repository/pl/piomin/services/person-service/1.3-SNAPSHOT/person-service-1.3-SNAPSHOT-stubs.jar

6. Testing change in contract

Ok, we have already prepared contracts and configured our CI environment. Now, let’s perform change in the API exposed by person-service. We will just change the name of one field: accountNo to accountNumber.

contracts-12

This changes requires a change in contract definition created on the producer side. If you modify the field name there person-service will build successfully and new version of contract will be published to Artifactory. Because all other pipelines listens for changes in the latest version of JAR files with stubs, the build will be started automatically. Microservices letter-service and contact-service do not use field accountNo, so their pipelines will not fail. Only bank-service pipeline report error in contract as shown on the picture below.

contracts-10

Now, if you were notified about failed verification of the newest contract version between person-service and bank-service, you can perform required change on the consumer side.

contracts-11