A Magic Around Spring Boot Externalized Configuration

There are some things I really like in Spring Boot, and one of them is an externalized (external) configuration. Spring Boot allows you to configure your application in many ways. You have 17 levels of loading configuration properties into application. All of them are described in the 24th Chapter of Spring Boot documentation available here.

This article was inspired by some last talks with developers about problems with the configuration of their applications. They haven’t heard about some interesting features that may be used to make it more flexible and clear. Continue reading “A Magic Around Spring Boot Externalized Configuration”

Spring Cloud Apps Memory Management

Today’s topic is about memory management in Java as well as about microservices architecture. The inspiration to write this post was the situation when our available memory on test environment for the Spring Cloud based applications was exhausted. Without going into the details what was the cause of such a situation, the problem related with memory consumption by monolith based architecture in comparison with microservices is obvious. For example, supposing we have quite a large monolithic application, often 1GB or 2 GB of RAM will be enough for it, especially if we are talking about not a production environment. If we divide this application into 20 or 30 independent microservices it is hard to expect that the RAM will still remain around 1GB or 2GB. Especially if we use Spring Cloud 🙂

When running sample microservices I will use an earlier example prepared for the purpose of the one of previous articles, which is available on GitHub. I’m going to launch three microservices. First, for service discovery which uses Netflix Eureka server and two simple microservices which provide REST API, communicate with each other and register themselves in discovery server. I will not limit in any way the memory usage by those applications.

Like you see in the figure below those three running microservices have occupied about 1.5GB RAM memory on my computer. This is not the best message considering that we are dealing with very simple applications which do not even have a data persistence layer. The lowest RAM usage is for discovery service and the biggest for customer service which initializes declarative feign client for invoking account service API. Before making that screen I send some test requests to every microservice and run Eureka web console.

micro-ram-1

A lot about memory usage is shown on the charts visible below made using JProfiler. As we see most of such a memory usage is affected by heap, in comparison to non-heap it does take up much space.

micro-ram-2

micro-ram-3

Of course, the first obvious question is whether we need as much space on the heap to run our microservice application. The answer is no, we do not. Now, let’s take a brief look at how the memory management process takes place in Java 8.

We can devide JVM memory into two different parts: Heap and Non-Heap. I have already mentioned a little about Heap. As you could see on the graphs above the heap commited size for our microservices was really big (~600MB). In turn, JVM Memory consists of Young Generation and Old Generation. All the newly created objects are located in the Young Generation. When young generation is filled, garbage collection (Minor GC) is performed. To be more precise, those objects are located in the part of Young Generation which is called Eden Space. Minor GC moves all still used objects from Eden Space into Survivor 0. The same process is performed for Survivor 0 and Survivor 1 spaces. All objects that survived many cycles of GC, are moved to the Old Generation memory space. For removing objects from there is Major GC process is responsible. So, these are the most important information about Java Heap. In order to better understand the figure below. The memory limits for Java Heap can be set with the following parameters during running java -jar command:

  • -Xms – initial heap size when JVM starts
  • -Xmx – maximum heap size
  • -Xmn – size of the Young Generation, rest of the space goes for Old Generation

jvm memory

The second part of the JVM Memory, looking at the graphs above slightly less important from our point of view, is Non-Heap. Non-Heap consists of the following parts:

  • Thread Stacks – space for all running threads. The maximum thread size can be set using -Xss parameter.
  • Metaspace – it replaced PermGem, which was in Java 7 the part of JVM Heap. In Metaspace there are located all classes and methods load by application. Looking at the number of libraries included for Spring Cloud we won’t save much memory here. Metaspace size can be managed by setting -XX:MetaspaceSize and -XX:MaxMetaspaceSize parameters.
  • Code Cache – this is the space for native code (like JNI) or Java methods that are compiled into native code by JIT (just-in-time) compiler. The maximum size is determined by setting -XX:ReservedCodeCacheSize parameter.
  • Compressed Class Space – the maximum memory reserved for compressed class space is set with -XX:CompressedClassSpaceSize
  • Direct NIO Buffers

To put it more simply, Heap is for objects and Non-Heap is for classes. As you can imagine we can end up with the situation when non-heap is larger than heap for our application. First, let’s run our service discovery with the parameters below. In my opinion these are the lowest values if you are starting Eureka with embedded Tomcat on Spring Boot.

-Xms16m -Xmx32m -XX:MaxMetaspaceSize=48m -XX:CompressedClassSpaceSize=8m -Xss256k -Xmn8m -XX:InitialCodeCacheSize=4m -XX:ReservedCodeCacheSize=8m -XX:MaxDirectMemorySize=16m

If we are running microservice with REST API and Eureka, Feign and Ribbon clients we need to increase values a little.

-Xms16m -Xmx48m -XX:MaxMetaspaceSize=64m -XX:CompressedClassSpaceSize=8m -Xss256k -Xmn8m -XX:InitialCodeCacheSize=4m -XX:ReservedCodeCacheSize=8m -XX:MaxDirectMemorySize=16m

Here are charts from JProfiler for the settings above and Customer service. The difference is in starting and requests processing time. The application is working slower in comparison with earlier settings (or rather lack of them :)). Well, I wouldn’t set such a parameters in production mode. Treat them rather as a minimum requirements for service discovery and microservice apps.

micro-ram-5

micro-ram-6

The current total memory usage is as follows. It is still the biggest for Customer service and the lowest for Discovery.

micro-ram-4

I have also tried to run Discovery application using different web containers. You can easily change web container by including in your pom.xml file the dependencies visible below.

For Jetty.

<dependency>
	<groupId>org.springframework.boot</groupId>
	<artifactId>spring-boot-starter-jetty</artifactId>
</dependency>

For Undertow.

<dependency>
	<groupId>org.springframework.boot</groupId>
	<artifactId>spring-boot-starter-undertow</artifactId>
</dependency>

The best result was for Undertow (116MB), second place for Tomcat (122MB) and third for Jetty (128MB). This tests were performed only for Eureka server without registering there any microservices.

Monitoring Microservices With Spring Boot Admin

A few days ago I came across an article about Spring Boot Admin framework. It is a simple solution created to manage and monitor Spring Boot applications. It is based on endpoints exposed by Spring Boot Actuator. It is worth emphasizing that application only allows monitoring and does not have such capabilities like creating new instances, restarting, so it is not a competition for the solutions like Pivotal Cloud Foundry. More about this solution can be read in my previous article Spring Cloud Microservices at Pivotal Platform. Despite this, Spring Boot Admin seems to be an interesting enough to take a closer look on it.

If you have to manage the system consisting of multiple microservices you need to collect all relevant information in one place. This applies to the logs when we usually use ELK stack (Elasticsearch + Logstash + Kibana), metrics (Zipkin) and details about the status of all application instances, which are running right now. If you are interested in more details about ELK or Zipkin I recommend my previous article Part 2: Creating microservices – monitoring with Spring Cloud Sleuth, ELK and Zipkin.

If you already using Spring Cloud Discovery I’ve got good news for you. Although Spring Boot Admin was created by Codecentric company, it fully integrates with Spring Cloud including the most popular service registration and discovery servers like Zookeeper, Consul and Eureka. It is easy to create your admin server instance. You just have to set up Spring Boot application and add annotation @EnableAdminServer into your main class.

@SpringBootApplication
@EnableDiscoveryClient
@EnableAdminServer
@EnableAutoConfiguration
public class Application {

	public static void main(String[] args) {
		SpringApplication.run(Application.class, args);
	}

}

In the sample application available as usual on GitHub, we enabled discovery from Eureka by adding annotation @EnableDiscoveryClient. There is no need to register admin service in Eureka, because we only need to collect information about all registered microservices. There is also a possibility to include Spring Boot Admin to your Eureka server instance, but admin context should be changed (property spring.boot.admin.context-path) to prevent clash with Eureka UI. Here’s application.yml configuration file for the sample with independent admin service.

eureka:
  client:
    registryFetchIntervalSeconds: 5
    registerWithEureka: false
    serviceUrl:
      defaultZone: ${DISCOVERY_URL:http://localhost:8761}/eureka/
  instance:
    leaseRenewalIntervalInSeconds: 10

management:
  security:
    enabled: false

Here is the list of dependencies included in pom.xml.

<dependencies>
	<dependency>
		<groupId>org.springframework.cloud</groupId>
		<artifactId>spring-cloud-starter-eureka</artifactId>
	</dependency>
	<dependency>
		<groupId>de.codecentric</groupId>
		<artifactId>spring-boot-admin-server</artifactId>
		<version>1.5.1</version>
	</dependency>
	<dependency>
		<groupId>de.codecentric</groupId>
		<artifactId>spring-boot-admin-server-ui</artifactId>
		<version>1.5.1</version>
	</dependency>
</dependencies>

Now you only need to build and run your server with java -jar admin-service.jar. UI dashboard is available under http://localhost:8080 as you on the figure below. Services are grouped by name and there is information how many instances of each microservice is running.

boot-admin-1

On the client side we have to add those two dependencies below. Spring Boot Actuator is required as a mentioned before, Jolokia library is used for more advanced features like JMX mbeans and log level management.

<dependency>
	<groupId>org.springframework.boot</groupId>
	<artifactId>spring-boot-starter-actuator</artifactId>
</dependency>
<dependency>
	<groupId>org.jolokia</groupId>
	<artifactId>jolokia-core</artifactId>
</dependency>

To display information visible in the figure below like version, Git commit details below for each application we need to add two maven plugins into pom.xml. First of them will generate build-info.properties file with most important application info. Second includes git.properties file with all information about last commit. Result are available under Spring Boot Actuator info endpoint.

<plugin>
	<groupId>org.springframework.boot</groupId>
	<artifactId>spring-boot-maven-plugin</artifactId>
	<configuration>
		<mainClass>pl.piomin.microservices.account.Application</mainClass>
		<addResources>true</addResources>
	</configuration>
	<executions>
		<execution>
			<goals>
				<goal>build-info</goal>
				<goal>repackage</goal>
			</goals>
			<configuration>
				<additionalProperties>
					<java.target>${maven.compiler.target}</java.target>
					<time>${maven.build.timestamp}</time>
				</additionalProperties>
			</configuration>
		</execution>
	</executions>
</plugin>
<plugin>
	<groupId>pl.project13.maven</groupId>
	<artifactId>git-commit-id-plugin</artifactId>
	<configuration>
		<failOnNoGitDirectory>false</failOnNoGitDirectory>
	</configuration>
</plugin>

I created two microservices in the sample application account-service and customer-service. Run some instances of them on different ports with command java -jar -DPORT=[port] [service-name].jar. Information visible in Version and Info columns is taken from build-info.properties and git.properties files.

boot-admin-2

Here’s full list of parameters for account-service.

boot-admin-3-details

There also some other interesting features offered by Spring Boot Admin. In the Trace section we can browse HTTP requestes and responses history with date, status and method information. It could be filtered by path fragment.

boot-admin-1-trace

By adding Jolokia dependency we are able to view and change log level for every category in the Logging section.

boot-admin-5-logs

We can collect configuration details for every instance of microservice.

boot-admin-7-env

In the Journal tab there is list of status changes for all services monitored by Spring Boot Admin.

boot-admin-11-journal

Conclusion

Spring Boot Admin is an excellent tool for visualizing endpoints exposed by Spring Boot Actuator with healhchecks and application details. It has easy integration with Spring Cloud and can group all running instances of microservice by its name taken from Eureka (or some other registration and discovery servers) registry. However, I see a lack of the possibility for remote application restart. I think it would be quite easy to implement using a tool such as Ansible and the information displayed by the Spring Boot Actuator endpoints.

In memory data grid with Hazelcast

In my previous article JPA caching with Hazelcast, Hibernate and Spring Boot I described an example illustrating Hazelcast usage as a solution for Hibernate 2nd level cache. One big disadvantage of that example was an ability by caching entities only by primary key. Some help was the opportunity to cache JPA queries by some other indices. But that did not solve the problem completely, because query could use already cached entities even if they matched the criteria. In that article I’m going to show you smart solution of that problem based on Hazelcast distributed queries.

hz1

Spring Boot has an build-in auto configuration for Hazelcast if such a library is available under application classpath and @Bean Config is declared.

	@Bean
	Config config() {
		Config c = new Config();
		c.setInstanceName("cache-1");
		c.getGroupConfig().setName("dev").setPassword("dev-pass");
		ManagementCenterConfig mcc = new ManagementCenterConfig().setUrl("http://192.168.99.100:38080/mancenter").setEnabled(true);
		c.setManagementCenterConfig(mcc);
		SerializerConfig sc = new SerializerConfig().setTypeClass(Employee.class).setClass(EmployeeSerializer.class);
		c.getSerializationConfig().addSerializerConfig(sc);
		return c;
	}

In the code fragment above we declared cluster name and password credentials, connection parameters to Hazelcast Management Center and entity serialization configuration. Entity is pretty simple – it has @Id and two fields for searching personId and company.

@Entity
public class Employee implements Serializable {

	private static final long serialVersionUID = 3214253910554454648L;

	@Id
	@GeneratedValue
	private Integer id;
	private Integer personId;
	private String company;

	public Integer getId() {
		return id;
	}

	public void setId(Integer id) {
		this.id = id;
	}

	public Integer getPersonId() {
		return personId;
	}

	public void setPersonId(Integer personId) {
		this.personId = personId;
	}

	public String getCompany() {
		return company;
	}

	public void setCompany(String company) {
		this.company = company;
	}

}

Every entity needs to have serializer declared if it is to be inserted and selected from cache. There are same default serializers available inside Hazelcast library, but I implemented the custom one for our sample. It is based on StreamSerializer and ObjectDataInput.

public class EmployeeSerializer implements StreamSerializer<Employee> {

	@Override
	public int getTypeId() {
		return 1;
	}

	@Override
	public void write(ObjectDataOutput out, Employee employee) throws IOException {
		out.writeInt(employee.getId());
		out.writeInt(employee.getPersonId());
		out.writeUTF(employee.getCompany());
	}

	@Override
	public Employee read(ObjectDataInput in) throws IOException {
		Employee e = new Employee();
		e.setId(in.readInt());
		e.setPersonId(in.readInt());
		e.setCompany(in.readUTF());
		return e;
	}

	@Override
	public void destroy() {
	}

}

There is also DAO interface for interacting with database. It has two searching methods and extends Spring Data CrudRepository.

public interface EmployeeRepository extends CrudRepository<Employee, Integer> {

	public Employee findByPersonId(Integer personId);
	public List<Employee> findByCompany(String company);

}

In this sample Hazelcast instance is embedded into the application. When starting Spring Boot application we have to provide VM argument -DPORT which is used for exposing service REST API. Hazelcast automatically detect other running member instances and its port will be incremented out of the box. Here’s REST @Controller class with exposed API.

@RestController
public class EmployeeController {

	private Logger logger = Logger.getLogger(EmployeeController.class.getName());

	@Autowired
	EmployeeService service;

	@GetMapping("/employees/person/{id}")
	public Employee findByPersonId(@PathVariable("id") Integer personId) {
		logger.info(String.format("findByPersonId(%d)", personId));
		return service.findByPersonId(personId);
	}

	@GetMapping("/employees/company/{company}")
	public List<Employee> findByCompany(@PathVariable("company") String company) {
		logger.info(String.format("findByCompany(%s)", company));
		return service.findByCompany(company);
	}

	@GetMapping("/employees/{id}")
	public Employee findById(@PathVariable("id") Integer id) {
		logger.info(String.format("findById(%d)", id));
		return service.findById(id);
	}

	@PostMapping("/employees")
	public Employee add(@RequestBody Employee emp) {
		logger.info(String.format("add(%s)", emp));
		return service.add(emp);
	}

}

@Service is injected into the EmployeeController. Inside EmployeeService there is an simple implementation of switching between Hazelcast cache instance and Spring Data DAO @Repository. In every find method we are trying to find data in the cache and in case it’s not there we are searching it in database and then putting found entity into the cache.

@Service
public class EmployeeService {

	private Logger logger = Logger.getLogger(EmployeeService.class.getName());

	@Autowired
	EmployeeRepository repository;
	@Autowired
	HazelcastInstance instance;

	IMap<Integer, Employee> map;

	@PostConstruct
	public void init() {
		map = instance.getMap("employee");
		map.addIndex("company", true);
		logger.info("Employees cache: " + map.size());
	}

	@SuppressWarnings("rawtypes")
	public Employee findByPersonId(Integer personId) {
		Predicate predicate = Predicates.equal("personId", personId);
		logger.info("Employee cache find");
		Collection<Employee> ps = map.values(predicate);
		logger.info("Employee cached: " + ps);
		Optional<Employee> e = ps.stream().findFirst();
		if (e.isPresent())
			return e.get();
		logger.info("Employee cache find");
		Employee emp = repository.findByPersonId(personId);
		logger.info("Employee: " + emp);
		map.put(emp.getId(), emp);
		return emp;
	}

	@SuppressWarnings("rawtypes")
	public List<Employee> findByCompany(String company) {
		Predicate predicate = Predicates.equal("company", company);
		logger.info("Employees cache find");
		Collection<Employee> ps = map.values(predicate);
		logger.info("Employees cache size: " + ps.size());
		if (ps.size() > 0) {
			return ps.stream().collect(Collectors.toList());
		}
		logger.info("Employees find");
		List<Employee> e = repository.findByCompany(company);
		logger.info("Employees size: " + e.size());
		e.parallelStream().forEach(it -> {
			map.putIfAbsent(it.getId(), it);
		});
		return e;
	}

	public Employee findById(Integer id) {
		Employee e = map.get(id);
		if (e != null)
			return e;
		e = repository.findOne(id);
		map.put(id, e);
		return e;
	}

	public Employee add(Employee e) {
		e = repository.save(e);
		map.put(e.getId(), e);
		return e;
	}

}

If you are interested in running sample application you can clone my repository on GitHub. In person-service module there is an example for my previous article about Hibernate 2nd cache with Hazelcast, in employee-module there is an example for that article.

Testing

Let’s start three instances of employee service on different ports using VM argument -DPORT. In the first figure visible in the beginning of article these ports are 2222, 3333 and 4444. When starting last third service’s instance you should see the fragment visible below in the application logs. It means that Hazelcast cluster of three members has been set up.

2017-05-09 23:01:48.127  INFO 16432 --- [ration.thread-0] c.h.internal.cluster.ClusterService      : [192.168.1.101]:5703 [dev] [3.7.7] 

Members [3] {
	Member [192.168.1.101]:5701 - 7a8dbf3d-a488-4813-a312-569f0b9dc2ca
	Member [192.168.1.101]:5702 - 494fd1ac-341b-451c-b585-1ad58a280fac
	Member [192.168.1.101]:5703 - 9750bd3c-9cf8-48b8-a01f-b14c915937c3 this
}

Here is picture from Hazelcast Management Center for two running members (only two members are available in the freeware version of Hazelcast Management Center).

hz-1.png

Then run docker containers with MySQL and Hazelcast Management Center.

docker run -d --name mysql -p 33306:3306 mysql
docker run -d --name hazelcast-mgmt -p 38080:8080 hazelcast/management-center:latest

Now, you could try to call endpoint http://localhost:/employees/company/{company} on all of your services. You should see that data is cached in the cluster and even if you call endpoint on different service it find entities put into the cache by different service. After several attempts my service instances put about 100k entities into the cache. Distribution between two Hazelcast members is 50% to 50%.

hz-2

Final Words

Probably we could implement smarter solution for the problem described in that article, but I just wanted to show you the idea. I tried to use Spring Data Hazelcast for that, but I’ve got a problem to run it on Spring Boot application. It has HazelcastRepository interface, which something similar to Spring Data CrudRepository but basing on cached entities in Hazelcast grid and also uses Spring Data KeyValue module. The project is not well document and like I said before it didn’t worked with Spring Boot so I decided to implement my simple solution 🙂

In my local environment, visualized in the beginning of the article, queries on cache were about 10 times faster than similar queries on database. I inserted 2M records into the employee table. Hazelcast data grid could not only be a 2nd level cache but even a middleware between your application and database. If your priority is a performance of queries on large amounts of data and you have a lot of RAM im memory data grid is right solution for you 🙂

JPA caching with Hazelcast, Hibernate and Spring Boot

Preface

In-Memory Data Grid is an in-memory distributed key-value store that enables caching data using distributed clusters. Do not confuse this solution with in-memory or nosql database. In most cases it is used for performance reasons – all data is stored in RAM not in the disk like in traditional databases. For the first time I had a touch with in-memory data grid while we considering moving to Oracle Coherence in one of organizations I had been working before. The solution really made me curious. Oracle Coherence is obviously a paid solution, but there are also some open source solutions among which the most interesting seem to be Apache Ignite and Hazelcast. Today I’m going to show you how to use Hazelcast for caching data stored in MySQL database accessed by Spring Data DAO objects. Here’s the figure illustrating architecture of presented solution.

hazelcast-1

Implementation

  • Starting Docker containers

We use three Docker containers. First with MySQL database, second with Hazelcast instance and third for Hazelcast Management Center – UI dashboard for monitoring Hazelcast cluster instances.

docker run -d --name mysql -p 33306:3306 mysql
docker run -d --name hazelcast -p 5701:5701 hazelcast/hazelcast
docker run -d --name hazelcast-mgmt -p 38080:8080 hazelcast/management-center:latest

If we would like to connect with Hazelcast Management Center from Hazelcast instance we need to place custom hazelcast.xml in /opt/hazelcast catalog inside Docker container. This can be done in two ways, by extending hazelcast base image or just by copying file to existing hazelcast container and restarting it.

docker run -d --name hazelcast -p 5701:5701 hazelcast/hazelcast
docker stop hazelcast
docker start hazelcast

Here’s the most important Hazelcast’s configuration file fragment.

<hazelcast xmlns="http://www.hazelcast.com/schema/config" xmlns:xsi="http://www.w3.org/2001/XMLSchema-instance" xsi:schemaLocation="http://www.hazelcast.com/schema/config http://www.hazelcast.com/schema/config/hazelcast-config-3.8.xsd">
     <group>
          <name>dev</name>
          <password>dev-pass</password>
     </group>
     <management-center enabled="true" update-interval="3">http://192.168.99.100:38080/mancenter</management-center>
...
</hazelcast>

Hazelcast Dashboard is available under http://192.168.99.100:38080/mancenter address. We can monitor there all running cluster members, maps and some other parameters.

hazelcast-mgmt-1

  • Maven configuration

Project is based on Spring Boot 1.5.3.RELEASE. We also need to add Spring Web and MySQL Java connector dependencies. Here’s root project pom.xml.


	<parent>
		<groupId>org.springframework.boot</groupId>
		<artifactId>spring-boot-starter-parent</artifactId>
		<version>1.5.3.RELEASE</version>
	</parent>
	...
	<dependencies>
		<dependency>
			<groupId>org.springframework.boot</groupId>
			<artifactId>spring-boot-starter-web</artifactId>
		</dependency>
		<dependency>
			<groupId>mysql</groupId>
			<artifactId>mysql-connector-java</artifactId>
			<scope>runtime</scope>
		</dependency>
	...
	</dependencies>

Inside person-service module we declared some other dependencies to Hazelcast artifacts and Spring Data JPA. I had to override managed hibernate-core version for Spring Boot 1.5.3.RELEASE, because Hazelcast didn’t worked properly with 5.0.12.Final. Hazelcast needs hibernate-core in 5.0.9.Final version. Otherwise, an exception occurs when starting application.

	<dependencies>
		<dependency>
			<groupId>org.springframework.boot</groupId>
			<artifactId>spring-boot-starter-data-jpa</artifactId>
		</dependency>
		<dependency>
			<groupId>com.hazelcast</groupId>
			<artifactId>hazelcast</artifactId>
		</dependency>
		<dependency>
			<groupId>com.hazelcast</groupId>
			<artifactId>hazelcast-client</artifactId>
		</dependency>
		<dependency>
			<groupId>com.hazelcast</groupId>
			<artifactId>hazelcast-hibernate5</artifactId>
		</dependency>
		<dependency>
			<groupId>org.hibernate</groupId>
			<artifactId>hibernate-core</artifactId>
			<version>5.0.9.Final</version>
		</dependency>
	</dependencies>
  • Hibernate Cache configuration

Probably you can configure it in several different ways, but for me the most suitable solution was inside application.yml. Here’s YAML configurarion file fragment. I enabled L2 Hibernate cache, set Hazelcast native client address, credentials and cache factory class HazelcastCacheRegionFactory. We can also set HazelcastLocalCacheRegionFactory. The differences between them are in performance – local factory is faster since its operations are handled as distributed calls. While if you use HazelcastCacheRegionFactory, you can see your maps on Management Center.

spring:
  application:
    name: person-service
  datasource:
    url: jdbc:mysql://192.168.99.100:33306/datagrid?useSSL=false
    username: datagrid
    password: datagrid
  jpa:
    properties:
      hibernate:
        show_sql: true
        cache:
          use_query_cache: true
          use_second_level_cache: true
          hazelcast:
            use_native_client: true
            native_client_address: 192.168.99.100:5701
            native_client_group: dev
            native_client_password: dev-pass
          region:
            factory_class: com.hazelcast.hibernate.HazelcastCacheRegionFactory
  • Application code

First, we need to enable caching for Person @Entity.

@Cache(usage = CacheConcurrencyStrategy.READ_WRITE)
@Entity
public class Person implements Serializable {

	private static final long serialVersionUID = 3214253910554454648L;

	@Id
	@GeneratedValue
	private Integer id;
	private String firstName;
	private String lastName;
	private String pesel;
	private int age;

	public Integer getId() {
		return id;
	}

	public void setId(Integer id) {
		this.id = id;
	}

	public String getFirstName() {
		return firstName;
	}

	public void setFirstName(String firstName) {
		this.firstName = firstName;
	}

	public String getLastName() {
		return lastName;
	}

	public void setLastName(String lastName) {
		this.lastName = lastName;
	}

	public String getPesel() {
		return pesel;
	}

	public void setPesel(String pesel) {
		this.pesel = pesel;
	}

	public int getAge() {
		return age;
	}

	public void setAge(int age) {
		this.age = age;
	}

	@Override
	public String toString() {
		return "Person [id=" + id + ", firstName=" + firstName + ", lastName=" + lastName + ", pesel=" + pesel + "]";
	}

}

DAO is implemented using Spring Data CrudRepository. Sample application source code is available on GitHub.

public interface PersonRepository extends CrudRepository<Person, Integer> {
	public List<Person> findByPesel(String pesel);
}

Testing

Let’s insert a little more data to the table. You can use my AddPersonRepositoryTest for that. It will insert 1M rows into the person table. Finally, we can call enpoint http://localhost:2222/persons/{id} twice with the same id. For me, it looks like below: 22ms for first call, 3ms for next call which is read from L2 cache. Entity can be cached only by primary key. If you call http://localhost:2222/persons/pesel/{pesel} entity will always be searched bypassing the L2 cache.

2017-05-05 17:07:27.360 DEBUG 9164 --- [nio-2222-exec-9] org.hibernate.SQL                        : select person0_.id as id1_0_0_, person0_.age as age2_0_0_, person0_.first_name as first_na3_0_0_, person0_.last_name as last_nam4_0_0_, person0_.pesel as pesel5_0_0_ from person person0_ where person0_.id=?
Hibernate: select person0_.id as id1_0_0_, person0_.age as age2_0_0_, person0_.first_name as first_na3_0_0_, person0_.last_name as last_nam4_0_0_, person0_.pesel as pesel5_0_0_ from person person0_ where person0_.id=?
2017-05-05 17:07:27.362 DEBUG 9164 --- [nio-2222-exec-9] o.h.l.p.e.p.i.ResultSetProcessorImpl     : Starting ResultSet row #0
2017-05-05 17:07:27.362 DEBUG 9164 --- [nio-2222-exec-9] l.p.e.p.i.EntityReferenceInitializerImpl : On call to EntityIdentifierReaderImpl#resolve, EntityKey was already known; should only happen on root returns with an optional identifier specified
2017-05-05 17:07:27.363 DEBUG 9164 --- [nio-2222-exec-9] o.h.engine.internal.TwoPhaseLoad         : Resolving associations for [pl.piomin.services.datagrid.person.model.Person#444]
2017-05-05 17:07:27.364 DEBUG 9164 --- [nio-2222-exec-9] o.h.engine.internal.TwoPhaseLoad         : Adding entity to second-level cache: [pl.piomin.services.datagrid.person.model.Person#444]
2017-05-05 17:07:27.373 DEBUG 9164 --- [nio-2222-exec-9] o.h.engine.internal.TwoPhaseLoad         : Done materializing entity [pl.piomin.services.datagrid.person.model.Person#444]
2017-05-05 17:07:27.373 DEBUG 9164 --- [nio-2222-exec-9] o.h.r.j.i.ResourceRegistryStandardImpl   : HHH000387: ResultSet's statement was not registered
2017-05-05 17:07:27.374 DEBUG 9164 --- [nio-2222-exec-9] .l.e.p.AbstractLoadPlanBasedEntityLoader : Done entity load : pl.piomin.services.datagrid.person.model.Person#444
2017-05-05 17:07:27.374 DEBUG 9164 --- [nio-2222-exec-9] o.h.e.t.internal.TransactionImpl         : committing
2017-05-05 17:07:30.168 DEBUG 9164 --- [nio-2222-exec-6] o.h.e.t.internal.TransactionImpl         : begin
2017-05-05 17:07:30.171 DEBUG 9164 --- [nio-2222-exec-6] o.h.e.t.internal.TransactionImpl         : committing

Query Cache

We can enable JPA query caching by marking repository method with @Cacheable annotation and adding @EnableCaching to main class definition.

public interface PersonRepository extends CrudRepository<Person, Integer> {

	@Cacheable("findByPesel")
	public List<Person> findByPesel(String pesel);

}

In addition to the @EnableCaching annotation we should declare HazelcastIntance and CacheManager beans. As a cache manager HazelcastCacheManager from hazelcast-spring library is used.

@SpringBootApplication
@EnableCaching
public class PersonApplication {

	public static void main(String[] args) {
		SpringApplication.run(PersonApplication.class, args);
	}

	@Bean
	HazelcastInstance hazelcastInstance() {
		ClientConfig config = new ClientConfig();
		config.getGroupConfig().setName("dev").setPassword("dev-pass");
		config.getNetworkConfig().addAddress("192.168.99.100");
		config.setInstanceName("cache-1");
		HazelcastInstance instance = HazelcastClient.newHazelcastClient(config);
		return instance;
	}

	@Bean
	CacheManager cacheManager() {
		return new HazelcastCacheManager(hazelcastInstance());
	}

}

Now, we should try find person by PESEL number by calling endpoint http://localhost:2222/persons/pesel/{pesel}. Cached query is stored as a map as you see in the picture below.

hazelcast-3

Clustering

Before final words let me say a little about clustering, what is the key functionality of Hazelcast in memory data grid. In the previous chapters we based on single Hazelcast instance. Let’s begin from running second container with Hazelcast exposed on different port.

docker run -d --name hazelcast2 -p 5702:5701 hazelcast/hazelcast

Now we should perform one change in hazelcast.xml configuration file. Because data grid is ran inside docker container the public address has to be set. For the first container it is 192.168.99.100:5701, and for second 192.168.99.100:5702, because it is exposed on 5702 port.

     <network>
        ...
	<public-address>192.168.99.100:5701</public-address>
        ...
     </network>

When starting person-service application you should see in the logs similar to visible below – connection with two cluster members.

Members [2] {
Member [192.168.99.100]:5702 - 04f790bc-6c2d-4c21-ba8f-7761a4a7422c
Member [192.168.99.100]:5701 - 2ca6e30d-a8a7-46f7-b1fa-37921aaa0e6b
}

All Hazelcast running instances are visible in Management Center.

hazelcast-2

Conclusion

Caching and clustering with Hazelcast are simple and fast. We can cache JPA entities and queries. Monitoring is realized via Hazelcast Management Center dashboard. One problem for me is that I’m able to cache entities only by primary key. If I would like to find entity by other index like PESEL number I had to cache findByPesel query. Even if entity was cached before by id query will not find it in the cache but perform SQL on database. Only next query call is cached. I’ll show you smart solution for that problem in my next article about that subject In memory data grid with Hazelcast.

Testing Java Microservices

While developing a new application we should never forget about testing. This term seems to be particularly important when working with microservices. Microservices testing requires different approach than tests designing for monolithic applications. As far as monolithic testing is concerned, the main focus is put on unit testing and also in most cases integration tests with the database layer. In the case of microservices, the most important test seems to be interactions between those microservices. Although every microservice is independently developed and released the change in one of them can affect on all which are interacting with that service. Interaction between them is realized by messages. Usually these are messages send via REST or AMQP protocols.

We can divide five different layers of microservices tests. The first three of them are same as for monolith applications.

Unit tests – we are testing the smallest pieces of code, for example single method or component and mocking every call of other methods or components. There are many popular frameworks that supporting unit tests in java like JUnit, TestNG and Mockito for mocking. The main task of this type of testing is to confirm that the implementation meets the requirements.

Integration tests – we are testing interaction and communication between components basing on their interfaces with external services mocked out.

End-to-end test – also known as functional tests. The main goal of that tests is to verify if the system meets the external requirements. It means that we should design test scenarios which test all the microservices take a part in that process.

Contract tests – test at the boundary of an external service verifying that it meets the contract expected by a consuming service

Component tests – limits the scope of the exercised software to a portion of the system under test, manipulating the system through internal code interfaces and using test doubles to isolate the code under test from other components.

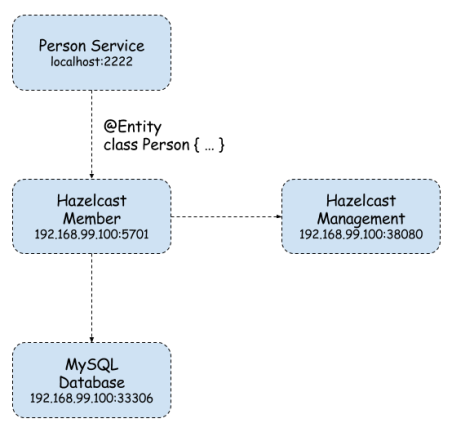
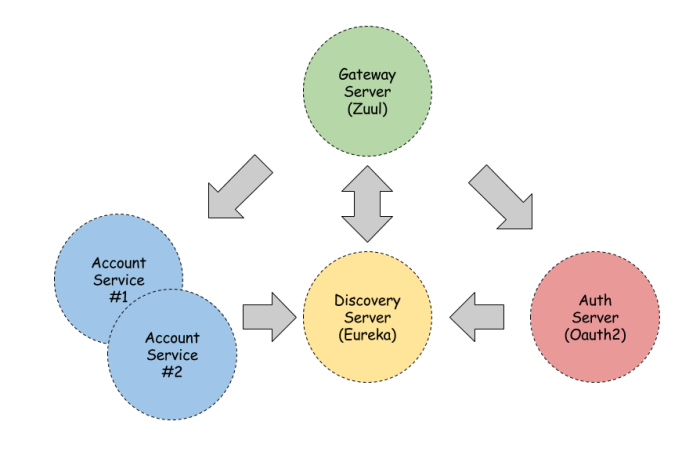
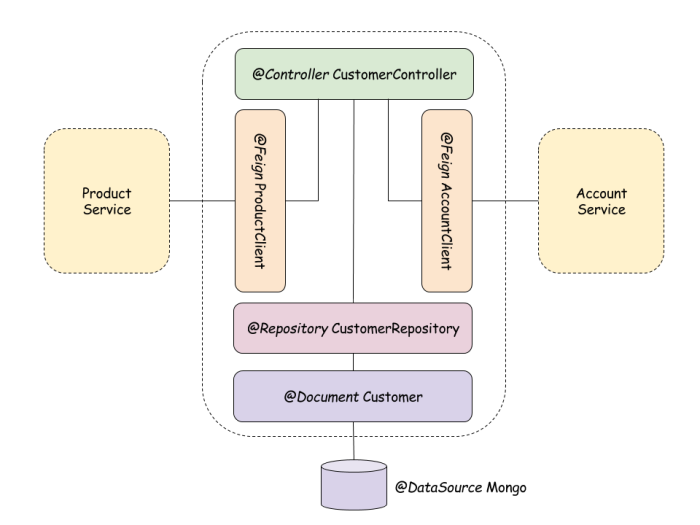
In the figure below we can see the component diagram of the one sample microservice (customer service). That architecture is similar for all other sample microservices described in that post. Customer service is interacting with Mongo database and storing there all customers. Mapped between object and database is realized by Spring Data @Document. We also use @Repository component as a DAO for Customer entity. Communication with other microservices is realized by @Feign REST client. Customer service collects all customer’s accounts and products from external microservices. @Repository and @Feign clients are injected into the @Controller which is exposed outside via REST resource.

testingmicroservices1

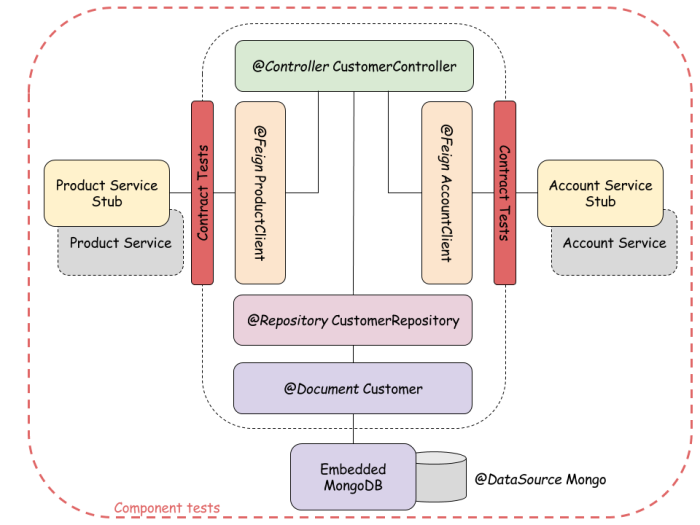
In this article I’ll show you contract and component tests for sample microservices architecture. In the figure below you can see test strategy for architecture showed in previous picture. For our tests we use embedded in-memory Mongo database and RESTful stubs generated with Spring Cloud Contract framework.

testingmicroservices2

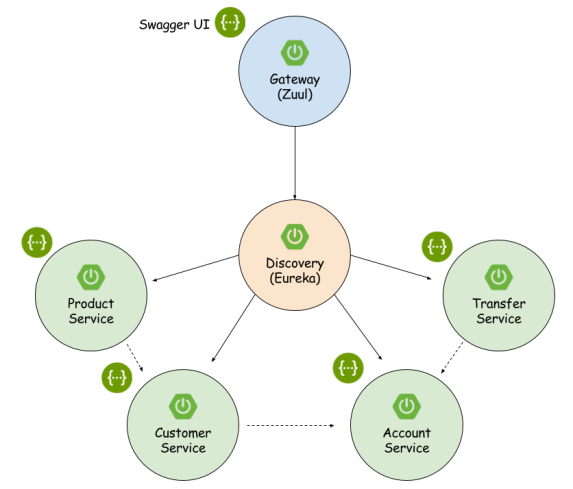
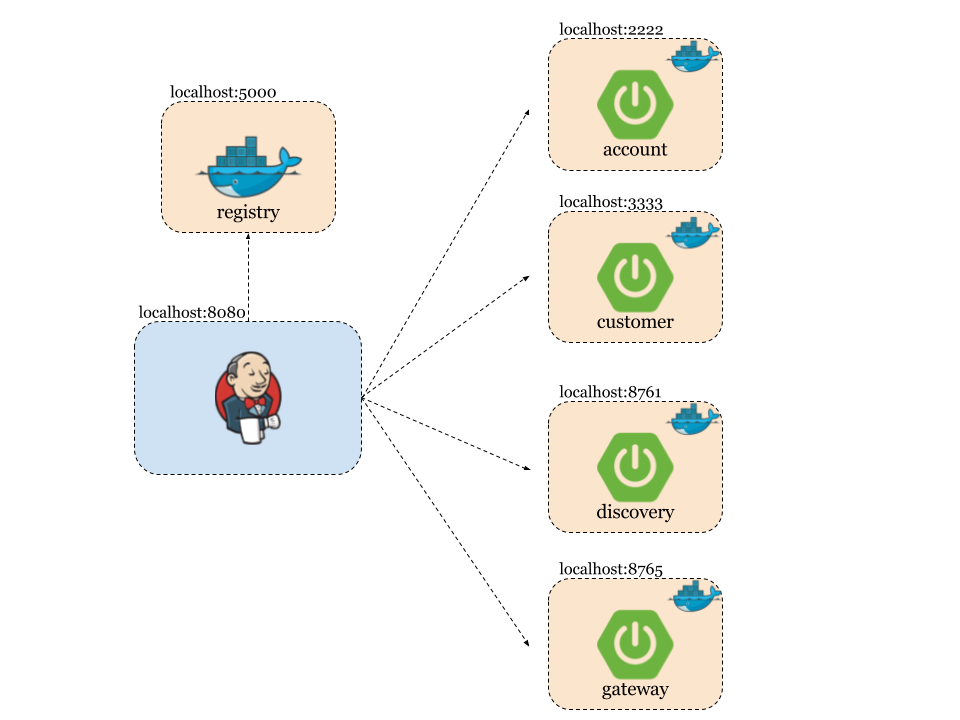
Now, let’s take a look on the big picture. We have four microservices interacting with each other like we see in the figure below. Spring Cloud Contract uses WireMock in the backgroud for recording and matching requests and responses. For testing purposes Eureka discovering on all microservices needs to be disabled.

testingmicroservices3

Sample application source code is available on GitHub. All microservices are basing on Spring Boot and Spring Cloud (Eureka, Zuul, Feign, Ribbon) frameworks. Interaction with Mongo database is realized with Spring Data MongoDB (spring-boot-starter-data-mongodb dependency in pom.xml) library. DAO is really simple. It extends MongoRepository CRUD component. @Repository and @Feign clients are injected into CustomerController.

public interface CustomerRepository extends MongoRepository<Customer, String> {

	public Customer findByPesel(String pesel);
	public Customer findById(String id);

}

Here’s full controller code.

@RestController
public class CustomerController {

	@Autowired
	private AccountClient accountClient;
	@Autowired
	private ProductClient productClient;

	@Autowired
	CustomerRepository repository;

	protected Logger logger = Logger.getLogger(CustomerController.class.getName());

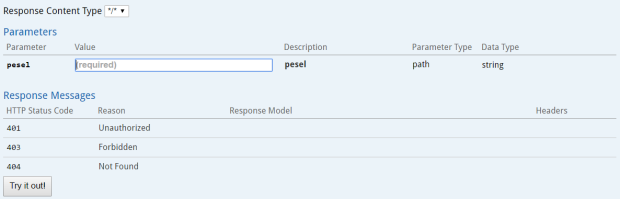
	@RequestMapping(value = "/customers/pesel/{pesel}", method = RequestMethod.GET)
	public Customer findByPesel(@PathVariable("pesel") String pesel) {
		logger.info(String.format("Customer.findByPesel(%s)", pesel));
		return repository.findByPesel(pesel);
	}

	@RequestMapping(value = "/customers", method = RequestMethod.GET)
	public List<Customer> findAll() {
		logger.info("Customer.findAll()");
		return repository.findAll();
	}

	@RequestMapping(value = "/customers/{id}", method = RequestMethod.GET)
	public Customer findById(@PathVariable("id") String id) {
		logger.info(String.format("Customer.findById(%s)", id));
		Customer customer = repository.findById(id);
		List<Account> accounts =  accountClient.getAccounts(id);
		logger.info(String.format("Customer.findById(): %s", accounts));
		customer.setAccounts(accounts);
		return customer;
	}

	@RequestMapping(value = "/customers/withProducts/{id}", method = RequestMethod.GET)
	public Customer findWithProductsById(@PathVariable("id") String id) {
		logger.info(String.format("Customer.findWithProductsById(%s)", id));
		Customer customer = repository.findById(id);
		List<Product> products =  productClient.getProducts(id);
		logger.info(String.format("Customer.findWithProductsById(): %s", products));
		customer.setProducts(products);
		return customer;
	}

	@RequestMapping(value = "/customers", method = RequestMethod.POST)
	public Customer add(@RequestBody Customer customer) {
		logger.info(String.format("Customer.add(%s)", customer));
		return repository.save(customer);
	}

	@RequestMapping(value = "/customers", method = RequestMethod.PUT)
	public Customer update(@RequestBody Customer customer) {
		logger.info(String.format("Customer.update(%s)", customer));
		return repository.save(customer);
	}

}

To replace external Mongo database with embedded in-memory instance during automated tests we only have to add following dependency to pom.xml.

<dependency>
	<groupId>de.flapdoodle.embed</groupId>
	<artifactId>de.flapdoodle.embed.mongo</artifactId>
	<scope>test</scope>
</dependency>

If we using different addresses and connection credentials also application seetings should be overriden in src/test/resources. Here’s application.yml file for testing. In the bottom there is a configuration for disabling Eureka discovering.

server:
  port: ${PORT:3333}

spring:
  application:
    name: customer-service
  data:
    mongodb:
      host: localhost
      port: 27017
  logging:
    level:
      org.springframework.cloud.contract: TRACE

eureka:
  client:
    enabled: false

In-memory MongoDB instance is started automatically during Spring Boot JUnit test. The next step is to add Spring Cloud Contract dependencies.

<dependency>
	<groupId>org.springframework.cloud</groupId>
	<artifactId>spring-cloud-starter-contract-stub-runner</artifactId>
	<scope>test</scope>
</dependency>
<dependency>
	<groupId>org.springframework.cloud</groupId>
	<artifactId>spring-cloud-starter-contract-verifier</artifactId>
	<scope>test</scope>
</dependency>

To enable automated tests generation by Spring Cloud Contract we also have to add following plugin into pom.xml.

<plugin>
	<groupId>org.springframework.cloud</groupId>
	<artifactId>spring-cloud-contract-maven-plugin</artifactId>
	<version>1.1.0.RELEASE</version>
	<extensions>true</extensions>
	<configuration>
			<packageWithBaseClasses>pl.piomin.microservices.advanced.customer.api</packageWithBaseClasses>
	</configuration>
</plugin>

Property packageWithBaseClasses defines package where base classes extended by generated test classes are stored. Here’s base test class for account service tests. In our sample architecture account service is only a produces it does not consume any services.

@RunWith(SpringRunner.class)
@SpringBootTest(classes = {Application.class})
public class ApiScenario1Base {

	@Autowired
	private WebApplicationContext context;

	@Before
	public void setup() {
		RestAssuredMockMvc.webAppContextSetup(context);
	}

}

As opposed to the account service customer service consumes some services for collecting customer’s account and products. That’s why base test class for customer service needs to define stub artifacts data.

@RunWith(SpringRunner.class)
@SpringBootTest(classes = {Application.class})
@AutoConfigureStubRunner(ids = {"pl.piomin:account-service:+:stubs:2222"}, workOffline = true)
public class ApiScenario1Base {

	@Autowired
	private WebApplicationContext context;

	@Before
	public void setup() {
		RestAssuredMockMvc.webAppContextSetup(context);
	}

}

Test classes are generated on the basis of contracts defined in src/main/resources/contracts. Such contracts can be implemented using Groovy language. Here’s sample contract for adding new account.

org.springframework.cloud.contract.spec.Contract.make {
  request {
    method 'POST'
    url '/accounts'
	body([
	  id: "1234567890",
          number: "12345678909",
          balance: 1234,
	  customerId: "123456789"
	])
	headers {
	  contentType('application/json')
	}
  }
response {
  status 200
  body([
    id: "1234567890",
    number: "12345678909",
    balance: 1234,
    customerId: "123456789"
  ])
  headers {
    contentType('application/json')
  }
 }
}

Test class are generated under target/generated-test-sources catalog. Here’s generated class for the code above.

@FixMethodOrder(MethodSorters.NAME_ASCENDING)
public class Scenario1Test extends ApiScenario1Base {

	@Test
	public void validate_1_postAccount() throws Exception {
		// given:
			MockMvcRequestSpecification request = given()
					.header("Content-Type", "application/json")
					.body("{\"id\":\"1234567890\",\"number\":\"12345678909\",\"balance\":1234,\"customerId\":\"123456789\"}");

		// when:
			ResponseOptions response = given().spec(request)
					.post("/accounts");

		// then:
			assertThat(response.statusCode()).isEqualTo(200);
			assertThat(response.header("Content-Type")).matches("application/json.*");
		// and:
			DocumentContext parsedJson = JsonPath.parse(response.getBody().asString());
			assertThatJson(parsedJson).field("id").isEqualTo("1234567890");
			assertThatJson(parsedJson).field("number").isEqualTo("12345678909");
			assertThatJson(parsedJson).field("balance").isEqualTo(1234);
			assertThatJson(parsedJson).field("customerId").isEqualTo("123456789");
	}

	@Test
	public void validate_2_postAccount() throws Exception {
		// given:
			MockMvcRequestSpecification request = given()
					.header("Content-Type", "application/json")
					.body("{\"id\":\"1234567891\",\"number\":\"12345678910\",\"balance\":4675,\"customerId\":\"123456780\"}");

		// when:
			ResponseOptions response = given().spec(request)
					.post("/accounts");

		// then:
			assertThat(response.statusCode()).isEqualTo(200);
			assertThat(response.header("Content-Type")).matches("application/json.*");
		// and:
			DocumentContext parsedJson = JsonPath.parse(response.getBody().asString());
			assertThatJson(parsedJson).field("id").isEqualTo("1234567891");
			assertThatJson(parsedJson).field("customerId").isEqualTo("123456780");
			assertThatJson(parsedJson).field("number").isEqualTo("12345678910");
			assertThatJson(parsedJson).field("balance").isEqualTo(4675);
	}

	@Test
	public void validate_3_getAccounts() throws Exception {
		// given:
			MockMvcRequestSpecification request = given();

		// when:
			ResponseOptions response = given().spec(request)
					.get("/accounts");

		// then:
			assertThat(response.statusCode()).isEqualTo(200);
			assertThat(response.header("Content-Type")).matches("application/json.*");
		// and:
			DocumentContext parsedJson = JsonPath.parse(response.getBody().asString());
			assertThatJson(parsedJson).array().contains("balance").isEqualTo(1234);
			assertThatJson(parsedJson).array().contains("customerId").isEqualTo("123456789");
			assertThatJson(parsedJson).array().contains("id").matches("[0-9]{10}");
			assertThatJson(parsedJson).array().contains("number").isEqualTo("12345678909");
	}

}

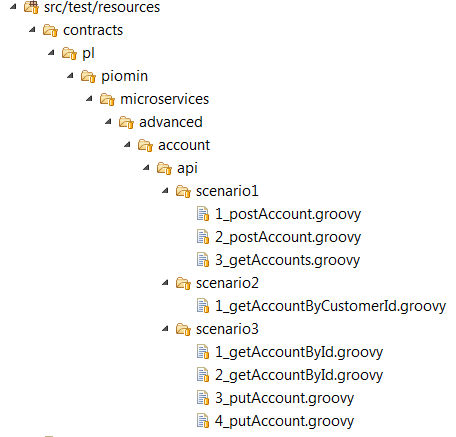
In the generated class there are three JUnit tests because I used scenario mechanisms available in Spring Cloud Contract. There are three groovy files inside scenario1 catalog like we can see in the picture below. The number in every file’s prefix defines tests order. Second scenario has only one definition file and is also used in the customer service (findById API method). Third scenario has four definition files and is used in the transfer service (execute API method).

scenarios

Like I mentioned before interaction between microservices is realized by @FeignClient. WireMock used by Spring Cloud Contract records request/response defined in scenario2 inside account service. Then recorded interaction is used by @FeignClient during tests instead of calling real service which is not available.

@FeignClient("account-service")
public interface AccountClient {

	@RequestMapping(method = RequestMethod.GET, value = "/accounts/customer/{customerId}", consumes = {MediaType.APPLICATION_JSON_VALUE})
	List<Account> getAccounts(@PathVariable("customerId") String customerId);

}

All the tests are generated and run during Maven build, for example mvn clean install command. If you are interested in more details and features of Spring Cloud Contract you can it here.

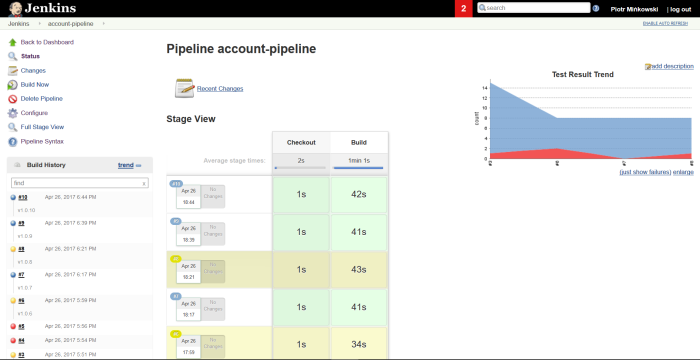
Finally, we can define Continuous Integration pipeline for our microservices. Each of them should be build independently. More about Continuous Integration / Continuous Delivery environment could be read in one of previous post How to setup Continuous Delivery environment. Here’s sample pipeline created with Jenkins Pipeline Plugin for account service. In Checkout stage we are updating our source code working for the newest version from repository. In the Build stage we are starting from checking out project version set inside pom.xml, then we build application using mvn clean install command. Finally, we are recording unit tests result using junit pipeline method. Same pipelines can be configured for all other microservices. In described sample all microservices are placed in the same Git repository with one Maven version for simplicity. But we can imagine that every microservice could be inside different repository with independent version in pom.xml. Tests will always be run with the newest version of stubs, which is set in that fragment of base test class with +: @AutoConfigureStubRunner(ids = {“pl.piomin:account-service:+:stubs:2222”}, workOffline = true)

node {

    withMaven(maven: 'Maven') {

        stage ('Checkout') {
            git url: 'https://github.com/piomin/sample-spring-microservices-advanced.git', credentialsId: 'github-piomin', branch: 'testing'
        }

        stage ('Build') {
            def pom = readMavenPom file: 'pom.xml'
            def version = pom.version.replace("-SNAPSHOT", ".${currentBuild.number}")
            env.pom_version = version
            print 'Build version: ' + version
            currentBuild.description = "v${version}"

            dir('account-service') {
                bat "mvn clean install -Dmaven.test.failure.ignore=true"
            }

            junit '**/target/surefire-reports/TEST-*.xml'
        }

    }

}

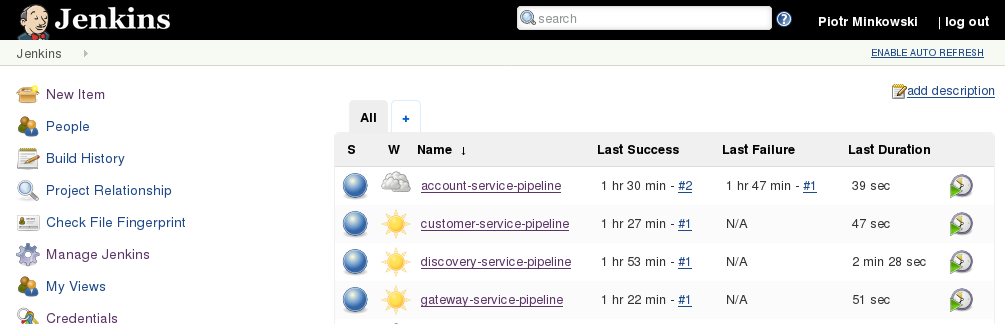
Here’s pipeline vizualization on Jenkins Management Dashboard.

account-pipeline


Microservices API Documentation with Swagger2

Swagger is the most popular tool for designing, building and documenting RESTful APIs. It has nice integration with Spring Boot. To use it in conjunction with Spring we need to add following two dependencies to Maven pom.xml.

<dependency>
	<groupId>io.springfox</groupId>
	<artifactId>springfox-swagger2</artifactId>
	<version>2.6.1</version>
</dependency>
<dependency>
	<groupId>io.springfox</groupId>
	<artifactId>springfox-swagger-ui</artifactId>
	<version>2.6.1</version>
</dependency>

Swagger configuration for single Spring Boot service is pretty simple. The level of complexity is greater if you want to create one documentation for several separated microservices. Such documentation should be available on API gateway. In the picture below you can see the architecture of our sample solution.

swagger

First, we should configure Swagger on every microservice. To enable it we have to declare @EnableSwagger2 on the main class. API documentation will be automatically generated from source code by Swagger library during application startup. The process is controlled by Docket @Bean which is also declared in the main class. API version is read from pom.xml file using MavenXpp3Reader. We also set some other properties like title, author and description using apiInfo method. By default, Swagger generates documentation for all REST services including those created by Spring Boot. We would like to limit documentation only to our @RestController located inside pl.piomin.microservices.advanced.account.api package.

    @Bean
    public Docket api() throws IOException, XmlPullParserException {
        MavenXpp3Reader reader = new MavenXpp3Reader();
        Model model = reader.read(new FileReader("pom.xml"));
        return new Docket(DocumentationType.SWAGGER_2)
          .select()
          .apis(RequestHandlerSelectors.basePackage("pl.piomin.microservices.advanced.account.api"))
          .paths(PathSelectors.any())
          .build().apiInfo(new ApiInfo("Account Service Api Documentation", "Documentation automatically generated", model.getParent().getVersion(), null, new Contact("Piotr Mińkowski", "piotrminkowski.wordpress.com", "piotr.minkowski@gmail.com"), null, null));
}

Here’s our API RESTful controller.

@RestController
public class AccountController {

	@Autowired
	AccountRepository repository;

	protected Logger logger = Logger.getLogger(AccountController.class.getName());

	@RequestMapping(value = "/accounts/{number}", method = RequestMethod.GET)
	public Account findByNumber(@PathVariable("number") String number) {
		logger.info(String.format("Account.findByNumber(%s)", number));
		return repository.findByNumber(number);
	}

	@RequestMapping(value = "/accounts/customer/{customer}", method = RequestMethod.GET)
	public List findByCustomer(@PathVariable("customer") String customerId) {
		logger.info(String.format("Account.findByCustomer(%s)", customerId));
		return repository.findByCustomerId(customerId);
	}

	@RequestMapping(value = "/accounts", method = RequestMethod.GET)
	public List findAll() {
		logger.info("Account.findAll()");
		return repository.findAll();
	}

	@RequestMapping(value = "/accounts", method = RequestMethod.POST)
	public Account add(@RequestBody Account account) {
		logger.info(String.format("Account.add(%s)", account));
		return repository.save(account);
	}

	@RequestMapping(value = "/accounts", method = RequestMethod.PUT)
	public Account update(@RequestBody Account account) {
		logger.info(String.format("Account.update(%s)", account));
		return repository.save(account);
	}

}

The similar Swagger’s configuration exists on every microservice. API documentation is available under http://localhost:/swagger-ui.html. Now, we would like to enable one documentation embedded on the gateway for all microservices. Here’s Spring @Component implementing SwaggerResourcesProvider interface which overrides default provider configuration exists in Spring context.

@Component
@Primary
@EnableAutoConfiguration
public class DocumentationController implements SwaggerResourcesProvider {

	@Override
	public List get() {
		List resources = new ArrayList<>();
		resources.add(swaggerResource("account-service", "/api/account/v2/api-docs", "2.0"));
		resources.add(swaggerResource("customer-service", "/api/customer/v2/api-docs", "2.0"));
		resources.add(swaggerResource("product-service", "/api/product/v2/api-docs", "2.0"));
		resources.add(swaggerResource("transfer-service", "/api/transfer/v2/api-docs", "2.0"));
		return resources;
	}

	private SwaggerResource swaggerResource(String name, String location, String version) {
		SwaggerResource swaggerResource = new SwaggerResource();
		swaggerResource.setName(name);
		swaggerResource.setLocation(location);
		swaggerResource.setSwaggerVersion(version);
		return swaggerResource;
	}

}

All microservices api-docs are added as Swagger resources. The location address is proxied via Zuul gateway. Here’s gateway route configuration.

zuul:
  prefix: /api
  routes:
    account:
      path: /account/**
      serviceId: account-service
    customer:
      path: /customer/**
      serviceId: customer-service
    product:
      path: /product/**
      serviceId: product-service
    transfer:
      path: /transfer/**
      serviceId: transfer-service

Now, API documentation is available under gateway address http://localhost:8765/swagger-ui.html. You can see how it looks for account service in the picture below. We can select source service in the combo box placed inside title panel.

swagger-1

Documentation appearence can be easily customized by providing UIConfiguration @Bean. In the code below I changed default operations expansion level by setting “list” as a second constructor parameter – docExpansion.

	@Bean
	UiConfiguration uiConfig() {
		return new UiConfiguration("validatorUrl", "list", "alpha", "schema",
				UiConfiguration.Constants.DEFAULT_SUBMIT_METHODS, false, true, 60000L);
	}

You can expand every operation to see the details. Every operation can be test by providing required parameters and clicking Try it out! button.

swagger-2

swagger-3

Sample application source code is available on GitHub.

Microservices Continuous Delivery with Docker and Jenkins

Docker, Microservices, Continuous Delivery are currently some of the most popular topics in the world of programming. In an environment consisting of dozens of microservices communicating with each other it seems to be particularly important the automation of the testing, building and deployment process. Docker is excellent solution for microservices, because it can create and run isolated containers with service. Today, I’m going to present you how to create basic continuous delivery pipeline for sample microservices using most popular software automation tool – Jenkins.

Sample Microservices

Before I get into the main topic of the article I say a few words about structure and tools used for sample microservices creation. Sample application consists of two sample microservices communicating with each other (account, customer), discovery server (Eureka) and API gateway (Zuul). It was implemented using Spring Boot and Spring Cloud frameworks. Its source code is available on GitHub. Spring Cloud has support for microservices discovery and gateway out of the box – we only have to define right dependencies inside maven project configuration file (pom.xml). The picture illustrating the adopted solution architecture is visible below. Both customer, account REST API services, discovery server and gateway running inside separated docker containers. Gateway is the entry point to the microservices system. It is interacting with all other services. It proxies requests to the selected microservices searching its addresses in discovery service. In case of existing more than one instance of each account or customer microservice the request is load balanced with  Ribbon  and  Feignclient. Account and customer services are registering themselves into the discovery server after startup. There is also a possibility of interaction between them, for example if we would like to find and return all customer’s account details.

Image title

I wouldn’t like to go into the details of those microservices implementation with Spring Boot and Spring Cloud frameworks. If you are interested in detailed description of the sample application development you can read it in my blog post here. Generally, Spring framework has a full support for microservices with all Netflix OSS tools like Ribbon, Hystrix and Eureka. In the blog post I described how to implement service discovery, distributed tracing, load balancing, logging trace ID propagation, API gateway for microservices with those solutions.

Dockerfiles

Each service in the sample source code has  Dockerfilewith docker image build definition. It’s really simple. Here’s Dockerfile for account service. We use openjdk as a base image. Jar file from target is added to the image and then run using java -jar command. Service is running on port 2222 which is exposed outside.

FROM openjdk
MAINTAINER Piotr Minkowski <piotr.minkowski@gmail.com>
ADD target/account-service.jar account-service.jar
ENTRYPOINT ["java", "-jar", "/account-service.jar"]
EXPOSE 2222

We also had to set main class in the JAR manifest. We achieve it using spring-boot-maven-plugin in module pom.xml. The fragment is visible below. We also set build finalName to cut off version number from target JAR file. Dockerfile and maven build definition is pretty similar for all other microservices.

<build>
  <finalName>account-service</finalName>
  <plugins>
    <plugin>
      <groupId>org.springframework.boot</groupId>
      <artifactId>spring-boot-maven-plugin</artifactId>
      <version>1.5.2.RELEASE</version>
      <configuration>
        <mainClass>pl.piomin.microservices.account.Application</mainClass>
        <addResources>true</addResources>
      </configuration>
      <executions>
        <execution>
          <goals>
            <goal>repackage</goal>
          </goals>
        </execution>
      </executions>
    </plugin>
  </plugins>
</build>

Jenkins pipelines

We use Pipeline Plugin for building continous delivery for our microservices. In addition to the standard plugins set on Jenkins we also need Docker Pipeline Plugin by CloudBees. There are four pipelines defined as you can see in the picture below.

Image title

Here’s pipeline definition written in Groovy language for discovery service. We have 5 stages of execution. Inside Checkout stage we are pulling changes for remote Git repository of the project. Then project is build with mvn clean install command and also maven version is read from  pom.xml. In Image stage we build docker image from discovery service Dockerfile and then push that image to local registry. In the fourth step we are running built image with default port exposed and hostname visible for linked docker containers. Finally, account pipeline is started with no wait option, which means that source pipeline is finished and won’t wait for account pipeline execution finish.

node {

    withMaven(maven:'maven') {

        stage('Checkout') {
            git url: 'https://github.com/piomin/sample-spring-microservices.git', credentialsId: 'github-piomin', branch: 'master'
        }

        stage('Build') {
            sh 'mvn clean install'

            def pom = readMavenPom file:'pom.xml'
            print pom.version
            env.version = pom.version
        }

        stage('Image') {
            dir ('discovery-service') {
                def app = docker.build "localhost:5000/discovery-service:${env.version}"
                app.push()
            }
        }

        stage ('Run') {
            docker.image("localhost:5000/discovery-service:${env.version}").run('-p 8761:8761 -h discovery --name discovery')
        }

        stage ('Final') {
            build job: 'account-service-pipeline', wait: false
        }      

    }

}

Account pipeline is very similar. The main difference is inside fourth stage where account service container is linked to discovery container. We need to linked that containers, because account-service is registering itself in discovery server and must be able to connect it using hostname.

node {

    withMaven(maven:'maven') {

        stage('Checkout') {
            git url: 'https://github.com/piomin/sample-spring-microservices.git', credentialsId: 'github-piomin', branch: 'master'
        }

        stage('Build') {
            sh 'mvn clean install'

            def pom = readMavenPom file:'pom.xml'
            print pom.version
            env.version = pom.version
        }

        stage('Image') {
            dir ('account-service') {
                def app = docker.build "localhost:5000/account-service:${env.version}"
                app.push()
            }
        }

        stage ('Run') {
            docker.image("localhost:5000/account-service:${env.version}").run('-p 2222:2222 -h account --name account --link discovery')
        }

        stage ('Final') {
            build job: 'customer-service-pipeline', wait: false
        }      

    }

}

Similar pipelines are also defined for customer and gateway service. They are available in main project catalog on each microservice as  Jenkinsfile. Every image which is built during pipeline execution is also pushed to local Docker registry. To enable local registry on our host we need to pull and run Docker registry image and also use that registry address as an image name prefix while pulling or pushing. Local registry is exposed on its default 5000 port. You can see the list of pushed images to local registry by calling its REST API, for example http://localhost:5000/v2/_catalog.

docker run -d --name registry -p 5000:5000 registry

Testing

You should launch the build on discovery-service-pipeline. This pipeline will not only run build for discovery service but also call start next pipeline build (account-service-pipeline) at the end.The same rule is configured for account-service-pipeline which calls customer-service-pipeline and for customer-service-pipeline which call gateway-service-pipeline. So, after all pipelines finish you can check the list of running docker containers by calling  docker ps  command. You should have seen 5 containers: local registry and our four microservices. You can also check the logs of each container by running command  docker logs, for example  docker logs account. If everything works fine you should be able te call some service like http://localhost:2222/accounts or via Zuul gateway http://localhost:8765/account/account.

</div>
<div class="cm-replace _replace_51">CONTAINER ID        IMAGE                                           COMMAND                  CREATED             STATUS              PORTS                    NAMES
fa3b9e408bb4        localhost:5000/gateway-service:1.0-SNAPSHOT     "java -jar /gatewa..."   About an hour ago   Up About an hour    0.0.0.0:8765->8765/tcp   gateway
cc9e2b44fe44        localhost:5000/customer-service:1.0-SNAPSHOT    "java -jar /custom..."   About an hour ago   Up About an hour    0.0.0.0:3333->3333/tcp   customer
49657f4531de        localhost:5000/account-service:1.0-SNAPSHOT     "java -jar /accoun..."   About an hour ago   Up About an hour    0.0.0.0:2222->2222/tcp   account
fe07b8dfe96c        localhost:5000/discovery-service:1.0-SNAPSHOT   "java -jar /discov..."   About an hour ago   Up About an hour    0.0.0.0:8761->8761/tcp   discovery
f9a7691ddbba        registry</div>
<div class="cm-replace _replace_51">

Conclusion

I have presented the basic sample of Continuous Delivery environment for microservices using Docker and Jenkins. You can easily find out the limitations of presented solution, for example we has to linked docker containers with each other to enable communication between them or all of the tools and microservices are running on the same machine. For more advanced sample we could use Jenkins slaves running on different machines or docker containers (more here), tools like Kubernetes for orchestration and clustering, maybe Docker-in-Docker containers for simulating multiple docker machines. I hope that article is a fine introduction to the microservices Continuous Delivery and helps you to understand the basics of this idea. I think that you could expect more my advanced articles about that subject near the future.

Microservices with Apache Camel

Apache Camel, as usual, is a step backwards in comparion with Spring framework and there is no difference in the case of microservices architecture. However, Camel have introduced new set of components for building microservices some months ago. In its newest version 2.18 there is a support for load balancing with Netflix Ribbon, circuit breaking with Netflix Hystrix, distributed tracing with Zipkin and service registration and discovery with Consul. The new key component for microservices support on Camel is ServiceCall EIP which allows to call a remote service in a distributed system where the service is looked up from a service registry. There are four tools which can be used as service registry for Apache Camel: etcd, Kubernetes, Ribbon and Consul. Release 2.18 also comes with a much-improved Spring Boot support.

In this articale I’m going to show you how to develop microservices in Camel with its support for Spring Boot, REST DSL and Consul. Sample application is available on GitHub. Below you see a picture with our application architecture.

camel-arch

To enable Spring Boot support in Camel application we need to add following dependency to pom.xml. After that we have to annotate our main class with @SpringBootApplication and set property camel.springboot.main-run-controller=true in application configuration file (application.properties or application.yml).

<dependency>
	<groupId>org.apache.camel</groupId>
	<artifactId>camel-spring-boot-starter</artifactId>
	<version>${camel.version}</version>
</dependency>

Then we just have to create Spring @Component extending Camel’s RouteBuilder. Inside route builder configuration we declare REST endpoint using Camel REST DSL. It’s really simple and intuitive. In the code visible below I exposed four REST endpoints: three for GET method and an single one for POST.  We are using netty4-http component as a web container for exposing REST endpoints and JSON binding. We also have to add to dependencies to pom.xml: camel-netty4-http for Netty framework and camel-jackson library for enabling consuming and producing JSON data. All routes are forwarding input requests to different methods inside Spring service @Component.

@Component
public class AccountRoute extends RouteBuilder {

	@Value("${port}")
	private int port;

	@Override
	public void configure() throws Exception {
		restConfiguration()
			.component("netty4-http")
			.bindingMode(RestBindingMode.json)
			.port(port);

		rest("/account")
			.get("/{id}")
				.to("bean:accountService?method=findById(${header.id})")
			.get("/customer/{customerId}")
				.to("bean:accountService?method=findByCustomerId(${header.customerId})")
			.get("/")
				.to("bean:accountService?method=findAll")
			.post("/").consumes("application/json").type(Account.class)
				.to("bean:accountService?method=add(${body})");
	}

}

Next element in our architecture is service registry component. We decided to use Consul. The simplest way to run it locally is to pull its docker image and run using docker command below. Consul provides UI management console and REST API for registering and searching services and key/value objects. REST API is available under v1 path and is well documented here.

docker run -d --name consul -p 8500:8500 -p 8600:8600 consul

Well, we have account microservice implemented and running Consul instance, so we would like to register our service there. And here we’ve got a problem. There is no mechanisms out of the box in Camel for service registration, there is only component for searching service. To be more precise I didn’t find any description about such a mechanism in Camel documentation… However, it may exists… somewhere. Maybe, you know how to find it? Here’s interesting solution for Camel Consul registry, but I didn’t check it out. I decided to rather simpler solution implemented by myself. I added two next routes to AccountRoute class.

from("direct:start").marshal().json(JsonLibrary.Jackson)
	.setHeader(Exchange.HTTP_METHOD, constant("PUT"))
	.setHeader(Exchange.CONTENT_TYPE, constant("application/json"))
	.to("http://192.168.99.100:8500/v1/agent/service/register");
from("direct:stop").shutdownRunningTask(ShutdownRunningTask.CompleteAllTasks)
	.toD("http://192.168.99.100:8500/v1/agent/service/deregister/${header.id}");

Route direct:start is running after Camel context startup and direct:stop before shutdown. Here’s EventNotifierSupport implementation for calling routes during startup and shutdown process. You can also try with camel-consul component, but in my opinion it is not well described in Camel documentation. List of services registered on Consul is available here: http://192.168.99.100:8500/v1/agent/services. I launch my account service with VM argument -Dport and it should be registered on Consul with account${port} ID.

@Component
public class EventNotifier extends EventNotifierSupport {

	@Value("${port}")
	private int port;

	@Override
	public void notify(EventObject event) throws Exception {
		if (event instanceof CamelContextStartedEvent) {
			CamelContext context = ((CamelContextStartedEvent) event).getContext();
			ProducerTemplate t = context.createProducerTemplate();
			t.sendBody("direct:start", new Register("account" + port, "account", "127.0.0.1", port));
		}
		if (event instanceof CamelContextStoppingEvent) {
			CamelContext context = ((CamelContextStoppingEvent) event).getContext();
			ProducerTemplate t = context.createProducerTemplate();
			t.sendBodyAndHeader("direct:stop", null, "id", "account" + port);
		}
	}

	@Override
	public boolean isEnabled(EventObject event) {
		return (event instanceof CamelContextStartedEvent || event instanceof CamelContextStoppingEvent);
	}

}

The last (but not least) element of our architecture is gateway. We also use netty for exposing REST services on port 8000.

restConfiguration()
	.component("netty4-http")
	.bindingMode(RestBindingMode.json)
	.port(8000);

We also have to provide configuration for connection with Consul registry and set it on CamelContext calling setServiceCallConfiguration method.

ConsulConfigurationDefinition config = new ConsulConfigurationDefinition();
config.setComponent("netty4-http");
config.setUrl("http://192.168.99.100:8500");
context.setServiceCallConfiguration(config);

Finally, we are defining routes which are mapping paths set on gateway to services registered on Consul using ServiceCall EIP. Now you call in your web browser one of those URLs, for example http://localhost:8000/account/1. If you would like to map path also while serviceCall EIP you need to put ‘//‘ instead of sinle slash ‘/‘ described in the Camel documentation. For example from(“rest:get:account”).serviceCall(“account//all”), not serviceCall(“account/all”).

from("rest:get:account:/{id}").serviceCall("account");
from("rest:get:account:/customer/{customerId}").serviceCall("account");
from("rest:get:account:/").serviceCall("account");
from("rest:post:account:/").serviceCall("account");

Conclusion

I was positively surprised by Camel. Before I started working on the sample described in this post I didn’t expect that Camel has such many features for building microservice solutions and working with them will be simple and fast. Of cource I can also find some disadvantages like inaccuracies or errors in documentation, only short description of some new components in developer guide or no registration process in discovery server like Consul. In these areas, I see an advantage of Spring Framework. But on the other hand Camel has support for some useful tools like etcd or Kubernetes which is not available in Spring. In conclusion, I’m looking forward to further improvements in Camel components for building microservices.

Microservices security with Oauth2

Preface

One of the most important aspects to consider when exposing a public access API consisting of many microservices is security. Spring has some interesting features and frameworks which makes configuration of our microservices security easier. In this article I’m going to show you how to use Spring Cloud and Oauth2 to provide token access security behind API gateway.

Theory

OAuth2 standard is currently used by all the major websites that allow you to access their resources through the shared API. It is an open authorization standard allowing users to share their private resources stored in one page to another page without having to go into the service of their credentials. These are basic terms related to oauth2.

  • Resource Owner – dispose of access to the resource
  • Resource Server – server that stores the owner’s resources that can be shared using special token
  • Authorization Server – manages the allocation of keys, tokens and other temporary resource access codes. It also has to ensure that access is granted to the relevant person
  • Access Token – the key that allows access to a resource
  • Authorization Grant – grants permission for access. There are different ways to confirm access: authorization code, implicit, resource owner password credentials, and client credentials

You can read more about this standard here and in this digitalocean article. The flow of this protocol has three main steps. In the begining we authorization request is sent to Resource Owner. After response from Resource Owner we send authorization grant request to Authorization Server and receive access token. Finally, we send this access token to Resource Server and if it is valid the API serves the resource to the application.

Our solution

The picture below shows architecture of our sample. We have API Gateway (Zuul) which proxies our requests to authorization server and two instances of account microservice. Authorization server is some kind of infrastructure service which provides outh2 security mechanisms. We also have discovery service (Eureka) where all of our microservices are registered.

sec-micro

Gateway

For our sample we won’t provide any security on API gateway. It just has to proxy requests from clients to authorization server and account microservices. In the Zuul’s gateway configuration visible below we set sensitiveHeaders property on empty value to enable Authorization HTTP header forward. By default Zuul cut that header while forwarding our request to the target API which is incorrect because of the basic authorization demanded by our services behind gateway.

zuul:
  routes:
    uaa:
      path: /uaa/**
      sensitiveHeaders:
      serviceId: auth-server
    account:
      path: /account/**
      sensitiveHeaders:
      serviceId: account-service

Main class inside gateway source code is very simple. It only has to enable Zuul proxy feature and discovery client for collecting services from Eureka registry.

@SpringBootApplication
@EnableZuulProxy
@EnableDiscoveryClient
public class GatewayServer {

	public static void main(String[] args) {
		SpringApplication.run(GatewayServer.class, args);
	}

}

Authorization Server

Our authorization server is as simple as possible. It based on default Spring security configuration. Client authorization details are stored in an in-memory repository. Of cource in the production mode you would like to use other implementations instead of in-memory repository like JDBC datasource and token store. You can read more about Spring authorization mechanisms in Spring Security Reference and Spring Boot Security. Here’s fragment of configuration from application.yml. We provided user basic authentication data and basic security credentials for the /token endpoint: client-id and client-secret. The user credentials are the normal Spring Security user details.

security:
  user:
    name: root
    password: password
  oauth2:
    client:
      client-id: acme
      client-secret: secret

Here’s main class of our authentication server with @EnableAuthorizationServer. We also exposed one REST endpoint with user authentication details for account service and enabled Eureka registration and discovery for clients.

@SpringBootApplication
@EnableAuthorizationServer
@EnableDiscoveryClient
@EnableResourceServer
@RestController
public class AuthServer {

	public static void main(String[] args) {
		SpringApplication.run(AuthServer.class, args);
	}

	@RequestMapping("/user")
	public Principal user(Principal user) {
		return user;
	}

}

Application – account microservice

Our sample microservice has only one endpoint for @GET request which always returns the same account. In main class resource server and Eureka discovery are enabled. Service configuration is trivial. Sample application source code is available on GitHub.

@SpringBootApplication
@EnableDiscoveryClient
@EnableResourceServer
public class AccountService {

	public static void main(String[] args) {
		SpringApplication.run(AccountService.class, args);
	}

}
security:
  user:
    name: root
    password: password
  oauth2:
    resource:
      loadBalanced: true
      userInfoUri: http://localhost:9999/user

Testing

We only need web browser and REST client (for example Chrome Advanced REST client) to test our solution. Let’s start from sending authorization request to resource owner. We can call oauth2 authorize endpoint via Zuul gateway in the web browser.

http://localhost:8765/uaa/oauth/authorize?response_type=token&client_id=acme&redirect_uri=http://example.com&scope=openid&state=48532

After sending this request we should see page below. Select Approve and click Authorize for requests an access token from the authorization server. If the application identity is authenticated and the authorization grant is valid an access token to the application should be returned in the HTTP response.

oauth2

http://example.com/#access_token=b1acaa35-1ebd-4995-987d-56ee1c0619e5&token_type=bearer&state=48532&expires_in=43199

And the final step is to call account endpoint using access token. We had to put it into Authorization header as bearer token. In the sample application logging level for security operation is set to TRACE so you can easily find out what happened if something goes wrong.

call

Conclusion

To be honest I’m not very familiar with security issues in applications. So one very important thing for me is the simplicity of security solution I decided to use. In Spring Security we have almost all needed mechanisms out of the box. It also provides components which can be easily extendable for more advanced requirements. You should treat this article as a brief introduction to more advanced solutions using Spring Cloud and Spring Security projects.

Reactive microservices with Spring 5

Spring team has announced support for reactive programming model from 5.0 release. New Spring version will probably be released on March. Fortunately, milestone and snapshot versions with these changes are now available on public spring repositories. There is new Spring Web Reactive project with support for reactive @Controller and also new WebClient with client-side reactive support. Today I’m going to take a closer look on solutions suggested by Spring team.

Following Spring WebFlux documentation  the Spring Framework uses Reactor internally for its own reactive support. Reactor is a Reactive Streams implementation that further extends the basic Reactive Streams Publisher contract with the Flux and Mono composable API types to provide declarative operations on data sequences of 0..N and 0..1. On the server-side Spring supports annotation based and functional programming models. Annotation model use @Controller and the other annotations supported also with Spring MVC. Reactive controller will be very similar to standard REST controller for synchronous services instead of it uses Flux, Mono and Publisher objects. Today I’m going to show you how to develop simple reactive microservices using annotation model and MongoDB reactive module. Sample application source code is available on GitHub.

For our example we need to use snapshots of Spring Boot 2.0.0 and Spring Web Reactive 0.1.0. Here are main pom.xml fragment and single microservice pom.xml below. In our microservices we use Netty instead of default Tomcat server.

	<parent>
		<groupId>org.springframework.boot</groupId>
		<artifactId>spring-boot-starter-parent</artifactId>
		<version>2.0.0.BUILD-SNAPSHOT</version>
	</parent>
	<dependencyManagement>
		<dependencies>
			<dependency>
				<groupId>org.springframework.boot.experimental</groupId>
				<artifactId>spring-boot-dependencies-web-reactive</artifactId>
				<version>0.1.0.BUILD-SNAPSHOT</version>
				<type>pom</type>
				<scope>import</scope>
			</dependency>
		</dependencies>
	</dependencyManagement>
	<dependencies>
		<dependency>
			<groupId>org.springframework.boot</groupId>
			<artifactId>spring-boot-starter-data-mongodb-reactive</artifactId>
		</dependency>
		<dependency>
			<groupId>org.springframework.boot.experimental</groupId>
			<artifactId>spring-boot-starter-web-reactive</artifactId>
			<exclusions>
				<exclusion>
					<groupId>org.springframework.boot</groupId>
					<artifactId>spring-boot-starter-tomcat</artifactId>
				</exclusion>
			</exclusions>
		</dependency>
		<dependency>
			<groupId>io.projectreactor.ipc</groupId>
			<artifactId>reactor-netty</artifactId>
		</dependency>
		<dependency>
			<groupId>io.netty</groupId>
			<artifactId>netty-all</artifactId>
		</dependency>
		<dependency>
			<groupId>pl.piomin.services</groupId>
			<artifactId>common</artifactId>
			<version>${project.version}</version>
		</dependency>
		<dependency>
			<groupId>org.springframework.boot</groupId>
			<artifactId>spring-boot-starter-test</artifactId>
			<scope>test</scope>
		</dependency>
		<dependency>
			<groupId>io.projectreactor.addons</groupId>
			<artifactId>reactor-test</artifactId>
			<scope>test</scope>
		</dependency>
	</dependencies>

We have two microservices: account-service and customer-service. Each of them have its own MongoDB database and they are exposing simple reactive API for searching and saving data. Also customer-service interacting with account-service to get all customer accounts and return them in customer-service method. Here’s our account controller code.

@RestController
public class AccountController {

	@Autowired
	private AccountRepository repository;

	@GetMapping(value = "/account/customer/{customer}")
	public Flux<Account> findByCustomer(@PathVariable("customer") Integer customerId) {
		return repository.findByCustomerId(customerId)
				.map(a -> new Account(a.getId(), a.getCustomerId(), a.getNumber(), a.getAmount()));
	}

	@GetMapping(value = "/account")
	public Flux<Account> findAll() {
		return repository.findAll().map(a -> new Account(a.getId(), a.getCustomerId(), a.getNumber(), a.getAmount()));
	}

	@GetMapping(value = "/account/{id}")
	public Mono<Account> findById(@PathVariable("id") Integer id) {
		return repository.findById(id)
				.map(a -> new Account(a.getId(), a.getCustomerId(), a.getNumber(), a.getAmount()));
	}

	@PostMapping("/person")
	public Mono<Account> create(@RequestBody Publisher<Account> accountStream) {
		return repository
				.save(Mono.from(accountStream)
						.map(a -> new pl.piomin.services.account.model.Account(a.getNumber(), a.getCustomerId(),
								a.getAmount())))
				.map(a -> new Account(a.getId(), a.getCustomerId(), a.getNumber(), a.getAmount()));
	}

}

In all API methods we also perform mapping from Account entity (MongoDB @Document) to Account DTO available in our common module. Here’s account repository class. It uses ReactiveMongoTemplate for interacting with Mongo collections.

@Repository
public class AccountRepository {

	@Autowired
	private ReactiveMongoTemplate template;

	public Mono<Account> findById(Integer id) {
		return template.findById(id, Account.class);
	}

	public Flux<Account> findAll() {
		return template.findAll(Account.class);
	}

	public Flux<Account> findByCustomerId(String customerId) {
		return template.find(query(where("customerId").is(customerId)), Account.class);
	}

	public Mono<Account> save(Mono<Account> account) {
		return template.insert(account);
	}

}

In our Spring Boot main or @Configuration class we should declare spring beans for MongoDB with connection settings.

@SpringBootApplication
public class Application {

	public static void main(String[] args) {
		SpringApplication.run(Application.class, args);
	}

	public @Bean MongoClient mongoClient() {
		return MongoClients.create("mongodb://192.168.99.100");
	}

	public @Bean ReactiveMongoTemplate reactiveMongoTemplate() {
		return new ReactiveMongoTemplate(mongoClient(), "account");
	}

}

I used docker MongoDB container for working on this sample.

docker run -d --name mongo -p 27017:27017 mongo

In customer service we call endpoint /account/customer/{customer} from account service. I declared @Bean WebClient in our main class.

	public @Bean WebClient webClient() {
		return WebClient.builder().clientConnector(new ReactorClientHttpConnector()).baseUrl("http://localhost:2222").build();
	}

Here’s customer controller fragment. @Autowired WebClient calls account service after getting customer from MongoDB.

	@Autowired
	private WebClient webClient;

	@GetMapping(value = "/customer/accounts/{pesel}")
	public Mono<Customer> findByPeselWithAccounts(@PathVariable("pesel") String pesel) {
		return repository.findByPesel(pesel).flatMap(customer -> webClient.get().uri("/account/customer/{customer}", customer.getId()).accept(MediaType.APPLICATION_JSON)
				.exchange().flatMap(response -> response.bodyToFlux(Account.class))).collectList().map(l -> {return new Customer(pesel, l);});
	}

We can test GET calls using web browser or REST clients. With POST it’s not so simple. Here are two simple test cases for adding new customer and getting customer with accounts. Test getCustomerAccounts need account service running on port 2222.

@RunWith(SpringRunner.class)
@SpringBootTest(webEnvironment = SpringBootTest.WebEnvironment.RANDOM_PORT)
public class CustomerTest {

	private static final Logger logger = Logger.getLogger("CustomerTest");

	private WebClient webClient;

	@LocalServerPort
	private int port;

	@Before
	public void setup() {
		this.webClient = WebClient.create("http://localhost:" + this.port);
	}

	@Test
	public void getCustomerAccounts() {
		Customer customer = this.webClient.get().uri("/customer/accounts/234543647565")
				.accept(MediaType.APPLICATION_JSON).exchange().then(response -> response.bodyToMono(Customer.class))
				.block();
		logger.info("Customer: " + customer);
	}

	@Test
	public void addCustomer() {
		Customer customer = new Customer(null, "Adam", "Kowalski", "123456787654");
		customer = webClient.post().uri("/customer").accept(MediaType.APPLICATION_JSON)
				.exchange(BodyInserters.fromObject(customer)).then(response -> response.bodyToMono(Customer.class))
				.block();
		logger.info("Customer: " + customer);
	}

}

Conclusion

Spring initiative with support for reactive programming seems promising, but now it’s on early stage of development. There is no availibility to use it with popular projects from Spring Cloud like Eureka, Ribbon or Hystrix. When I tried to add this dependencies to pom.xml my service failed to start. I hope that in the near future such functionalities like service discovery and load balancing will be available also for reactive microservices same as for synchronous REST microservices. Spring has also support for reactive model in Spring Cloud Stream project. It’s more stable than WebFlux framework. I’ll try use it in the future.

Launch microservice in Docker container

Docker, Microservices and Continuous Delivery are increasingly popular topics among modern development teams. Today I’m going to create simple microservice and present you how to run it in Docker container using Maven plugin or Jenkins pipeline. Let’s start from application code which is available on https://github.com/piomin/sample-docker-microservice.git. It has only one endpoint for searching all persons and single person by id. Here’s controller code:

package pl.piomin.microservices.person;

import java.util.ArrayList;
import java.util.List;
import java.util.logging.Logger;

import org.springframework.web.bind.annotation.PathVariable;
import org.springframework.web.bind.annotation.RequestMapping;
import org.springframework.web.bind.annotation.RestController;

@RestController
public class Api {

protected Logger logger = Logger.getLogger(Api.class.getName());

private List<Person> persons;

public Api() {
persons = new ArrayList<>();
persons.add(new Person(1, "Jan", "Kowalski", 22));
persons.add(new Person(1, "Adam", "Malinowski", 33));
persons.add(new Person(1, "Tomasz", "Janowski", 25));
persons.add(new Person(1, "Alina", "Iksińska", 54));
}

@RequestMapping("/person")
public List<Person> findAll() {
logger.info("Api.findAll()");
return persons;
}

@RequestMapping("/person/{id}")
public Person findById(@PathVariable("id") Integer id) {
logger.info(String.format("Api.findById(%d)", id));
return persons.stream().filter(p -> (p.getId().intValue() == id)).findAny().get();
}

}

We need to have Docker installed on our machine and Docker Registry container running on port 5000. If you are interested in commercial support, there is also Docker Trusted Registry provides an image registry and same other features like LDAP/Active Directory integration, security certificates.

docker run -d --name registry -p 5000:5000 registry:latest

We use openjdk as a base image for our new microservice image defined in Dockerfile. Application JAR file will be launched in java command and exposed on port 2222.

FROM openjdk
MAINTAINER Piotr Minkowski <piotr.minkowski@gmail.com>
ADD sample-docker-microservice-1.0-SNAPSHOT.jar person-service.jar
ENTRYPOINT ["java", "-jar", "/person-service.jar"]
EXPOSE 2222

We use docker-maven-plugin to configure image building process inside pom.xml. There is no need for using Dockerfile with that plugin. It has equivalent tags in configuration which could be use instead of Dockerfile entries. Our example is based on Dockerfile.

<plugin>
<groupId>com.spotify</groupId>
<artifactId>docker-maven-plugin</artifactId>
<version>0.4.13</version>
<configuration>
<imageName>${docker.image.prefix}/${project.artifactId}</imageName>
<imageTags>${project.version}</imageTags>
<dockerDirectory>src/main/docker</dockerDirectory>
<dockerHost>https://192.168.99.100:2376</dockerHost>
<dockerCertPath>C:\Users\minkowp\.docker\machine\machines\default</dockerCertPath>
<resources>
<resource>
<targetPath>/</targetPath>
<directory>${project.build.directory}</directory>
<include>${project.build.finalName}.jar</include>
</resource>
</resources>
</configuration>
</plugin>

Finally, we can build our code using Maven command.

mvn clean package docker:build

After running maven command the images is tagged and pushed to local repository.

docker tag e106e5bf3d57 localhost:5000/microservices/sample-docker-microservice:1.0-SNAPSHOT
docker push localhost:5000/microservices/sample-docker-microservice:1.0-SNAPSHOT

Application images now is registered in local Docker Registry. Optionally, we could push it docker.io or to enterprise Docker Trusted Registry. We can check it out using API available at http://192.168.99.100:5000/v2/_catalog. Here’s Docker command for running with newly created image stored in local register. Service is available at http://192.168.99.100:2222/person/.

docker run -d --name sample1 -p 2222:2222 microservice/sample-docker-microservice:1.0-SNAPSHOT


How to ship logs with Logstash, Elasticsearch and RabbitMQ

Here’s simple picture of our solution. We’ll start from sample Spring Boot application shipping logs to RabbitMQ exchange. Then using Docker, we’ll configure environment containing RabbitMQ, Logstash, Elasticsearch and Kibana – each running on separated Docker container.

sscg9hyasgmdht1k46653

My sample Java application is available on https://github.com/piomin/sample-amqp-logging.git.

There are only two Spring Boot dependencies needed inside pom.xml. First for REST controller and second for AMQP dependencies.

<dependencies>
	<dependency>
		<groupId>org.springframework.boot</groupId>
		<artifactId>spring-boot-starter-data-rest</artifactId>
	</dependency>
	<dependency>
		<groupId>org.springframework.boot</groupId>
		<artifactId>spring-boot-starter-amqp</artifactId>
	</dependency>
</dependencies>

Here’s simple controller with one logging message.

import org.slf4j.Logger;
import org.slf4j.LoggerFactory;
import org.springframework.web.bind.annotation.PathVariable;
import org.springframework.web.bind.annotation.RequestMapping;
import org.springframework.web.bind.annotation.RestController;

@RestController
public class Controller {

 protected Logger logger = LoggerFactory.getLogger(Controller.class.getName());

 @RequestMapping("/hello/{param}")
 public String hello(@PathVariable("param") String param) {
  logger.info("Controller.hello(" + param + ")");
  return "Hello";
 }

}

I use logback as logger implementation and Spring AMQP appender for sending logs to RabbitMQ over AMQP protocol.

<appender name="AMQP" class="org.springframework.amqp.rabbit.logback.AmqpAppender">
	<layout>
		<pattern>
			{
			"time": "%date{ISO8601}",
			"thread": "%thread",
			"level": "%level",
			"class": "%logger{36}",
			"message": "%message"
			}
		</pattern>
	</layout>

	<!-- RabbitMQ connection -->
	<host>192.168.99.100</host>
	<port>30000</port>
	<username>guest</username>
	<password>guest</password>

	<applicationId>api-service-4</applicationId>
	<routingKeyPattern>api-service-4</routingKeyPattern>
	<declareExchange>true</declareExchange>
	<exchangeType>direct</exchangeType>
	<exchangeName>ex_logstash</exchangeName>

	<generateId>true</generateId>
	<charset>UTF-8</charset>
	<durable>true</durable>
	<deliveryMode>PERSISTENT</deliveryMode>
</appender>

I run RabbitMQ server using docker image https://hub.docker.com/_/rabbitmq/. Here’s docker command for it. I choosed rabbitmq:management docker image to enable expose of RabbitMQ UI management console on port 30001. After running this command we can go to management console available on 192.168.99.100:30001. There we have to create queue named q_logstash and direct exchange named ex_logstach having routing set to q_logstash queue.

docker run -d -it --name rabbit --hostname rabbit -p 30000:5672 -p 30001:15672
 rabbitmq:management


rabbit
RabbitMQ management console with exchange and queue binding

Then we run Elasticsearch and Kibana docker images. Kibana container need to be linked to elasticsearch.

docker run -d -it --name es -p 9200:9200 -p 9300:9300 elasticsearch
docker run -d -it --name kibana --link es:elasticsearch -p 5601:5601 kibana

Finally we can run Logstash docker image which get RabbitMQ queue as input and set Elasticsearch api as output. We have to change host to docker machine default address and port configured when running RabbitMQ container. Also we have durable queue so it has to be changed because default value for that is false following this reference:https://www.elastic.co/guide/en/logstash/current/plugins-inputs-rabbitmq.html

docker run -d -it --name logstash logstash -e 'input { rabbitmq {
host => "192.168.99.100" port => 30000 durable => true } }
output { elasticsearch { hosts => ["192.168.99.100"] } }'

After running all docker containers for RabbitMQ, Logstash, Elasticsearch and Kibana we can run our sample Spring Boot application and see logs on Kibana available on http://192.168.99.100:5601.