OpenShift 4 has introduced official support for service mesh based on Istio framework. This support is built on top of Maistra operator. Maistra is an opinionated distribution of Istio designed to work with Openshift. It combines Kiali, Jaeger, and Prometheus into a platform managed by the operator. The current version of OpenShift Service Mesh is 1.1.5. According to the documentation, this version of the service mesh supports Istio 1.4.8. Also, for creating this tutorial I was using OpenShift 4.4 installed on Azure. Continue reading “Intro to OpenShift Service Mesh”
Tag: Istio
Spring Boot Library for integration with Istio
In this article I’m going to present an annotation-based Spring Boot library for integration with Istio. The Spring Boot Istio library provides auto-configuration, so you don’t have to do anything more than including it to your dependencies to be able to use it. Continue reading “Spring Boot Library for integration with Istio”
Circuit breaker and retries on Kubernetes with Istio and Spring Boot
An ability to handle communication failures in an inter-service communication is an absolute necessity for every single service mesh framework. It includes handling of timeouts and HTTP error codes. In this article I’m going to show how to configure retry and circuit breaker mechanisms using Istio. The same as for the previous article about Istio Service mesh on Kubernetes with Istio and Spring Boot we will analyze a communication between two simple Spring Boot applications deployed on Kubernetes. But instead of very basic example we are going to discuss more advanced topics. Continue reading “Circuit breaker and retries on Kubernetes with Istio and Spring Boot”
Service mesh on Kubernetes with Istio and Spring Boot
Istio is currently the leading solution for building service mesh on Kubernetes. Thanks to Istio you can take control of a communication process between microservices. It also lets you to secure and observe your services. Spring Boot is still the most popular JVM framework for building microservice applications. In this article I’m going to show how to use both these tools to build applications and provide communication between them over HTTP on Kubernetes. Continue reading “Service mesh on Kubernetes with Istio and Spring Boot”
Best Practices For Microservices on Kubernetes
There are several best practices for building microservices architecture properly. You may find many articles about it online. One of them is my previous article Spring Boot Best Practices For Microservices. I focused there on the most important aspects that should be considered when running microservice applications built on top of Spring Boot on production. I didn’t assumed there any platform used for orchestration or management, but just a group of independent applications. In this article I’m going to extend the list of already introduced best practices with some new rules dedicated especially for microservices deployed on Kubernetes platform. Continue reading “Best Practices For Microservices on Kubernetes”
Integration tests on OpenShift using Arquillian Cube and Istio
Building integration tests for applications deployed on Kubernetes/OpenShift platforms seems to be quite a big challenge. With Arquillian Cube, an Arquillian extension for managing Docker containers, it is not complicated. Kubernetes extension, being a part of Arquillian Cube, helps you write and run integration tests for your Kubernetes/Openshift application. It is responsible for creating and managing temporary namespace for your tests, applying all Kubernetes resources required to setup your environment and once everything is ready it will just run defined integration tests.
The one very good information related to Arquillian Cube is that it supports Istio framework. You can apply Istio resources before executing tests. One of the most important features of Istio is an ability to control of traffic behavior with rich routing rules, retries, delays, failovers, and fault injection. It allows you to test some unexpected situations during network communication between microservices like server errors or timeouts.
If you would like to run some tests using Istio resources on Minishift you should first install it on your platform. To do that you need to change some privileges for your OpenShift user. Let’s do that.
1. Enabling Istio on Minishift
Istio requires some high-level privileges to be able to run on OpenShift. To add those privileges to the current user we need to login as an user with cluster admin role. First, we should enable admin-user addon on Minishift by executing the following command.
$ minishift addons enable admin-user
After that you would be able to login as system:admin user, which has cluster-admin role. With this user you can also add cluster-admin role to other users, for example admin. Let’s do that.
$ oc login -u system:admin
$ oc adm policy add-cluster-role-to-user cluster-admin admin
$ oc login -u admin -p admin
Now, let’s create new project dedicated especially for Istio and then add some required privileges.
$ oc new-project istio-system
$ oc adm policy add-scc-to-user anyuid -z istio-ingress-service-account -n istio-system
$ oc adm policy add-scc-to-user anyuid -z default -n istio-system
$ oc adm policy add-scc-to-user anyuid -z prometheus -n istio-system
$ oc adm policy add-scc-to-user anyuid -z istio-egressgateway-service-account -n istio-system
$ oc adm policy add-scc-to-user anyuid -z istio-citadel-service-account -n istio-system
$ oc adm policy add-scc-to-user anyuid -z istio-ingressgateway-service-account -n istio-system
$ oc adm policy add-scc-to-user anyuid -z istio-cleanup-old-ca-service-account -n istio-system
$ oc adm policy add-scc-to-user anyuid -z istio-mixer-post-install-account -n istio-system
$ oc adm policy add-scc-to-user anyuid -z istio-mixer-service-account -n istio-system
$ oc adm policy add-scc-to-user anyuid -z istio-pilot-service-account -n istio-system
$ oc adm policy add-scc-to-user anyuid -z istio-sidecar-injector-service-account -n istio-system
$ oc adm policy add-scc-to-user anyuid -z istio-galley-service-account -n istio-system
$ oc adm policy add-scc-to-user privileged -z default -n myproject
Finally, we may proceed to Istio components installation. I downloaded the current newest version of Istio – 1.0.1. Installation file is available under install/kubernetes directory. You just have to apply it to your Minishift instance by calling oc apply command.
$ oc apply -f install/kubernetes/istio-demo.yaml
2. Enabling Istio for Arquillian Cube
I have already described how to use Arquillian Cube to run tests with OpenShift in the article Testing microservices on OpenShift using Arquillian Cube. In comparison with the sample described in that article we need to include dependency responsible for enabling Istio features.
<dependency>
	<groupId>org.arquillian.cube</groupId>
	<artifactId>arquillian-cube-istio-kubernetes</artifactId>
	<version>1.17.1</version>
	<scope>test</scope>
</dependency>
Now, we can use @IstioResource annotation to apply Istio resources into OpenShift cluster or IstioAssistant bean to be able to use some additional methods for adding, removing resources programmatically or polling an availability of URLs.
Let’s take a look on the following JUnit test class using Arquillian Cube with Istio support. In addition to the standard test created for running on OpenShift instance I have added Istio resource file customer-to-account-route.yaml. Then I have invoked method await provided by IstioAssistant. First test test1CustomerRoute creates new customer, so it needs to wait until customer-route is deployed on OpenShift. The next test test2AccountRoute adds account for the newly created customer, so it needs to wait until account-route is deployed on OpenShift. Finally, the test test3GetCustomerWithAccounts is ran, which calls the method responsible for finding customer by id with list of accounts. In that case customer-service calls method endpoint by account-service. As you have probably find out the last line of that test method contains an assertion to empty list of accounts: Assert.assertTrue(c.getAccounts().isEmpty()). Why? We will simulate the timeout in communication between customer-service and account-service using Istio rules.
@Category(RequiresOpenshift.class)
@RequiresOpenshift
@Templates(templates = {
        @Template(url = "classpath:account-deployment.yaml"),
        @Template(url = "classpath:deployment.yaml")
})
@RunWith(ArquillianConditionalRunner.class)
@IstioResource("classpath:customer-to-account-route.yaml")
@FixMethodOrder(MethodSorters.NAME_ASCENDING)
public class IstioRuleTest {

    private static final Logger LOGGER = LoggerFactory.getLogger(IstioRuleTest.class);
    private static String id;

    @ArquillianResource
    private IstioAssistant istioAssistant;

    @RouteURL(value = "customer-route", path = "/customer")
    private URL customerUrl;
    @RouteURL(value = "account-route", path = "/account")
    private URL accountUrl;

    @Test
    public void test1CustomerRoute() {
        LOGGER.info("URL: {}", customerUrl);
        istioAssistant.await(customerUrl, r -> r.isSuccessful());
        LOGGER.info("URL ready. Proceeding to the test");
        OkHttpClient httpClient = new OkHttpClient();
        RequestBody body = RequestBody.create(MediaType.parse("application/json"), "{\"name\":\"John Smith\", \"age\":33}");
        Request request = new Request.Builder().url(customerUrl).post(body).build();
        try {
            Response response = httpClient.newCall(request).execute();
            ResponseBody b = response.body();
            String json = b.string();
            LOGGER.info("Test: response={}", json);
            Assert.assertNotNull(b);
            Assert.assertEquals(200, response.code());
            Customer c = Json.decodeValue(json, Customer.class);
            this.id = c.getId();
        } catch (IOException e) {
            e.printStackTrace();
        }
    }

    @Test
    public  void test2AccountRoute() {
        LOGGER.info("Route URL: {}", accountUrl);
        istioAssistant.await(accountUrl, r -> r.isSuccessful());
        LOGGER.info("URL ready. Proceeding to the test");
        OkHttpClient httpClient = new OkHttpClient();
        RequestBody body = RequestBody.create(MediaType.parse("application/json"), "{\"number\":\"01234567890\", \"balance\":10000, \"customerId\":\"" + this.id + "\"}");
        Request request = new Request.Builder().url(accountUrl).post(body).build();
        try {
            Response response = httpClient.newCall(request).execute();
            ResponseBody b = response.body();
            String json = b.string();
            LOGGER.info("Test: response={}", json);
            Assert.assertNotNull(b);
            Assert.assertEquals(200, response.code());
        } catch (IOException e) {
            e.printStackTrace();
        }
    }

    @Test
    public void test3GetCustomerWithAccounts() {
        String url = customerUrl + "/" + id;
        LOGGER.info("Calling URL: {}", customerUrl);
        OkHttpClient httpClient = new OkHttpClient();
        Request request = new Request.Builder().url(url).get().build();
        try {
            Response response = httpClient.newCall(request).execute();
            String json = response.body().string();
            LOGGER.info("Test: response={}", json);
            Assert.assertNotNull(response.body());
            Assert.assertEquals(200, response.code());
            Customer c = Json.decodeValue(json, Customer.class);
            Assert.assertTrue(c.getAccounts().isEmpty());
        } catch (IOException e) {
            e.printStackTrace();
        }
    }

}
3. Creating Istio rules
On of the interesting features provided by Istio is an availability of injecting faults to the route rules. we can specify one or more faults to inject while forwarding HTTP requests to the rule’s corresponding request destination. The faults can be either delays or aborts. We can define a percentage level of error using percent field for the both types of fault. In the following Istio resource I have defines 2 seconds delay for every single request sent to account-service.
apiVersion: networking.istio.io/v1alpha3
kind: VirtualService
metadata:
  name: account-service
spec:
  hosts:
    - account-service
  http:
  - fault:
      delay:
        fixedDelay: 2s
        percent: 100
    route:
    - destination:
        host: account-service
        subset: v1
Besides VirtualService we also need to define DestinationRule for account-service. It is really simple – we have just define version label of the target service.
apiVersion: networking.istio.io/v1alpha3
kind: DestinationRule
metadata:
  name: account-service
spec:
  host: account-service
  subsets:
  - name: v1
    labels:
      version: v1
Before running the test we should also modify OpenShift deployment templates of our sample applications. We need to inject some Istio resources into the pods definition using istioctl kube-inject command as shown below.
$ istioctl kube-inject -f deployment.yaml -o customer-deployment-istio.yaml
$ istioctl kube-inject -f account-deployment.yaml -o account-deployment-istio.yaml
Finally, we may rewrite generated files into OpenShift templates. Here’s the fragment of Openshift template containing DeploymentConfig definition for account-service.
kind: Template
apiVersion: v1
metadata:
  name: account-template
objects:
  - kind: DeploymentConfig
    apiVersion: v1
    metadata:
      name: account-service
      labels:
        app: account-service
        name: account-service
        version: v1
    spec:
      template:
        metadata:
          annotations:
            sidecar.istio.io/status: '{"version":"364ad47b562167c46c2d316a42629e370940f3c05a9b99ccfe04d9f2bf5af84d","initContainers":["istio-init"],"containers":["istio-proxy"],"volumes":["istio-envoy","istio-certs"],"imagePullSecrets":null}'
          name: account-service
          labels:
            app: account-service
            name: account-service
            version: v1
        spec:
          containers:
          - env:
            - name: DATABASE_NAME
              valueFrom:
                secretKeyRef:
                  key: database-name
                  name: mongodb
            - name: DATABASE_USER
              valueFrom:
                secretKeyRef:
                  key: database-user
                  name: mongodb
            - name: DATABASE_PASSWORD
              valueFrom:
                secretKeyRef:
                  key: database-password
                  name: mongodb
            image: piomin/account-vertx-service
            name: account-vertx-service
            ports:
            - containerPort: 8095
            resources: {}
          - args:
            - proxy
            - sidecar
            - --configPath
            - /etc/istio/proxy
            - --binaryPath
            - /usr/local/bin/envoy
            - --serviceCluster
            - account-service
            - --drainDuration
            - 45s
            - --parentShutdownDuration
            - 1m0s
            - --discoveryAddress
            - istio-pilot.istio-system:15007
            - --discoveryRefreshDelay
            - 1s
            - --zipkinAddress
            - zipkin.istio-system:9411
            - --connectTimeout
            - 10s
            - --statsdUdpAddress
            - istio-statsd-prom-bridge.istio-system:9125
            - --proxyAdminPort
            - "15000"
            - --controlPlaneAuthPolicy
            - NONE
            env:
            - name: POD_NAME
              valueFrom:
                fieldRef:
                  fieldPath: metadata.name
            - name: POD_NAMESPACE
              valueFrom:
                fieldRef:
                  fieldPath: metadata.namespace
            - name: INSTANCE_IP
              valueFrom:
                fieldRef:
                  fieldPath: status.podIP
            - name: ISTIO_META_POD_NAME
              valueFrom:
                fieldRef:
                  fieldPath: metadata.name
            - name: ISTIO_META_INTERCEPTION_MODE
              value: REDIRECT
            image: gcr.io/istio-release/proxyv2:1.0.1
            imagePullPolicy: IfNotPresent
            name: istio-proxy
            resources:
              requests:
                cpu: 10m
            securityContext:
              readOnlyRootFilesystem: true
              runAsUser: 1337
            volumeMounts:
            - mountPath: /etc/istio/proxy
              name: istio-envoy
            - mountPath: /etc/certs/
              name: istio-certs
              readOnly: true
          initContainers:
          - args:
            - -p
            - "15001"
            - -u
            - "1337"
            - -m
            - REDIRECT
            - -i
            - '*'
            - -x
            - ""
            - -b
            - 8095,
            - -d
            - ""
            image: gcr.io/istio-release/proxy_init:1.0.1
            imagePullPolicy: IfNotPresent
            name: istio-init
            resources: {}
            securityContext:
              capabilities:
                add:
                - NET_ADMIN
          volumes:
          - emptyDir:
              medium: Memory
            name: istio-envoy
          - name: istio-certs
            secret:
              optional: true
              secretName: istio.default
4. Building applications
The sample applications are implemented using Eclipse Vert.x framework. They use Mongo database for storing data. The connection settings are injected into pods using Kubernetes Secrets.
public class MongoVerticle extends AbstractVerticle {

	private static final Logger LOGGER = LoggerFactory.getLogger(MongoVerticle.class);

	@Override
	public void start() throws Exception {
		ConfigStoreOptions envStore = new ConfigStoreOptions()
				.setType("env")
				.setConfig(new JsonObject().put("keys", new JsonArray().add("DATABASE_USER").add("DATABASE_PASSWORD").add("DATABASE_NAME")));
		ConfigRetrieverOptions options = new ConfigRetrieverOptions().addStore(envStore);
		ConfigRetriever retriever = ConfigRetriever.create(vertx, options);
		retriever.getConfig(r -> {
			String user = r.result().getString("DATABASE_USER");
			String password = r.result().getString("DATABASE_PASSWORD");
			String db = r.result().getString("DATABASE_NAME");
			JsonObject config = new JsonObject();
			LOGGER.info("Connecting {} using {}/{}", db, user, password);
			config.put("connection_string", "mongodb://" + user + ":" + password + "@mongodb/" + db);
			final MongoClient client = MongoClient.createShared(vertx, config);
			final CustomerRepository service = new CustomerRepositoryImpl(client);
			ProxyHelper.registerService(CustomerRepository.class, vertx, service, "customer-service");
		});
	}
}
MongoDB should be started on OpenShift before starting any applications, which connect to it. To achieve it we should insert Mongo deployment resource into Arquillian configuration file as env.config.resource.name field.
The configuration of Arquillian Cube is visible below. We will use an existing namespace myproject, which has already granted the required privileges (see Step 1). We also need to pass authentication token of user admin. You can collect it using command oc whoami -t after login to OpenShift cluster.
<extension qualifier="openshift">
	<property name="namespace.use.current">true</property>
	<property name="namespace.use.existing">myproject</property>
	<property name="kubernetes.master">https://192.168.99.100:8443</property>
	<property name="cube.auth.token">TYYccw6pfn7TXtH8bwhCyl2tppp5MBGq7UXenuZ0fZA</property>
	<property name="env.config.resource.name">mongo-deployment.yaml</property>
</extension>
The communication between customer-service and account-service is realized by Vert.x WebClient. We will set read timeout for the client to 1 second. Because Istio injects 2 seconds delay into the route, the communication is going to end with timeout.
public class AccountClient {

	private static final Logger LOGGER = LoggerFactory.getLogger(AccountClient.class);
	private Vertx vertx;

	public AccountClient(Vertx vertx) {
		this.vertx = vertx;
	}

	public AccountClient findCustomerAccounts(String customerId, Handler<AsyncResult<List>> resultHandler) {
		WebClient client = WebClient.create(vertx);
		client.get(8095, "account-service", "/account/customer/" + customerId).timeout(1000).send(res2 -> {
			if (res2.succeeded()) {
				LOGGER.info("Response: {}", res2.result().bodyAsString());
				List accounts = res2.result().bodyAsJsonArray().stream().map(it -> Json.decodeValue(it.toString(), Account.class)).collect(Collectors.toList());
				resultHandler.handle(Future.succeededFuture(accounts));
			} else {
				resultHandler.handle(Future.succeededFuture(new ArrayList()));
			}
		});
		return this;
	}
}
The full code of sample applications is available on GitHub in the repository https://github.com/piomin/sample-vertx-kubernetes/tree/openshift-istio-tests.
5. Running tests
You can the tests during Maven build or just using your IDE. As the first test1CustomerRoute test is executed. It adds new customer and save generated id for two next tests.

The next test is test2AccountRoute. It adds an account for the customer created during previous test.

Finally, the test responsible for verifying communication between microservices is running. It verifies if the list of accounts is empty, what is a result of timeout in communication with account-service.

Microservices traffic management using Istio on Kubernetes
I have already described a simple example of route configuration between two microservices deployed on Kubernetes in one of my previous articles: Service Mesh with Istio on Kubernetes in 5 steps. You can refer to this article if you are interested in the basic information about Istio, and its deployment on Kubernetes via Minikube. Today we will create some more advanced traffic management rules basing on the same sample applications as used in the previous article about Istio.
The source code of sample applications is available on GitHub in repository sample-istio-services (https://github.com/piomin/sample-istio-services.git). There are two sample application callme-service and caller-service deployed in two different versions 1.0 and 2.0. Version 1.0 is available in branch v1 (https://github.com/piomin/sample-istio-services/tree/v1), while version 2.0 in the branch v2 (https://github.com/piomin/sample-istio-services/tree/v2). Using these sample applications in different versions I’m going to show you different strategies of traffic management depending on a HTTP header set in the incoming requests.
We may force caller-service to route all the requests to the specific version of callme-service by setting header x-version to v1 or v2. We can also do not set this header in the request what results in splitting traffic between all existing versions of service. If the request comes to version v1 of caller-service the traffic is splitted 50-50 between two instances of callme-service. If the request is received by v2 instance of caller-service 75% traffic is forwarded to version v2 of callme-service, while only 25% to v1. The scenario described above has been illustrated on the following diagram.

Before we proceed to the example, I should say some words about traffic management with Istio. If you have read my previous article about Istio, you would probably know that each rule is assigned to a destination. Rules control a process of requests routing within a service mesh. The one very important information about them,especially for the purposes of the example illustrated on the diagram above, is that multiple rules can be applied to the same destination. The priority of every rule is determined by the precedence field of the rule. There is one principle related to a value of this field: the higher value of this integer field, the greater priority of the rule. As you may probably guess, if there is more than one rule with the same precedence value the order of rules evaluation is undefined. In addition to a destination, we may also define a source of the request in order to restrict a rule only to a specific caller. If there are multiple deployments of a calling service, we can even filter them out by setting source’s label field. Of course, we can also specify the attributes of an HTTP request such as uri, scheme or headers that are used for matching a request with defined rule.
Ok, now let’s take a look on the rule with the highest priority. Its name is callme-service-v1 (1). It applies to callme-service (2), and has the highest priority in comparison to other rules (3). It is applies only to requests sent by caller-service (4), that contain HTTP header x-version with value v1 (5). This route rule applies only to version v1 of callme-service (6).
apiVersion: config.istio.io/v1alpha2
kind: RouteRule
metadata:
  name: callme-service-v1 # (1)
spec:
  destination:
    name: callme-service # (2)
  precedence: 4 # (3)
  match:
    source:
      name: caller-service # (4)
    request:
      headers:
        x-version:
          exact: "v1" # (5)
  route:
  - labels:
      version: v1 # (6)
Here’s the fragment of the first diagram, which is handled by this route rule.

The next rule callme-service-v2 (1) has a lower priority (2). However, it does not conflicts with first rule, because it applies only to the requests containing x-version header with value v2 (3). It forwards all requests to version v2 of callme-service (4).
apiVersion: config.istio.io/v1alpha2
kind: RouteRule
metadata:
  name: callme-service-v2 # (1)
spec:
  destination:
    name: callme-service
  precedence: 3 # (2)
  match:
    source:
      name: caller-service
    request:
      headers:
        x-version:
          exact: "v2" # (3)
  route:
  - labels:
      version: v2 # (4)
As before, here’s the fragment of the first diagram, which is handled by this route rule.

The rule callme-service-v1-default (1) visible in the code fragment below has a lower priority (2) than two previously described rules. In practice it means that it is executed only if conditions defined in two previous rules were not fulfilled. Such a situation occurs if you do not pass the header x-version inside HTTP request, or it would have diferent value than v1 or v2. The rule visible below applies only to the instance of service labeled with v1 version (3). Finally, the traffic to callme-service is load balanced in propertions 50-50 between two versions of that service (4).
apiVersion: config.istio.io/v1alpha2
kind: RouteRule
metadata:
  name: callme-service-v1-default # (1)
spec:
  destination:
    name: callme-service
  precedence: 2 # (2)
  match:
    source:
      name: caller-service
      labels:
        version: v1 # (3)
  route: # (4)
  - labels:
      version: v1
    weight: 50
  - labels:
      version: v2
    weight: 50
Here’s the fragment of the first diagram, which is handled by this route rule.

The last rule is pretty similar to the previously described callme-service-v1-default. Its name is callme-service-v2-default (1), and it applies only to version v2 of caller-service (3). It has the lowest priority (2), and splits traffic between two version of callme-service in proportions 75-25 in favor of version v2 (4).
apiVersion: config.istio.io/v1alpha2
kind: RouteRule
metadata:
  name: callme-service-v2-default # (1)
spec:
  destination:
    name: callme-service
  precedence: 1 # (2)
  match:
    source:
      name: caller-service
      labels:
        version: v2 # (3)
  route: # (4)
  - labels:
      version: v1
    weight: 25
  - labels:
      version: v2
    weight: 75
The same as before, I have also included the diagram illustrated a behaviour of this rule.

All the rules may be placed inside a single file. In that case they should be separated with line ---. This file is available in code’s repository inside callme-service module as multi-rule.yaml. To deploy all defined rules on Kubernetes just execute the following command.
$ kubectl apply -f multi-rule.yaml
After successful deploy you may check out the list of available rules by running command istioctl get routerule.

Before we will start any tests, we obviously need to have sample applications deployed on Kubernetes. This applications are really simple and pretty similar to the applications used for tests in my previous article about Istio. The controller visible below implements method GET /callme/ping, which prints version of application taken from pom.xml and value of x-version HTTP header received in the request.
@RestController
@RequestMapping("/callme")
public class CallmeController {

	private static final Logger LOGGER = LoggerFactory.getLogger(CallmeController.class);

	@Autowired
	BuildProperties buildProperties;

	@GetMapping("/ping")
	public String ping(@RequestHeader(name = "x-version", required = false) String version) {
		LOGGER.info("Ping: name={}, version={}, header={}", buildProperties.getName(), buildProperties.getVersion(), version);
		return buildProperties.getName() + ":" + buildProperties.getVersion() + " with version " + version;
	}

}
Here’s the controller class that implements method GET /caller/ping. It prints version of caller-service taken from pom.xml and calls method GET callme/ping exposed by callme-service. It needs to include x-version header to the request when sending it to the downstream service.
@RestController
@RequestMapping("/caller")
public class CallerController {

	private static final Logger LOGGER = LoggerFactory.getLogger(CallerController.class);

	@Autowired
	BuildProperties buildProperties;
	@Autowired
	RestTemplate restTemplate;

	@GetMapping("/ping")
	public String ping(@RequestHeader(name = "x-version", required = false) String version) {
		LOGGER.info("Ping: name={}, version={}, header={}", buildProperties.getName(), buildProperties.getVersion(), version);
		HttpHeaders headers = new HttpHeaders();
		if (version != null)
			headers.set("x-version", version);<span id="mce_SELREST_start" style="overflow:hidden;line-height:0;"></span>
		HttpEntity entity = new HttpEntity(headers);
		ResponseEntity response = restTemplate.exchange("http://callme-service:8091/callme/ping", HttpMethod.GET, entity, String.class);
		return buildProperties.getName() + ":" + buildProperties.getVersion() + ". Calling... " + response.getBody() + " with header " + version;
	}

}
Now, we may proceeed to applications build and deployment on Kubernetes. Here are are the further steps.
1. Building appplication
First, switch to branch v1 and build the whole project sample-istio-services by executing mvn clean install command.
2. Building Docker image
The Dockerfiles are placed in the root directory of every application. Build their Docker images by executing the following commands.
$ docker build -t piomin/callme-service:1.0 .
$ docker build -t piomin/caller-service:1.0 .
Alternatively, you may omit this step, because images piomin/callme-service and piomin/caller-service are available on my Docker Hub account.
3. Inject Istio components to Kubernetes deployment file
Kubernetes YAML deployment file is available in the root directory of every application as deployment.yaml. The result of the following command should be saved as separated file, for example deployment-with-istio.yaml.
$ istioctl kube-inject -f deployment.yaml
4. Deployment on Kubernetes
Finally, you can execute well-known kubectl command in order to deploy Docker container with our sample application.
$ kubectl apply -f deployment-with-istio.yaml
Then switch to branch v2, and repeat the steps described above for version 2.0 of the sample applications. The final deployment result is visible on picture below.

One very useful thing when running Istio on Kubernetes is out-of-the-box integration with such tools like Zipkin, Grafana or Prometheus. Istio automatically sends some metrics, that are collected by Prometheus, for example total number of requests in metric istio_request_count. YAML deployment files for these plugins ara available inside directory ${ISTIO_HOME}/install/kubernetes/addons. Before installing Prometheus using kubectl command I suggest to change service type from default ClusterIP to NodePort by adding the line type: NodePort.
apiVersion: v1
kind: Service
metadata:
  annotations:
    prometheus.io/scrape: 'true'
  labels:
    name: prometheus
  name: prometheus
  namespace: istio-system
spec:
  type: NodePort
  selector:
    app: prometheus
  ports:
  - name: prometheus
    protocol: TCP
    port: 9090
Then we should run command kubectl apply -f prometheus.yaml in order to deploy Prometheus on Kubernetes. The deployment is available inside istio-system namespace. To check the external port of service run the following command. For me, it is available under address http://192.168.99.100:32293.

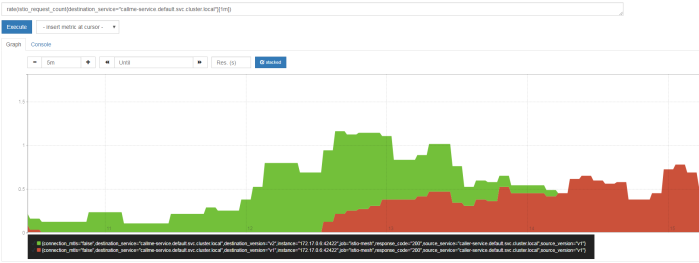
In the following diagram visualized using Prometheus I filtered out only the requests sent to callme-service. Green color points to requests received by version v2 of the service, while red color points to requests processed by version v1 of the service. Like you can see in this diagram, in the beginning I have sent the requests to caller-service with HTTP header x-version set to value v2, then I didn’t set this header and traffic has been splitted between to deployed instances of the service. Finally I set it to v1. I defined an expression rate(istio_request_count{callme-service.default.svc.cluster.local}[1m]), which returns per-second rate of requests received by callme-service.
Testing
Before sending some test requests to caller-service we need to obtain its address on Kubernetes. After executing the following command you see that it is available under address http://192.168.99.100:32237/caller/ping.

We have four possible scenarios. In first, when we set header x-version to v1 the request will be always routed to callme-service-v1.

If a header x-version is not included in the requests the traffic will be splitted between callme-service-v1…

… and callme-service-v2.

Finally, if we set header x-version to v2 the request will be always routed to callme-service-v2.

Conclusion
Using Istio you can easily create and apply simple and more advanced traffic management rules to the applications deployed on Kubernetes. You can also monitor metrics and traces through the integration between Istio and Zipkin, Prometheus and Grafana.
Service Mesh with Istio on Kubernetes in 5 steps
In this article I’m going to show you some basic and more advanced samples that illustrate how to use Istio platform in order to provide communication between microservices deployed on Kubernetes. Following the description on Istio website it is:
An open platform to connect, manage, and secure microservices. Istio provides an easy way to create a network of deployed services with load balancing, service-to-service authentication, monitoring, and more, without requiring any changes in service code.
Istio provides mechanisms for traffic management like request routing, discovery, load balancing, handling failures and fault injection. Additionally you may enable istio-auth that provides RBAC (Role-Based Access Control) and Mutual TLS Authentication. In this article we will discuss only about traffic management mechanisms.
Step 1. Installing Istio on Minikube platform
The most comfortable way to test Istio locally on Kubernetes is through Minikube. I have already described how to configure Minikube on your local machine in this article: Microservices with Kubernetes and Docker. When installing Istio on Minikube we should first enable some Minikube’s plugins during startup.
minikube start --extra-config=controller-manager.ClusterSigningCertFile="/var/lib/localkube/certs/ca.crt" --extra-config=controller-manager.ClusterSigningKeyFile="/var/lib/localkube/certs/ca.key" --extra-config=apiserver.Admission.PluginNames=NamespaceLifecycle,LimitRanger,ServiceAccount,PersistentVolumeLabel,DefaultStorageClass,DefaultTolerationSeconds,MutatingAdmissionWebhook,ValidatingAdmissionWebhook,ResourceQuota
Istio is installed in dedicated namespace called istio-system, but is able to manage services from all other namespaces. First, you should go to release page and download installation file corresponding to your OS. For me it is Windows, and all the next steps will be described with the assumption that we are using exactly this OS. After running Minikube it would be useful to enable Docker on Minikube’s VM. Thanks to that you will be able to execute docker commands.
@FOR /f "tokens=* delims=^L" %i IN ('minikube docker-env') DO @call %i
Now, extract Istio files to your local filesystem. File istioctl.exe, which is available under ${ISTIO_HOME}/bin directory should be added to your PATH. Istio contains some installation files for Kubernetes platform in ${ISTIO_HOME}/install/kubernetes. To install Istio’s core components on Minikube just apply the following YAML definition file.
kubectl apply -f install/kubernetes/istio.yaml
Now, you have Istio’s core components deployed on your Minikube instance. These components are:
Envoy – it is an open-source edge and service proxy, designed for cloud-native application. Istio uses an extended version of the Envoy proxy. If you are interested in some details about Envoy and microservices read my article Envoy Proxy with Microservices, that describes how to integrate Envoy gateway with service discovery.
Mixer – it is a platform-independent component responsible for enforcing access control and usage policies across the service mesh.
Pilot – it provides service discovery for the Envoy sidecars, traffic management capabilities for intelligent routing and resiliency.
The configuration provided inside istio.yaml definition file deploys some pods and services related to the components mentioned above. You can verify the installation using kubectl command or just by visiting Web Dashboard available after executing command minikube dashboard.

Step 2. Building sample applications based on Spring Boot
Before we start configure any traffic rules with Istio, we need to create sample applications that will communicate with each other. These are really simple services. The source code of these applications is available on my GitHub account inside repository sample-istio-services. There are two services: caller-service and callme-service. Both of them expose endpoint ping which prints application’s name and version. Both of these values are taken from Spring Boot build-info file, which is generated during application build. Here’s implementation of endpoint GET /callme/ping.
@RestController
@RequestMapping("/callme")
public class CallmeController {

	private static final Logger LOGGER = LoggerFactory.getLogger(CallmeController.class);

	@Autowired
	BuildProperties buildProperties;

	@GetMapping("/ping")
	public String ping() {
		LOGGER.info("Ping: name={}, version={}", buildProperties.getName(), buildProperties.getVersion());
		return buildProperties.getName() + ":" + buildProperties.getVersion();
	}

}
And here’s implementation of endpoint GET /caller/ping. It calls GET /callme/ping endpoint using Spring RestTemplate. We are assuming that callme-service is available under address callme-service:8091 on Kubernetes. This service is will be exposed inside Minikube node under port 8091.
@RestController
@RequestMapping("/caller")
public class CallerController {

	private static final Logger LOGGER = LoggerFactory.getLogger(CallerController.class);

	@Autowired
	BuildProperties buildProperties;
	@Autowired
	RestTemplate restTemplate;

	@GetMapping("/ping")
	public String ping() {
		LOGGER.info("Ping: name={}, version={}", buildProperties.getName(), buildProperties.getVersion());
		String response = restTemplate.getForObject("http://callme-service:8091/callme/ping", String.class);
		LOGGER.info("Calling: response={}", response);
		return buildProperties.getName() + ":" + buildProperties.getVersion() + ". Calling... " + response;
	}

}
The sample applications have to be started on Docker container. Here’s Dockerfile that is responsible for building image with caller-service application.
FROM openjdk:8-jre-alpine
ENV APP_FILE caller-service-1.0.0-SNAPSHOT.jar
ENV APP_HOME /usr/app
EXPOSE 8090
COPY target/$APP_FILE $APP_HOME/
WORKDIR $APP_HOME
ENTRYPOINT ["sh", "-c"]
CMD ["exec java -jar $APP_FILE"]
The similar Dockerfile is available for callme-service. Now, the only thing we have to is to build Docker images.
docker build -t piomin/callme-service:1.0 .
docker build -t piomin/caller-service:1.0 .
There is also version 2.0.0-SNAPSHOT of callme-service available in branch v2. Switch to this branch, build the whole application, and then build docker image with 2.0 tag. Why we need version 2.0? I’ll describe it in the next section.
docker build -t piomin/callme-service:2.0 .
Step 3. Deploying sample applications on Minikube
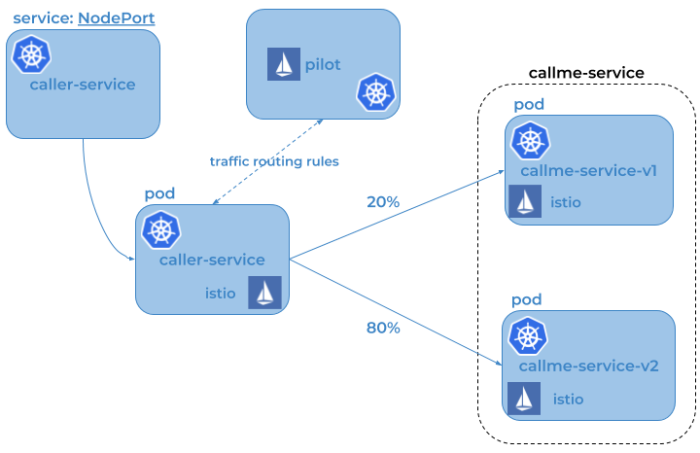
Before we start deploying our applications on Minikube, let’s take a look on the sample system architecture visible on the following diagram. We are going to deploy callme-service in two versions: 1.0 and 2.0. Application caller-service is just calling callme-service, so I does not know anything about different versions of the target service. If we would like to route traffic between two versions of callme-service in proportions 20% to 80%, we have to configure the proper Istio’s routerule. And also one thing. Because Istio Ingress is not supported on Minikube, we will just Kubernetes Service. If we need to expose it outside Minikube cluster we should set type to NodePort.
Let’s proceed to the deployment phase. Here’s deployment definition for callme-service in version 1.0.
apiVersion: v1
kind: Service
metadata:
  name: callme-service
  labels:
    app: callme-service
spec:
  type: NodePort
  ports:
  - port: 8091
    name: http
  selector:
    app: callme-service
---
apiVersion: extensions/v1beta1
kind: Deployment
metadata:
  name: callme-service
spec:
  replicas: 1
  template:
    metadata:
      labels:
        app: callme-service
        version: v1
    spec:
      containers:
      - name: callme-service
        image: piomin/callme-service:1.0
        imagePullPolicy: IfNotPresent
        ports:
        - containerPort: 8091
Before deploying it on Minikube we have to inject some Istio properties. The command visible below prints a new version of deployment definition enriched with Istio configuration. We may copy it and save as deployment-with-istio.yaml file.
istioctl kube-inject -f deployment.yaml
Now, let’s apply the configuration to Kubernetes.
kubectl apply -f deployment-with-istio.yaml
The same steps should be performed for caller-service, and also for version 2.0 of callme-service. All YAML configuration files are committed together with applications, and are located in the root directory of every application’s module. If you have succesfully deployed all the required components you should see the following elements in your Minikube’s dashboard.

Step 4. Applying Istio routing rules
Istio provides a simple Domain-specific language (DSL) that allows you configure some interesting rules that control how requests are routed within your service mesh. I’m going to show you the following rules:
- Split traffic between different service versions
- Injecting the delay in the request path
- Injecting HTTP error as a reponse from service
Here’s sample route rule definition for callme-service. It splits traffic in proportions 20:80 between versions 1.0 and 2.0 of the service. It also adds 3 seconds delay in 10% of the requests, and returns an HTTP 500 error code for 10% of the requests.
apiVersion: config.istio.io/v1alpha2
kind: RouteRule
metadata:
  name: callme-service
spec:
  destination:
    name: callme-service
  route:
  - labels:
      version: v1
    weight: 20
  - labels:
      version: v2
    weight: 80
  httpFault:
    delay:
      percent: 10
      fixedDelay: 3s
    abort:
      percent: 10
      httpStatus: 500
Let’s apply a new route rule to Kubernetes.
kubectl apply -f routerule.yaml
Now, we can easily verify that rule by executing command istioctl get routerule.

Step 5. Testing the solution
Before we start testing let’s deploy Zipkin on Minikube. Istio provides deployment definition file zipkin.yaml inside directory ${ISTIO_HOME}/install/kubernetes/addons.
kubectl apply -f zipkin.yaml
Let’s take a look on the list of services deployed on Minikube. API provided by application caller-service is available under port 30873.

We may easily test the service for a web browser by calling URL http://192.168.99.100:30873/caller/ping. It prints the name and version of the service, and also the name and version of callme-service invoked by caller-service. Because 80% of traffic is routed to version 2.0 of callme-service you will probably see the following response.

However, sometimes version 1.0 of callme-service may be called…

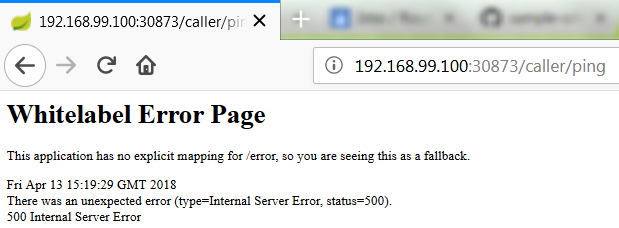
… or Istio can simulate HTTP 500 code.
You can easily analyze traffic statistics with Zipkin console.

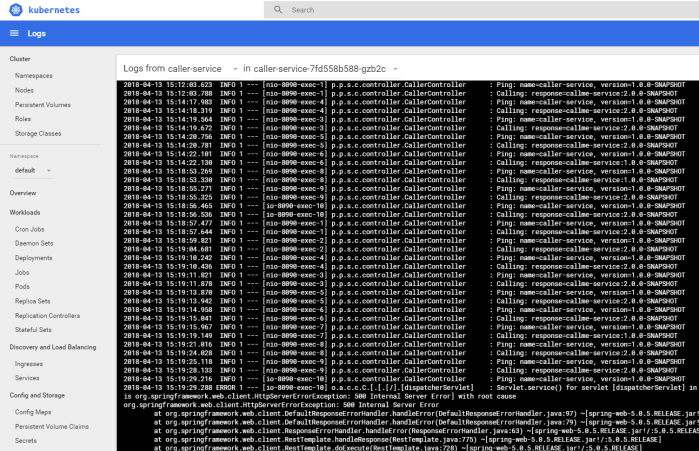
Or just take a look on the logs generated by pods.
