GraphQL – The Future of Microservices?

Often, GraphQL is presented as a revolutionary way of designing web APIs in comparison to REST. However, if you would take a closer look on that technology you will see that there are so many differences between them. GraphQL is a relatively new solution that has been open sourced by Facebook in 2015. Today, REST is still the most popular paradigm used for exposing APIs and inter-service communication between microservices. Is GraphQL going to overtake REST in the future? Let’s take a look how to create microservices communicating through GraphQL API using Spring Boot and Apollo client.

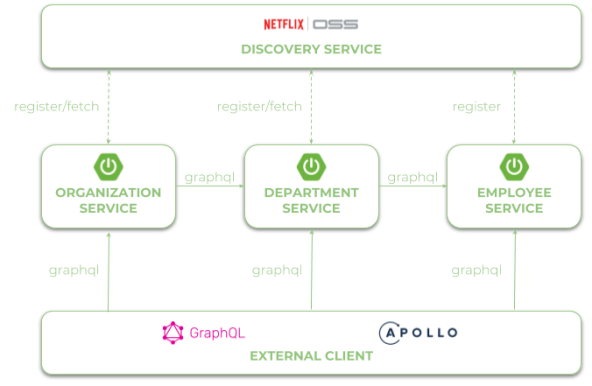
Let’s begin from an architecture of our sample system. We have three microservices that communicates to each other using URLs taken from Eureka service discovery.

graphql-arch

1. Enabling Spring Boot support for GraphQL

We can easily enable support for GraphQL on the server-side Spring Boot application just by including some starters. After including graphql-spring-boot-starter the GraphQL servlet would be automatically accessible under path /graphql. We can override that default path by settings property graphql.servlet.mapping in application.yml file. We should also enable GraphiQL – an in-browser IDE for writing, validating, and testing GraphQL queries, and GraphQL Java Tools library, which contains useful components for creating queries and mutations. Thanks to that library any files on the classpath with .graphqls extension will be used to provide the schema definition.

<dependency>
	<groupId>com.graphql-java</groupId>
	<artifactId>graphql-spring-boot-starter</artifactId>
	<version>5.0.2</version>
</dependency>
<dependency>
	<groupId>com.graphql-java</groupId>
	<artifactId>graphiql-spring-boot-starter</artifactId>
	<version>5.0.2</version>
</dependency>
<dependency>
	<groupId>com.graphql-java</groupId>
	<artifactId>graphql-java-tools</artifactId>
	<version>5.2.3</version>
</dependency>

2. Building GraphQL schema definition

Every schema definitions contains data types declaration, relationships between them, and a set of operations including queries for searching objects and mutations for creating, updating or deleting data. Usually we will start from creating type declaration, which is responsible for domain object definition. You can specify if the field is required using ! char or if it is an array using [...]. Definition has to contain type declaration or reference to other types available in the specification.

type Employee {
  id: ID!
  organizationId: Int!
  departmentId: Int!
  name: String!
  age: Int!
  position: String!
  salary: Int!
}

Here’s an equivalent Java class to GraphQL definition visible above. GraphQL type Int can be also mapped to Java Long. The ID scalar type represents a unique identifier – in that case it also would be Java Long.

public class Employee {

	private Long id;
	private Long organizationId;
	private Long departmentId;
	private String name;
	private int age;
	private String position;
	private int salary;
	
	// constructor
	
	// getters
	// setters
	
}

The next part of schema definition contains queries and mutations declaration. Most of the queries return list of objects – what is marked with [Employee]. Inside EmployeeQueries type we have declared all find methods, while inside EmployeeMutations type methods for adding, updating and removing employees. If you pass the whole object to that method you need to declare it as an input type.

schema {
  query: EmployeeQueries
  mutation: EmployeeMutations
}

type EmployeeQueries {
  employees: [Employee]
  employee(id: ID!): Employee!
  employeesByOrganization(organizationId: Int!): [Employee]
  employeesByDepartment(departmentId: Int!): [Employee]
}

type EmployeeMutations {
  newEmployee(employee: EmployeeInput!): Employee
  deleteEmployee(id: ID!) : Boolean
  updateEmployee(id: ID!, employee: EmployeeInput!): Employee
}

input EmployeeInput {
  organizationId: Int
  departmentId: Int
  name: String
  age: Int
  position: String
  salary: Int
}

3. Queries and mutation implementation

Thanks to GraphQL Java Tools and Spring Boot GraphQL auto-configuration we don’t need to do much to implement queries and mutations in our application. The EmployeesQuery bean has to GraphQLQueryResolver interface. Basing on that Spring would be able to automatically detect and call right method as a response to one of the GraphQL query declared inside the schema. Here’s a class containing an implementation of queries.

@Component
public class EmployeeQueries implements GraphQLQueryResolver {

	private static final Logger LOGGER = LoggerFactory.getLogger(EmployeeQueries.class);
	
	@Autowired
	EmployeeRepository repository;
	
	public List employees() {
		LOGGER.info("Employees find");
		return repository.findAll();
	}
	
	public List employeesByOrganization(Long organizationId) {
		LOGGER.info("Employees find: organizationId={}", organizationId);
		return repository.findByOrganization(organizationId);
	}

	public List employeesByDepartment(Long departmentId) {
		LOGGER.info("Employees find: departmentId={}", departmentId);
		return repository.findByDepartment(departmentId);
	}
	
	public Employee employee(Long id) {
		LOGGER.info("Employee find: id={}", id);
		return repository.findById(id);
	}
	
}

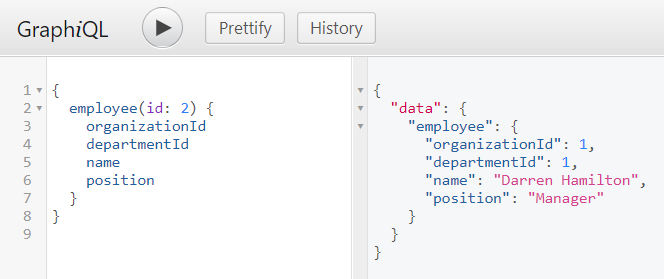
If you would like to call, for example method employee(Long id) you should build the following query. You can easily test it in your application using GraphiQL tool available under path /graphiql.

graphql-1
The bean responsible for implementation of mutation methods needs to implement GraphQLMutationResolver. Despite declaration of EmployeeInput we still to use the same domain object as returned by queries – Employee.

@Component
public class EmployeeMutations implements GraphQLMutationResolver {

	private static final Logger LOGGER = LoggerFactory.getLogger(EmployeeQueries.class);
	
	@Autowired
	EmployeeRepository repository;
	
	public Employee newEmployee(Employee employee) {
		LOGGER.info("Employee add: employee={}", employee);
		return repository.add(employee);
	}
	
	public boolean deleteEmployee(Long id) {
		LOGGER.info("Employee delete: id={}", id);
		return repository.delete(id);
	}
	
	public Employee updateEmployee(Long id, Employee employee) {
		LOGGER.info("Employee update: id={}, employee={}", id, employee);
		return repository.update(id, employee);
	}
	
}

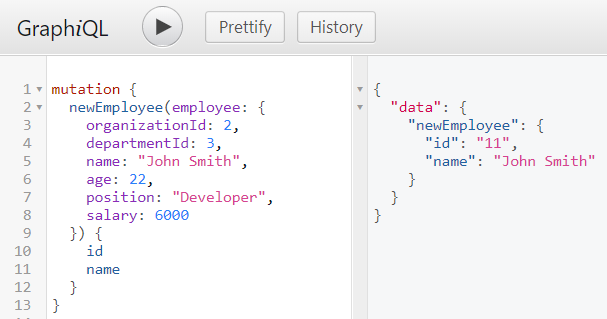
We can also use GraphiQL to test mutations. Here’s the command that adds new employee, and receives response with employee’s id and name.

graphql-2

4. Generating client-side classes

Ok, we have successfully created server-side application. We have already tested some queries using GraphiQL. But our main goal is to create some other microservices that communicate with employee-service application through GraphQL API. Here the most of tutorials about Spring Boot and GraphQL ending.
To be able to communicate with our first application through GraphQL API we have two choices. We can get a standard REST client and implement GraphQL API by ourselves with HTTP GET requests or use one of existing Java clients. Surprisingly, there are no many GraphQL Java client implementations available. The most serious choice is Apollo GraphQL Client for Android. Of course it is not designed only for Android devices, and you can successfully use it in your microservice Java application.
Before using the client we need to generate classes from schema and .grapql files. The recommended way to do it is through Apollo Gradle Plugin. There are also some Maven plugins, but none of them provide the level of automation as Gradle plugin, for example it automatically downloads node.js required for generating client-side classes. So, the first step is to add Apollo plugin and runtime to the project dependencies.

buildscript {
  repositories {
    jcenter()
    maven { url 'https://oss.sonatype.org/content/repositories/snapshots/' }
  }
  dependencies {
    classpath 'com.apollographql.apollo:apollo-gradle-plugin:1.0.1-SNAPSHOT'
  }
}

apply plugin: 'com.apollographql.android'

dependencies {
  compile 'com.apollographql.apollo:apollo-runtime:1.0.1-SNAPSHOT'
}

GraphQL Gradle plugin tries to find files with .graphql extension and schema.json inside src/main/graphql directory. GraphQL JSON schema can be obtained from your Spring Boot application by calling resource /graphql/schema.json. File .graphql contains queries definition. Query employeesByOrganization will be called by organization-service, while employeesByDepartment by both department-service and organization-service. Those two application needs a little different set of data in the response. Application department-service requires more detailed information about every employee than organization-service. GraphQL is an excellent solution in that case, because we can define the require set of data in the response on the client side. Here’s query definition of employeesByOrganization called by organization-service.

query EmployeesByOrganization($organizationId: Int!) {
  employeesByOrganization(organizationId: $organizationId) {
    id
    name
  }
}

Application organization-service would also call employeesByDepartment query.

query EmployeesByDepartment($departmentId: Int!) {
  employeesByDepartment(departmentId: $departmentId) {
    id
    name
  }
}

The query employeesByDepartment is also called by department-service, which requires not only id and name fields, but also position and salary.

query EmployeesByDepartment($departmentId: Int!) {
  employeesByDepartment(departmentId: $departmentId) {
    id
    name
    position
    salary
  }
}

All the generated classes are available under build/generated/source/apollo directory.

5. Building Apollo client with discovery

After generating all required classes and including them into calling microservices we may proceed to the client implementation. Apollo client has two important features that will affect our development:

  • It provides only asynchronous methods based on callback
  • It does not integrate with service discovery based on Spring Cloud Netflix Eureka

Here’s an implementation of employee-service client inside department-service. I used EurekaClient directly (1). It gets all running instances registered as EMPLOYEE-SERVICE. Then it selects one instance form the list of available instances randomly (2). The port number of that instance is passed to ApolloClient (3). Before calling asynchronous method enqueue provided by ApolloClient we create lock (4), which waits max. 5 seconds for releasing (8). Method enqueue returns response in the callback method onResponse (5). We map the response body from GraphQL Employee object to returned object (6) and then release the lock (7).

@Component
public class EmployeeClient {

	private static final Logger LOGGER = LoggerFactory.getLogger(EmployeeClient.class);
	private static final int TIMEOUT = 5000;
	private static final String SERVICE_NAME = "EMPLOYEE-SERVICE"; 
	private static final String SERVER_URL = "http://localhost:%d/graphql";
	
	Random r = new Random();
	
	@Autowired
	private EurekaClient discoveryClient; // (1)
	
	public List findByDepartment(Long departmentId) throws InterruptedException {
		List employees = new ArrayList();
		Application app = discoveryClient.getApplication(SERVICE_NAME); // (2)
		InstanceInfo ii = app.getInstances().get(r.nextInt(app.size()));
		ApolloClient client = ApolloClient.builder().serverUrl(String.format(SERVER_URL, ii.getPort())).build(); // (3)
		CountDownLatch lock = new CountDownLatch(1); // (4)
		client.query(EmployeesByDepartmentQuery.builder().build()).enqueue(new Callback() {

			@Override
			public void onFailure(ApolloException ex) {
				LOGGER.info("Err: {}", ex);
				lock.countDown();
			}

			@Override
			public void onResponse(Response res) { // (5)
				LOGGER.info("Res: {}", res);
				employees.addAll(res.data().employees().stream().map(emp -> new Employee(Long.valueOf(emp.id()), emp.name(), emp.position(), emp.salary())).collect(Collectors.toList())); // (6)
				lock.countDown(); // (7)
			}

		});
		lock.await(TIMEOUT, TimeUnit.MILLISECONDS); // (8)
		return employees;
	}
	
}

Finally, EmployeeClient is injected into the query resolver class – DepartmentQueries, and used inside query departmentsByOrganizationWithEmployees.

@Component
public class DepartmentQueries implements GraphQLQueryResolver {

	private static final Logger LOGGER = LoggerFactory.getLogger(DepartmentQueries.class);
	
	@Autowired
	EmployeeClient employeeClient;
	@Autowired
	DepartmentRepository repository;

	public List departmentsByOrganizationWithEmployees(Long organizationId) {
		LOGGER.info("Departments find: organizationId={}", organizationId);
		List departments = repository.findByOrganization(organizationId);
		departments.forEach(d -> {
			try {
				d.setEmployees(employeeClient.findByDepartment(d.getId()));
			} catch (InterruptedException e) {
				LOGGER.error("Error calling employee-service", e);
			}
		});
		return departments;
	}
	
	// other queries
	
}

Before calling target query we should take a look on the schema created for department-service. Every Department object can contain the list of assigned employees, so we also define type Employee referenced by Department type.

schema {
  query: DepartmentQueries
  mutation: DepartmentMutations
}

type DepartmentQueries {
  departments: [Department]
  department(id: ID!): Department!
  departmentsByOrganization(organizationId: Int!): [Department]
  departmentsByOrganizationWithEmployees(organizationId: Int!): [Department]
}

type DepartmentMutations {
  newDepartment(department: DepartmentInput!): Department
  deleteDepartment(id: ID!) : Boolean
  updateDepartment(id: ID!, department: DepartmentInput!): Department
}

input DepartmentInput {
  organizationId: Int!
  name: String!
}

type Department {
  id: ID!
  organizationId: Int!
  name: String!
  employees: [Employee]
}

type Employee {
  id: ID!
  name: String!
  position: String!
  salary: Int!
}

Now, we can call our test query with list of required fields using GraphiQL. An application department-service is by default available under port 8091, so we may call it using address http://localhost:8091/graphiql.

graphql-3

Conclusion

GraphQL seems to be an interesting alternative to standard REST APIs. However, we should not consider it as a replacement to REST. There are some use cases where GraphQL may be better choice, and some use cases where REST is better choice. If your clients does not need the full set of fields returned by the server side, and moreover you have many clients with different requirements to the single endpoint – GraphQL is a good choice. When it comes to microservices there are no solutions based on Java that allow you to use GraphQL together with service discovery, load balancing or API gateway out-of-the-box. In this article I have shown an example of usage Apollo GraphQL client together with Spring Cloud Eureka for inter-service communication. Sample applications source code is available on GitHub https://github.com/piomin/sample-graphql-microservices.git.

Quick Guide to Microservices with Kubernetes, Spring Boot 2.0 and Docker

Here’s the next article in a series of “Quick Guide to…”. This time we will discuss and run examples of Spring Boot microservices on Kubernetes. The structure of that article will be quite similar to this one Quick Guide to Microservices with Spring Boot 2.0, Eureka and Spring Cloud, as they are describing the same aspects of applications development. I’m going to focus on showing you the differences and similarities in development between for Spring Cloud and for Kubernetes. The topics covered in this article are:

  • Using Spring Boot 2.0 in cloud-native development
  • Providing service discovery for all microservices using Spring Cloud Kubernetes project
  • Injecting configuration settings into application pods using Kubernetes Config Maps and Secrets
  • Building application images using Docker and deploying them on Kubernetes using YAML configuration files
  • Using Spring Cloud Kubernetes together with Zuul proxy to expose a single Swagger API documentation for all microservices

Spring Cloud and Kubernetes may be threaten as a competitive solutions when you build microservices environment. Such components like Eureka, Spring Cloud Config or Zuul provided by Spring Cloud may be replaced by built-in Kubernetes objects like services, config maps, secrets or ingresses. But even if you decide to use Kubernetes components instead of Spring Cloud you can take advantage of some interesting features provided throughout the whole Spring Cloud project.

The one raelly interesting project that helps us in development is Spring Cloud Kubernetes (https://github.com/spring-cloud-incubator/spring-cloud-kubernetes). Although it is still in incubation stage it is definitely worth to dedicating some time to it. It integrates Spring Cloud with Kubernetes. I’ll show you how to use implementation of discovery client, inter-service communication with Ribbon client and Zipkin discovery using Spring Cloud Kubernetes.

Before we proceed to the source code, let’s take a look on the following diagram. It illustrates the architecture of our sample system. It is quite similar to the architecture presented in the already mentioned article about microservices on Spring Cloud. There are three independent applications (employee-service, department-service, organization-service), which communicate between each other through REST API. These Spring Boot microservices use some build-in mechanisms provided by Kubernetes: config maps and secrets for distributed configuration, etcd for service discovery, and ingresses for API gateway.

micro-kube-1

Let’s proceed to the implementation. Currently, the newest stable version of Spring Cloud is Finchley.RELEASE. This version of spring-cloud-dependencies should be declared as a BOM for dependency management.

<dependencyManagement>
	<dependencies>
		<dependency>
			<groupId>org.springframework.cloud</groupId>
			<artifactId>spring-cloud-dependencies</artifactId>
			<version>Finchley.RELEASE</version>
			<type>pom</type>
			<scope>import</scope>
		</dependency>
	</dependencies>
</dependencyManagement>

Spring Cloud Kubernetes is not released under Spring Cloud Release Trains. So, we need to explicitly define its version. Because we use Spring Boot 2.0 we have to include the newest SNAPSHOT version of spring-cloud-kubernetes artifacts, which is 0.3.0.BUILD-SNAPSHOT.

The source code of sample applications presented in this article is available on GitHub in repository https://github.com/piomin/sample-spring-microservices-kubernetes.git.

Pre-requirements

In order to be able to deploy and test our sample microservices we need to prepare a development environment. We can realize that in the following steps:

  • You need at least a single node cluster instance of Kubernetes (Minikube) or Openshift (Minishift) running on your local machine. You should start it and expose embedded Docker client provided by both of them. The detailed intruction for Minishift may be found there: Quick guide to deploying Java apps on OpenShift. You can also use that description to run Minikube – just replace word ‘minishift’ with ‘minikube’. In fact, it does not matter if you choose Kubernetes or Openshift – the next part of this tutorial would be applicable for both of them
  • Spring Cloud Kubernetes requires access to Kubernetes API in order to be able to retrieve a list of address of pods running for a single service. If you use Kubernetes you should just execute the following command:
$ kubectl create clusterrolebinding admin --clusterrole=cluster-admin --serviceaccount=default:default

If you deploy your microservices on Minishift you should first enable admin-user addon, then login as a cluster admin, and grant required permissions.

$ minishift addons enable admin-user
$ oc login -u system:admin
$ oc policy add-role-to-user cluster-reader system:serviceaccount:myproject:default
  • All our sample microservices use MongoDB as a backend store. So, you should first run an instance of this database on your node. With Minishift it is quite simple, as you can use predefined templates just by selecting service Mongo on the Catalog list. With Kubernetes the task is more difficult. You have to prepare deployment configuration files by yourself and apply it to the cluster. All the configuration files are available under kubernetes directory inside sample Git repository. To apply the following YAML definition to the cluster you should execute command kubectl apply -f kubernetes\mongo-deployment.yaml. After it Mongo database would be available under the name mongodb inside Kubernetes cluster.
apiVersion: apps/v1
kind: Deployment
metadata:
  name: mongodb
  labels:
    app: mongodb
spec:
  replicas: 1
  selector:
    matchLabels:
      app: mongodb
  template:
    metadata:
      labels:
        app: mongodb
    spec:
      containers:
      - name: mongodb
        image: mongo:latest
        ports:
        - containerPort: 27017
        env:
        - name: MONGO_INITDB_DATABASE
          valueFrom:
            configMapKeyRef:
              name: mongodb
              key: database-name
        - name: MONGO_INITDB_ROOT_USERNAME
          valueFrom:
            secretKeyRef:
              name: mongodb
              key: database-user
        - name: MONGO_INITDB_ROOT_PASSWORD
          valueFrom:
            secretKeyRef:
              name: mongodb
              key: database-password
---
apiVersion: v1
kind: Service
metadata:
  name: mongodb
  labels:
    app: mongodb
spec:
  ports:
  - port: 27017
    protocol: TCP
  selector:
    app: mongodb

1. Inject configuration with Config Maps and Secrets

When using Spring Cloud the most obvious choice for realizing distributed configuration in your system is Spring Cloud Config. With Kubernetes you can use Config Map. It holds key-value pairs of configuration data that can be consumed in pods or used to store configuration data. It is used for storing and sharing non-sensitive, unencrypted configuration information. To use sensitive information in your clusters, you must use Secrets. An usage of both these Kubernetes objects can be perfectly demonstrated basing on the example of MongoDB connection settings. Inside Spring Boot application we can easily inject it using environment variables. Here’s fragment of application.yml file with URI configuration.

spring:
  data:
    mongodb:
      uri: mongodb://${MONGO_USERNAME}:${MONGO_PASSWORD}@mongodb/${MONGO_DATABASE}

While username or password are a sensitive fields, a database name is not. So we can place it inside config map.

apiVersion: v1
kind: ConfigMap
metadata:
  name: mongodb
data:
  database-name: microservices

Of course, username and password are defined as secrets.

apiVersion: v1
kind: Secret
metadata:
  name: mongodb
type: Opaque
data:
  database-password: MTIzNDU2
  database-user: cGlvdHI=

To apply the configuration to Kubernetes cluster we run the following commands.

$ kubectl apply -f kubernetes/mongodb-configmap.yaml
$ kubectl apply -f kubernetes/mongodb-secret.yaml

After it we should inject the configuration properties into application’s pods. When defining container configuration inside Deployment YAML file we have to include references to environment variables and secrets as shown below

apiVersion: apps/v1
kind: Deployment
metadata:
  name: employee
  labels:
    app: employee
spec:
  replicas: 1
  selector:
    matchLabels:
      app: employee
  template:
    metadata:
      labels:
        app: employee
    spec:
      containers:
      - name: employee
        image: piomin/employee:1.0
        ports:
        - containerPort: 8080
        env:
        - name: MONGO_DATABASE
          valueFrom:
            configMapKeyRef:
              name: mongodb
              key: database-name
        - name: MONGO_USERNAME
          valueFrom:
            secretKeyRef:
              name: mongodb
              key: database-user
        - name: MONGO_PASSWORD
          valueFrom:
            secretKeyRef:
              name: mongodb
              key: database-password

2. Building service discovery with Kubernetes

We usually running microservices on Kubernetes using Docker containers. One or more containers are grouped by pods, which are the smallest deployable units created and managed in Kubernetes. A good practice is to run only one container inside a single pod. If you would like to scale up your microservice you would just have to increase a number of running pods. All running pods that belong to a single microservice are logically grouped by Kubernetes Service. This service may be visible outside the cluster, and is able to load balance incoming requests between all running pods. The following service definition groups all pods labelled with field app equaled to employee.

apiVersion: v1
kind: Service
metadata:
  name: employee
  labels:
    app: employee
spec:
  ports:
  - port: 8080
    protocol: TCP
  selector:
    app: employee

Service can be used for accessing application outside Kubernetes cluster or for inter-service communication inside a cluster. However, the communication between microservices can be implemented more comfortable with Spring Cloud Kubernetes. First we need to include the following dependency to project pom.xml.

<dependency>
	<groupId>org.springframework.cloud</groupId>
	<artifactId>spring-cloud-starter-kubernetes</artifactId>
	<version>0.3.0.BUILD-SNAPSHOT</version>
</dependency>

Then we should enable discovery client for an application – the same as we have always done for discovery Spring Cloud Netflix Eureka. This allows you to query Kubernetes endpoints (services) by name. This discovery feature is also used by the Spring Cloud Kubernetes Ribbon or Zipkin projects to fetch respectively the list of the pods defined for a microservice to be load balanced or the Zipkin servers available to send the traces or spans.

@SpringBootApplication
@EnableDiscoveryClient
@EnableMongoRepositories
@EnableSwagger2
public class EmployeeApplication {

	public static void main(String[] args) {
		SpringApplication.run(EmployeeApplication.class, args);
	}
	
	// ...
}

The last important thing in this section is to guarantee that Spring application name would be exactly the same as Kubernetes service name for the application. For application employee-service it is employee.

spring:
  application:
    name: employee

3. Building microservice using Docker and deploying on Kubernetes

There is nothing unusual in our sample microservices. We have included some standard Spring dependencies for building REST-based microservices, integrating with MongoDB and generating API documentation using Swagger2.

<dependency>
	<groupId>org.springframework.boot</groupId>
	<artifactId>spring-boot-starter-web</artifactId>
</dependency>
<dependency>
	<groupId>org.springframework.boot</groupId>
	<artifactId>spring-boot-starter-actuator</artifactId>
</dependency>
<dependency>
	<groupId>io.springfox</groupId>
	<artifactId>springfox-swagger2</artifactId>
	<version>2.9.2</version>
</dependency>
<dependency>
	<groupId>org.springframework.boot</groupId>
	<artifactId>spring-boot-starter-data-mongodb</artifactId>
</dependency>

In order to integrate with MongoDB we should create interface that extends standard Spring Data CrudRepository.

public interface EmployeeRepository extends CrudRepository {
	
	List findByDepartmentId(Long departmentId);
	List findByOrganizationId(Long organizationId);
	
}

Entity class should be annotated with Mongo @Document and a primary key field with @Id.

@Document(collection = "employee")
public class Employee {

	@Id
	private String id;
	private Long organizationId;
	private Long departmentId;
	private String name;
	private int age;
	private String position;
	
	// ...
	
}

The repository bean has been injected to the controller class. Here’s the full implementation of our REST API inside employee-service.

@RestController
public class EmployeeController {

	private static final Logger LOGGER = LoggerFactory.getLogger(EmployeeController.class);
	
	@Autowired
	EmployeeRepository repository;
	
	@PostMapping("/")
	public Employee add(@RequestBody Employee employee) {
		LOGGER.info("Employee add: {}", employee);
		return repository.save(employee);
	}
	
	@GetMapping("/{id}")
	public Employee findById(@PathVariable("id") String id) {
		LOGGER.info("Employee find: id={}", id);
		return repository.findById(id).get();
	}
	
	@GetMapping("/")
	public Iterable findAll() {
		LOGGER.info("Employee find");
		return repository.findAll();
	}
	
	@GetMapping("/department/{departmentId}")
	public List findByDepartment(@PathVariable("departmentId") Long departmentId) {
		LOGGER.info("Employee find: departmentId={}", departmentId);
		return repository.findByDepartmentId(departmentId);
	}
	
	@GetMapping("/organization/{organizationId}")
	public List findByOrganization(@PathVariable("organizationId") Long organizationId) {
		LOGGER.info("Employee find: organizationId={}", organizationId);
		return repository.findByOrganizationId(organizationId);
	}
	
}

In order to run our microservices on Kubernetes we should first build the whole Maven project with mvn clean install command. Each microservice has Dockerfile placed in the root directory. Here’s Dockerfile definition for employee-service.

FROM openjdk:8-jre-alpine
ENV APP_FILE employee-service-1.0-SNAPSHOT.jar
ENV APP_HOME /usr/apps
EXPOSE 8080
COPY target/$APP_FILE $APP_HOME/
WORKDIR $APP_HOME
ENTRYPOINT ["sh", "-c"]
CMD ["exec java -jar $APP_FILE"]

Let’s build Docker images for all three sample microservices.

$ cd employee-service
$ docker build -t piomin/employee:1.0 .
$ cd department-service
$ docker build -t piomin/department:1.0 .
$ cd organization-service
$ docker build -t piomin/organization:1.0 .

The last step is to deploy Docker containers with applications on Kubernetes. To do that just execute commands kubectl apply on YAML configuration files. The sample deployment file for employee-service has been demonstrated in step 1. All required deployment fields are available inside project repository in kubernetes directory.

$ kubectl apply -f kubernetes\employee-deployment.yaml
$ kubectl apply -f kubernetes\department-deployment.yaml
$ kubectl apply -f kubernetes\organization-deployment.yaml

4. Communication between microservices with Spring Cloud Kubernetes Ribbon

All the microservice are deployed on Kubernetes. Now, it’s worth to discuss some aspects related to inter-service communication. Application employee-service in contrast to other microservices did not invoke any other microservices. Let’s take a look on to other microservices that calls API exposed by employee-service and communicates between each other (organization-service calls department-service API).
First we need to include some additional dependencies to the project. We use Spring Cloud Ribbon and OpenFeign. Alternatively you can also use Spring @LoadBalanced RestTemplate.

<dependency>
	<groupId>org.springframework.cloud</groupId>
	<artifactId>spring-cloud-starter-netflix-ribbon</artifactId>
</dependency>
<dependency>
	<groupId>org.springframework.cloud</groupId>
	<artifactId>spring-cloud-starter-kubernetes-ribbon</artifactId>
	<version>0.3.0.BUILD-SNAPSHOT</version>
</dependency>
<dependency>
	<groupId>org.springframework.cloud</groupId>
	<artifactId>spring-cloud-starter-openfeign</artifactId>
</dependency>

Here’s the main class of department-service. It enables Feign client using @EnableFeignClients annotation. It works the same as with discovery based on Spring Cloud Netflix Eureka. OpenFeign uses Ribbon for client-side load balancing. Spring Cloud Kubernetes Ribbon provides some beans that forces Ribbon to communicate with Kubernetes API through Fabric8 KubernetesClient.

@SpringBootApplication
@EnableDiscoveryClient
@EnableFeignClients
@EnableMongoRepositories
@EnableSwagger2
public class DepartmentApplication {
	
	public static void main(String[] args) {
		SpringApplication.run(DepartmentApplication.class, args);
	}
	
	// ...
	
}

Here’s implementation of Feign client for calling method exposed by employee-service.

@FeignClient(name = "employee")
public interface EmployeeClient {

	@GetMapping("/department/{departmentId}")
	List findByDepartment(@PathVariable("departmentId") String departmentId);
	
}

Finally, we have to inject Feign client’s beans to the REST controller. Now, we may call the method defined inside EmployeeClient, which is equivalent to calling REST endpoints.

@RestController
public class DepartmentController {

	private static final Logger LOGGER = LoggerFactory.getLogger(DepartmentController.class);
	
	@Autowired
	DepartmentRepository repository;
	@Autowired
	EmployeeClient employeeClient;
	
	// ...
	
	@GetMapping("/organization/{organizationId}/with-employees")
	public List findByOrganizationWithEmployees(@PathVariable("organizationId") Long organizationId) {
		LOGGER.info("Department find: organizationId={}", organizationId);
		List departments = repository.findByOrganizationId(organizationId);
		departments.forEach(d -> d.setEmployees(employeeClient.findByDepartment(d.getId())));
		return departments;
	}
	
}

5. Building API gateway using Kubernetes Ingress

An Ingress is a collection of rules that allow incoming requests to reach the downstream services. In our microservices architecture ingress is playing a role of an API gateway. To create it we should first prepare YAML description file. The descriptor file should contain the hostname under which the gateway will be available and mapping rules to the downstream services.

apiVersion: extensions/v1beta1
kind: Ingress
metadata:
  name: gateway-ingress
  annotations:
    nginx.ingress.kubernetes.io/rewrite-target: /
spec:
  backend:
    serviceName: default-http-backend
    servicePort: 80
  rules:
  - host: microservices.info
    http:
      paths:
      - path: /employee
        backend:
          serviceName: employee
          servicePort: 8080
      - path: /department
        backend:
          serviceName: department
          servicePort: 8080
      - path: /organization
        backend:
          serviceName: organization
          servicePort: 8080

You have to execute the following command to apply the configuration visible above to the Kubernetes cluster.

$ kubectl apply -f kubernetes\ingress.yaml

For testing this solution locally we have to insert the mapping between IP address and hostname set in ingress definition inside hosts file as shown below. After it we can services through ingress using defined hostname just like that: http://microservices.info/employee.

192.168.99.100 microservices.info

You can check the details of created ingress just by executing command kubectl describe ing gateway-ingress.
micro-kube-2

6. Enabling API specification on gateway using Swagger2

Ok, what if we would like to expose single swagger documentation for all microservices deployed on Kubernetes? Well, here the things are getting complicated… We can run container with Swagger UI, and map all paths exposed by the ingress manually, but it is rather not a good solution…
In that case we can use Spring Cloud Kubernetes Ribbon one more time – this time together with Spring Cloud Netflix Zuul. Zuul will act as gateway only for serving Swagger API.
Here’s the list of dependencies used in my gateway-service project.

<dependency>
	<groupId>org.springframework.cloud</groupId>
	<artifactId>spring-cloud-starter-netflix-zuul</artifactId>
</dependency>
<dependency>
	<groupId>org.springframework.cloud</groupId>
	<artifactId>spring-cloud-starter-kubernetes</artifactId>
	<version>0.3.0.BUILD-SNAPSHOT</version>
</dependency>
<dependency>
	<groupId>org.springframework.cloud</groupId>
	<artifactId>spring-cloud-starter-netflix-ribbon</artifactId>
</dependency>
<dependency>
	<groupId>org.springframework.cloud</groupId>
	<artifactId>spring-cloud-starter-kubernetes-ribbon</artifactId>
	<version>0.3.0.BUILD-SNAPSHOT</version>
</dependency>
<dependency>
	<groupId>io.springfox</groupId>
	<artifactId>springfox-swagger-ui</artifactId>
	<version>2.9.2</version>
</dependency>
<dependency>
	<groupId>io.springfox</groupId>
	<artifactId>springfox-swagger2</artifactId>
	<version>2.9.2</version>
</dependency>

Kubernetes discovery client will detect all services exposed on cluster. We would like to display documentation only for our three microservices. That’s why I defined the following routes for Zuul.

zuul:
  routes:
    department:
      path: /department/**
    employee:
      path: /employee/**
    organization:
      path: /organization/**

Now we can use ZuulProperties bean to get routes addresses from Kubernetes discovery, and configure them as Swagger resources as shown below.

@Configuration
public class GatewayApi {

	@Autowired
	ZuulProperties properties;

	@Primary
	@Bean
	public SwaggerResourcesProvider swaggerResourcesProvider() {
		return () -> {
			List resources = new ArrayList();
			properties.getRoutes().values().stream()
					.forEach(route -> resources.add(createResource(route.getId(), "2.0")));
			return resources;
		};
	}

	private SwaggerResource createResource(String location, String version) {
		SwaggerResource swaggerResource = new SwaggerResource();
		swaggerResource.setName(location);
		swaggerResource.setLocation("/" + location + "/v2/api-docs");
		swaggerResource.setSwaggerVersion(version);
		return swaggerResource;
	}

}

Application gateway-service should be deployed on cluster the same as other applications. You can the list of running service by executing command kubectl get svc. Swagger documentation is available under address http://192.168.99.100:31237/swagger-ui.html.
micro-kube-3

Conclusion

I’m actually rooting for Spring Cloud Kubernetes project, which is still at the incubation stage. Kubernetes popularity as a platform is rapidly growing during some last months, but it still has some weaknesses. One of them is inter-service communication. Kubernetes doesn’t give us many mechanisms out-of-the-box, which allows configure more advanced rules. This a reason for creating frameworks for service mesh on Kubernetes like Istio or Linkerd. While these projects are still relatively new solutions, Spring Cloud is stable, opinionated framework. Why not to use to provide service discovery, inter-service communication or load balancing? Thanks to Spring Cloud Kubernetes it is possible.