In this article I’m going to describe two features of Spring Cloud Gateway: retrying based on GatewayFilter pattern and timeouts based on a global configuration. In some previous articles in this series I have described rate limiting based on Redis, and circuit breaker built with Resilience4J. For more details about those two features you may refer to the following blog posts:
I have already written about documentation for microservices more than two years ago in my article Microservices API Documentation with Swagger2. In that case I used project SpringFox for auto-generating Swagger documentation for Spring Boot applications. Since that time the SpringFox library is not being actively developed by the maintainers – the latest version has been released on June 2018. Currently, the most important problems with this library are a lack of support for OpenAPI in the newest version 3, and for Spring reactive APIs built using WebFlux. All these features are implemented by Springdoc OpenAPI library. Therefore, it may threaten as a replacement for SpringFox as Swagger and OpenAPI 3 generation tool for Spring Boot applications. Continue reading “Microservices API Documentation with Springdoc OpenAPI”→
One thing’s for sure. If you don’t have to version your API, do not try to do that. However, sometimes you have to. A large part of the most popular services like Twitter, Facebook, Netflix or PayPal is versioning their REST APIs. The advantages and disadvantages of that approach are obvious. On the one hand you don’t have to worry about making changes in your API even if many external clients and applications consume it. But on the other hand, you have maintain different versions of API implementation in your code, what sometimes may be troublesome.
In this article I’m going to show you how to maintain the several versions of REST API in your application in the most comfortable way. We will base on the sample application written on the top of Spring Boot framework and exposing API documentation using Swagger and SpringFox libraries.
Spring Boot does not provide any dedicated solutions for versioning APIs. The situation is different for SpringFox Swagger2 library, which provides grouping mechanism from version 2.8.0, which is perfect for generating documentation of versioned REST API.
I have already introduced Swagger2 together with Spring Boot application in one of my previous posts. In the article Microservices API Documentation with Swagger2 you may read how to use Swagger2 for generating API documentation for all the independent microservices and publishing it in one place – on API Gateway.
Different approaches to API versioning
There are some different ways to provide an API versioning in your application. The most popular of them are:
Through an URI path – you include the version number in the URL path of the endpoint, for example /api/v1/persons
Through query parameters – you pass the version number as a query parameter with specified name, for example /api/persons?version=1
Through custom HTTP headers – you define a new header that contains the version number in the request
Through a content negotiation – the version number is included to the “Accept” header together with accepted content type. The request with cURL would look like in the following sample: curl -H "Accept: application/vnd.piomin.v1+json" http://localhost:8080/api/persons
The decision, which of that approach implement in the application is up to you. We would discuss the advantages and disadvantages of every single approach, however it is not the main purpose of that article. The main purpose is to show you how to implement versioning in Spring Boot application and then publish the API documentation automatically using Swagger2. The sample application source code is available on GitHub (https://github.com/piomin/sample-api-versioning.git). I have implemented two of the approaches described above – in point 1 and 4.
Enabling Swagger for Spring Boot
Swagger2 can be enabled in Spring Boot application by including SpringFox library. In fact, this is the suite of java libraries used for automating the generation of machine and human readable specifications for JSON APIs written using Spring Framework. It supports such formats like swagger, RAML and jsonapi. To enable it for your application include the following Maven dependencies to the project: io.springfox:springfox-swagger-ui, io.springfox:springfox-swagger2, io.springfox:springfox-spring-web. Then you will have to annotate the main class with @EnableSwagger2 and define Docker object. Docket is a Springfox’s primary configuration mechanism for Swagger 2.0. We will discuss the details about it in the next section along with the sample for each way of versioning API.
Sample API
Our sample API is very simple. It exposes basic CRUD methods for Person entity. There are three versions of API available for external clients: 1.0, 1.1 and 1.2. In the version 1.1 I have changed the method for updating Person entity. In version 1.0 it was available under /person path, while now it is available under /person/{id} path. This is the only difference between versions 1.0 and 1.1. There is also one only difference in API between versions 1.1 and 1.2. Instead of field birthDate it returns age as integer parameter. This change affects to all the endpoints except DELETE /person/{id}. Now, let’s proceed to the implementation.
Versioning using URI path
Here’s the full implementation of URI path versioning inside Spring @RestController.
@RestController
@RequestMapping("/person")
public class PersonController {

	@Autowired
	PersonMapper mapper;
	@Autowired
	PersonRepository repository;

	@PostMapping({"/v1.0", "/v1.1"})
	public PersonOld add(@RequestBody PersonOld person) {
		return (PersonOld) repository.add(person);
	}

	@PostMapping("/v1.2")
	public PersonCurrent add(@RequestBody PersonCurrent person) {
		return mapper.map((PersonOld) repository.add(person));
	}

	@PutMapping("/v1.0")
	@Deprecated
	public PersonOld update(@RequestBody PersonOld person) {
		return (PersonOld) repository.update(person);
	}

	@PutMapping("/v1.1/{id}")
	public PersonOld update(@PathVariable("id") Long id, @RequestBody PersonOld person) {
		return (PersonOld) repository.update(person);
	}

	@PutMapping("/v1.2/{id}")
	public PersonCurrent update(@PathVariable("id") Long id, @RequestBody PersonCurrent person) {
		return mapper.map((PersonOld) repository.update(person));
	}

	@GetMapping({"/v1.0/{id}", "/v1.1/{id}"})
	public PersonOld findByIdOld(@PathVariable("id") Long id) {
		return (PersonOld) repository.findById(id);
	}

	@GetMapping("/v1.2/{id}")
	public PersonCurrent findById(@PathVariable("id") Long id) {
		return mapper.map((PersonOld) repository.findById(id));
	}

	@DeleteMapping({"/v1.0/{id}", "/v1.1/{id}", "/v1.2/{id}"})
	public void delete(@PathVariable("id") Long id) {
		repository.delete(id);
	}

}
If you would like to have three different versions available in the single generated API specification you should declare three Docket@Beans – one per single version. In this case the swagger group concept, which has been already introduced by SpringFox, would be helpful for us. The reason this concept bas been introduced is a necessity for support applications which require more than one swagger resource listing. Usually you need more than one resource listing in order to provide different versions of the same API. We can assign group to every Docket just by invoking groupName DSL method on it. Because different versions of API method are implemented within the same controller, we have to distinguish them by declaring path regex matching the selected version. All other settings are standard.
@Bean
public Docket swaggerPersonApi10() {
	return new Docket(DocumentationType.SWAGGER_2)
		.groupName("person-api-1.0")
		.select()
			.apis(RequestHandlerSelectors.basePackage("pl.piomin.services.versioning.controller"))
			.paths(regex("/person/v1.0.*"))
		.build()
		.apiInfo(new ApiInfoBuilder().version("1.0").title("Person API").description("Documentation Person API v1.0").build());
}

@Bean
public Docket swaggerPersonApi11() {
	return new Docket(DocumentationType.SWAGGER_2)
		.groupName("person-api-1.1")
		.select()
			.apis(RequestHandlerSelectors.basePackage("pl.piomin.services.versioning.controller"))
			.paths(regex("/person/v1.1.*"))
		.build()
		.apiInfo(new ApiInfoBuilder().version("1.1").title("Person API").description("Documentation Person API v1.1").build());
}

@Bean
public Docket swaggerPersonApi12() {
	return new Docket(DocumentationType.SWAGGER_2)
		.groupName("person-api-1.2")
		.select()
			.apis(RequestHandlerSelectors.basePackage("pl.piomin.services.versioning.controller"))
			.paths(regex("/person/v1.2.*"))
		.build()
		.apiInfo(new ApiInfoBuilder().version("1.2").title("Person API").description("Documentation Person API v1.2").build());
}
Now, we may display Swagger UI for our API just by calling URL in the web browser path /swagger-ui.html. You can switch between all available versions of API as you can see on the picture below.
Switching between available versions of API
Specification is generated by the exact version of API. Here’s documentation for version 1.0. Because method PUT /person is annotated with @Deprecated it is crossed out on the generated HTML documentation page.
Person API 1.0 specification
If you switch to group person-api-1 you will see all the methods that contains v1.1 in the path. Along them you may recognize the current version of PUT method with {id} field in the path.
Person API 1.1 specification
When using documentation generated by Swagger you may easily call every method after expanding it. Here’s the sample of calling method PUT /person/{id} from implemented for version 1.2.
Updating Person entity by calling method PUT from 1.2 version
Versioning using ‘Accept’ header
To access the implementation of versioning witt ‘Accept’ header you should switch to branch header (https://github.com/piomin/sample-api-versioning/tree/header). Here’s the full implementation of content negotiation using ‘Accept’ header versioning inside Spring @RestController.
@RestController
@RequestMapping("/person")
public class PersonController {

	@Autowired
	PersonMapper mapper;
	@Autowired
	PersonRepository repository;

	@PostMapping(produces = {"application/vnd.piomin.app-v1.0+json", "application/vnd.piomin.app-v1.1+json"})
	public PersonOld add(@RequestBody PersonOld person) {
		return (PersonOld) repository.add(person);
	}

	@PostMapping(produces = "application/vnd.piomin.app-v1.2+json")
	public PersonCurrent add(@RequestBody PersonCurrent person) {
		return mapper.map((PersonOld) repository.add(person));
	}

	@PutMapping(produces = "application/vnd.piomin.app-v1.0+json")
	@Deprecated
	public PersonOld update(@RequestBody PersonOld person) {
		return (PersonOld) repository.update(person);
	}

	@PutMapping(value = "/{id}", produces = "application/vnd.piomin.app-v1.1+json")
	public PersonOld update(@PathVariable("id") Long id, @RequestBody PersonOld person) {
		return (PersonOld) repository.update(person);
	}

	@PutMapping(value = "/{id}", produces = "application/vnd.piomin.app-v1.2+json")
	public PersonCurrent update(@PathVariable("id") Long id, @RequestBody PersonCurrent person) {
		return mapper.map((PersonOld) repository.update(person));
	}

	@GetMapping(name = "findByIdOld", value = "/{idOld}", produces = {"application/vnd.piomin.app-v1.0+json", "application/vnd.piomin.app-v1.1+json"})
	@Deprecated
	public PersonOld findByIdOld(@PathVariable("idOld") Long id) {
		return (PersonOld) repository.findById(id);
	}

	@GetMapping(name = "findById", value = "/{id}", produces = "application/vnd.piomin.app-v1.2+json")
	public PersonCurrent findById(@PathVariable("id") Long id) {
		return mapper.map((PersonOld) repository.findById(id));
	}

	@DeleteMapping(value = "/{id}", produces = {"application/vnd.piomin.app-v1.0+json", "application/vnd.piomin.app-v1.1+json", "application/vnd.piomin.app-v1.2+json"})
	public void delete(@PathVariable("id") Long id) {
		repository.delete(id);
	}

}
We still have to define three Docker@Beans, but the filtering criterias are slightly different. The simple filtering by path is not an option here. We have to crate Predicate for RequestHandler object and pass it to apis DSL method. The predicate implementation should filter every method in order to find only those which have produces field with required version number. Here’s sample Docket implementation for version 1.2.
@Bean
public Docket swaggerPersonApi12() {
	return new Docket(DocumentationType.SWAGGER_2)
		.groupName("person-api-1.2")
		.select()
			.apis(p -> {
				if (p.produces() != null) {
					for (MediaType mt : p.produces()) {
						if (mt.toString().equals("application/vnd.piomin.app-v1.2+json")) {
							return true;
						}
					}
				}
				return false;
			})
		.build()
		.produces(Collections.singleton("application/vnd.piomin.app-v1.2+json"))
		.apiInfo(new ApiInfoBuilder().version("1.2").title("Person API").description("Documentation Person API v1.2").build());
}
As you can see on the picture below the generated methods does not have the version number in the path.
Person API 1.2 specification for a content negotiation approach
When calling method for the selected version of API the only difference is in the response’s required content type.
Updating person and setting response content type
Summary
Versioning is one of the most important concept around HTTP APIs designing. No matter which approach to versioning you choose you should do everything to describe your API well. This seems to be especially important in the era of microservices, where your interface may be called by many other independent applications. In this case creating documentation in isolation from the source code could be troublesome. Swagger solves all of described problems. It may be easily integrated with your application, supports versioning. Thanks to SpringFox project it also can be easily customized in your Spring Boot application to meet more advanced demands.
Today exposing RESTful API with JSON protocol is the most common standard. We can find many articles describing advantages and disadvantages of JSON versus XML. Both these protocols exchange messages in text format. If an important aspect affecting to the choice of communication protocol in your systems is performance you should definitely pay attention to Protocol Buffers. It is a binary format created by Google as:
A language-neutral, platform-neutral, extensible way of serializing structured data for use in communications protocols, data storage, and more.
Protocol Buffers, which is sometimes referred as Protobuf is not only a message format but also a set of language rules that define the structure of messages. It is extremely useful in service to service communication what has been very well described in that article Beating JSON performance with Protobuf. In that example Protobuf was about 5 times faster than JSON for tests based on Spring Boot framework.
Introduction to Protocol Buffers can be found here. My sample is similar to previous samples from my weblog – it is based on two microservices account and customer which calls one of account’s endpoint. Let’s begin from message types definition provided inside .proto file. Place your .proto file in src/main/proto directory. Here’s account.proto defined in account service. We set java_package and java_outer_classname to define package and name of Java generated class. Message definition syntax is pretty intuitive. Account object generated from that file has three properties id, customerId and number. There is also Accounts object which wrappes list of Account objects.
Here’s .proto file definition from customer service. It a little more complicated than the previous one from account service. In addition to its definitions it contains definitions of account service messages, because they are used by @Feign client.
We generate source code from the message definitions above by using protobuf-maven-plugin maven plugin. Plugin needs to have protocExecutable file location set. It can be downloaded from Google’s Protocol Buffer download site.
Protobuf classes are generated into src/main/generated output directory. Let’s add that source directory to maven sources with build-helper-maven-plugin.
Sample application source code is available on GitHub. Before proceeding to the next steps build application using mvn clean install command. Generated classes are available under src/main/generated and our microservices are ready to run. Now, let me describe some implementation details. We need two dependencies in maven pom.xml to use Protobuf.
Then, we need to declare default HttpMessageConverter@Bean and inject it into RestTemplate@Bean.
    @Bean
    @Primary
    ProtobufHttpMessageConverter protobufHttpMessageConverter() {
        return new ProtobufHttpMessageConverter();
    }

    @Bean
    RestTemplate restTemplate(ProtobufHttpMessageConverter hmc) {
        return new RestTemplate(Arrays.asList(hmc));
    }
Here’s REST @Controller code. Account and Accounts from AccountProto generated class are returned as a response body in all three API methods visible below. All objects generated from .proto files have newBuilder method used for creating new object instances. I also set application/x-protobuf as default response content type.
Method GET /accounts/customer/{customer} is called from customer service using @Feign client.
@FeignClient(value = "account-service")
public interface AccountClient {

    @RequestMapping(method = RequestMethod.GET, value = "/accounts/customer/{customerId}")
    Accounts getAccounts(@PathVariable("customerId") Integer customerId);

}
We can easily test described configuration using JUnit test class visible below.
@SpringBootTest(webEnvironment = WebEnvironment.RANDOM_PORT)
@RunWith(SpringRunner.class)
public class AccountApplicationTest {

	protected Logger logger = Logger.getLogger(AccountApplicationTest.class.getName());

	@Autowired
	TestRestTemplate template;

	@Test
	public void testFindByNumber() {
		Account a = this.template.getForObject("/accounts/{id}", Account.class, "111111");
		logger.info("Account[\n" + a + "]");
	}

	@Test
	public void testFindByCustomer() {
		Accounts a = this.template.getForObject("/accounts/customer/{customer}", Accounts.class, "2");
		logger.info("Accounts[\n" + a + "]");
	}

	@Test
	public void testFindAll() {
		Accounts a = this.template.getForObject("/accounts", Accounts.class);
		logger.info("Accounts[\n" + a + "]");
	}

	@TestConfiguration
	static class Config {

		@Bean
		public RestTemplateBuilder restTemplateBuilder() {
			return new RestTemplateBuilder().additionalMessageConverters(new ProtobufHttpMessageConverter());
		}

	}

}
Conclusion
This article shows how to enable Protocol Buffers for microservices project based on Spring Boot. Protocol Buffer is an alternative to text-based protocols like XML or JSON and surpasses them in terms of performance. Adapt to this protocol using in Spring Boot application is pretty simple. For microservices we can still uses Spring Cloud components like Feign or Ribbon in combination with Protocol Buffers same as with REST over JSON or XML.
Swagger is the most popular tool for designing, building and documenting RESTful APIs. It has nice integration with Spring Boot. To use it in conjunction with Spring we need to add following two dependencies to Maven pom.xml.
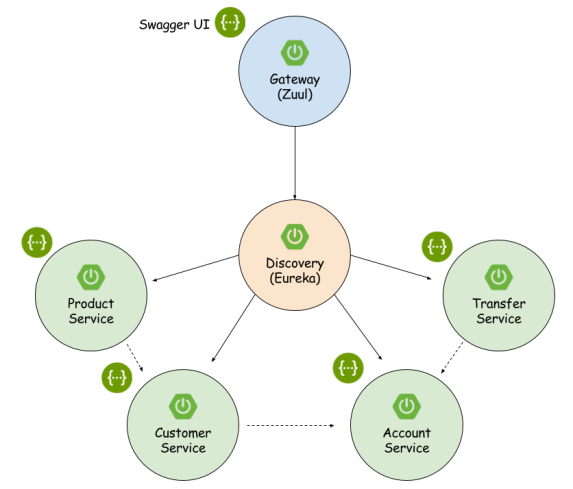
Swagger configuration for single Spring Boot service is pretty simple. The level of complexity is greater if you want to create one documentation for several separated microservices. Such documentation should be available on API gateway. In the picture below you can see the architecture of our sample solution.
First, we should configure Swagger on every microservice. To enable it we have to declare @EnableSwagger2 on the main class. API documentation will be automatically generated from source code by Swagger library during application startup. The process is controlled by Docket@Bean which is also declared in the main class. API version is read from pom.xml file using MavenXpp3Reader. We also set some other properties like title, author and description using apiInfo method. By default, Swagger generates documentation for all REST services including those created by Spring Boot. We would like to limit documentation only to our @RestController located inside pl.piomin.microservices.advanced.account.api package.
    @Bean
    public Docket api() throws IOException, XmlPullParserException {
        MavenXpp3Reader reader = new MavenXpp3Reader();
        Model model = reader.read(new FileReader("pom.xml"));
        return new Docket(DocumentationType.SWAGGER_2)
          .select()
          .apis(RequestHandlerSelectors.basePackage("pl.piomin.microservices.advanced.account.api"))
          .paths(PathSelectors.any())
          .build().apiInfo(new ApiInfo("Account Service Api Documentation", "Documentation automatically generated", model.getParent().getVersion(), null, new Contact("Piotr Mińkowski", "piotrminkowski.wordpress.com", "piotr.minkowski@gmail.com"), null, null));
}
The similar Swagger’s configuration exists on every microservice. API documentation is available under http://localhost:/swagger-ui.html. Now, we would like to enable one documentation embedded on the gateway for all microservices. Here’s Spring @Component implementing SwaggerResourcesProvider interface which overrides default provider configuration exists in Spring context.
@Component
@Primary
@EnableAutoConfiguration
public class DocumentationController implements SwaggerResourcesProvider {

	@Override
	public List get() {
		List resources = new ArrayList<>();
		resources.add(swaggerResource("account-service", "/api/account/v2/api-docs", "2.0"));
		resources.add(swaggerResource("customer-service", "/api/customer/v2/api-docs", "2.0"));
		resources.add(swaggerResource("product-service", "/api/product/v2/api-docs", "2.0"));
		resources.add(swaggerResource("transfer-service", "/api/transfer/v2/api-docs", "2.0"));
		return resources;
	}

	private SwaggerResource swaggerResource(String name, String location, String version) {
		SwaggerResource swaggerResource = new SwaggerResource();
		swaggerResource.setName(name);
		swaggerResource.setLocation(location);
		swaggerResource.setSwaggerVersion(version);
		return swaggerResource;
	}

}
All microservices api-docs are added as Swagger resources. The location address is proxied via Zuul gateway. Here’s gateway route configuration.
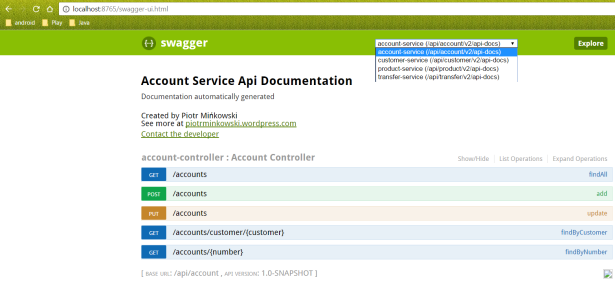
Now, API documentation is available under gateway address http://localhost:8765/swagger-ui.html. You can see how it looks for account service in the picture below. We can select source service in the combo box placed inside title panel.
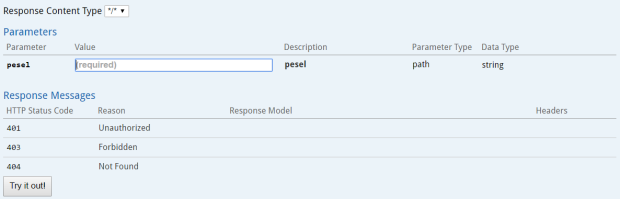
Documentation appearence can be easily customized by providing UIConfiguration@Bean. In the code below I changed default operations expansion level by setting “list” as a second constructor parameter – docExpansion.