Kubernetes doesn’t provide built-in support for ConfigMap
or Secret
versioning. Sometimes such a feature may be useful, when we are deciding to rollback current version of our application. In Kubernetes we are able to rollback just a version of Deployment
without any additional configuration properties stored in ConfigMap
or Secret
. Continue reading “Kubernetes ConfigMap Versioning for Spring Boot Apps”
Tag: versioning
Microservices traffic management using Istio on Kubernetes
I have already described a simple example of route configuration between two microservices deployed on Kubernetes in one of my previous articles: Service Mesh with Istio on Kubernetes in 5 steps. You can refer to this article if you are interested in the basic information about Istio, and its deployment on Kubernetes via Minikube. Today we will create some more advanced traffic management rules basing on the same sample applications as used in the previous article about Istio.
The source code of sample applications is available on GitHub in repository sample-istio-services (https://github.com/piomin/sample-istio-services.git). There are two sample application callme-service
and caller-service
deployed in two different versions 1.0
and 2.0
. Version 1.0
is available in branch v1
(https://github.com/piomin/sample-istio-services/tree/v1), while version 2.0
in the branch v2
(https://github.com/piomin/sample-istio-services/tree/v2). Using these sample applications in different versions I’m going to show you different strategies of traffic management depending on a HTTP header set in the incoming requests.
We may force caller-service
to route all the requests to the specific version of callme-service
by setting header x-version
to v1
or v2
. We can also do not set this header in the request what results in splitting traffic between all existing versions of service. If the request comes to version v1
of caller-service
the traffic is splitted 50-50 between two instances of callme-service
. If the request is received by v2 instance of caller-service
75% traffic is forwarded to version v2
of callme-service
, while only 25% to v1
. The scenario described above has been illustrated on the following diagram.
Before we proceed to the example, I should say some words about traffic management with Istio. If you have read my previous article about Istio, you would probably know that each rule is assigned to a destination. Rules control a process of requests routing within a service mesh. The one very important information about them,especially for the purposes of the example illustrated on the diagram above, is that multiple rules can be applied to the same destination. The priority of every rule is determined by the precedence
field of the rule. There is one principle related to a value of this field: the higher value of this integer field, the greater priority of the rule. As you may probably guess, if there is more than one rule with the same precedence value the order of rules evaluation is undefined. In addition to a destination, we may also define a source of the request in order to restrict a rule only to a specific caller. If there are multiple deployments of a calling service, we can even filter them out by setting source’s label field. Of course, we can also specify the attributes of an HTTP request such as uri, scheme or headers that are used for matching a request with defined rule.
Ok, now let’s take a look on the rule with the highest priority. Its name is callme-service-v1
(1). It applies to callme-service
(2), and has the highest priority in comparison to other rules (3). It is applies only to requests sent by caller-service (4), that contain HTTP header x-version
with value v1
(5). This route rule applies only to version v1
of callme-service
(6).
apiVersion: config.istio.io/v1alpha2 kind: RouteRule metadata: name: callme-service-v1 # (1) spec: destination: name: callme-service # (2) precedence: 4 # (3) match: source: name: caller-service # (4) request: headers: x-version: exact: "v1" # (5) route: - labels: version: v1 # (6)
Here’s the fragment of the first diagram, which is handled by this route rule.
The next rule callme-service-v2
(1) has a lower priority (2). However, it does not conflicts with first rule, because it applies only to the requests containing x-version
header with value v2
(3). It forwards all requests to version v2
of callme-service
(4).
apiVersion: config.istio.io/v1alpha2 kind: RouteRule metadata: name: callme-service-v2 # (1) spec: destination: name: callme-service precedence: 3 # (2) match: source: name: caller-service request: headers: x-version: exact: "v2" # (3) route: - labels: version: v2 # (4)
As before, here’s the fragment of the first diagram, which is handled by this route rule.
The rule callme-service-v1-default
(1) visible in the code fragment below has a lower priority (2) than two previously described rules. In practice it means that it is executed only if conditions defined in two previous rules were not fulfilled. Such a situation occurs if you do not pass the header x-version
inside HTTP request, or it would have diferent value than v1
or v2
. The rule visible below applies only to the instance of service labeled with v1
version
(3). Finally, the traffic to callme-service
is load balanced in propertions 50-50 between two versions of that service (4).
apiVersion: config.istio.io/v1alpha2 kind: RouteRule metadata: name: callme-service-v1-default # (1) spec: destination: name: callme-service precedence: 2 # (2) match: source: name: caller-service labels: version: v1 # (3) route: # (4) - labels: version: v1 weight: 50 - labels: version: v2 weight: 50
Here’s the fragment of the first diagram, which is handled by this route rule.
The last rule is pretty similar to the previously described callme-service-v1-default
. Its name is callme-service-v2-default
(1), and it applies only to version v2
of caller-service
(3). It has the lowest priority (2), and splits traffic between two version of callme-service
in proportions 75-25 in favor of version v2
(4).
apiVersion: config.istio.io/v1alpha2 kind: RouteRule metadata: name: callme-service-v2-default # (1) spec: destination: name: callme-service precedence: 1 # (2) match: source: name: caller-service labels: version: v2 # (3) route: # (4) - labels: version: v1 weight: 25 - labels: version: v2 weight: 75
The same as before, I have also included the diagram illustrated a behaviour of this rule.
All the rules may be placed inside a single file. In that case they should be separated with line ---
. This file is available in code’s repository inside callme-service
module as multi-rule.yaml
. To deploy all defined rules on Kubernetes just execute the following command.
$ kubectl apply -f multi-rule.yaml
After successful deploy you may check out the list of available rules by running command istioctl get routerule
.
Before we will start any tests, we obviously need to have sample applications deployed on Kubernetes. This applications are really simple and pretty similar to the applications used for tests in my previous article about Istio. The controller visible below implements method GET /callme/ping
, which prints version of application taken from pom.xml
and value of x-version
HTTP header received in the request.
@RestController @RequestMapping("/callme") public class CallmeController { private static final Logger LOGGER = LoggerFactory.getLogger(CallmeController.class); @Autowired BuildProperties buildProperties; @GetMapping("/ping") public String ping(@RequestHeader(name = "x-version", required = false) String version) { LOGGER.info("Ping: name={}, version={}, header={}", buildProperties.getName(), buildProperties.getVersion(), version); return buildProperties.getName() + ":" + buildProperties.getVersion() + " with version " + version; } }
Here’s the controller class that implements method GET /caller/ping
. It prints version of caller-service
taken from pom.xml
and calls method GET callme/ping
exposed by callme-service
. It needs to include x-version
header to the request when sending it to the downstream service.
@RestController @RequestMapping("/caller") public class CallerController { private static final Logger LOGGER = LoggerFactory.getLogger(CallerController.class); @Autowired BuildProperties buildProperties; @Autowired RestTemplate restTemplate; @GetMapping("/ping") public String ping(@RequestHeader(name = "x-version", required = false) String version) { LOGGER.info("Ping: name={}, version={}, header={}", buildProperties.getName(), buildProperties.getVersion(), version); HttpHeaders headers = new HttpHeaders(); if (version != null) headers.set("x-version", version);<span id="mce_SELREST_start" style="overflow:hidden;line-height:0;"></span> HttpEntity entity = new HttpEntity(headers); ResponseEntity response = restTemplate.exchange("http://callme-service:8091/callme/ping", HttpMethod.GET, entity, String.class); return buildProperties.getName() + ":" + buildProperties.getVersion() + ". Calling... " + response.getBody() + " with header " + version; } }
Now, we may proceeed to applications build and deployment on Kubernetes. Here are are the further steps.
1. Building appplication
First, switch to branch v1
and build the whole project sample-istio-services
by executing mvn clean install
command.
2. Building Docker image
The Dockerfiles are placed in the root directory of every application. Build their Docker images by executing the following commands.
$ docker build -t piomin/callme-service:1.0 . $ docker build -t piomin/caller-service:1.0 .
Alternatively, you may omit this step, because images piomin/callme-service
and piomin/caller-service
are available on my Docker Hub account.
3. Inject Istio components to Kubernetes deployment file
Kubernetes YAML deployment file is available in the root directory of every application as deployment.yaml
. The result of the following command should be saved as separated file, for example deployment-with-istio.yaml
.
$ istioctl kube-inject -f deployment.yaml
4. Deployment on Kubernetes
Finally, you can execute well-known kubectl command in order to deploy Docker container with our sample application.
$ kubectl apply -f deployment-with-istio.yaml
Then switch to branch v2
, and repeat the steps described above for version 2.0
of the sample applications. The final deployment result is visible on picture below.
One very useful thing when running Istio on Kubernetes is out-of-the-box integration with such tools like Zipkin, Grafana or Prometheus. Istio automatically sends some metrics, that are collected by Prometheus, for example total number of requests in metric istio_request_count. YAML deployment files for these plugins ara available inside directory ${ISTIO_HOME}/install/kubernetes/addons
. Before installing Prometheus using kubectl
command I suggest to change service type from default ClusterIP
to NodePort
by adding the line type: NodePort
.
apiVersion: v1 kind: Service metadata: annotations: prometheus.io/scrape: 'true' labels: name: prometheus name: prometheus namespace: istio-system spec: type: NodePort selector: app: prometheus ports: - name: prometheus protocol: TCP port: 9090
Then we should run command kubectl apply -f prometheus.yaml
in order to deploy Prometheus on Kubernetes. The deployment is available inside istio-system
namespace. To check the external port of service run the following command. For me, it is available under address http://192.168.99.100:32293.
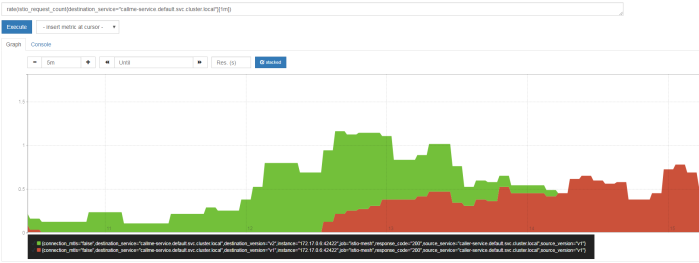
In the following diagram visualized using Prometheus I filtered out only the requests sent to callme-service
. Green color points to requests received by version v2
of the service, while red color points to requests processed by version v1
of the service. Like you can see in this diagram, in the beginning I have sent the requests to caller-service
with HTTP header x-version
set to value v2
, then I didn’t set this header and traffic has been splitted between to deployed instances of the service. Finally I set it to v1
. I defined an expression rate(istio_request_count{callme-service.default.svc.cluster.local}[1m])
, which returns per-second rate of requests received by callme-service
.
Testing
Before sending some test requests to caller-service
we need to obtain its address on Kubernetes. After executing the following command you see that it is available under address http://192.168.99.100:32237/caller/ping
.
We have four possible scenarios. In first, when we set header x-version
to v1
the request will be always routed to callme-service-v1
.
If a header x-version
is not included in the requests the traffic will be splitted between callme-service-v1
…
… and callme-service-v2
.
Finally, if we set header x-version
to v2
the request will be always routed to callme-service-v2
.
Conclusion
Using Istio you can easily create and apply simple and more advanced traffic management rules to the applications deployed on Kubernetes. You can also monitor metrics and traces through the integration between Istio and Zipkin, Prometheus and Grafana.
Versioning REST API with Spring Boot and Swagger
One thing’s for sure. If you don’t have to version your API, do not try to do that. However, sometimes you have to. A large part of the most popular services like Twitter, Facebook, Netflix or PayPal is versioning their REST APIs. The advantages and disadvantages of that approach are obvious. On the one hand you don’t have to worry about making changes in your API even if many external clients and applications consume it. But on the other hand, you have maintain different versions of API implementation in your code, what sometimes may be troublesome.
In this article I’m going to show you how to maintain the several versions of REST API in your application in the most comfortable way. We will base on the sample application written on the top of Spring Boot framework and exposing API documentation using Swagger and SpringFox libraries.
Spring Boot does not provide any dedicated solutions for versioning APIs. The situation is different for SpringFox Swagger2 library, which provides grouping mechanism from version 2.8.0, which is perfect for generating documentation of versioned REST API.
I have already introduced Swagger2 together with Spring Boot application in one of my previous posts. In the article Microservices API Documentation with Swagger2 you may read how to use Swagger2 for generating API documentation for all the independent microservices and publishing it in one place – on API Gateway.
Different approaches to API versioning
There are some different ways to provide an API versioning in your application. The most popular of them are:
- Through an URI path – you include the version number in the URL path of the endpoint, for example /api/v1/persons
- Through query parameters – you pass the version number as a query parameter with specified name, for example /api/persons?version=1
- Through custom HTTP headers – you define a new header that contains the version number in the request
- Through a content negotiation – the version number is included to the “Accept” header together with accepted content type. The request with cURL would look like in the following sample:
curl -H "Accept: application/vnd.piomin.v1+json" http://localhost:8080/api/persons
The decision, which of that approach implement in the application is up to you. We would discuss the advantages and disadvantages of every single approach, however it is not the main purpose of that article. The main purpose is to show you how to implement versioning in Spring Boot application and then publish the API documentation automatically using Swagger2. The sample application source code is available on GitHub (https://github.com/piomin/sample-api-versioning.git). I have implemented two of the approaches described above – in point 1 and 4.
Enabling Swagger for Spring Boot
Swagger2 can be enabled in Spring Boot application by including SpringFox library. In fact, this is the suite of java libraries used for automating the generation of machine and human readable specifications for JSON APIs written using Spring Framework. It supports such formats like swagger, RAML and jsonapi. To enable it for your application include the following Maven dependencies to the project: io.springfox:springfox-swagger-ui
, io.springfox:springfox-swagger2
, io.springfox:springfox-spring-web
. Then you will have to annotate the main class with @EnableSwagger2
and define Docker
object. Docket is a Springfox’s primary configuration mechanism for Swagger 2.0. We will discuss the details about it in the next section along with the sample for each way of versioning API.
Sample API
Our sample API is very simple. It exposes basic CRUD methods for Person
entity. There are three versions of API available for external clients: 1.0
, 1.1
and 1.2
. In the version 1.1
I have changed the method for updating Person
entity. In version 1.0
it was available under /person
path, while now it is available under /person/{id}
path. This is the only difference between versions 1.0
and 1.1
. There is also one only difference in API between versions 1.1
and 1.2
. Instead of field birthDate
it returns age
as integer parameter. This change affects to all the endpoints except DELETE /person/{id}
. Now, let’s proceed to the implementation.
Versioning using URI path
Here’s the full implementation of URI path versioning inside Spring @RestController
.
@RestController @RequestMapping("/person") public class PersonController { @Autowired PersonMapper mapper; @Autowired PersonRepository repository; @PostMapping({"/v1.0", "/v1.1"}) public PersonOld add(@RequestBody PersonOld person) { return (PersonOld) repository.add(person); } @PostMapping("/v1.2") public PersonCurrent add(@RequestBody PersonCurrent person) { return mapper.map((PersonOld) repository.add(person)); } @PutMapping("/v1.0") @Deprecated public PersonOld update(@RequestBody PersonOld person) { return (PersonOld) repository.update(person); } @PutMapping("/v1.1/{id}") public PersonOld update(@PathVariable("id") Long id, @RequestBody PersonOld person) { return (PersonOld) repository.update(person); } @PutMapping("/v1.2/{id}") public PersonCurrent update(@PathVariable("id") Long id, @RequestBody PersonCurrent person) { return mapper.map((PersonOld) repository.update(person)); } @GetMapping({"/v1.0/{id}", "/v1.1/{id}"}) public PersonOld findByIdOld(@PathVariable("id") Long id) { return (PersonOld) repository.findById(id); } @GetMapping("/v1.2/{id}") public PersonCurrent findById(@PathVariable("id") Long id) { return mapper.map((PersonOld) repository.findById(id)); } @DeleteMapping({"/v1.0/{id}", "/v1.1/{id}", "/v1.2/{id}"}) public void delete(@PathVariable("id") Long id) { repository.delete(id); } }
If you would like to have three different versions available in the single generated API specification you should declare three Docket
@Beans
– one per single version. In this case the swagger group concept, which has been already introduced by SpringFox, would be helpful for us. The reason this concept bas been introduced is a necessity for support applications which require more than one swagger resource listing. Usually you need more than one resource listing in order to provide different versions of the same API. We can assign group to every Docket just by invoking groupName DSL method on it. Because different versions of API method are implemented within the same controller, we have to distinguish them by declaring path regex matching the selected version. All other settings are standard.
@Bean public Docket swaggerPersonApi10() { return new Docket(DocumentationType.SWAGGER_2) .groupName("person-api-1.0") .select() .apis(RequestHandlerSelectors.basePackage("pl.piomin.services.versioning.controller")) .paths(regex("/person/v1.0.*")) .build() .apiInfo(new ApiInfoBuilder().version("1.0").title("Person API").description("Documentation Person API v1.0").build()); } @Bean public Docket swaggerPersonApi11() { return new Docket(DocumentationType.SWAGGER_2) .groupName("person-api-1.1") .select() .apis(RequestHandlerSelectors.basePackage("pl.piomin.services.versioning.controller")) .paths(regex("/person/v1.1.*")) .build() .apiInfo(new ApiInfoBuilder().version("1.1").title("Person API").description("Documentation Person API v1.1").build()); } @Bean public Docket swaggerPersonApi12() { return new Docket(DocumentationType.SWAGGER_2) .groupName("person-api-1.2") .select() .apis(RequestHandlerSelectors.basePackage("pl.piomin.services.versioning.controller")) .paths(regex("/person/v1.2.*")) .build() .apiInfo(new ApiInfoBuilder().version("1.2").title("Person API").description("Documentation Person API v1.2").build()); }
Now, we may display Swagger UI for our API just by calling URL in the web browser path /swagger-ui.html
. You can switch between all available versions of API as you can see on the picture below.
Specification is generated by the exact version of API. Here’s documentation for version 1.0
. Because method PUT /person
is annotated with @Deprecated
it is crossed out on the generated HTML documentation page.
If you switch to group person-api-1
you will see all the methods that contains v1.1
in the path. Along them you may recognize the current version of PUT method with {id}
field in the path.
When using documentation generated by Swagger you may easily call every method after expanding it. Here’s the sample of calling method PUT /person/{id}
from implemented for version 1.2.
Versioning using ‘Accept’ header
To access the implementation of versioning witt ‘Accept’ header you should switch to branch header (https://github.com/piomin/sample-api-versioning/tree/header). Here’s the full implementation of content negotiation using ‘Accept’ header versioning inside Spring @RestController
.
@RestController @RequestMapping("/person") public class PersonController { @Autowired PersonMapper mapper; @Autowired PersonRepository repository; @PostMapping(produces = {"application/vnd.piomin.app-v1.0+json", "application/vnd.piomin.app-v1.1+json"}) public PersonOld add(@RequestBody PersonOld person) { return (PersonOld) repository.add(person); } @PostMapping(produces = "application/vnd.piomin.app-v1.2+json") public PersonCurrent add(@RequestBody PersonCurrent person) { return mapper.map((PersonOld) repository.add(person)); } @PutMapping(produces = "application/vnd.piomin.app-v1.0+json") @Deprecated public PersonOld update(@RequestBody PersonOld person) { return (PersonOld) repository.update(person); } @PutMapping(value = "/{id}", produces = "application/vnd.piomin.app-v1.1+json") public PersonOld update(@PathVariable("id") Long id, @RequestBody PersonOld person) { return (PersonOld) repository.update(person); } @PutMapping(value = "/{id}", produces = "application/vnd.piomin.app-v1.2+json") public PersonCurrent update(@PathVariable("id") Long id, @RequestBody PersonCurrent person) { return mapper.map((PersonOld) repository.update(person)); } @GetMapping(name = "findByIdOld", value = "/{idOld}", produces = {"application/vnd.piomin.app-v1.0+json", "application/vnd.piomin.app-v1.1+json"}) @Deprecated public PersonOld findByIdOld(@PathVariable("idOld") Long id) { return (PersonOld) repository.findById(id); } @GetMapping(name = "findById", value = "/{id}", produces = "application/vnd.piomin.app-v1.2+json") public PersonCurrent findById(@PathVariable("id") Long id) { return mapper.map((PersonOld) repository.findById(id)); } @DeleteMapping(value = "/{id}", produces = {"application/vnd.piomin.app-v1.0+json", "application/vnd.piomin.app-v1.1+json", "application/vnd.piomin.app-v1.2+json"}) public void delete(@PathVariable("id") Long id) { repository.delete(id); } }
We still have to define three Docker
@Beans
, but the filtering criterias are slightly different. The simple filtering by path is not an option here. We have to crate Predicate
for RequestHandler
object and pass it to apis
DSL method. The predicate implementation should filter every method in order to find only those which have produces
field with required version number. Here’s sample Docket
implementation for version 1.2
.
@Bean public Docket swaggerPersonApi12() { return new Docket(DocumentationType.SWAGGER_2) .groupName("person-api-1.2") .select() .apis(p -> { if (p.produces() != null) { for (MediaType mt : p.produces()) { if (mt.toString().equals("application/vnd.piomin.app-v1.2+json")) { return true; } } } return false; }) .build() .produces(Collections.singleton("application/vnd.piomin.app-v1.2+json")) .apiInfo(new ApiInfoBuilder().version("1.2").title("Person API").description("Documentation Person API v1.2").build()); }
As you can see on the picture below the generated methods does not have the version number in the path.
When calling method for the selected version of API the only difference is in the response’s required content type.
Summary
Versioning is one of the most important concept around HTTP APIs designing. No matter which approach to versioning you choose you should do everything to describe your API well. This seems to be especially important in the era of microservices, where your interface may be called by many other independent applications. In this case creating documentation in isolation from the source code could be troublesome. Swagger solves all of described problems. It may be easily integrated with your application, supports versioning. Thanks to SpringFox project it also can be easily customized in your Spring Boot application to meet more advanced demands.