Spring Boot Actuator is one of the most modified projects after release of Spring Boot 2. It has been through the major improvements, which aimed to simplify customization, and include some new features like support for other web technologies, for example the new reactive module – Spring WebFlux. It also adds out-of-the-box support for exporting metrics to InfluxDB – an open source time series database designed to handle high volumes of timestamped data. It is really a great simplification in comparison to the version used with Spring Boot 1.5. You can see for yourself how much by reading one of my previous articles Custom metrics visualization with Grafana and InfluxDB. I described there how to export metrics generated by Spring Boot Actuator to InfluxDB using @ExportMetricsWriter bean. The sample Spring Boot application has been available for that article on GitHub repository sample-spring-graphite (https://github.com/piomin/sample-spring-graphite.git) in the branch master. For the current article, I have created the branch spring2 (https://github.com/piomin/sample-spring-graphite/tree/spring2), which show how to implement the same feature as before using version 2.0 of Spring Boot and Spring Boot Actuator.
Additionally, I’m going to show you how to export the same metrics to another popular monitoring system for efficiently storing timeseries data – Prometheus. There is one major difference between models of exporting metrics between InfluxDB and Prometheus. First of them is a push based system, while the second is a pull based system. So, our sample application needs to to actively send data to the InfluxDB monitoring system, while with Prometheus it only has to expose endpoint that will be fetched for data periodically. Let’s begin from InfluxDB.
1. Running InfluxDB
In the previous article I didn’t write much about this database and its configuration. So, now I say some words about it. First step is typical for my examples – we will run Docker container with InfluxDB. Here’s the simplest command that run InfluxDB on your local machine and exposes HTTP API over 8086 port.
$ docker run -d --name influx -p 8086:8086 influxdb
Once we started that container, you would probably want to login there and execute some commands. Nothing simpler, just run the following command and you would be able to do it. After login you should see the version of InfluxDB running on the target Docker container.
$ docker exec -it influx influx
Connected to http://localhost:8086 version 1.5.2
InfluxDB shell version: 1.5.2
The first step is to create database. As you can probably guess, tt can be achieved using command create database. Then switch to the newly created database.
$ create database springboot
$ use springboot
Is that semantic looks familiar for you? Yes, InfluxDB provides very similar query language to SQL. It is called InluxQL, and allows you to define SELECT statements, GROUP BY or INTO clauses, and many more. However, before executing such queries, we should have data stored inside database, am I right? Now, let’s proceed to the next steps in order to generate some test metrics.
2. Integrating Spring Boot application with InfluxDB
If you include artifact micrometer-registry-influx to the project’s dependencies, an export to InfluxDB will be enabled automatically. Of course, we also need to include starter spring-boot-starter-actuator.
<dependency>
	<groupId>org.springframework.boot</groupId>
	<artifactId>spring-boot-starter-actuator</artifactId>
</dependency>
<dependency>
	<groupId>io.micrometer</groupId>
	<artifactId>micrometer-registry-influx</artifactId>
</dependency>
The only thing you have to do is to override default address of InfluxDB, because we are running InfluxDB Docker container on VM. By default, Spring Boot Data tries to connect database named mydb. However, I have already created database springboot, so I should also override this default value. In the version 2 of Spring Boot all the configuration properties related to Spring Boot Actuator endpoints has been moved to management.* section.
management:
  metrics:
    export:
      influx:
        db: springboot
        uri: http://192.168.99.100:8086
You may be surprised a little after starting Spring Boot application with actuator included on the classpath, that it exposes only two HTTP endpoints by default /actuator/info and /actuator/health. That’s why in the newest version of Spring Boot all actuators other than /health and /info are disabled by default, for security purposes. To enable all the actuator enpoints, you have to set property management.endpoints.web.exposure.include to '*'.
In the newest version of Spring Boot monitoring of HTTP metrics has been improved significantly. We can enable collecting all Spring MVC metrics by setting the property management.metrics.web.server.auto-time-requests to true. Alternatively, when it is set to false, you can enable metrics for the specific REST controller by annotating it with @Timed. You can also annotate a single method inside controller, to generate metrics only for specific endpoint.
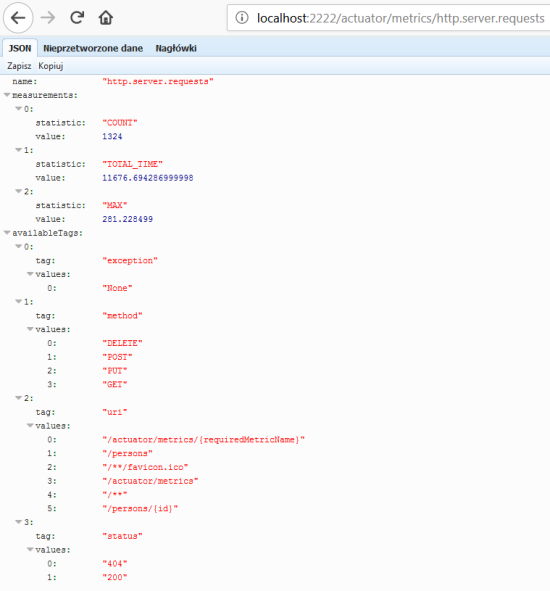
After application boot you may check out the full list of generated metrics by calling endpoint GET /actuator/metrics. By default, metrics for Spring MVC controller are generated under the name http.server.requests. This name can be customized by setting the management.metrics.web.server.requests-metric-name property. If you run the sample application available inside my GitHub repository it is by default available uder port 2222. Now, you can check out the list of statistics generated for a single metric by calling the endpoint GET /actuator/metrics/{requiredMetricName}, as shown in the following picture.
3. Building Spring Boot application
The sample Spring Boot application used for generating metrics consists of a single controller that implements basic CRUD operations for manipulating Person entity, repository bean and entity class. The application connects to MySQL database using Spring Data JPA repository providing CRUD implementation. Here’s the controller class.
@RestController
@Timed
public class PersonController {

	protected Logger logger = Logger.getLogger(PersonController.class.getName());

	@Autowired
	PersonRepository repository;

	@GetMapping("/persons/pesel/{pesel}")
	public List findByPesel(@PathVariable("pesel") String pesel) {
		logger.info(String.format("Person.findByPesel(%s)", pesel));
		return repository.findByPesel(pesel);
	}

	@GetMapping("/persons/{id}")
	public Person findById(@PathVariable("id") Integer id) {
		logger.info(String.format("Person.findById(%d)", id));
		return repository.findById(id).get();
	}

	@GetMapping("/persons")
	public List findAll() {
		logger.info(String.format("Person.findAll()"));
		return (List) repository.findAll();
	}

	@PostMapping("/persons")
	public Person add(@RequestBody Person person) {
		logger.info(String.format("Person.add(%s)", person));
		return repository.save(person);
	}

	@PutMapping("/persons")
	public Person update(@RequestBody Person person) {
		logger.info(String.format("Person.update(%s)", person));
		return repository.save(person);
	}

	@DeleteMapping("/persons/{id}")
	public void remove(@PathVariable("id") Integer id) {
		logger.info(String.format("Person.remove(%d)", id));
		repository.deleteById(id);
	}

}
Before running the application we have setup MySQL database. The most convenient way to achieve it is through MySQL Docker image. Here’s the command that runs container with database grafana, defines user and password, and exposes MySQL 5 on port 33306.
docker run -d --name mysql -e MYSQL_DATABASE=grafana -e MYSQL_USER=grafana -e MYSQL_PASSWORD=grafana -e MYSQL_ALLOW_EMPTY_PASSWORD=yes -p 33306:3306 mysql:5
Then we need to set some database configuration properties on the application side. All the required tables will be created on application’s boot thanks to setting property spring.jpa.properties.hibernate.hbm2ddl.auto to update.
spring:
  datasource:
    url: jdbc:mysql://192.168.99.100:33306/grafana?useSSL=false
    username: grafana
    password: grafana
    driverClassName: com.mysql.jdbc.Driver
  jpa:
    properties:
      hibernate:
        dialect: org.hibernate.dialect.MySQL5Dialect
        hbm2ddl.auto: update
4. Generating metrics
After starting the application and the required Docker containers, the only thing that needs to be is done is to generate some test statistics. I created JUnit test class that generates some test data and calls endpoints exposed by the application in a loop. Here’s the fragment of that test method.
int ix = new Random().nextInt(100000);
Person p = new Person();
p.setFirstName("Jan" + ix);
p.setLastName("Testowy" + ix);
p.setPesel(new DecimalFormat("0000000").format(ix) + new DecimalFormat("000").format(ix%100));
p.setAge(ix%100);
p = template.postForObject("http://localhost:2222/persons", p, Person.class);
LOGGER.info("New person: {}", p);

p = template.getForObject("http://localhost:2222/persons/{id}", Person.class, p.getId());
p.setAge(ix%100);
template.put("http://localhost:2222/persons", p);
LOGGER.info("Person updated: {} with age={}", p, ix%100);

template.delete("http://localhost:2222/persons/{id}", p.getId());
Now, let’s move back to the step 1. As you probably remember, I have shown you how to run the influx client in the InfluxDB Docker container. After some minutes of working test unit should call exposed endpoints many times. We can check out the values of metric http_server_requests stored on Influx. The following query returns list of measurements collected during last 3 minutes.
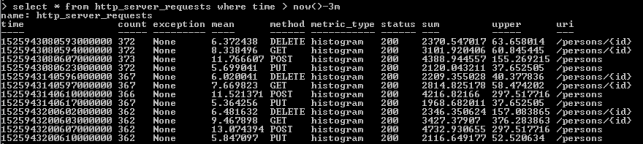
As you see, all the metrics generated by Spring Boot Actuator are tagged with the following information: method, uri, status and exception. Thanks to that tags we may easily group metrics per signle endpoint including failures and success percentage. Let’s see how to configure and view it in Grafana.
5. Metrics visualization using Grafana
Once we have exported succesfully metrics to InfluxDB, it is time to visualize them using Grafana. First, let’s run Docker container with Grafana.
$ docker run -d --name grafana -p 3000:3000 grafana/grafana
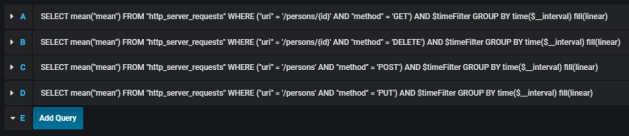
Grafana provides user friedly interface for creating influx queries. We define a graph that visualizes requests processing time per each of calling endpoints and total number of requests received by the application. If we filter the statistics stored in the table http_server_requests by method type and uri, we would collect all metrics generated per single endpoint.
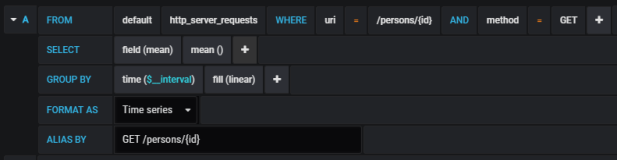
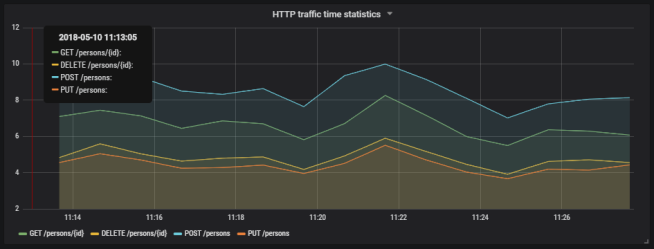
The similar definition should be created for the other endpoints. We will illustrate them all on a single graph.
Here’s the final result.
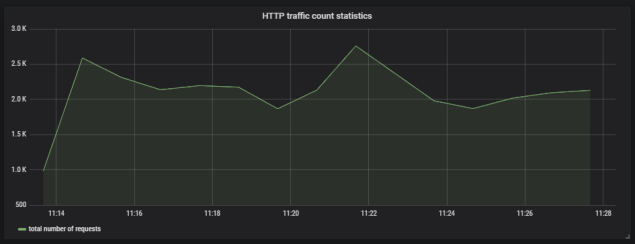
Here’s the graph that visualizes total number of requests sent to the application.
6. Running Prometheus
The most suitable way to run Prometheus locally is obviously through a Docker container. The API is exposed under port 9090. We should also pass the initial configuration file and name of Docker network. Why? You will find all the anwers in the next part of this step description.
docker run -d --name prometheus -p 9090:9090 -v /tmp/prometheus.yml:/etc/prometheus/prometheus.yml --network springboot prom/prometheus
In contrast to InfluxDB, Prometheus pulls metrics from an application. Therefore, we need to enable actuator endpoint that exposes metrics for Prometheus, which is disabled by default. To enable it, set property management.endpoint.prometheus.enabled to true, as shown on the configuration fragment below.
management:
  endpoint:
    prometheus:
	  enabled: true
Then we should set the address of actuator endpoint exposed by the application in Prometheus configuration file. A scrape_config section is responsible for specifying a set of targets and parameters describing how to connect with them. By default, Prometheus tries to collect data from defined target endpoint once a minute.
scrape_configs:
  - job_name: 'springboot'
    metrics_path: '/actuator/prometheus'
    static_configs:
    - targets: ['person-service:2222']
The similar as for integration with InfluxDB we need to include the following artifact to the project’s dependencies.
<dependency>
	<groupId>io.micrometer</groupId>
	<artifactId>micrometer-registry-prometheus</artifactId>
</dependency>
In my case, Docker is running on VM, and is available under IP 192.168.99.100. If I would like Prometheus, which is launched as a Docker container, to be able to connect my application, I also should launch it as Docker container. The most convenient way to link two independent containers is through Docker network. If both containers are assigned to the same network, they would be able to connect to each other using container’s name as a target address. Dockerfile is available in the root directory of the sample application’s source code. Second command visible below (docker build) is not required, because the required image piomin/person-service is available on my Docker Hub repository.
$ docker network create springboot
$ docker build -t piomin/person-service .
$ docker run -d --name person-service -p 2222:2222 --network springboot piomin/person-service
7. Integrate Prometheus with Grafana
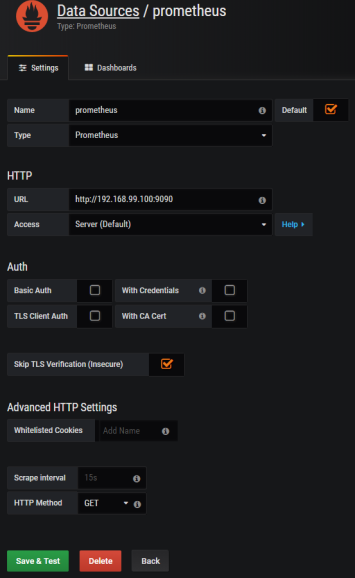
Prometheus exposes web console under address 192.168.99.100:9090, where you can specify query and display graph with metrics. However, we can integrate it with Grafana to take an advantage of nicer visualization offered by this tool. First, you should create Prometheus data source.
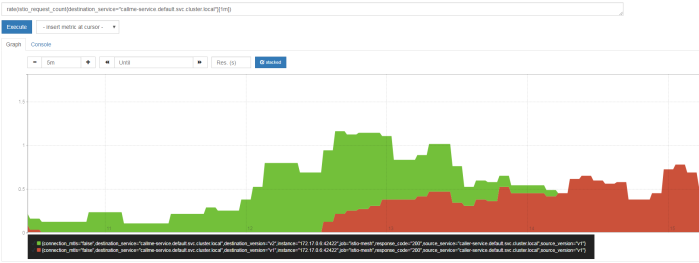
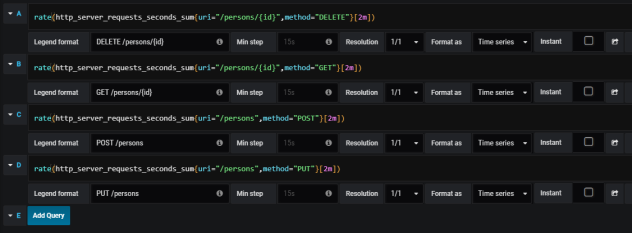
Then we should define queries for collecting metrics from Prometheus API. Spring Boot Actuator exposes three different metrics related to HTTP traffic: http_server_requests_seconds_count, http_server_requests_seconds_sum and http_server_requests_seconds_max. For example, we may calculate per-second average rate of increase of the time series for http_server_requests_seconds_sum, that returns total number of seconds spent on processing requests by using rate() function. The values can be filtered by method and uri using expression inside {}. The following picture illustrates configuration of rate() function per each endpoint.
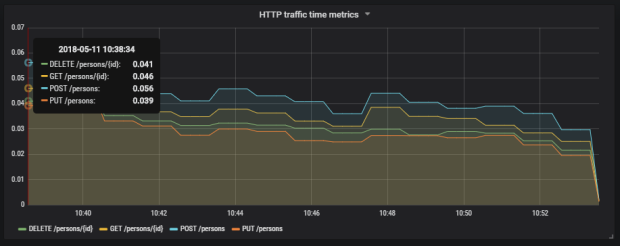
Here’s the graph.
Summary
The improvement in metrics generation between version 1.5 and 2.0 of Spring Boot is significant. Exporting data to such the popular monitoring systems like InfluxDB or Prometheus is now much easier then before, and does not require any additional development. The metrics relating to HTTP traffic are more detailed and they may be easily associated with specific endpoint, thanks to tags indicating the uri, type and status of HTTP request. I think that modifications in Spring Boot Actuator in relation to the previous version of Spring Boot, could be one of the main motivation to migrate your applications to the newest version.