Micronaut framework has been introduced as an alternative to Spring Boot for building microservice applications. At first glance it is very similar to Spring. It also implements such patterns like dependency injection and inversion of control based on annotations, however it uses JSR-330 (java.inject) for doing it. It has been designed specially in order to building serverless functions, Android applications, and low memory-footprint microservices. This means that it should faster startup time, lower memory usage or easier unit testing than competitive frameworks. However, today I don’t want to focus on those characteristics of Micronaut. I’m going to show you how to build simple microservices-based system using this framework. You can easily compare it with Spring Boot and Spring Cloud by reading my previous article about the same subject Quick Guide to Microservices with Spring Boot 2.0, Eureka and Spring Cloud. Does Micronaut have a change to gain the same popularity as Spring Boot? Let’s find out.
Our sample system consists of three independent microservices that communicate with each other. All of them integrate with Consul in order to fetch shared configuration. After startup every single service will register itself in Consul. Applications organization-service and department-service call endpoints exposed by other microservices using Micronaut declarative HTTP client. The traces from communication are sending to Zipkin. The source code of sample applications is available on GitHub in repository sample-micronaut-microservices.

Step 1. Creating application
We need to start by including some dependencies to our Maven pom.xml. First let’s define BOM with the newest stable Micronaut version.
<properties>
	<exec.mainClass>pl.piomin.services.employee.EmployeeApplication</exec.mainClass>
	<micronaut.version>1.0.3</micronaut.version>
	<jdk.version>1.8</jdk.version>
</properties>
<dependencyManagement>
	<dependencies>
		<dependency>
			<groupId>io.micronaut</groupId>
			<artifactId>micronaut-bom</artifactId>
			<version>${micronaut.version}</version>
			<type>pom</type>
			<scope>import</scope>
		</dependency>
	</dependencies>
</dependencyManagement>
The list of required dependencies isn’t very long. Also not all of them are required, but they will be useful in our demo. For example micronaut-management need to be included in case we would like to expose some built-in management and monitoring endpoints.
<dependency>
	<groupId>io.micronaut</groupId>
	<artifactId>micronaut-http-server-netty</artifactId>
</dependency>
<dependency>
	<groupId>io.micronaut</groupId>
	<artifactId>micronaut-inject</artifactId>
</dependency>
<dependency>
	<groupId>io.micronaut</groupId>
	<artifactId>micronaut-runtime</artifactId>
</dependency>
<dependency>
	<groupId>io.micronaut</groupId>
	<artifactId>micronaut-management</artifactId>
</dependency>
<dependency>
	<groupId>io.micronaut</groupId>
	<artifactId>micronaut-inject-java</artifactId>
	<scope>provided</scope>
</dependency>
To build application uber-jar we need configure plugin responsible for packaging JAR file with dependencies. It can be for example maven-shade-plugin. When building new application it is also worth to expose basic information about it under /info endpoint. As I have already mentioned Micronaut adds support for monitoring your app via HTTP endpoints after including artifact micronaut-management. Management endpoint are integrated with Micronaut security module, what means that you need to authenticate yourself to be able to access them. To simplify we can disable authentication for /info endpoint.
endpoints:
  info:
    enabled: true
    sensitive: false
We can customize /info endpoint by adding some supported info sources. This mechanism is very similar to Spring Boot Actuator approach. If git.properties file is available on the classpath, all the values inside file will be exposed by /info endpoint. The same situation applies to build-info.properties file, that needs to be placed inside META-INF directory. However, in comparison with Spring Boot we need to provide more configuration in pom.xml to generate and package those to application JAR. The following Maven plugins are responsible for generating required properties files.
<plugin>
	<groupId>pl.project13.maven</groupId>
	<artifactId>git-commit-id-plugin</artifactId>
	<version>2.2.6</version>
	<executions>
		<execution>
			<id>get-the-git-infos</id>
			<goals>
				<goal>revision</goal>
			</goals>
		</execution>
	</executions>
	<configuration>
		<verbose>true</verbose>
		<dotGitDirectory>${project.basedir}/.git</dotGitDirectory>
		<dateFormat>MM-dd-yyyy '@' HH:mm:ss Z</dateFormat>
		<generateGitPropertiesFile>true</generateGitPropertiesFile>
		<generateGitPropertiesFilename>src/main/resources/git.properties</generateGitPropertiesFilename>
		<failOnNoGitDirectory>true</failOnNoGitDirectory>
	</configuration>
</plugin>
<plugin>
	<groupId>com.rodiontsev.maven.plugins</groupId>
	<artifactId>build-info-maven-plugin</artifactId>
	<version>1.2</version>
	<configuration>
		<filename>classes/META-INF/build-info.properties</filename>
		<projectProperties>
			<projectProperty>project.groupId</projectProperty>
			<projectProperty>project.artifactId</projectProperty>
			<projectProperty>project.version</projectProperty>
		</projectProperties>
	</configuration>
	<executions>
		<execution>
			<phase>prepare-package</phase>
			<goals>
				<goal>extract</goal>
			</goals>
		</execution>
	</executions>
</plugin>
</plugins>
Now, our /info endpoint is able to print the most important information about our app including Maven artifact name, version, and last Git commit id.

Step 2. Exposing HTTP endpoints
Micronaut provides their own annotations for pointing out HTTP endpoints and methods. As I have mentioned in the preface it also uses JSR-330 (java.inject) for dependency injection. Our controller class should be annotated with @Controller. We also have annotations for every HTTP method type. The path parameter is automatically mapped to the class method parameter by its name, what is a nice simplification in comparison to Spring MVC where we need to use @PathVariable annotation. The repository bean used for CRUD operations is injected into controller using @Inject annotation.
@Controller("/employees")
public class EmployeeController {

    private static final Logger LOGGER = LoggerFactory.getLogger(EmployeeController.class);

    @Inject
    EmployeeRepository repository;

    @Post
    public Employee add(@Body Employee employee) {
        LOGGER.info("Employee add: {}", employee);
        return repository.add(employee);
    }

    @Get("/{id}")
    public Employee findById(Long id) {
        LOGGER.info("Employee find: id={}", id);
        return repository.findById(id);
    }

    @Get
    public List<Employee> findAll() {
        LOGGER.info("Employees find");
        return repository.findAll();
    }

    @Get("/department/{departmentId}")
    @ContinueSpan
    public List<Employee> findByDepartment(@SpanTag("departmentId") Long departmentId) {
        LOGGER.info("Employees find: departmentId={}", departmentId);
        return repository.findByDepartment(departmentId);
    }

    @Get("/organization/{organizationId}")
    @ContinueSpan
    public List<Employee> findByOrganization(@SpanTag("organizationId") Long organizationId) {
        LOGGER.info("Employees find: organizationId={}", organizationId);
        return repository.findByOrganization(organizationId);
    }

}
Our repository bean is pretty simple. It just provides in-memory store for Employee instances. We will mark it with @Singleton annotation.
@Singleton
public class EmployeeRepository {

	private List<Employee> employees = new ArrayList<>();

	public Employee add(Employee employee) {
		employee.setId((long) (employees.size()+1));
		employees.add(employee);
		return employee;
	}

	public Employee findById(Long id) {
		Optional<Employee> employee = employees.stream().filter(a -> a.getId().equals(id)).findFirst();
		if (employee.isPresent())
			return employee.get();
		else
			return null;
	}

	public List<Employee> findAll() {
		return employees;
	}

	public List<Employee> findByDepartment(Long departmentId) {
		return employees.stream().filter(a -> a.getDepartmentId().equals(departmentId)).collect(Collectors.toList());
	}

	public List<Employee> findByOrganization(Long organizationId) {
		return employees.stream().filter(a -> a.getOrganizationId().equals(organizationId)).collect(Collectors.toList());
	}

}
Micronaut is able to automatically generate Swagger YAML definition from our controller and methods basing on annotations. To achieve this, we first need to include the following dependency to our pom.xml.
<dependency>
	<groupId>io.swagger.core.v3</groupId>
	<artifactId>swagger-annotations</artifactId>
</dependency>
Then we should annotate application main class with @OpenAPIDefinition and provide some basic information like title or version number. Here’s employee application main class.
@OpenAPIDefinition(
    info = @Info(
        title = "Employees Management",
        version = "1.0",
        description = "Employee API",
        contact = @Contact(url = "https://piotrminkowski.wordpress.com", name = "Piotr Mińkowski", email = "piotr.minkowski@gmail.com")
    )
)
public class EmployeeApplication {

    public static void main(String[] args) {
        Micronaut.run(EmployeeApplication.class);
    }

}
Micronaut generates Swagger file basing on title and version fields inside @Info annotation. In that case our YAML definition file is available under name employees-management-1.0.yml, and will be generated to the META-INF/swagger directory. We can expose it outside application using HTTP endpoint. Here’s the appropriate configuration provided inside application.yml file.
micronaut:
  router:
    static-resources:
      swagger:
        paths: classpath:META-INF/swagger
        mapping: /swagger/**
Now, our file is available under path http://localhost:8080/swagger/employees-management-1.0.yml if run it on default 8080 port (we won’t do that, what I’m going to describe in the next part of this article). In comparison to Spring Boot, we don’t have such project like Swagger SpringFox for Micronaut, so we need to copy the content to online editor in order to see the graphical representation of Swagger YAML. Here’s it.

Ok, since we have finished implementation of single microservice we may proceed to cloud-native features provided by Micronaut.
Step 3. Distributed configuration
Micronaut comes with built in APIs for doing distributed configuration. In fact, the only one available solution for now is distributed configuration based on HashiCorp’s Consul. Micronaut features for externalizing and adapting configuration to the environment are very similar to the Spring Boot approach. We also have application.yml and bootstrap.yml files, which can be used for application environment configuration. When using distributed configuration we first need to provide bootstrap.yml file on the classpath. It should contains an address of remote configuration server and preferred configuration store format. Of course, we first need to enable distributed configuration client by setting property micronaut.config-client.enabled to true. Here’s bootstrap.yml file for department-service.
micronaut:
  application:
    name: department-service
  config-client:
    enabled: true
consul:
  client:
    defaultZone: "192.168.99.100:8500"
    config:
      format: YAML
We can choose between properties, JSON, YAML and FILES (git2consul) configuration formats. I decided to use YAML. To apply this configuration on Consul we first need to start it locally in development mode. Because I’m using Docker Toolbox the default address of Consul is 192.168.99.100. The following Docker command will start single-node Consul instance and expose it on port 8500.
$ docker run -d --name consul -p 8500:8500 consul
Now, you can navigate to the tab Key/Value in Consul web console and create new file in YAML format /config/application.yml as shown below. Besides configuration for Swagger and /info management endpoint it also enables dynamic HTTP generation on startup by setting property micronaut.server.port to -1. Because, the name of file is application.yml it is by default shared between all microservices that uses Consul config client.

Step 4. Service discovery
Micronaut gives you more options when configuring service discovery, than for distributed configuration. You can use Eureka, Consul, Kubernetes or just manually configure list of available services. However, I have observed that using Eureka discovery client together with Consul config client causes some errors on startup. In this example we will use Consul discovery. Because Consul address has been already provided in bootstrap.yml for every microservice, we just need to enable service discovery by adding the following lines to application.yml stored in Consul KV.
consul:
  client:
    registration:
      enabled: true
We should also include the following dependency to Maven pom.xml of every single application.
<dependency>
	<groupId>io.micronaut</groupId>
	<artifactId>micronaut-discovery-client</artifactId>
</dependency>
Finally, you can just run every microservice (you may run more than one instance locally, since HTTP port is generated dynamically). Here’s my list of running services registered in Consul.
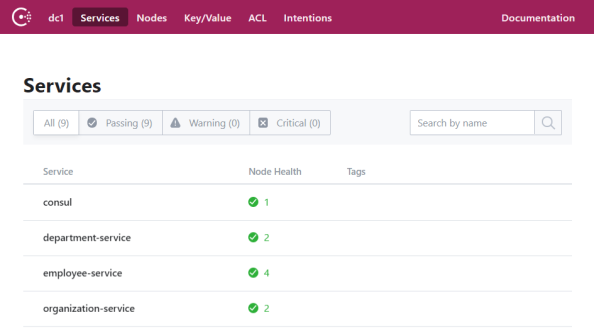
I have run two instances of employee-service as shown below.

Step 5. Inter-service communication
Micronaut uses build-in HTTP client for load balancing between multiple instances of single microservice. By default it leverages Round Robin algorithm. We may choose between low-level HTTP client and declarative HTTP client with @Client. Micronaut declarative HTTP client concept is very similar to Spring Cloud OpenFeign. To use built-in client we first need to include the following dependency to project pom.xml.
<dependency>
	<groupId>io.micronaut</groupId>
	<artifactId>micronaut-http-client</artifactId>
</dependency>
Declarative client automatically integrates with a discovery client. It tries to find the service registered in Consul under the same name as value provided inside id field.
@Client(id = "employee-service", path = "/employees")
public interface EmployeeClient {

	@Get("/department/{departmentId}")
	List<Employee> findByDepartment(Long departmentId);

}
Now, the client bean needs to be injected into the controller.
@Controller("/departments")
public class DepartmentController {

	private static final Logger LOGGER = LoggerFactory.getLogger(DepartmentController.class);

	@Inject
	DepartmentRepository repository;
	@Inject
	EmployeeClient employeeClient;

	@Post
	public Department add(@Body Department department) {
		LOGGER.info("Department add: {}", department);
		return repository.add(department);
	}

	@Get("/{id}")
	public Department findById(Long id) {
		LOGGER.info("Department find: id={}", id);
		return repository.findById(id);
	}

	@Get
	public List<Department> findAll() {
		LOGGER.info("Department find");
		return repository.findAll();
	}

	@Get("/organization/{organizationId}")
	@ContinueSpan
	public List<Department> findByOrganization(@SpanTag("organizationId") Long organizationId) {
		LOGGER.info("Department find: organizationId={}", organizationId);
		return repository.findByOrganization(organizationId);
	}

	@Get("/organization/{organizationId}/with-employees")
	@ContinueSpan
	public List<Department> findByOrganizationWithEmployees(@SpanTag("organizationId") Long organizationId) {
		LOGGER.info("Department find: organizationId={}", organizationId);
		List<Department> departments = repository.findByOrganization(organizationId);
		departments.forEach(d -> d.setEmployees(employeeClient.findByDepartment(d.getId())));
		return departments;
	}

}
Step 6. Distributed tracing
Micronaut application can be easily integrated with Zipkin to send there traces with HTTP traffic automatically. To enable this feature we first need to include the following dependencies to pom.xml.
<dependency>
	<groupId>io.micronaut</groupId>
	<artifactId>micronaut-tracing</artifactId>
</dependency>
<dependency>
	<groupId>io.zipkin.brave</groupId>
	<artifactId>brave-instrumentation-http</artifactId>
	<scope>runtime</scope>
</dependency>
<dependency>
	<groupId>io.zipkin.reporter2</groupId>
	<artifactId>zipkin-reporter</artifactId>
	<scope>runtime</scope>
</dependency>
<dependency>
	<groupId>io.opentracing.brave</groupId>
	<artifactId>brave-opentracing</artifactId>
</dependency>
Then, we have to provide some configuration settings inside application.yml including Zipkin URL and sampler options. By setting property tracing.zipkin.sampler.probability to 1 we are forcing micronaut to send traces for every single request. Here’s our final configuration.

During the tests of my application I have observed that using distributed configuration together with Zipkin tracing results in the problems in communication between microservice and Zipkin. The traces just do not appear in Zipkin. So, if you would like to test this feature now you must provide application.yml on the classpath and disable Consul distributed configuration for all your applications.
We can add some tags to the spans by using @ContinueSpan or @NewSpan annotations on methods.
After making some test calls of GET methods exposed by organization-service and department-service we may take a look on Zipkin web console, available under address http://192.168.99.100:9411. The following picture shows the list of all the traces sent to Zipkin by our microservices in 1 hour.

We can check out the details of every trace by clicking on the element from the list. The following picture illustrates the timeline for HTTP method exposed by organization-service GET /organizations/{id}/with-departments-and-employees. This method finds the organization in the in-memory repository, and then calls HTTP method exposed by department-service GET /departments/organization/{organizationId}/with-employees. This method is responsible for finding all departments assigned to the given organization. It also needs to return employees within department, so it calls method GET /employees/department/{departmentId} from employee-service.

We can also take a look on the details of every single call from the timeline.

Conclusion
In comparison to Spring Boot Micronaut is still in the early stage of development. For example, I were not able to implement any application that could acts as an API gateway to our system, what can easily achieved with Spring using Spring Cloud Gateway or Spring Cloud Netflix Zuul. There are still some bugs that needs to be fixed. But above all that, Micronaut is now probably the most interesting micro-framework on the market. It implements most popular microservice patterns, provides integration with several third-party solutions like Consul, Eureka, Zipkin or Swagger, consumes less memory and starts faster than similar Spring Boot app. I will definitely follow the progress in Micronaut development closely.

How would you compare it to Vert.x which seems to be more like a toolkit that’s really very fast and has great doc.?
LikeLike
Of course it very early stage of development for Micronaut, but it could combine advantages of Vert.x like low memory consumption, fast startup or small size of dependencies in comparison to Spring Boot. I think both Micronaut na Vert.x are documented well.
LikeLike